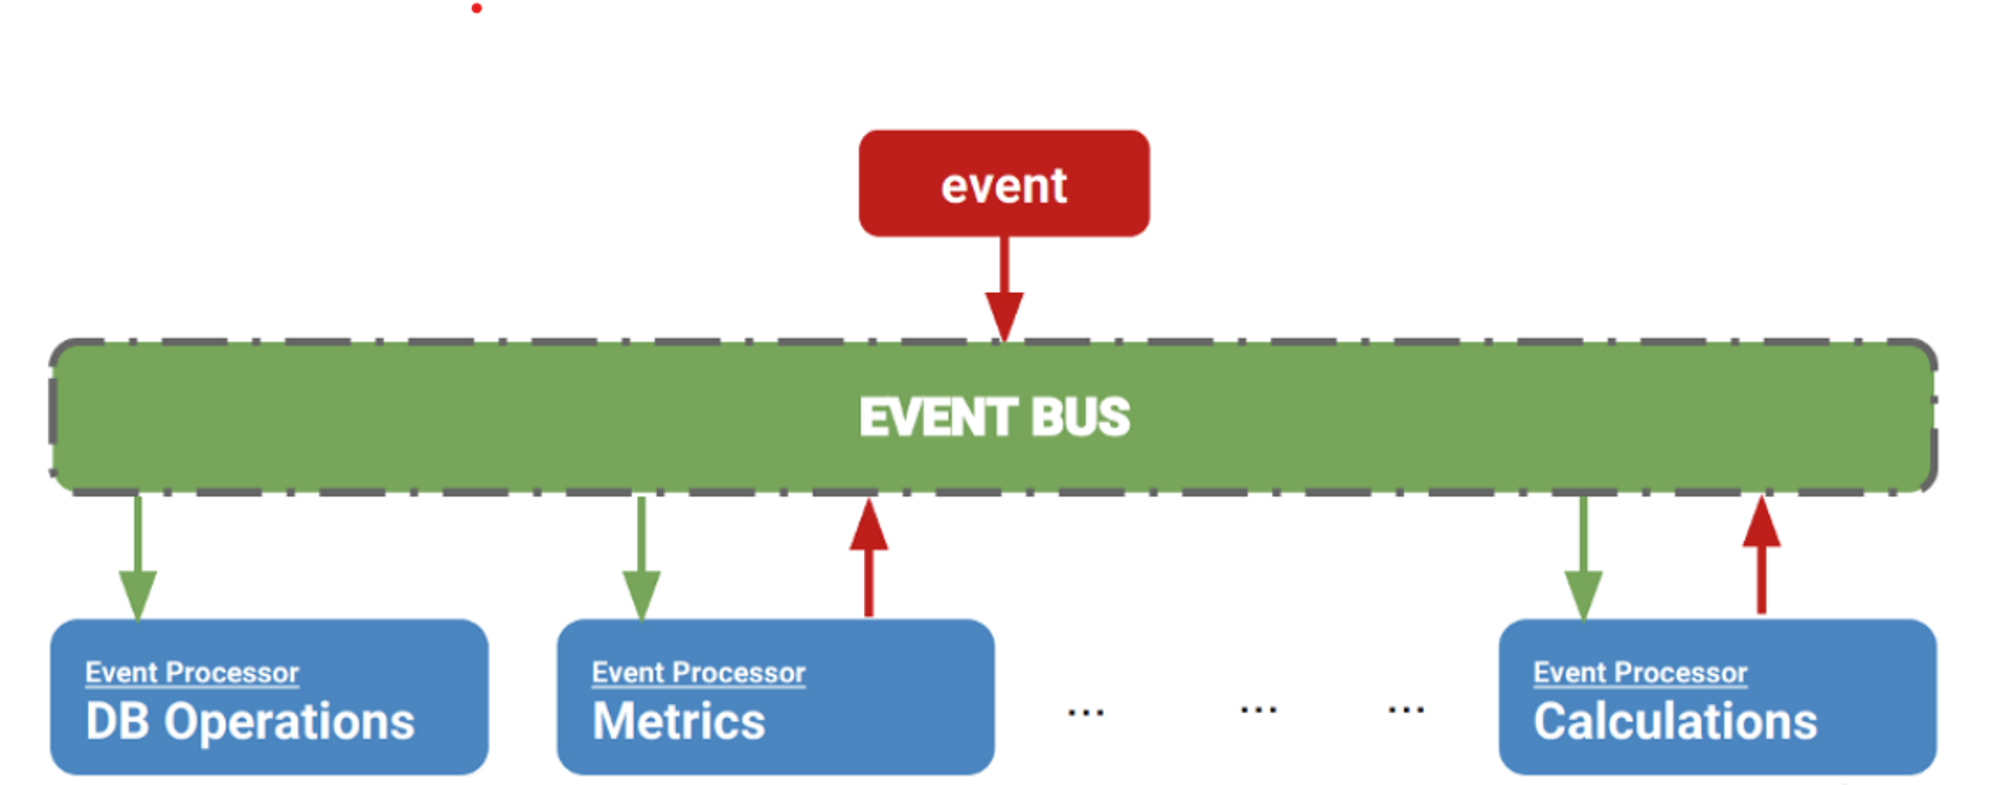
📌 이벤트 버스 패턴
이벤트 버스 패턴은 옵저버 패턴이 발행자와 구독자의 명확한 구도가 있었던 것과 다르게, 발행자와 구독자가 모두 N명인 형태를 말한다.
이벤트가 발생했다면 모든 참여자들은 메세지를 받게 되고, 누가 보낸 메세지인지는 알 필요가 없다. 다만, 구현을 다르게 하여 구독자들을 정할 수 있다.
동시에 플레이하는 게임에서 누가 중지를 했다고 생각해보자.
잠깐 핑이 길어지거나 이런 것을 용인하는 게임들이 (옛날에는)있었다.
이때 동정한 게임을 위해서 모두가 중단되어야 한다고 생각해보면 이런 이벤트는 발행자와 구독자가 따로 있는 개념이라기보다는 모두 다 같이 가능할 것이다.
➔ 예제 1
public interface IEvent { }

public struct PlayerEvent : IEvent {
    public int health;
    public int mana;
}

public interface IEventBinding<T> {
    public Action<T> OnEvent { get; set; }
    public Action OnEventNoArgs { get; set; }
}

public class EventBinding<T> : IEventBinding<T> where T : IEvent {
    Action<T> onEvent = _ => { };
    Action onEventNoArgs = () => { };

    Action<T> IEventBinding<T>.OnEvent {
        get => onEvent;
        set => onEvent = value;
    }

    Action IEventBinding<T>.OnEventNoArgs {
        get => onEventNoArgs;
        set => onEventNoArgs = value;
    }

    public EventBinding(Action<T> onEvent) => this.onEvent = onEvent;
    public EventBinding(Action onEventNoArgs) => this.onEventNoArgs = onEventNoArgs;

    public void Add(Action onEvent) => onEventNoArgs += onEvent;
    public void Remove(Action onEvent) => onEventNoArgs -= onEvent;

    public void Add(Action<T> onEvent) => this.onEvent += onEvent;
    public void Remove(Action<T> onEvent) => this.onEvent -= onEvent;
}

public static class EventBus<T> where T : IEvent {
    static readonly HashSet<IEventBinding<T>> bindings = new HashSet<IEventBinding<T>>();

    public static void Register(EventBinding<T> binding) => bindings.Add(binding);
    public static void Deregister(EventBinding<T> binding) => bindings.Remove(binding);

    public static void Raise(T @event) {
        foreach (var binding in bindings) {
            binding.OnEvent.Invoke(@event);
            binding.OnEventNoArgs.Invoke();
        }
    }

    static void Clear() {
        Debug.Log($"Clearing {typeof(T).Name} bindings");
        bindings.Clear();
    }
}
➔ 예제 2
using UnityEngine.Events;
using System.Collections.Generic;

namespace Chapter.EventBus
{
    public class RaceEventBus
    {
        private static readonly
            IDictionary<RaceEventType, UnityEvent>
            Events = new Dictionary<RaceEventType, UnityEvent>();

        public static void Subscribe
            (RaceEventType eventType, UnityAction listener) {

            UnityEvent thisEvent;

            if (Events.TryGetValue(eventType, out thisEvent)) {
                thisEvent.AddListener(listener);
            }
            else {
                thisEvent = new UnityEvent();
                thisEvent.AddListener(listener);
                Events.Add(eventType, thisEvent);
            }
        }

        public static void Unsubscribe
            (RaceEventType type, UnityAction listener) {

            UnityEvent thisEvent;

            if (Events.TryGetValue(type, out thisEvent)) {
                thisEvent.RemoveListener(listener);
            }
        }

        public static void Publish(RaceEventType type) {

            UnityEvent thisEvent;

            if (Events.TryGetValue(type, out thisEvent)) {
                thisEvent.Invoke();
            }
        }
    }

    public class ClientEventBus : MonoBehaviour
    {
      private bool _isButtonEnabled;

      void Start()
      {
          gameObject.AddComponent<HUDController>();
          gameObject.AddComponent<CountdownTimer>();
          gameObject.AddComponent<BikeController>();

          _isButtonEnabled = true;
      }

      void OnEnable()
      {
          RaceEventBus.Subscribe(
              RaceEventType.STOP, Restart);
      }

      void OnDisable()
      {
          RaceEventBus.Unsubscribe(
              RaceEventType.STOP, Restart);
      }

      private void Restart()
      {
          _isButtonEnabled = true;
      }

      void OnGUI()
      {
          if (_isButtonEnabled)
          {
              if (GUILayout.Button("Start Countdown"))
              {
                  _isButtonEnabled = false;
                  RaceEventBus.Publish(RaceEventType.COUNTDOWN);
              }
          }
      }
}
📌 프로토타입 패턴
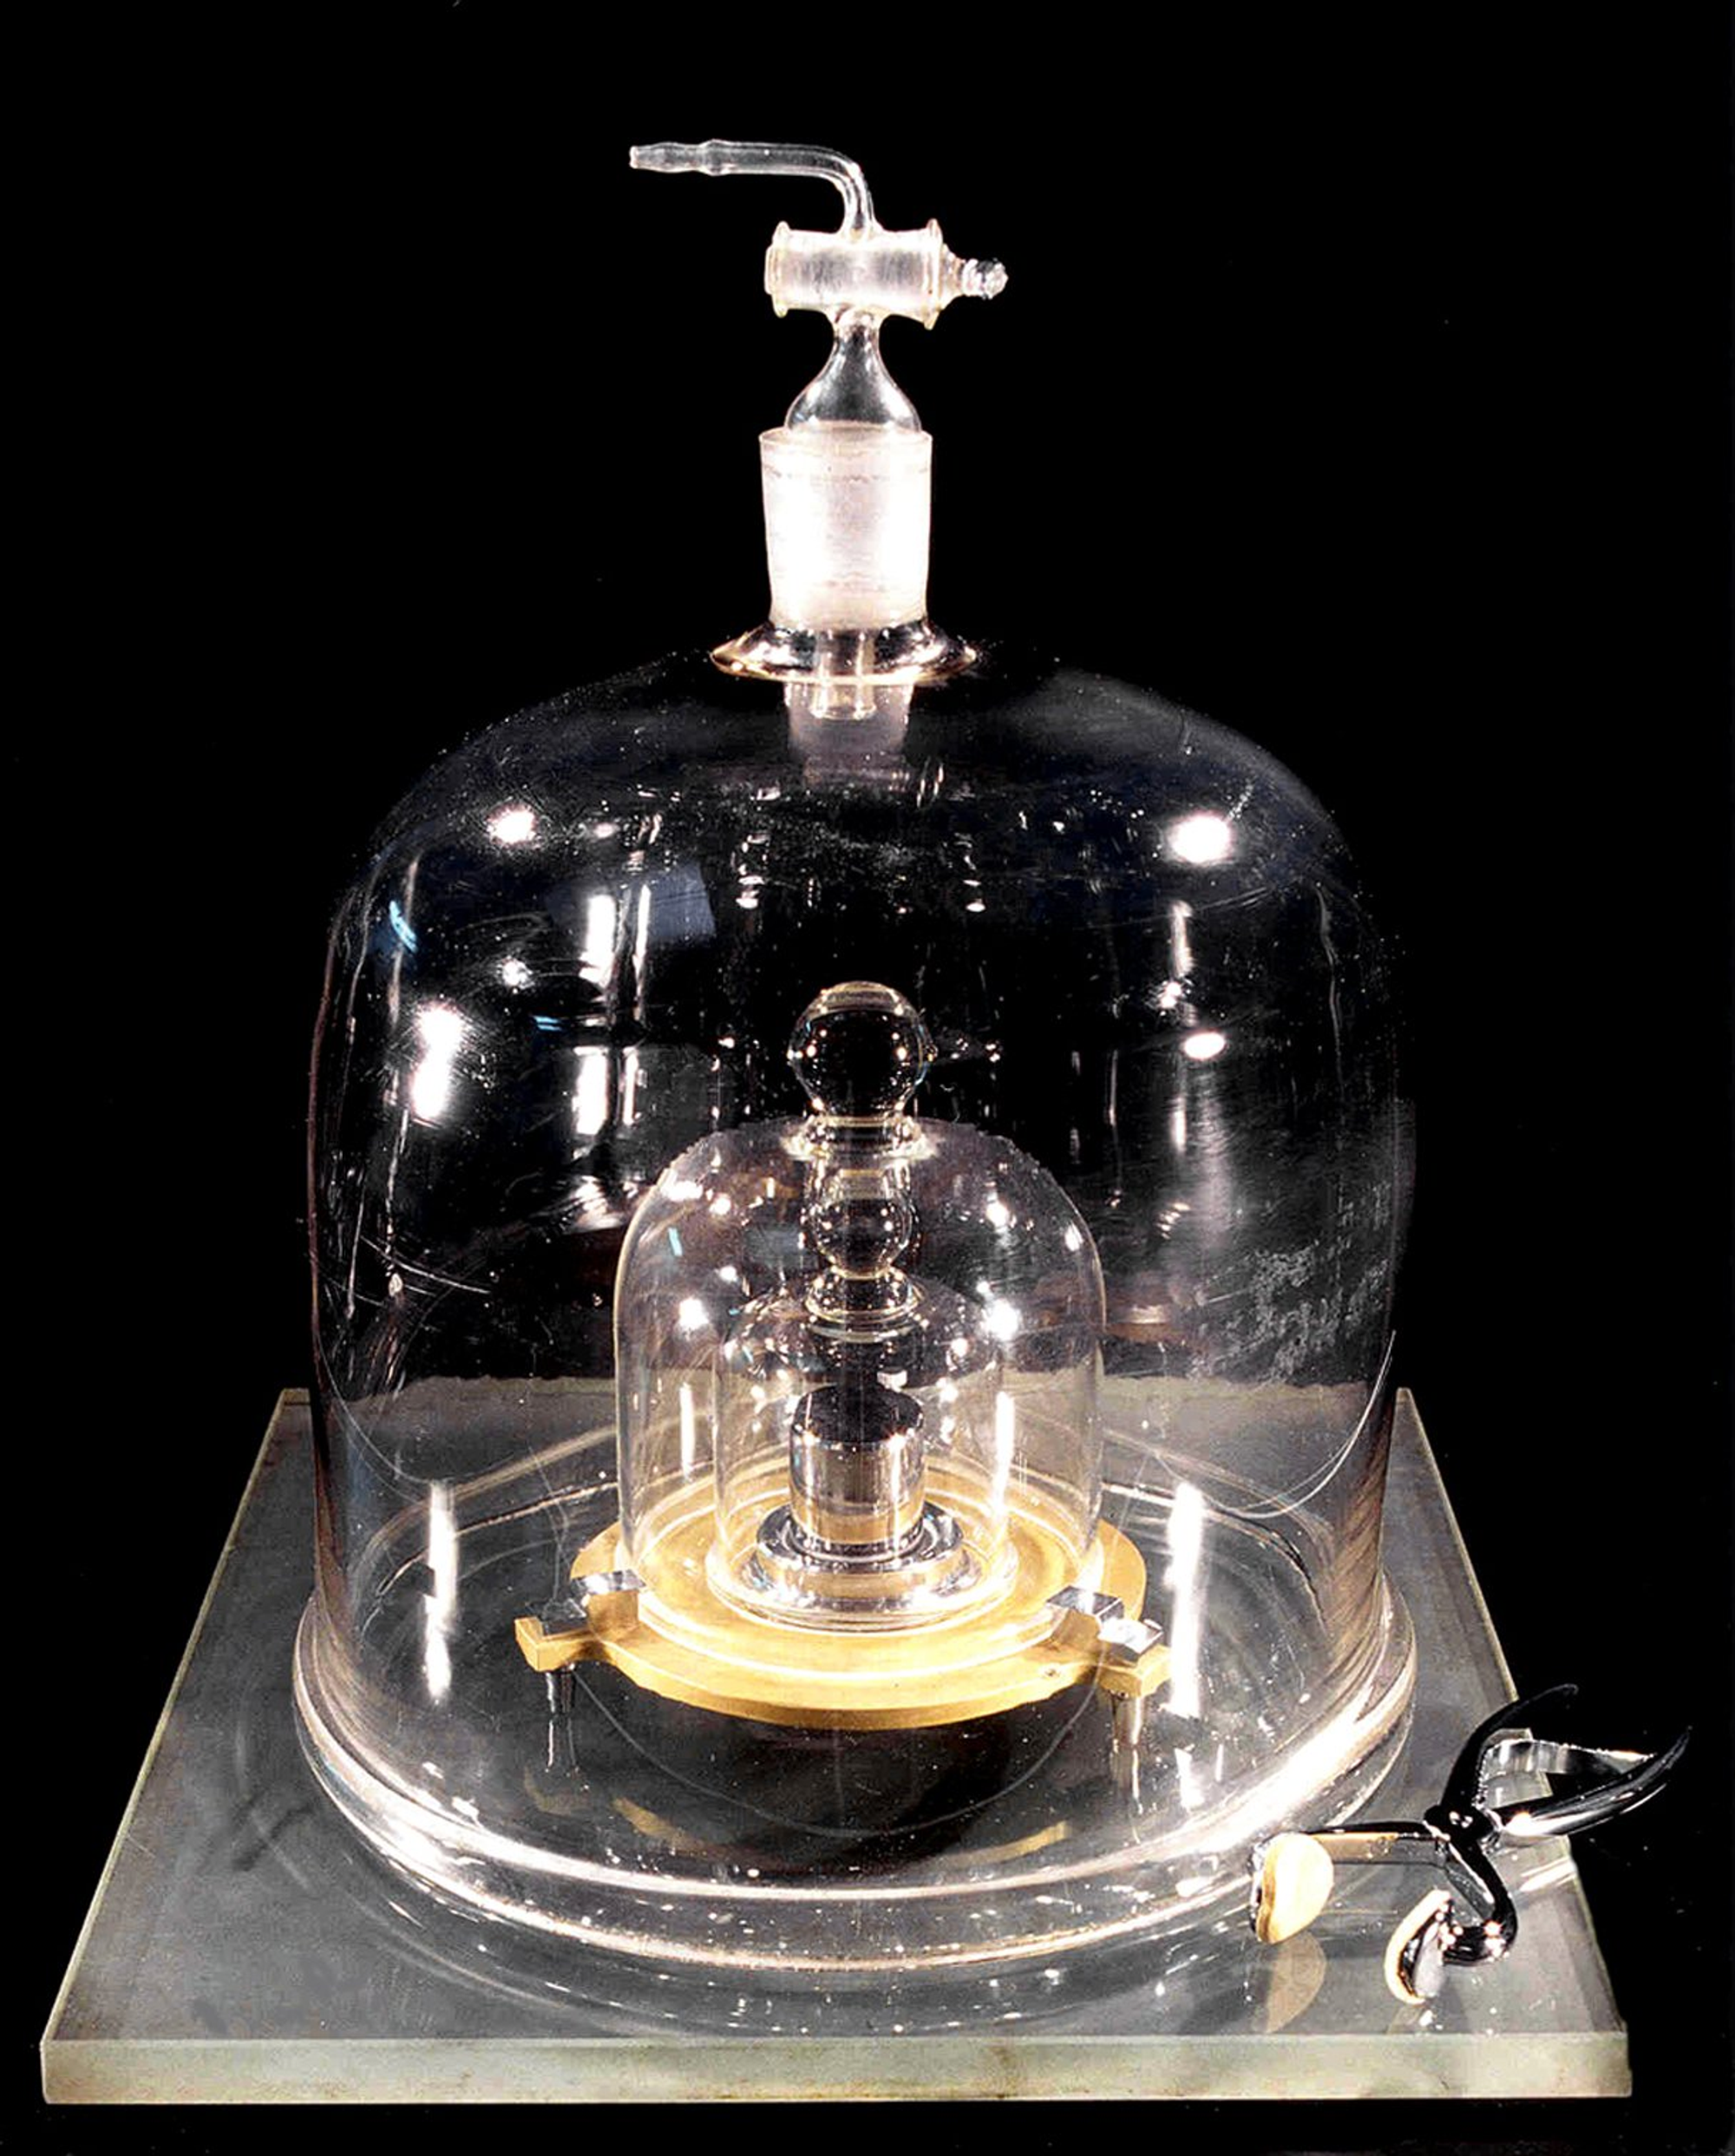
프로토타입은 원기라는 뜻으로, 아래에 있는 1kg 원기처럼, 도량형의 통일을 위해서 세상의 표준이 되는 1kg을 두고, 이를 통해 측정할 수 있도록 한 것을 말한다. 즉, 어떤 대상의 기준, 원형을 프로토타입이라고 말한다.
프로토타입 패턴은 유니티에서 아주 익숙한 Instantiate처럼 오브젝트를 처음부터 생성하는 것이 아닌 원본 게임오브젝트의 복사본을 만들고 이에 대해 수정을 진행하는 방식으로 구형되어 있다.
➔ 예제
아래 예시는, Object타입을 상속받지 않는 오브젝트에 대한 Spawner를 구현한 예시이다.
using System.Collections;
using System.Collections.Generic;
using UnityEngine;

namespace Prototype.MonsterSpawner
{
		public abstract class _Monster
    {
        //This method implements the Prototype design pattern
        public abstract _Monster Clone();

        public abstract void Talk();
    }

    public class Spawner
    {
        private _Monster prototype;

        public Spawner(_Monster prototype)
        {
            this.prototype = prototype;
        }

        public _Monster SpawnMonster()
        {
            return prototype.Clone();
        }
    }
}
📌 빌더 패턴
빌더 패턴은 객체의 초기화를 체계적으로 하도록 도와주는 패턴이다. 예를 들어서, 집과 같은 객체는 엄청 복잡한 객체이기 떄문에, 한 번 집이라는 객체를 생성한다고 하면 생성자에 엄청 많은 파라미터들이 들어가게 된다.

그래서 이 단계를 체계적으로 수행하는 디렉터를 두고, 이 디렉터를 통해 수행하도록 하는 것이 빌더 패턴이다.
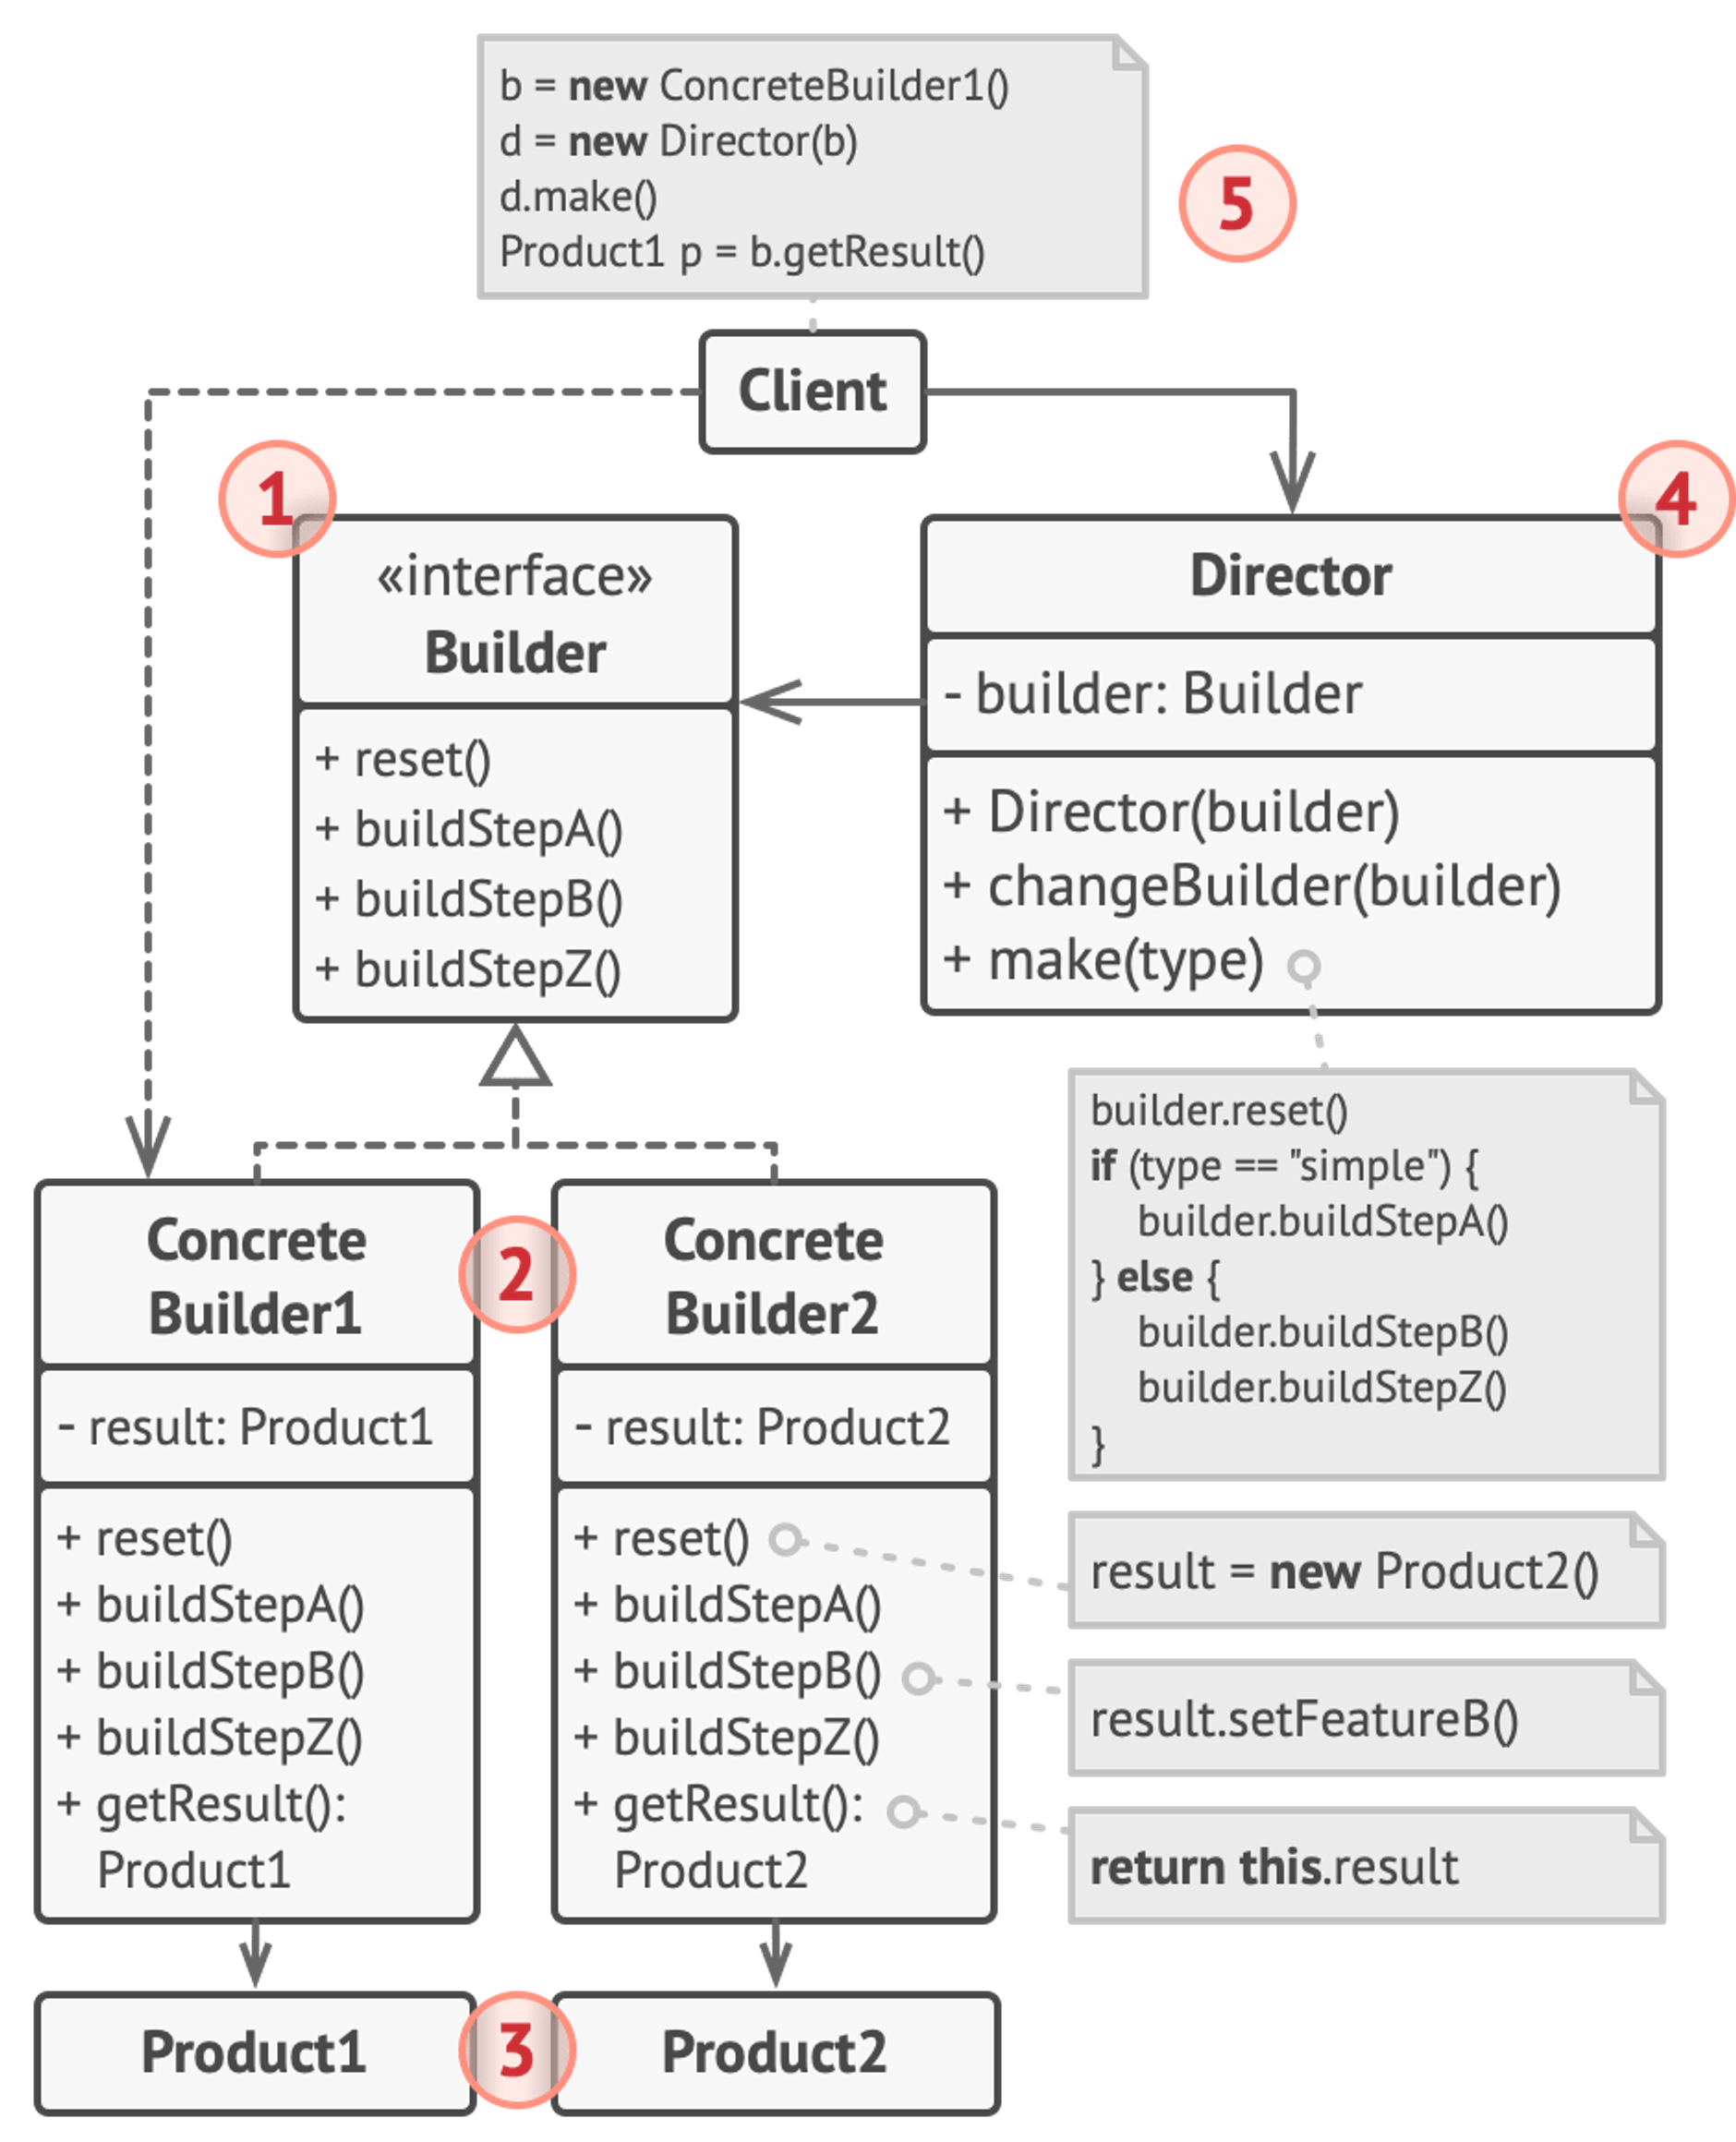
➔ 예제 - Builder / Director
using UnityEngine;

public class EnemyDirector {
    public Enemy Construct(EnemyBuilder builder, EnemyData data) {
        builder.AddWeaponComponent();
        builder.AddWeaponStrategy(data.WeaponStrategy);
        builder.AddHealthComponent();

        return builder.Build();
    }
}

public class EnemyBuilder {
    Enemy enemy = new GameObject(name: "Enemy").AddComponent<Enemy>();

    public void AddWeaponComponent() {
        enemy.gameObject.AddComponent<EnemyWeapon>();
    }

    public void AddWeaponStrategy(WeaponStrategy strategy) {
        if (enemy.gameObject.TryGetComponent<EnemyWeapon>(out var weapon)) {
            weapon.SetWeaponStrategy(strategy);
        }
    }

    public void AddHealthComponent() {
        enemy.gameObject.AddComponent<Health>();
    }

    public Enemy Build() {
        Enemy builtEnemy = enemy;
        enemy = new GameObject(name: "Enemy").AddComponent<Enemy>();

        return builtEnemy;
    }
}
➔ 예제 - Fluent Builder
public class Enemy {
	public string Name {get; private set;}
	public int Health {get; private set;}

	public Enemy(string name, int health) {
		Name = name;
		Health = health;
	}

		public class EnemyBuilder {
		string name;
		int health;

			public EnemyBuilder WithName(string name) {
				this.name = name;
				return this;
			}

			public EnemyBuilder WithHealth(int health) {
				this.health = health;
				return this;
			}

			public Enemy Build(EnemyBuilder enemyBuilder){
				return new Enemy(name, health);
			}
		}
}

public GameManager : MonoBehaviour {
	void Start() {
		Enemy enemy = new Enemy.EnemyBuilder()
			.WithName("Jiwon")
			.WithHealth(1000)
			.Build();
	}
}
📌 팩토리 패턴
팩토라 패턴은 객체의 생성과 관련된 패턴으로, 객체의 생성을 체계적으로 하기 위한 다양한 기법들을 통칭하여 부르는 말이다.
➔ 예제 - Simple Factory
심플팩토리 패턴은 객체를 생성하는 클래스를 따로 두는 것을 말한다.
using System.Collections;
using System.Collections.Generic;
using UnityEngine;
using Decorator.OrderSystem;

namespace Factory.CarFactory
{
	public class CarFactory{
		public _Car ManufactureCar(CarModels carModel, List<CarExtras> carExtras)
    {
        _Car car = null;

        switch (carModel)
        {
            case CarModels.ModelA:
                car = new CarModelA(carExtras);
                break;
            case CarModels.ModelB:
                car = new CarModelB(carExtras);
                break;
            // Add more cases for other car models
        }

        return car;
    }
	}
}
➔ 예제 - Factory Method
팩토리 메소드 패턴은 인스턴스를 만드는 일을 서브 클래스가 맡도록 하는 것을 말한다.
using System.Collections;
using System.Collections.Generic;
using Decorator.OrderSystem;
using UnityEngine;

namespace Factory.CarFactory
{

		public abstract class _CarFactory
    {
        //This method is called the Factory Method
        public abstract _Car ManufactureCar(CarModels carModel, List<CarExtras> carExtras);
    }

    public class ChinaFactory : _CarFactory
    {
        public override _Car ManufactureCar(CarModels carModel, List<CarExtras> carExtras)
        {
            _Car car = null;

            if (carModel == CarModels.ModelS)
            {
                car = new ModelS();
            }
            else if (carModel == CarModels.Roadster)
            {
                car = new Roadster();
            }

            //Notice that the Cybertruck is missing here, so we cant manufacture it!
            if (car == null)
            {
                Debug.Log("Sorry but this factory cant manufacture this model :(");

                return car;
            }


            //Add the extras
            foreach (CarExtras carExtra in carExtras)
            {
                if (carExtra == CarExtras.DracoThruster)
                {
                    car = new DracoThruster(car, 1);
                }
                else if (carExtra == CarExtras.EjectionSeat)
                {
                    car = new EjectionSeat(car, 1);
                }
                else
                {
                    Debug.Log("Sorry but this factory cant add this car extra :(");
                }
            }

            return car;
        }
    }
}
📌 메모이제이션(Memoization)
중간 결과값을 미리 저장하는 형태 (Dynamic Programming)
f(n) = f(n-1) + f(n-2) - 피보나치
점화식(이전 항과 이번 항간의 관계를 나타낸 식) ➔ 메모이제이션
문제가 진짜 쉬운 경우는 안 해도되지만 문제가 어려워지면 해야한다.
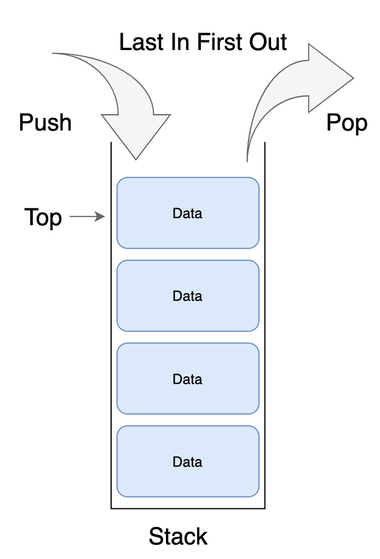
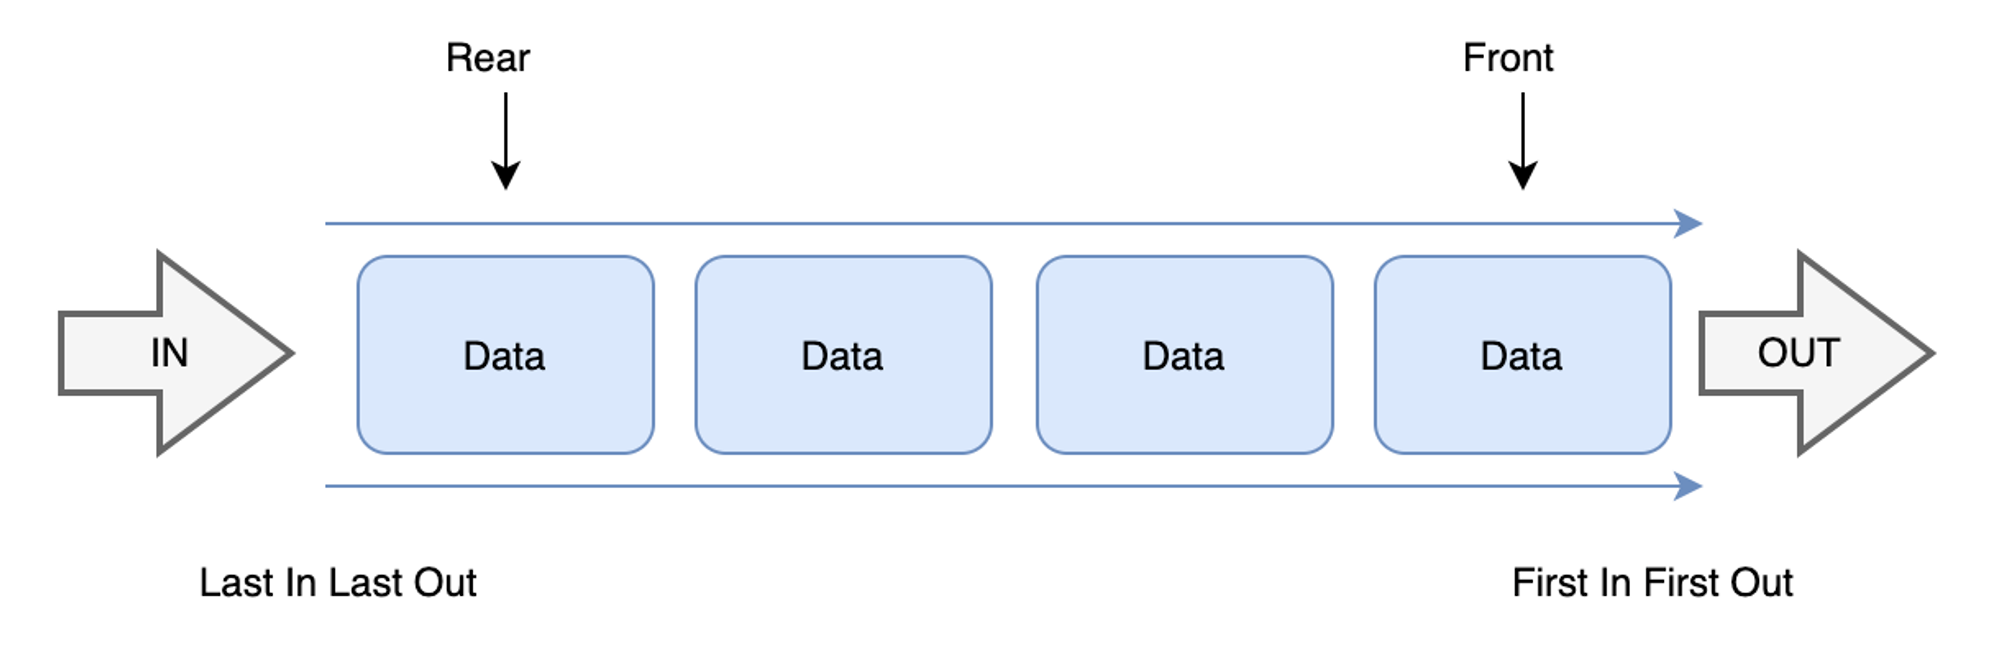
📌 Stack / Queue
자료구조는 자료들의 특징에 따라 효율적으로 CRUD(생성, 읽기, 수정, 쓰기)할 수 있도록 하는 저장 방법에 대한 이론이다. 예를 들어서, 정해진 데이터 개수를 가지는 경우에는 배열(Array) 혹은 리스트(List)를, 키가 되는 데이터를 통해 데이터를 빠르게 찾는게 목표라면 딕셔너리(Dictionary)를 활욜할 수 있다.
Queue / Stack은 단순히 List를 쓰는 것보다 조금 더 복잡한 상황이 있는 경우 사용한다. 먼저 들어온 데이터가 무조건 제일 앞으로 가야한다든지(Queue), 먼저 들어온 데이터가 마지막으로 가야한다던지(Stack)와 같은 조건을 부여하여 사용하는 것이 Stack과 Queue이다.
사실, Array에서 이 둘에 대한 구현을 프로그래밍을 통해서 할 수 있으나, C#에서 주어진 Stack과 Queue가 있으므로 이를 직접 구현할 필요는 없다.
스택과 큐 모두 Array를 활용한 구현, LinkedList를 활용한 구현이 있으며, Array를 통한 구현은 값의 개수에 제한이 있다는 점이고, LinkedList를 활용하면 그렇지 않게 된다.
Algorithm Visualzations - Linked List Stack Visualzation
📌 (Stack, Queue를 활용한) 그래프 탐색 알고리즘
➔ 그래프
그래프는 정점들과 그 정점들을 연결하는 간선들로 구성된 자료구조이다.
각 정점은 고유한 식별자를 가지고 있으며, 간선은 정점들 간의 관계를 나타낸다.
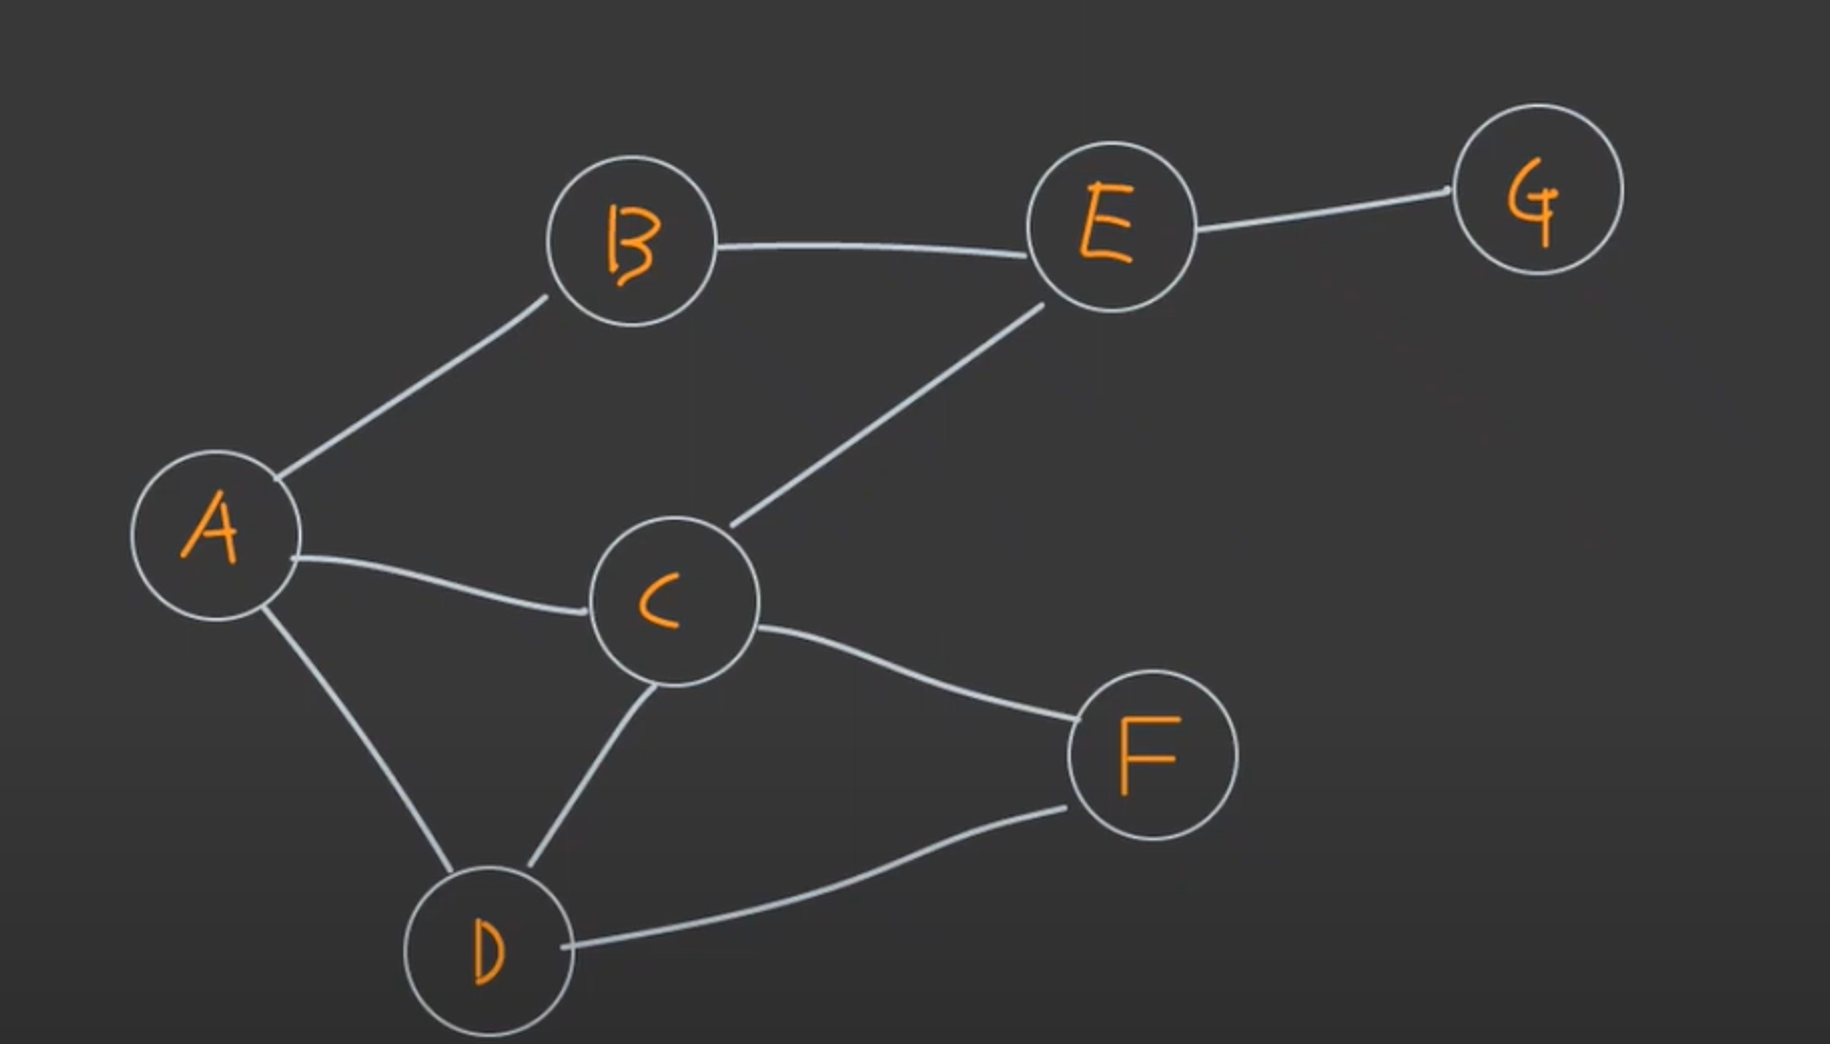
그래프는 다양한 형태로 사용될 수 있다. 예를 들어, 지도에서 도시를 정점으로, 도로를 간선으로 나타낼 수 있다. 또는 소셜 네트워크에서 사람을 정점으로, 친구 관계를 간선으로 표현할 수도 있다.
➔ DFS / BFS
그래프는 다양한 알고리즘에 활용된다. 그래프 내의 정점을 특정 순서로 벙문하는 작업이다. 대표적인 그래프 탐색 알고리즘으로는 깊이 우선 탐색(Depth-First Search, DFS)과 너비 우선 탐색(Breadth-First Search, BFS)이 있다.
-
DFS는 현재 정점에서 연결된 정점을 하나씩 방문하며, 더 이상 방문할 정점이 없을 때까지 계속해서 탐색을 진행한다. 이 과정에서 스택(Stack) 자료구조를 사용한다.
-
BFS는 현재 정점과 인접한 모든 정점을 큐(Queue)에 넣고, 큐에서 하나씩 꺼내어 방문하는 방식으로 탐색을 진행한다. 이 과정에서 큐(Queue) 자료구조를 사용한다.
그래프틑 활용한 탐색 알고리즘은 경로 찾기, 최단 경로 찾기, 연결성 확인 등 다양한 문제에 활용된다.
Path-finding Visualization Comparison; A*, Dijkstra, BFS and DFS
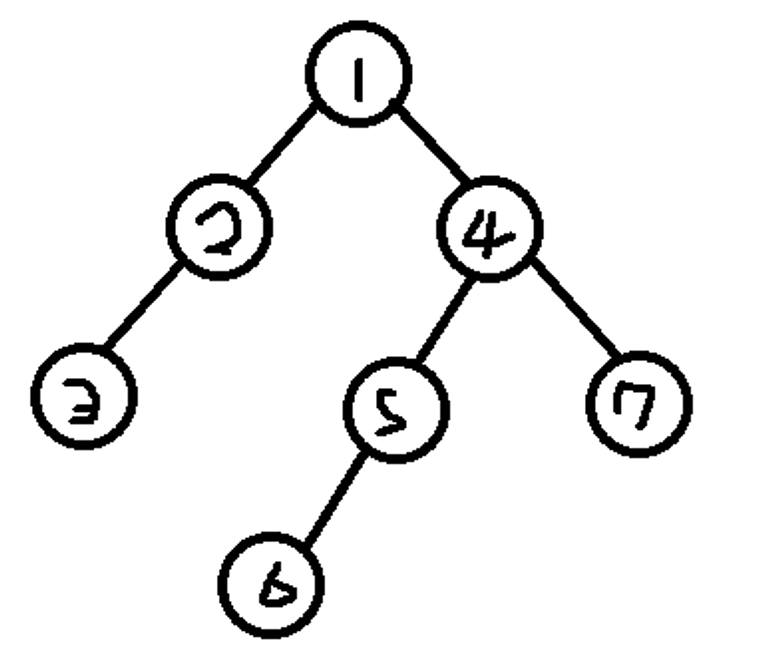
[DFS]
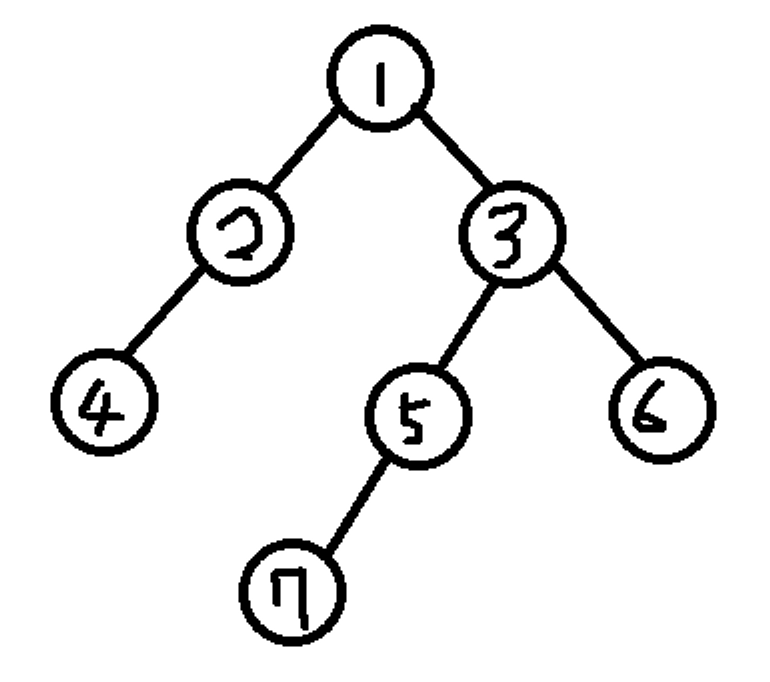
[BFS]
➔ 예시 : 맵 탐색 (BFS)
안정적인 퍼포먼스
class Program
    {
        static void Main(string[] args)
        {
            int[,] adj = new int[6, 6]
            {
                { 0, 1, 0, 1, 0, 0},
                { 1, 0, 1, 1, 0, 0},
                { 0, 1, 0, 0, 0, 0},
                { 1, 1, 0, 0, 1, 0},
                { 0, 0, 0, 1, 0, 1},
                { 0, 0, 0, 0, 1, 0},
            };

            BFS bfs = new BFS();
            bfs.Initurlize(adj);
            var resault = bfs.Search(0);

            foreach (var dic in resault)
            {
                foreach (var value in dic.Value)
                    Console.WriteLine($"{dic.Key} - {value}");
            }
        }
    }
    public class BFS
    {
        int[,] _graph;
        public void Initurlize(int[,] graph)
        {
            _graph = graph;
        }

        public Dictionary<string, int[]> Search(int start)
        {
            if (_graph == null)
                return null;

            int num = _graph.GetLength(0);//정점 총수

            Queue<int> queue = new Queue<int>();
            bool[] found = new bool[num];//경유 유무
            List<int> sequence = new List<int>();//경유 순서
            int[] parent = new int[num];//정점의 부모
            int[] distance = new int[num];//start정점과 각 정점사이거리

            queue.Enqueue(start);
            found[start] = true;
            parent[start] = start;
            distance[start] = 0;

            while (queue.Count > 0)
            {
                int now = queue.Dequeue();
                sequence.Add(now);

                for (int next = 0; next < num; next++)
                {
                    if (_graph[now, next] == 0)
                        continue;

                    if (found[next])
                        continue;

                    queue.Enqueue(next);
                    found[next] = true;
                    parent[next] = now;
                    distance[next] = distance[now] + 1;
                }
            }

            Dictionary<string, int[]> answer = new Dictionary<string, int[]>()
            {
                {"sequence",sequence.ToArray() },
                {"parent",parent },
                {"distance",distance },
            };

            return answer;
        }
    }
➔ 예시 : 도착 가능 여부 확인 (DFS)
Worst Case 위험
class Graph
{
    int[,] adj = new int[6, 6]
    {
            { 0, 1, 0, 1, 0, 0},
            { 1, 0, 1, 1, 0, 0},
            { 0, 1, 0, 0, 0, 0},
            { 1, 1, 0, 0, 1, 0},
            { 0, 0, 0, 1, 0, 1},
            { 0, 0, 0, 0, 1, 0},
    };
    bool[] visited = new bool[6];

    //1) now부터 방문
    //2) now와 연결된 정점들을 하나씩 확인해서 [아직 미방문 상태라면]방문
    public void DFS(int now)
    {
        Console.WriteLine(now);
        visited[now] = true; //1) now부터 방문

        for (int next = 0; next < 6; next++)
        {
            if (adj[now, next] == 0)//연결된 정점이라면 스킵
                continue;
            if (visited[next])//이미 방문한 곳이라면 스킵
                continue;

            DFS(next);
        }
    }
}