Java String class
String class
// new 생성자로 객체를 생성하고 저장.
String str1 = new String("Hello World");
String str2 = new String("Hello World");
// new 생성자 메서드에 의해 heap memory에 새로운 객체 생성, stack memory에 참조하는 주소값 저장.
// str1과 str2의 참조 주소값은 다름

String str3 = "Hello World";
String str4 = "Hello World";
// 생성자 없이 객체 생성시 literal pool에 생성.
// stack memory에 주소값 저장.
// str3과 str4는 같은 객체를 가리킴(주소값이 같음)
literal pool : 재활용 메모리 공간
charAt(a)
원하는 인덱스(a) 입력시 인덱스에 해당하는 문자 하나를 반환받음
replaceAll(a, b)
a를 b로 치환한 값을 반환.
원본 값 변경 x. 변경된 값 반환. 문자열이기 때문에 ""로 작성.
indexOf(a)
첫번째 만나는 a의 인덱스 반환. 없을 경우 -1 반환
length()
String 문자열의 값 반환
toUperCase()
대문자로 변환한 값 반환
toLowerCase()
소문자로 변환 값 반환
subString(a, b)
문자열 인덱스의 a ~ b-1까지 슬라이싱.
subString(a) : 0 ~ a까지 슬라이싱.
        String str = "HelloWorld";

        System.out.println(str.charAt(1)); // 'e'
        System.out.println(str.replaceAll("o", "x")); // HellxWxrld
        System.out.println(str.length()); // 10
        System.out.println(str.toUpperCase()); //HELLOWORLD
        System.out.println(str.toLowerCase()); //helloworld
        System.out.println(str.substring(5)); // World
        System.out.println(str.substring(5, 8)); // Wor
        System.out.println(str.indexOf("W")); //5
        System.out.println("kk"); // -1
equals()
두 문자열을 비교해 같으면 true 다르면 false 반환
compareTo()
문자열을 사전순으로 비교해 두 문자열이 같으면 0, 비교 대상 문자열이 기준 문자열보다 작으면 음수, 크면 양수 반환
        String str1 = "candy";
        String str2 = "candy";
        String str3 = "winter";

        System.out.println(str1.equals(str2)); // true
        System.out.println(str1.equals(str3)); // false

        String str4 = "apple";
        String str5 = "sweets";

        if(str4.compareTo(str5) < 0){
            System.out.println("str4가 str5보다 사전순으로 앞에 있습니다.");
        }
        else {
            System.out.println("str4가 str5보다 사전순으로 뒤에 있습니다.");
        }
split()
특정 구분자를 기준으로 분리함
        String cen = "Winter,Wonder,Land";
        String[] arr = cen.split(",");

        for(String word:arr){
            System.out.println(word);
        }
        // Winter
        // Wonder
        // Land

        cen = "Winter Wonder Land";
        String[] arr2 = cen.split("\\s+");
        // \s+ : 하나 이상의 공백 문자

        for(String word: arr2){
            System.out.println(word);
        }
        // Winter
        // Wonder
        // Land
Interface 기반 프로그래밍
인터페이스 기반 프로그래밍의 필요성
DB 제공 벤더(기업)들이 Java에서 제공하는 API를 만들어 제공하는데 이를 인터페이스 기반 프로그래밍이라 함. 인터페이스를 이용해 프로그램을 동작시키는 프로그래밍 기법.
여러 DB 벤더들은 각자의 DB마다 이용하는(접속하는) 방법이 다르다. 이 경우 DB마다 각각 다른 API들이 만들어져야 하는가? 자기의 DB를 이용하게 하기 위해서는 벤더들이 API를 만들어야한다. 근데 이 API들도 각자 다르게 API를 만들고, Java 개발자들은 이 각각의 API를 모두 이해해서 이용해야 하는 불편함이 생긴다. 이러한 불편함을 해결하기 위해 Java에서 인터페이스를 제공하고, 벤더들이 DB API를 만들 때 Java 제공 인터페이스에 맞게 작성하면 Java 개발자들은 인터페이스 활용 방법만 알면 되는 것.
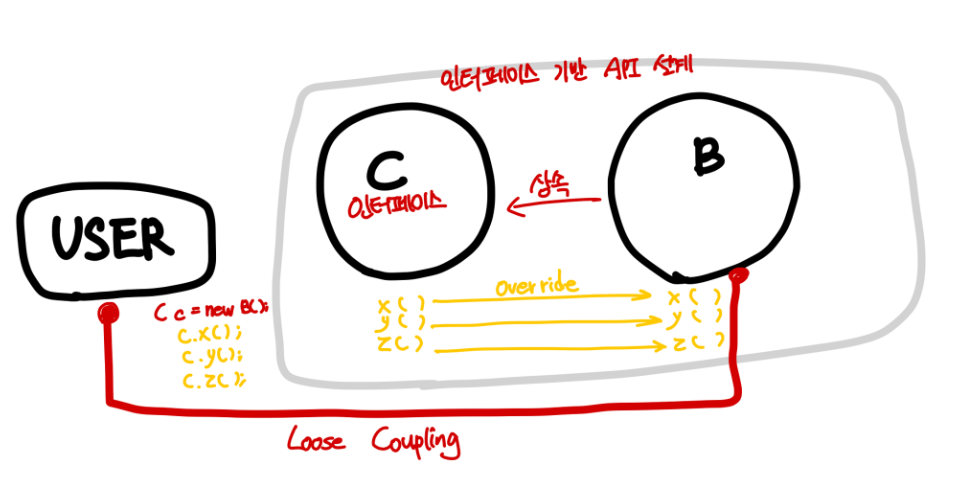
: C는 옵저버로서 인터페이스 역할을 한다. Java에서 만든 인터페이스(C)를 override해서 벤더 측에서 API(B)를 작성하고, 사용자는 재정의된 인터페이스의 메서드를 이용하면 사용자가 모든 B의 API 활용법을 알 필요는 없는 것이다.
Loose coupling
느슨한 연결. 상호작용을 하나 서로에 대해 잘 모름.
DB 연결과정에서 C는 벤더의 Driver라고 볼 수 있다.
Driver
: 벤더들이 자사 DB 접속에 필요한 동작을 만들어 배포하는 클래스들(API)
interface에서 Driver에 연결 시(getConnertion()) URL(DB 접속 URL), username, password 를 요구한다. 이 정보가 유효할 경우 Driver class를 통해 DB Vender와 연결됨.
JDBC Programming(Java DataBase Connectivity)
자바 데이터베이스 프로그래밍.
Java는 인터페이스를 제공, 벤더(DB 회사)는 인터페이스를 구현해 Driver Class를 만들고 배포.
각 벤더마다 드라이버 이름이 다름(jar).
사용자는 벤더들이 제공하는 DB 접속 URL과 URL 형식을 알아야 함
JDBC: Java에서 DB와의 연결을 위한 API
java.sql
: Java에서 데이터베이스 프로그래밍을 하기 위해 제공된 API들이 들어있는 패키지.
Collection Framework
collection framework에는 객체만 넣을 수 있다(기본 자료형 불가. 기본 자료형을 객체로 만들어 넣어야 함)
wrapper class
기본 데이터 타입(primitive data type)을 객체로 다룰 수 있게 만들어진 클래스.
자동으로 boxing, unboxing이 이루어짐.
기본 자료형의 첫 글자를 대문자로 작성하면 됨.
    Integer a = 10;
    System.out.println(a.intValue());

    Integer b = new Integer(20); // auto-boxing
    int b2 = b;
    // Integer b의 타입과 b2의 타입은 다르지만 auto-unboxing으로 값 저장 가능.
int를 ArrayList에 저장할 수 있는 이유: API에서 auto-boxing을 해주기 때문에 개발자가 직접 wrapping을 해주지 않아도 됨. 저장되는 건 Integer 객체가 저장된다.
정수<->문자열
- 숫자형 문자열-> 정수 : Integer.parseInt()
- 정수 -> 문자열: String.valueOf(), ""+정수
collections Framework API
Java에서 제공하는 데이터 구조인 컬렉션을 표현하는 인터페이스와 클래스들.
- List : 순서가 있는 객체의 모음을 다루는 인터페이스
- ArrayList : List 인터페이스를 구현하는 클래스
- LinkedList : List 인터페이스를 구현하는 클래스
- Set : 중복된 원소가 없는 객체의 모음을 다루는 인터페이스
- HashSet : Set 인터페이스를 구현하는 클래스
- TreeSet : SortedSet 인터페이스를 구현하는 클래스
- Map : 키-값 쌍의 객체를 다루는 인터페이스
- HashMap : Map 인터페이스를 구현하는 클래스
- TreeMap : SortedMap 인터페이스를 구현하는 클래스
List API
순서가 있고 중복 가능한 collections API
-
ArrayList
```java
    ArrayList<Integer> arr3= new ArrayList();
    arr3.add(10);
    arr3.add(20);
    arr3.add(30);

    for(int val : arr3){
        System.out.println(val);
    }
    // for(Object val : arr3){
    //     System.out.println(val);
    // }
    // ArrayList<Integer> arr3 -> int val로 출력 가능
    // ArrayList arr3 -> 임의의 타입 Object로 저장되기에 Object val로 출력
```
사용 가능 메서드
: add(), remove(), size(), ...
Set API
순서가 없고 중복 불가능한 collections API
- HashSet
사용 가능 메서드
: add(), remove(), size(), contains, isEmpty, ...
Map API
key-value로 데이터를 관리하는 collection API
- HashMap
사용 가능 메서드
: put(), get(), remove(), entrySet() ...
Java Generic
Java Generic
컬렉션, 메서드, 클래스에서 사용하는 데이터 타입을 런타임 시에 결정할 수 있는 방법. <>으로 표시.
재사용성을 높일 수 있는 방법. 타입을 선언할 때 어떤 데이터 타입을 받을 지 결정하지 않기 때문에 다양한 데이터 타입에 대해 일반적으로 적용할 수 있는 메서드, 클래스 작성 가능.
    // String 객체를 받는 ObjectArr 타입의 배열 arr 생성
    ObjectArr<String> arr = new ObjectArr<>(5);
    arr.set(0, "Winter");
    arr.set(1, "Wonder");
    arr.set(2, "Land");
    arr.set(3, "Cold");

    for(int i=0; i<arr.size(); i++){
        System.out.println(arr.get(i));
    }
    /*
    Winter
    Wonder
    Land
    Cold
    null
    */

    ObjectArr<Person> persons = new ObjectArr<>(4);
    persons.set(0, new Person("Kim", 25, "010-1111-2222"));
    persons.set(1, new Person("Park", 27, "010-2342-2322"));
    persons.set(2, new Person("Lee", 22, "010-1311-4564"));
    persons.set(3, new Person("Jang", 29, "010-1231-9678"));

    for(int i=0; i<persons.size(); i++){
        System.out.println(persons.get(i).toString());
    }
    /*
    Person{name='Kim', age=25, phone='010-1111-2222'}
    Person{name='Park', age=27, phone='010-2342-2322'}
    Person{name='Lee', age=22, phone='010-1311-4564'}
    Person{name='Jang', age=29, phone='010-1231-9678'}
    */
여기서 <>안의 T를 generic type이라 함.
제네릭 타입을 이용해 요소의 타입을 지정하는 경우, 인스턴스 생성 시 요소의 타입이 매개변수로 전달됨.
요소의 타입을 명시적으로 지정할 수 있으며 타입 안정성을 보장하는 방법.
제네릭 타입에서의 멀티 타입 파라미터
제네릭 타입을 여러 개 선언해서 사용하는 것.
    Pair<String, Integer> pair = new Pair<>("hello", 1);
    System.out.println(pair.getKey()); // hello
    System.out.println(pair.getValue()); // 1

    Map<String, Integer> maps = new HashMap<>();
    maps.put("kor", 99);
    maps.put("jap", 53);
    maps.put("eng", 87);

    System.out.println(maps.get("kor")); // 99
    System.out.println(maps.get("jap")); // 53
    System.out.println(maps.get("eng")); // 87
제네릭 타입에서의 제한된 타입 파라미터
특정한 타입으로 제한된 제네릭 타입 파라미터. 제네릭 클래스나 메서드에서 사용할 수 있는 타입을 제한할 수 있음
public class GeneTestNum<T extends Number> {
    // <T extends Number> -> T가 Number 클래스 또는 Number 클래스의 하위 클래스인 타입만 사용할 수 있음
    // Integer, Double, Float 등의 Number 타입만 사용 가능.
    // 다른 타입 사용 시-컴파일 에러

    private T[] numbers;

    public GeneTestNum(T[] numbers) {
        this.numbers = numbers;
    }
}

///

public class GeneTest {
    public static void main(String[] args) {
        Integer[] integers = {1, 2, 3, 4, 5};
        GeneTestNum<Integer> integers2 = new GeneTestNum<>(integers);
        System.out.println(integers2.toString());
        // GeneTestNum{numbers=[1, 2, 3, 4, 5]}

        Double[] doubles = {1.0, 2.0, 3.0, 4.0, 5.0};
        GeneTestNum<Double> doubles2 = new GeneTestNum<Double>(doubles);
        System.out.println(doubles2.toString());
        // GeneTestNum{numbers=[1.0, 2.0, 3.0, 4.0, 5.0]}

        String[] words = {"my", "name", "is", "carrot"};
        GeneTestNum<String> words2 = new GeneTestNum<String>(words);
        System.out.println(words2.toString());
        // error : java: type argument java.lang.String is not within bounds of type-variable T

    }
}
람다, 스트림 API
함수형 인터페이스(Function Interface)
단일 추상 메서드 인터페이스(Single abstract Method)
단 하나의 추상 메서드를 가진 인터페이스.
함수형 인터페이스 사용 시 람다 표현식 사용 가능.
@FunctionalInterface 어노테이션으로 명시적으로 표시 가능
단독으로 객체를 생성할 수 없는 인터페이스를 생성과 동시에 바로 override하는 방법으로 객체를 생성할 수 있다. -> 익명 클래스 사용
함수형 인터페이스를 사용하는 이유
- 람다 표현식 사용 가능
- 메서드 참도
- Stream API와의 통합
- 병렬 프로그래밍
- 코드 재사용
@FunctionalInterface // 함수형 인터페이스
public interface MathOperation {
    public int operation(int x, int y); // 추상메서드. 하나만 가질 수 있음
}

///

import fc.java.model.MathOperation;

public class FunctionInterfaceTest{
    public static void main(String[] args) {
        // MathOperation 인터페이스를 내부 익명클래스로 구현
        MathOperation mo = new MathOperation() {
            @Override
            public int operation(int x, int y) {
                return x + y;
            }
        };
    }
}
함수형 인터페이스 메서드 참조
이미 정의된 메서드를 직접 참조하여 람다 표현식을 간결하게 만들 수 있다.
메서드 참조의 유형 4가지
- 정적 메시드 참조: 클래스명::메서드명
- 인스턴트 메서드 참조: 객체참조::메서드명
- 특정 객체의 인스턴스 메서드 참조: 클래스명::메서드명
- 생성자 참조: 클래스명::new
@FunctionalInterface
public interface Converter<F,T> {
    T convert(F from);
    // F의 타입을 T로 바꿈
}
//정적 메서드 참조
public class InteUtils {
    public static int stringToInt(String s){
        return Integer.parseInt(s);
    }
    /*
      Converter 인터페이스를 구현하지 않고 다른 클래스(InteUtils)를 참조하게 할 수 있음.
      Converter 의 convert 메서드가 호출되었을 때 InteUtils가 실행되도록 하는 것.

     */
    public static void main(String[] args) {
        Converter<String, Integer> converter = InteUtils::stringToInt;
        Integer result = converter.convert("123");
        System.out.println(result);
    }
}
// 인스턴스 메서드 참조
public class StringUtils {
public String reverse(String s) {
return new StringBuilder(s).reverse().toString();
}
}
public static void main(String[] args) {
StringUtils stringUtils = new StringUtils();
Converter<String, String> converter = stringUtils::reverse;
// 객체를 생성해서 생성된 객체의 메서드를 참조하는 것
String result = converter.convert("hello");
System.out.println(result);
}
// 특정 객체의 인스턴스 메서드 참조
public static void main(String[] args) {
    List<String> names = Arrays.asList("Winter", "wonder", "land");
    // String class의 compareTo 메서드를 참조
    Collections.sort(names, String::compareTo);
    System.out.println(names); // [Winter, land, wonder]
}
// 생성자 참조

public class Person{
    String name;
    int age;

    Person(String name, int age){
        this.name = name;
        this.age = age;
    }
}

// Person의 생성자를 참조
@FunctionalInterface
public interface PersonInter<F,T> {
    Person create(String name, int age);
}

PersonInter personInter = Person::new;
Person person = personInter.create("Kim", 28);

// 람다 표현식 사용 표현법
PersonInter personInter =(name,age)->new Person(name, age);
Person person = personInter.create("Kim", 28);