K8S PODs
POD란?
K8S에서 배포의 단위가 되며, App Container들로 구성됨.
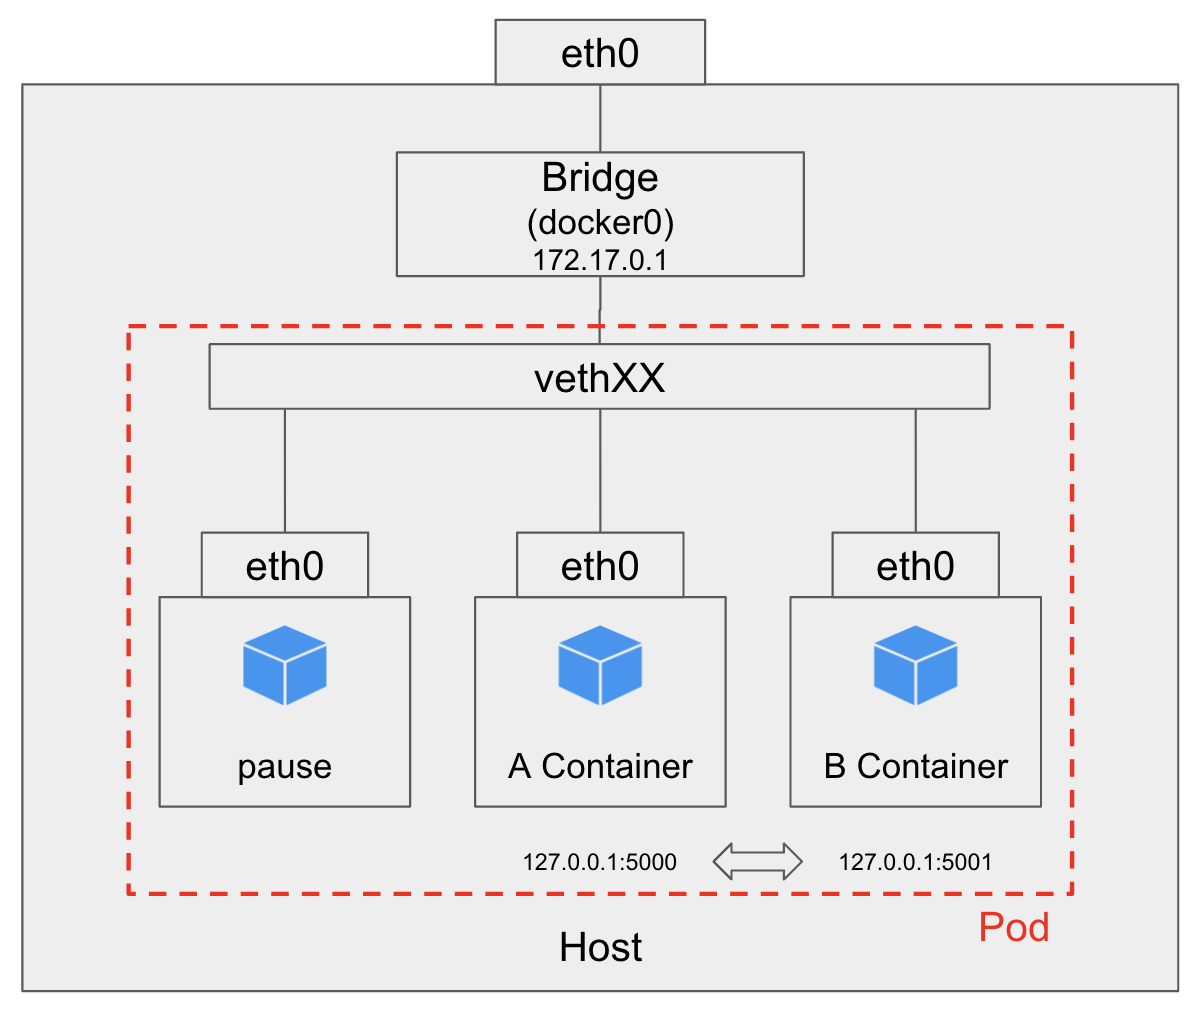
POD란 컨테이너와 마찬가지로 독립된 프로세스 환경을 구성하는데 그렇기 때문에 POD 내부의 컨테이너들은 프로세스 자원을 공유할 수 있다.
PAUSE 컨테이너
POD를 생성할 때 PAUSE 컨테이너가 우선적으로 생성된다.
PAUSE 컨테이너가 생성될 때 이 컨테이너에 네임스페이스가 할당되고, 이후 생성되는 APP Container가 이 네임스페이스를 공유하면서 POD 내부의 프로세스 자원을 공유할 수 있게 된다.
같은 네임스페이스를 공유하기 때문에 localhost로 통신이 가능하다.
또한 PAUSE 컨테이너의 네임스페이스를 공유하기 때문에 PAUSE 컨테이너는 APP Container의 PID를 알고있다. 따라서 PAUSE 컨테이너가 initProcess의 역할을 수행함으로써 Zombie가 된 컨테이너들의 수거또한 가능하다.
POD 관리 - Label
Label은 K8S의 모든 리소스를 구성하는 단위이다. 비단 POD에만 사용되는 것이 아니다.
리소스에 key-value 쌍으로 라벨을 등록하고, Selector를 이용해 자원을 선택한다.
리소스들은 하나 이상의 라벨을 가질 수 있으며 할당된 라벨 또한 수정 가능하다.
우리는 MSA 구조에서 하나의 서비스를 파드로 묶어 스케일 아웃을 하는데 이때 동일한 서비스끼리 라벨을 묶어서 하나의 그룹으로 관리한다.
시나리오 코드
pod-label.yml
apiVersion: v1
kind: Pod
metadata:
  name: examlabel
  labels:
    app: web
    type: frontend
    name: nginx
  annotation: # annotation으로 label에 대한 주석을 적을 수 있습니다.
  	app: service-kind
    type: service-type
    name: service-name
spec:
	containers:
		- name: nginx-container
          image: nginx:1.14
kubectl create -f pod-label.yml
kubectl get pod
kubectl get pod --show-labels
#If you're only interested in certain labels, you can specify them with the L- switch.
kubectl get pod -L app
#Labels can also be added to and modified on existing pods:
kubectl label pod redis-pod app=db
kubectl label pod nginx-pod app=web-services type=frontend
kubectl label pod label-pod app=web-services -overwrite
kubectl get pod --show-labels
kubectl get pod -L app,type
kubectl get pod - selector app=dbnode-label
pod를 특정 node에만 배포하고 싶을 때 node에 라벨을 붙여서 특정 노드에만 배포되도록 설정할 수 있다.
# Check nodes' label
kubectl get nodes --show-labels
kubectl get nodes -L beta.kubernetes.io/arch

# Allocate Label To Node
kubectl label node node2.example.com ssd=true

kubectl get nodes -L ssd
pod-nodeselector.yml
apiVersion: v1
kind: Pod
metadata
	name: nodeselector-pod
spec:
    nodeSelector:
    	ssd: "true"
  containers:
  - name: nainx-container
kubectl create -f pod-nodeselector.yam|
kubectl get pod o- widePOD 삭제
# By Pod Name
kubectl delete pod <pod-name>

# By Label
kubectl delete pod -l <key=value>

# All pod
kubectl delete pod --all
POD 관리 - Liveness
POD가 반드시 실행될 수 있도록 Health Check를 하는 것이다.
이 기능을 사용하면 서비스가 가능한 컨테이너를 진단하고, 진단 결과 실패하면 해당 POD를 KILL하고 다시 POD를 띄워준다.
시나리오 코드
nginx-pod-liveness.yml
apiVersion: v1
kind: Pod
metadata:
  name: nginx-pod-liveness
spec:
  containers:
  - image: nginx:1.14
    name: nginx-container
    ports:
    - containerPort: 80
      protocol: TCP
    livenessProbe:
      httpGet:
        path: /
      initialDelaySeconds: 15
      periodSeconds: 20
      timeoutSeconds: 1
      successThreshold: 1
      failureThreshold: 3
매커니즘
httpGet probe
저장한 IP주소, port, path에 HTTP GET 요청을 보내, 해당 컨테이너가 응답하는지 를 확인한다.
반환코드가 200이 아닌 값이 나오면 오류. 컨테이너를 다시 시작한다.
livenessProbe:
  httpGet:
    path: /
    port: 80
tcpSocket probe
지정된 포트에 TCP연결을 시도. 연결이 되지 않으면 컨테이너를 다시 시작한다.
livenessProbe:
  tcpSocket:
    port: 22
exec probe
exec 명령을 전달하고 명령의 종료코드가 0이 아닌 컨테이너를 다시 시작 한다.
livenessProbe:
  exec:
    command:
    - ls
    - /data/file
매개변수
- periodSeconds : health check 반복 실행 시간(초)
- initialDelaySeconds : Pod 실행 후 delay할 시간(초)
- timeoutSeconds : health check 후 응답을 기다리는 시간(초)