회원가입 페이지에서 이메일을 입력하고 메일 인증 버튼을 누르면 메일로 임의의 문자열을 발송할 수 있도록 아스키코드를 이용해서 임의의 문자열을 생성해 보겠습니다.
임의의 문자 5개 (숫자,영어소문자+대문자)
		//숫자 : 48 ~ 57, 소문자 : 65 ~90 ,대문자 : 97 ~ 122
		String code = "";
		for(int i = 0 ; i < 5 ; i++) {
			while(true) {
				int cd = (int)(Math.random()*100)+22;
				if((cd>=48 && cd<=68) || (cd>=65 && cd<=90) || (cd>=97 && cd<=122) ) {
					char ct = (char)cd;
					code = code + ct;
					break;
				}
			}
		}
아스키 코드를 활용한 임의의 문자 5개를 code에 추가하는 방식으로 생성시켰습니다.
그 후에 Java 서비스 부분에 클래스를 하나 만들어 받는 메일 주소, 제목, 내용을 파라미터로 받아 메일을 보내는 클래스를 만들었습니다.
public class SendMail {
		//Key값들 :: email:보낸 메일주소, result:성공or실패, time:발송시간
		HashMap<String,String> result = null;
		//SMTP 정보
		final String user = "내 메일주소";
		final String password = "비밀번호";
	public HashMap<String,String> excute(String email, String title, String text){
		//naver SMTP 정보
		Properties prop = new Properties();
		prop.put("mail.smtp.host", "smtp.naver.com");
		prop.put("mail.smtp.port", 465);
		prop.put("mail.smtp.auth", "true");
		prop.put("mail.smtp.ssl.enable", "true");
		prop.put("mail.smtp.ssl.trust", "smtp.naver.com");
		//naver Session 생성
		Session session = Session.getDefaultInstance(prop, new javax.mail.Authenticator() {
            protected PasswordAuthentication getPasswordAuthentication() {
                return new PasswordAuthentication(user, password);
            }
        });
		 try {
	            MimeMessage message = new MimeMessage(session);
	            //발신자
	            message.setFrom(new InternetAddress(user));
	            //수신자   message.addRecipient(Message.RecipientType.TO, new InternetAddress(email));
	            //제목
	            message.setSubject(title);
	            //내용
	            message.setText(text);
	            // send the message
	            Transport.send(message); ////전송
	            System.out.println("message sent successfully...");
	        } catch (AddressException e) {
	            // TODO Auto-generated catch block
	            e.printStackTrace();
	        } catch (MessagingException e) {
	            // TODO Auto-generated catch block
	            e.printStackTrace();
	        }
		return result;
	}
}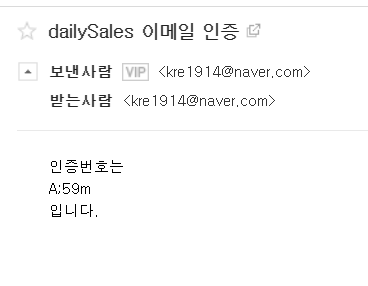
메일 발송 성공. 이제 생성된 값을 세션에 올리고 화면부분에서 Ajax로 확인하는 부분을 만들면 정상적으로 작동할 것 같다.
저는 서버에 올렸는데 카페24에서 smtp채널을 지원해줘서인지.. 정상작동했는데 로컬에서 보낼때는 smtp관련 서비스를 설치하지 않으면 작동되지 않습니다.

개발하자!