scss는 메타언어로서, 추가 기능과 유용한 도구를 제공하기 위해 CSS의 구문을 개선하는 역할
- @mixin / @include : 스타일 청크(묶음)를 쉽게 재사용할 수 있다.
- @extend : 여러 선택자가 스타일을 상속받도록 할 수 있다.
- @import / @use : 다른 스타일시트에 있는 변수, 함수, 믹스인 등을 불러와 결합해서 쓸 수 있다.
- @function : SassScript에서 사용할 수 있는 사용자 정의 함수를 만들 수 있다.
- @if / @each / @for : 상황에 맞춰 CSS가 적용되도록 흐름을 제어할 수 있다.
CSS 아키텍처 중 하나인 7-1패턴 (7개의 폴더 구성)
abstracts(utills 이라고도함)
실제 스타일은 없고, 그저 다른 폴더에 정의된 스타일을 도와는 역할을 한다.
글로벌 변수, 함수는 _variables 파일에, mixins은 _mixins에 작성한다.
base
사이트 전반에 걸쳐서 재사용되는 스타일을 여기에 정의한다.
사이트 전반에 사용될 폰트, 디폴트 스타일이 여기에 해당된다.
ex) _typography : 폰트용
components
컴포넌트는 "소형" 레이아웃 같은 것이다.
사이트 내에서 재사용가능한 작은 부분들을 여기에 정의한다.
buttons, forms, profile pictures와 같은 것이 여기에 해당된다.
layout
사이트 구조에 해당하는 레이아웃을 여기서 정의한다.
nav bars, headers, footers 와 같은 것이 여기에 해당된다.
pages
모든 페이지가 같은 스타일을 사용할 수는 없기 때문에 각 페이지에서 사용될 구체적인 스타일을 여기에 넣으면 된다. 예를들어, "Contact Us"에서만 사용될 스타일이 있다면 _contact.scss와 같이 네이밍한 후 이 폴더에 넣으면 된다.
themes (쓰지않음)
사이트가 다른 종류의 모드를 지원할 때 사용된다. 예를들어 관리자모드와 디폴트모드가 있는 사이트라던가, 다크모드(야간모드)와 라이트모드가 있는 사이트가 있을 수 있다. 각 모드에 따라서 각기 다른 스타일이 지정되기 때문이다.
vendors(쓰지않음)
프로젝트에서 사용하는 외부 스타일을 이 폴더에 넣으면 된다. 예를들어 부트스트랩을 커스터마이징 하고 싶다면 부트스트랩 stylesheet을 다운받아 이 폴더에 넣으면 된다.
style.scss
이제 위와같이 각 폴더에 기준에 따라 scss파일들을 분류했다면, 이 파일을 한데 모을 허브가 필요하다. 그럼 style.scss 라는 파일을 생성해서 모든 파일들을 import를 해주면된다. style.scss는 다른 파일들과는 달리 앞에 _표시가 없다. 해당 파일에는 직접 스타일을 정의하지 않고 "import"만을 담당하는 폴더이다.
vscode 확장 프로그램 sass 다운으로 컴파일 해서 scss사용하기
컴파일(compile): 자동으로 불러와서 변환되어 저장됨 → scss에 쓴게 css구조로 변환되어 css에 자동저장
저장 경로 설정 및 map 파일 제거하기
{
"liveSassCompile.settings.generateMap": false,
//이부분 수정
"liveSassCompile.settings.formats": [
{
"format": "expanded",
"extensionName": ".css",
"savePath": "~/../css/"  *-> 이걸 써줘야 css파일에 compile 되어 저장됨*
}
],
"liveServer.settings.donotShowInfoMsg": true,
}
위 설정 과정에서 format 종류
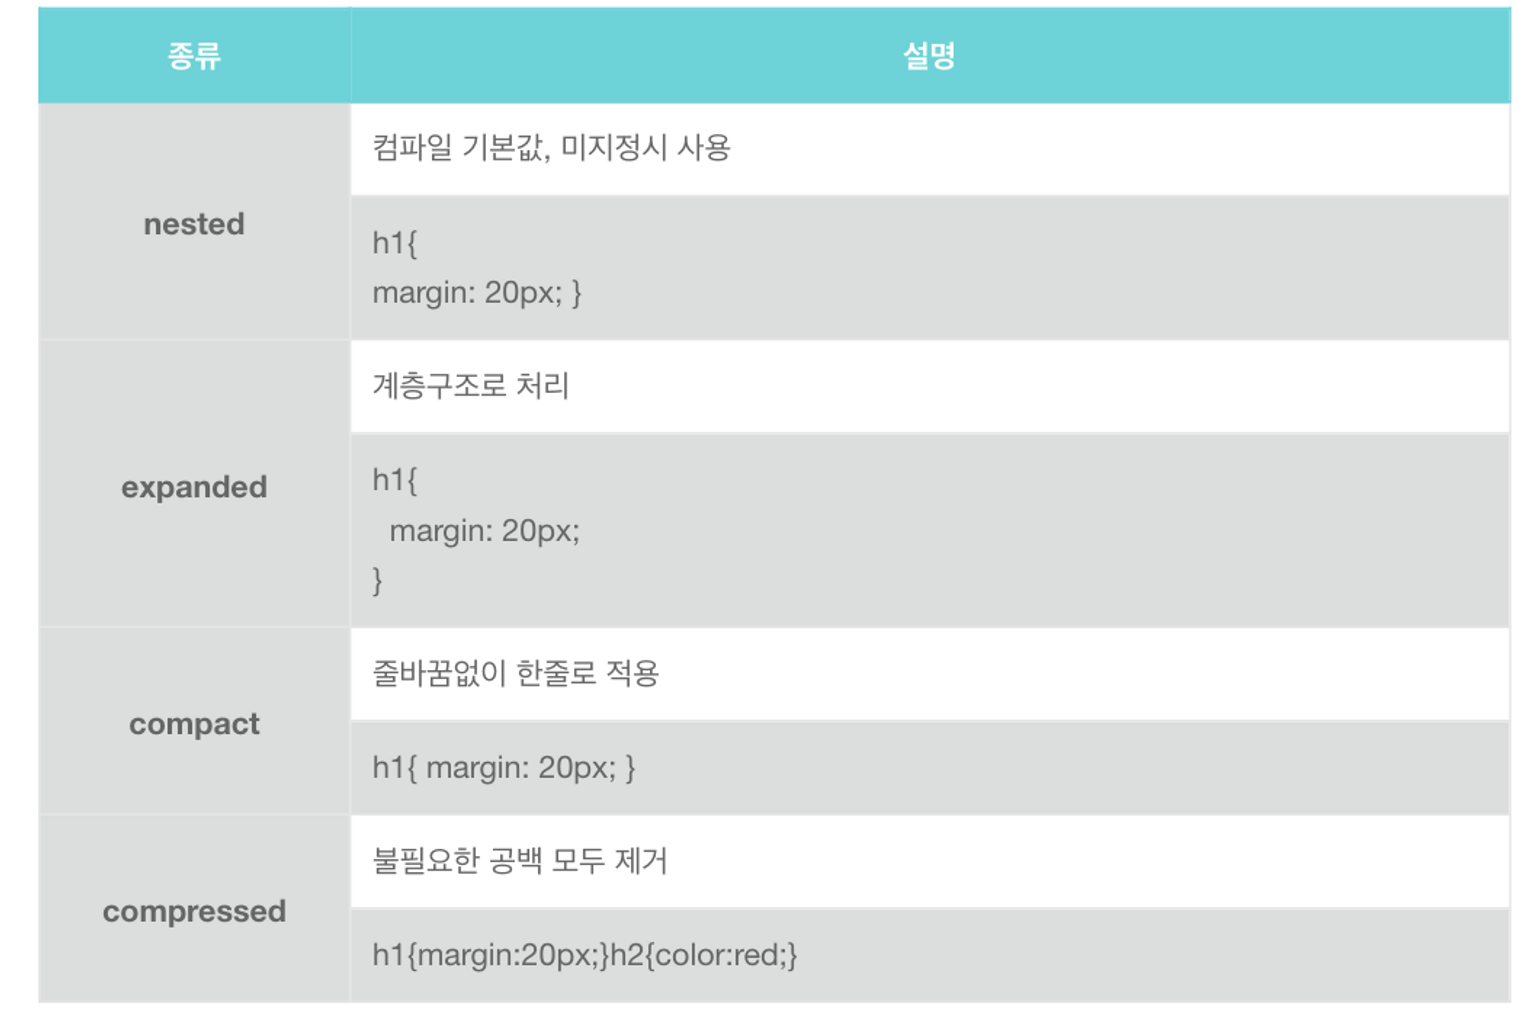
/ 실제 실무에서는 compressed 방식이 가장 많이 쓰임 /
가져오기(Import)
@import로 외부에서 가져온 Sass 파일은 모두 단일 CSS 출력 파일로 병합
또한, 가져온 파일에 정의된 모든 변수 또는 Mixins 등을 주 파일에서 사용 가능
Sass @import는 기본적으로 Sass 파일을 가져옴
하지만, CSS @import 규칙으로 컴파일되는 몇 가지 예외 사항
- 파일 확장자가
.css일 때 - 파일 이름이
http://로 시작하는 경우 url()이 붙었을 경우- 미디어쿼리가 있는 경우
위의 경우 CSS @import 규칙대로 컴파일 됨
@import "hello.css";
@import "http://hello.com/hello";
@import url(hello);
@import "hello" screen;

//여러 파일 가져오기
@import "header", "footer";
가져오는 순서(순위)
- @import ‘./utils/var’; →변수
- @import ‘./utils/mixins’; →재활용 가능한 소스
- @import ‘./base/typo’; →폰트
- @import ‘./base/reset’; →초기화 및 세팅 (reset에서 폰트를 선언하기 때문에 typo파일이 먼저 불러와져있어야함)
- @import ‘./base/common’; →공통 소스
- @import ‘./layout/header’;
- @import ‘./layout/footer’;
- @import ‘./pages/main’;
파일 분할(Partials)
파일들을 header나 side-menu 같이 각 기능과 부분으로 나눠 유지보수가 쉽도록 관리
모든 파일이 컴파일 시 각각의 ~.css 파일로 나눠서 저장된다면 관리나 성능 차원에서 문제 가능성
그래서 Sass는 Partials 기능을 지원
파일 이름 앞에 _를 붙여(_header.scss와 같이) 컴파일 시 ~.css 파일로 컴파일 되지 않는다
이 때, style.scss 파일에서 @import로 가져오면 됨
ex) @import ‘./header’;
주의 할 점은 뒤에 파일명 뒤에 scss를 붙이지 않는다.
사용 규칙
- 중첩 마다 들여 쓰기 한다.
- 하위 선택자가 시작될 때 빈 줄을 추가한다.
extend/include를 상단에 모아쓰고 그 뒤에 빈 줄을 추가한다.- 재선언이 필요한 경우 include를 필요한 위치에 추가 할 수 있다.
.foo {
    //@extend, @include는 상단에 모아쓰고 그 뒤 빈 줄을 추가한다.
    @extend %a;
    @extend %b;
    @include abc(n);

    //속성 별 개행.
    display: block;
    overflow: hidden;
    position: relative;
    z-index: 10;
    width: 100px;
    margin: 0;
    padding: 0;
    border: 1px solid red;
    background: red;
    font-weight: bold;
    letter-spacing: -1px;
    text-decoration: underline;

    //상황에 따라 하단에 위치할수도 있음.
    @include bcd(n);

    //하위 선택자가 시작될 때 빈 줄 추가.
    .bar {
        ...
    }
}
중첩(Nesting)
Sass는 중첩 기능을 사용할 수 있다.
상위 선택자의 반복을 피하고 좀 더 편리하게 복잡한 구조를 작성할 수 있다.
.section {
  width: 100%;
  .list {
    padding: 20px;
    li {
      float: left;
    }
  }
}

---------------Compiled------------------
.section {width:100%;}
.section .list {padding: 20px;}
.section .list li {float: left;}
Ampersand(상위 선택자 참조)
중첩 안에서 & 키워드는 상위(부모) 선택자를 참조하여 치환한다.
(css에서 선택자 사이 띄워쓰기 없이 붙여서 써짐)
.btn {
  position: absolute;
  &.active {
    color: red;
  }
}

.list {
  li {---------------Compiled------------------
    &:last-child {
      margin-right: 0;
    }
  }
}
---------------Compiled------------------
.btn {
  position: absolute;
}
.btn.active {
  color: red;
}
.list li:last-child {
  margin-right: 0;
}
.fs {
&-small { font-size: 12px; }
&-medium { font-size: 14px; }
&-large { font-size: 16px; }
}
---------------Compiled------------------
.fs-small {
font-size: 12px;
}
.fs-medium {
font-size: 14px;
}
.fs-large {
font-size: 16px;
}@at-root (중첩 벗어나기)
쓰지않으면 $w변수를 쓸수가없다!
.list {
  $w: 100px;
  $h: 50px;
  li {
    width: $w;
    height: $h;
  }
  @at-root .box {
    width: $w;
    height: $h;
  }
}
---------------Compiled------------------
.list li {
  width: 100px;
  height: 50px;
}
.box {
  width: 100px;
  height: 50px;
}
중첩된 속성
font-, margin-
등과 같이 동일한 네임 스페이스를 가지는 것들은 반복하여 계속 쓰지 않아도 된다
.box {
  font: {
    weight: bold;
    size: 10px;
    family: sans-serif;
  };
  margin: {
    top: 10px;
    left: 20px;
  };
  padding: {
    bottom: 40px;
    right: 30px;
  };
}
---------------Compiled------------------
.box {
  font-weight: bold;
  font-size: 10px;
  font-family: sans-serif;
  margin-top: 10px;
  margin-left: 20px;
  padding-bottom: 40px;
  padding-right: 30px;
}
변수(Variables)
$color-primary: #e96900;
$url-images: "/assets/images/";
$w: 200px;

.box {
  width: $w;
  margin-left: $w;
  background: $color-primary url($url-images + "bg.jpg");
}
---------------Compiled------------------
.box {
  width: 200px;
  margin-left: 200px;
  background: #e96900 url("/assets/images/bg.jpg");
}- 변수재할당
$red: #FF0000;
$blue: #0000FF;

$color-primary: $blue;
$color-danger: $red;

.box {
  color: $color-primary;
  background: $color-danger;
}- 변수유효범위
.box1 {
  $color: #111;
  background: $color;
}
// Error
.box2 {
  background: $color;
}
- !global (전역 설정)
.box1 {
  $color: #111 !global;
  background: $color;
}
.box2 {
  background: $color;
}
---------------Compiled------------------
.box1 {
  background: #111;
}
.box2 {
  background: #111;
}
#{} (문자 보간)
$family: unquote("Droid+Sans");
@import url("http://fonts.googleapis.com/css?family=#{$family}");

---------------Compiled------------------

@import url("http://fonts.googleapis.com/css?family=Droid+Sans");
@mixin
// SCSS
@mixin 믹스인이름 {
  스타일;
}

// SCSS
@mixin large-text {
  font-size: 22px;
  font-weight: bold;
  font-family: sans-serif;
  color: orange;
}

@mixin large-text {
  font: {
    size: 22px;
    weight: bold;
    family: sans-serif;
  }
  color: orange;

  &::after {
    content: "!!";
  }

  span.icon {
    background: url("/images/icon.png");
  }
}
@include
// SCSS
@include 믹스인이름;

// SCSS
h1 {
  @include large-text;
}
div {
  @include large-text;
}
@mixin border-radius($radius) {
  -webkit-border-radius: $radius;
     -moz-border-radius: $radius;
      -ms-border-radius: $radius;
          border-radius: $radius;
}

.box { @include border-radius(10px); }
즉, mixins 파일에서 @mixin 을 써서 소스를 만들어 선언하고
불러올때는 사용하고자 하는 곳에서 @include 를 사용해서 쓴다
@each
@each $animal in puma, sea-slug, egret, salamander {
    .#{$animal}-icon {
        background-image: url('/images/#{$animal}.png');
    }
}
.puma-icon {
background-image: url('/images/puma.png');
}
.sea-slug-icon {
background-image: url('/images/sea-slug.png');
}
.egret-icon {
background-image: url('/images/egret.png');
}
.salamander-icon {
background-image: url('/images/salamander.png');
}@if
$type: monster;

p {
    @if $type == ocean {
        color: blue;
    } @else if $type == matador {
        color: red;
    } @else if $type == monster {
        color: green;
    } @else {
        color: black;
    }
}
p {
color: green;
}@for
@for $i from 1 through 10 {
    .foo:nth-of-type(#{$i}) {
        border-color: hsl($i * 36, 50%, 50%);
    }
}.foo:nth-of-type(1) {
border-color: #bf8c40;
}
.foo:nth-of-type(2) {
border-color: #a6bf40;
}
.foo:nth-of-type(3) {
border-color: #59bf40;
}