📚JavaScript 개념정리
변수 선언과 데이터 할당
변수 선언 방법과 차이점
let name; // 변수 선언
name = 'lee' // 데이터 할당

let age = 28 // 변수 선언과 동시에 할당
주소 0x001 0x002 0x003 데이터 ... 변수명 : name, 값 :'lee' 변수명 : age, 값 : 28 위의 코드를 말로 풀어쓰면 "변할 수 있는 데이터를 만든다. 이 데이터의 식별자는 a로 한다"가 된다.
변할 수 있는 데이터이므로 선언할 때는 undefined라도 나중에 다른 값으로 바꾸면 된다.
또한 선언과 동시에 데이터를 할당 할 수 있다.
=> 결국 변경 가능한 테이터가 담길 수 있는 공간 또는 그릇이라고 생각하면 된다.
let, var, const 차이점
var 키워드는 1995년부터 사용되어왔고, let과 const는 ES6(2015)에 등장되어 사용되고 있다.
let 과 var 비교
/*

let은 같은 이름의 변수를 2번 선언하면 SyntexError가 발생한다.
var는 같은 이름의 변수를 2번 선언해도 SyntexError가 발생하지 않는다.
*/

let name = 'lee';
let name = 0;

var age = 28;
var age = '28';

/*
let은 Block Scoped이므로 {변수가 선언된 블록} 밖에서는 사용이 불가능
var는 Function Scoped이므로 {변수가 선언된 블록} 밖에서 사용이 가능
*/

{
	let x = 2;
}

{
	var x = 2;
}

// let을 사용하면 동일한 블록에서 변수를 다시 선언하는 것이 허용되지 않음
var x = 2;    // Allowed
let x = 3;    // Not allowed

{
let x = 2;    // Allowed
let x = 3     // Not allowed
}

{
let x = 2;    // Allowed
var x = 3     // Not allowed
}

// 다른 블록에서 let으로 변수를 다시 선언하는 것은 허용된다.
let x = 2;    // Allowed

{
let x = 3;    // Allowed
}

{
let x = 4;    // Allowed
}

/*
var로 정의된 변수는 맨 위로 올려지며(hoisting) 언제든지 초기화할 수 있다.
let으로 정의된 변수도 블록의 맨 위로 올려지지만(hoisting) 초기화되지는 않는다.
그러므로 선언되기 전에 let 변수를 사용하면 ReferenceError가 발생한다.
*/

carName = "Volvo";
var carName; // Allowed

carName = "Saab";
let carName = "Volvo"; Not allowed
const란?
/*
let과 동일하게 Block-Scoped이므로 위 코드블록의 특징들을 갖고 있으며,
let과의 차이점은 immutable 여부이다.
const는 let과는 다르게 데이터 재할당하는 것도 불가능하다.
그렇기 때문에 보통 const는 재할당이 필요없는 상수와 객체에 사용한다.
*/
const PI = 3.14159;
PI = 3.14; // TypeError: Assignment to constant variable
console.log(PI);
자바스크립트 데이터 타입의 종류
자바스크립트의 데이터 타입에는 크게 두 가지가 있다.
바로 기본형(Primitive Type)과 참조형(Reference Type)이다.
| 기본형 | 참조형(Object) |
|---|---|
| Number | Array |
| String | Function |
| Boolean | Date |
| null | RegExp |
| undefined | Map, WeakMap |
| Symbol | Set, WeakSet |
기본형은 값이 담긴 주솟값을 바로 복제하는 반면,
참조형은 값이 담긴 주솟값들로 이루어진 묶음을 가리키는 주솟값을 복제한다는 점이 다르다.
그리고기본형은 불변성을 띈다
불변성을 설명하기 전에 우선 데이터가 메모리에 어떻게 담기는지 알아보자.
let a = 5;
let b = a;
b = 7;

let c = 'lee';
let d = 'sh';
d = 'suhyeon';
데이터는 우선 변수명과 주솟값이 하나의 영역에 저장되고, 다른 영역의 해당 주솟값에 값이 저장되는 방식으로 저장된다.
- 기본형의 불변성이란 위에 있는 예시처럼 변수 a에 5가 담기면 데이터 영역 한 부분에 값 5가 저장된다.
- 변수 b에 a를 할당하면 a의 변수영역에 담겨있는 주솟값 @5001이 저장돼서, 값 5를 가리킨다.
- 변수 b의 값을 7로 변경하면 데이터 영역 @5001에 저장 되어있는 값 5를 변경하는 것이 아니라 새로운 곳에 값 7을 저장한다.
- 만약 변수 a의 값을 변경하더라도 @5001의 값 5는 가비지 컬렉팅을 하지 않는 이상 변하지 않는다.
=> 이것을 기본형이 불변성을 띈다고 하는 것이다.
=> 그렇다면 참조형은 모두 가변성을 띄고있을까??정답은 ❌
참조형은 기본적인 성질은 가변값인 경우가 많지만 설정에 따라 변경 불가능한 경우도 있고, 아예 불변값으로 활용하는 방안도 있다.
우선 참조형 데이터를 변수에 할당하는 과정부터 확인해보자
let cat = {
	name:'bean',
  	age:5,
};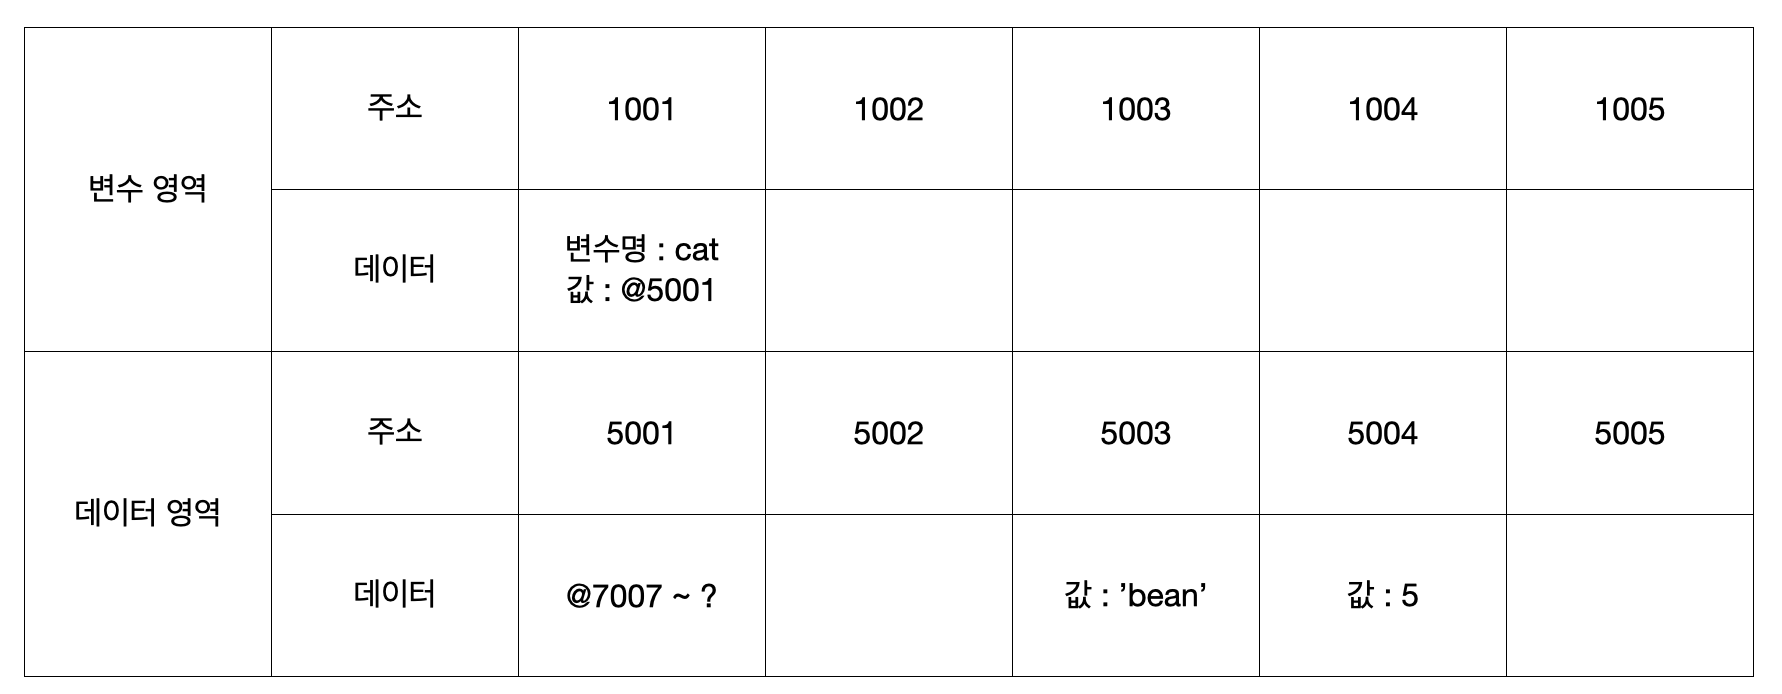

- 변수 영역 @1001에 주소 @5001의 변수명을 cat으로 지정한다.
- 데이터 영역 @5001에 여러 개의 프로퍼티로 이뤄진 데이터 그룹을 저장하기 위해, 별도의 변수 영역을 마련하고 그 영역의 주소 @7007~ ?를 저장한다.
- @7007과 @7008에 name과 age라는 변수명에 데이터 영역의 주소값을 저장한다.
- 데이터 영역에서 'bean'을 우선 탐색하고 없으면 @5003에 저장하고, 5도 마찬가지로 @5004에 저장한다.
만약 cat.age = 7; 로 값을 재할당하면,


@5005에 7이 담기고, 객체 변수 영역의 @7007 주소의 값이 변경된다.
즉, 새로운 객체가 생기는게 아니고 객체 내부의 값만 변경된다.(가변성)
이러한 특징 때문에
let cat2 = cat;로 값을 할당하면, cat2의 변수영역에는 cat과 동일한 주솟값 @5001이 할당돼서, 같은 주소를 바라보고 참조하기 때문에 cat, cat2변수를 사용하여 객체 내부의 값을 변경하면 둘 다 변경된다.cat === cat2 // true의 결과가 나온다.
불변 객체를 만드는 방법
불변 객체는 React, vue 등의 라이브러리나 프레임워크에서뿐만 아니라 함수형 프로그래밍, 디자인 패턴 등에서도 매우 중요한 기초 개념이라고 한다.
위에서 말했듯이 참조형 데이터의 가변성은 데이터 자체가 아닌 내부 프로퍼티를 변경할 때만 성립한다.
데이터 자체를 변경하고자 하면(새로운 데이터를 할당하고자 하면) 기본형과 마찬가지로 기존 데이터는 변하지 않는다.
let copyObject = (obj) => {
  let result = {};
  for (let prop in obj) {
    result[prop] = obj[prop];
  }
  return result;
};
let user = {
  name: "lee",
  age: 28,
  urls: {
    git: "https://github.com/lshyun955",
    blog: "https://velog.io/@lshyun955",
  },
};

let user2 = copyObject(user);
console.log(user === user2); // false
console.log(user.urls === user2.urls); // true
위 코드는 한 단계 밑의 프로퍼티들은 복사하는 얕은 복사 이다.
내부의 모든 값들을 하나하나 찾아서 전부 복사하는 방법은 깊은 복사 이다.
/*
재귀를 이용한 방법
*/
let copyDeepObject = (obj) => {
  let result = {};
  if (typeof obj === "object" && obj !== null) {
    for (let prop in obj) {
      result[prop] = copyDeepObject(obj[prop]);
    }
  } else {
    result = obj;
  }

  return result;
};
let user = {
  name: "lee",
  age: 28,
  urls: {
    git: "https://github.com/lshyun955",
    blog: "https://velog.io/@lshyun955",
  },
};

let user2 = copyDeepObject(user);
console.log(user === user2); // false
console.log(user.urls === user2.urls); // false

/*
JSON을 활용한 간단한 깊은 복사
*/
let user = {
  name: "lee",
  age: 28,
  urls: {
    git: "https://github.com/lshyun955",
    blog: "https://velog.io/@lshyun955",
  },
};
let copyObjectViaJSON = (obj) => {
  return JSON.parse(JSON.stringify(obj));
};

let user2 = copyObjectViaJSON(user);
console.log(user === user2); // false
console.log(user.urls === user2.urls); // false
if문의 조건으로 해당 파라미터의 타입이 object인지와 null인지 체크를 해주고, 아닐 시에는 result에 파라미터의 값을 할당하고 반환한다.
만약 조건을 충족하면, for문 안에서 result의 프로퍼티에 copyDeepObject()를 재귀호출하여 프로퍼티가 object인지 null 인지 체크 해주고, 조건을 충족하면 한 단계 더 깊이 들어가서 값을 반복하는 로직을 수행하도록 한다.
number와 string의 메서드
'string' 메서드
문자열의 일부를 추출하는 3가지 메서드
- slice(start?:number, end?:number): string;
 [출처] https://www.codewithharry.com/videos/python-tutorials-for-absolute-beginners-8/
/*
@param start The index to the beginning of the specified portion of stringObj.
@param end The index to the end of the specified portion of stringObj.
The substring includes the characters up to, but not including, the character indicated by end.
If this value is not specified, the substring continues to the end of stringObj.
*/
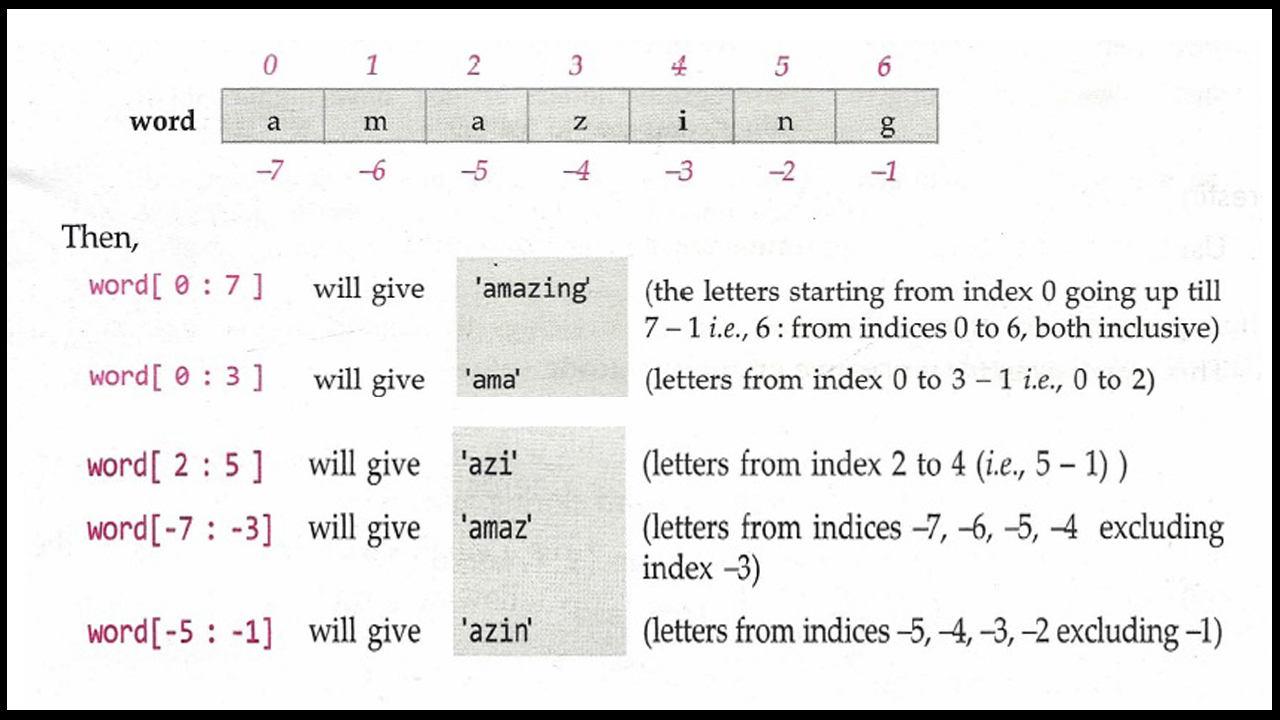
let word = "amazing";
console.log(word.slice(0, 3)); // 'ama'
console.log(word.slice(0, 7)); // 'amazing'
console.log(word.slice(2, 5)); // 'azi'
console.log(word.slice(0)); // 'amazing'
console.log(word.slice(-7)); // 'amazing'
console.log(word.slice(-7, -3)); // 'amaz'
console.log(word.slice(-5, -1)); // 'azin'- substring(start:number, end?:number) : string;
/*
@param start The zero-based index number indicating the beginning of the substring.
@param end Zero-based index number indicating the end of the substring.
The substring includes the characters up to, but not including, the character indicated by end.
If end is omitted, the characters from start through the end of the original string are returned.
*/
let word = "amazing";
console.log(word.substring(0, 3)); // 'ama'
console.log(word.substring(0, 7)); // 'amazing'
console.log(word.substring(2, 5)); // 'azi'
console.log(word.substring(0)); // 'amazing'- substr(from:number, length?:number) : string;
/*
@param from The starting position of the desired substring.
 The index of the first character in the string is zero.
@param length The number of characters to include in the returned substring.
*/
let word = "amazing";
console.log(word.substr(0, 3)); // 'ama'
console.log(word.substr(0, 7)); // 'amazing'
console.log(word.substr(2, 5)); // 'azing'
console.log(word.substr(0)); // 'amazing'
❗️
slice()와substring()의 결과값이 같지만, 둘은 차이점이 있다.
slice()는 string뿐만 아니라 array에서도 작동한다.slice()는 음수 인덱스를 넣을 수 있지만,substring()음수 인덱스를 인식하지 못한다.
문자열 내용을 바꾸는 메서드
- replace(searchValue, replacer): string;
/*
원본은 변경하지 않고 새로운 문자열을 반환한다.
첫 번째 일치 항목만 대체합니다
*/
let text = "Please visit Microsoft!";
let newText = text.replace("Microsoft", "W3Schools");

console.log(text); // Please visit Microsoft Microsoft!
console.log(newText);// Please visit W3Schools Microsoft!

// 기본적으로 대소문자를 구분한다.
let text = "Please visit Microsoft!";
let newText = text.replace("MICROSOFT", "W3Schools");
console.log(text); // Please visit Microsoft!
console.log(newText);// Please visit Microsoft!

// 대소문자를 구분하지 않으려면 /i 플래그와 함께 정규식을 사용한다.
let text = "Please visit Microsoft!";
let newText = text.replace(/MICROSOFT/i, "W3Schools");
console.log(text); // Please visit Microsoft!
console.log(newText); // Please visit W3Schools!

// 모든 일치 항목을 바꾸려면 /g 플래그와 함께 정규식을 사용한다.
let text = "Please visit Microsoft and Microsoft!";
let newText = text.replace(/Microsoft/g, "W3Schools");
console.log(text); // Please visit Microsoft and Microsoft!
console.log(newText); // Please visit W3Schools and W3Schools!
문자열의 문자를 추출하는 메서드와 속성
- charAt(position)
/*
charAt() 메서드는 문자열의 지정된 인덱스에 있는 문자를 반환한다.
*/
let text = "HELLO WORLD";
let char = text.charAt(0);
let char2 = text.charAt();
console.log(char); // H
console.log(char2); // H- charCodeAt(position)
/*
charCodeAt() 메서드는 문자열의 지정된 인덱스에 있는 문자의 유니코드를 반환한다.
*/
let text = "HELLO WORLD";
let char = text.charCodeAt(0);
console.log(char); // 72- Property access [] (Not Method)
/*
[] 속성은 [] 안에 인덱스를 넣으면 해당 인덱스에 있는 문자를 반환한다.
*/
let text = "HELLO WORLD";
let char = text[0];
console.log(char); // H
문자열을 배열로 변환시키는 메서드
- split()
// split() 메소드 argument로 특정 문자가 전달되면 해당 문자를 기준으로 분할하여 배열로 변환된다.
let text = "apple, grape, peach, kiwi";
let textToArr = text.split(",");
console.log(text); // 'apple, grape, peach, kiwi'
console.log(textToArr); // [ 'apple', ' grape', ' peach', ' kiwi' ]

let text2 = "apple grape peach kiwi";
let textToArr = text2.split(" ");
console.log(text2); // 'apple grape peach kiwi'
console.log(textToArr); // [ 'apple', ' grape', ' peach', ' kiwi' ]

// split() 메소드 argument가 ''로 전달되면 문자열의 모든 문자가 원소인 배열로 변환된다.
let text3 = "apple";
let textToArr = text3.split("");
console.log(text3); // 'apple'
console.log(textToArr); // [ 'a', 'p', 'p', 'l', 'e' ]

// split() 메소드 argument가 전달되지 않으면 문자열 전체가 하나의 원소인 배열로 변환된다.
let text4 = "apple";
let textToArr = text4.split();
console.log(text); // 'apple'
console.log(textToArr); // [ 'apple' ]
문자열 검색 메서드
기타 메서드
- toUpperCase()
// 문자열을 대문자로 변환한다
let text1 = "Hello World!";
let text2 = text1.toUpperCase();
console.log(text2) // 'HELLO WORLD!'- toLowerCase()
// 문자열을 소문자로 변환한다
let text1 = "Hello World!";
let text2 = text1.toLowerCase();
console.log(text2) // 'hello world!'- concat(...strings)
// concat()은 두 개 이상의 문자열을 결합
let text1 = "Hello";
let text2 = "World";
let text3 = text1.concat(" ", text2);
console.log(text3); // 'Hello World'

let text4 = "Hello";
let text5 = "World";
let text6 = text4.concat(" ", "BYE", text5);
console.log(text6); // 'Hello BYEWorld'- trim()
// trim() 메서드는 문자열의 양쪽에서 공백을 제거한다
let text1 = "      Hello World!      ";
let text2 = text1.trim();
console.log(text2); // 'Hello World!'- padStart(maxLength:number, fillString?:string) : string
// padStart() 메서드는 문자열을 다른 문자열로 채운다
let text = "5";
let padded = text.padStart(4, "x");
console.log(padded); // 'xxx5'- padEnd(maxLength:number, fillString?:string) : string
// padEnd() 메서드는 문자열을 다른 문자열로 채운다
let text = "5";
let padded = text.padEnd(4, "x");
console.log(padded); // '5xxx'
함수가 필요한 이유
함수가 필요한 이유는 대표적으로 3가지가 있다.
- 재사용성 : 반복 사용되는 코드를 함수로 만들어두면 필요한 곳에서는 호출을 통해 사용할 수 있어서 편리하다.
- 가독성 : 함수의 이름을 통해 무슨 기능을하는 함수인지 유추할 수 있다.
- 모듈화 : 어떤 기능에서 에러가 발생하면 해당 기능을 하는 함수만 수정하면 되므로 편리하다.
함수의 정의와 호출의 차이점
💡Javascript 함수는 [function 키워드], [함수명], [() 괄호], [{} 중괄호]로 정의된다.
- 함수명은 변수명과 동일한 규칙을 따른다.
- 괄호에는 쉼표로 구분된
parameter이름이 포함될 수 있다.- 함수에 의해 실행되는 코드는 중괄호 안에 배치된다.
💡 함수 내부의 코드는 '무언가'가 함수를 호출할 때 실행된다.
- 이벤트가 발생했을 때(ex. 사용자가 버튼을 클릭했을 때)
- Javascript 코드에서 호출될 때
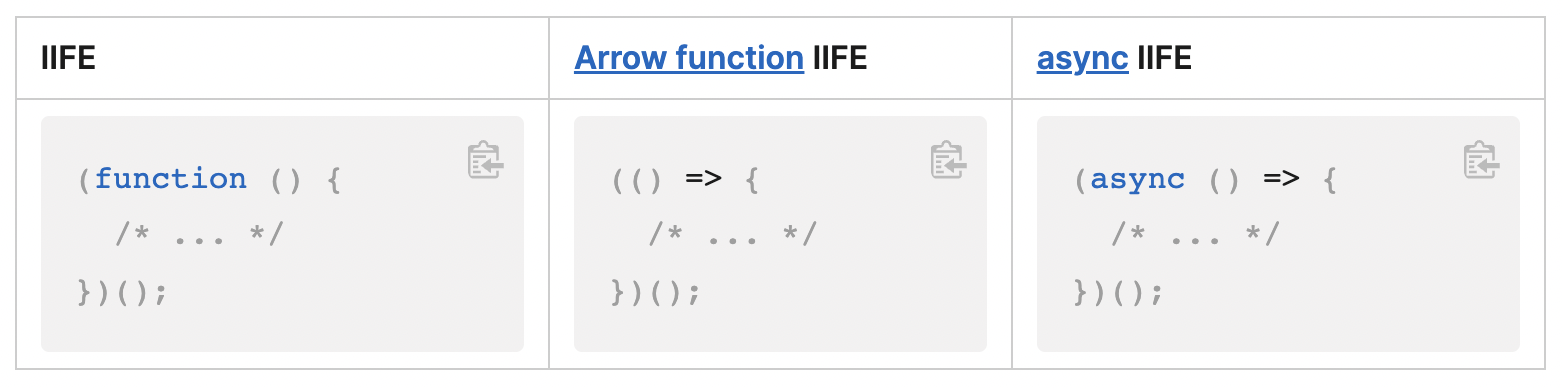
- 정의되는 즉시 자동으로 호출(IIFE)
IIFE를 사용하는 이유 : 우리의 application에는 다른 소스 파일의 많은 함수와 전역 변수가 포함될 수 있으므로 전역 변수의 수를 제한하는 것이 중요하다. 다시 사용할 필요가 없는 초기화 코드가 있는 경우 IIFE 패턴을 사용할 수 있다. 또한 IIFE를 사용하여 private & public 변수와 메서드를 생성할 수 있다.
// 예시코드1
(() => {
  // some initiation code
  let firstVariable;
  let secondVariable;
})();
// 여기서 firstVariable과 secondVariable은 함수가 실행된 후 폐기된다.
//
// 예시코드2
const makeWithdraw = (balance) => ((copyBalance) => {
  let balance = copyBalance; // This variable is private
  const doBadThings = () => {
    console.log('I will do bad things with your money');
  };
  doBadThings();
  return {
    withdraw(amount) {
      if (balance >= amount) {
        balance -= amount;
        return balance;
      }
      return 'Insufficient money';
    },
  };
})(balance);
const firstAccount = makeWithdraw(100);   // "I will do bad things with your money"
console.log(firstAccount.balance);        // undefined
console.log(firstAccount.withdraw(20));   // 80
console.log(firstAccount.withdraw(30));   // 50
console.log(firstAccount.doBadThings);    // undefined; this method is private
const secondAccount = makeWithdraw(20);   // "I will do bad things with your money"
console.log(secondAccount.withdraw(30));  // "Insufficient money"
console.log(secondAccount.withdraw(20));  // 0
 [출처]
[출처] // 코드에서 호출될 때
function add(a, b) {
console.log(a + b);
};
add(2,4) // 6
// IIFE (Immediately-Invoked Function Expressions), 정의되는 즉시 자동으로 호출
(function run() {
console.log("Run");
})();조건문이 필요한 이유
조건문이 필요한 이유는 상황마다 다른 로직이 수행되도록 하기 위해서다.
예를 들면, 함수의 파라미터로 전달받은 값이 짝수이면 '짝수'를 홀수이면 '홀수'를 출력하기 위해서는
조건문이 필요하다.💡 조건문은 if ... else문, switch문, 삼항연산자가 존재한다.
// if ... else문
if(조건) {
	조건이 True일 경우 실행할 코드
} else {
	조건이 False일 경우 실행할 코드
}
// 예시 코드1
function evenOrOdd(num) {
	if(num % 2 === 0) {
    	console.log('짝수');
    } else {
    	console.log('홀수');
    }
}
evenOrOdd(4) // '짝수'

// if ..else if문
// 첫 번째 if문의 조건이 false이면 다음 else if문의 조건이 true인지 확인하고, false이면 else문 실행
let fruit = "grape";
if (fruit === "apple") {
  console.log("🍎");
  let a = 1;
  console.log(a);
} else if (fruit === "orange") {
  console.log("🍊");
} else {
  console.log("xxxxxxx"); // 이 코드가 실행됨
}

// switch문
// 입력으로 하나의 표현식/값을 받고, 값과 일치하는 하나를 찾을 때까지 여러 항목을 살펴보고 그에 맞는 코드를 실행한다
let day = 3; // 0:월요일, 1:화요일 ... 6:일요일
let dayName;

switch (day) {
  case 0: // case 키워드 뒤에 표현식이나 값이 온다.
    dayName = "Mon";
    break; // 표현식이나 값과 일치한다면 해당 코드 블록에서 실행을 멈추고, switch문 아래 코드로 이동한다.
  case 1:
    dayName = "Tue";
    break;
  case 2:
    dayName = "Wed";
    break;
  case 3:
    dayName = "Thu";
    break;
  case 4:
    dayName = "Fri";
    break;
  case 5:
    dayName = "Sat";
    break;
  case 6:
    dayName = "Sun";
    break;
  default: // default 키워드는 일치하는 항목이 없으면 실행된다. 이 블록 이후에는 실행할 코드가 없으므로 break가 필요하지 않다.
    console.log("default!");
}

console.log(dayName); // 'Thu'


// 삼항 조건 연산자 Ternary Operator
// 조건식 ? 참인경우 : 거짓인경우

let fruit = "orange";
fruit === "apple" ? console.log("OOOO") : console.log("XXX"); // 'XXX'

let emoji = fruit === "apple" ? "APPLE" : "XXXX";
console.log(emoji); // 'XXXX'
Truthy & Falsy
//falsy
if (false)
if (null)
if (undefined)
if (0)
if (-0)
if (0n)
if (NaN)
if ("")
//truthy if (true) if ({}) if ([]) if (42) if ("0") if ("false") if (new Date()) if (-42) if (12n) if (3.14) if (-3.14) if (Infinity) if (-Infinity)
참고자료
https://www.w3schools.com/js/js_const.asp
https://www.w3schools.com/js/js_string_methods.asp
https://www.w3schools.com/js/js_number_methods.asp
https://velog.io/@bathingape/JavaScript-var-let-const-%EC%B0%A8%EC%9D%B4%EC%A0%90
http://www.yes24.com/Product/Goods/78586788
https://developer.mozilla.org/ko/docs/Web/JavaScript/Data_structures
https://developer.mozilla.org/en-US/docs/Web/JavaScript/Guide/Functions#calling_functions
https://www.w3schools.com/js/js_functions.asp
https://developer.mozilla.org/en-US/docs/Glossary/IIFE
https://poiemaweb.com/js-function
https://developer.mozilla.org/en-US/docs/Glossary/Truthy