회원가입, 로그인 구현
회원가입 API
저번 아이템 API 구현에 이어 회원 가입과 로그인을 구현해보자.
구현 조건
- 아이디, 비밀번호, 비밀번호 확인, 이름을 데이터로 넘겨서 회원가입을 요청합니다.
- 보안을 위해 비밀번호는 평문(Plain Text)으로 저장하지 않고 해싱된 값을 저장합니다.
- 아래 사항에 대한 유효성 체크를 해야 되며 유효하지 않은 경우 알맞은 HTTP 상태코드와 에러 메세지를 반환해야 합니다.
- 아이디: 다른 사용자와 중복될 수 없으며 오로지 영어 소문자 + 숫자 조합으로 구성이 되어야 합니다.
- 비밀번호: 최소 6자 이상이며, 비밀번호 확인과 일치해야 합니다.
- 회원가입 성공 시, 비밀번호를 제외 한 사용자의 정보를 반환합니다.
먼저 로그인 시 필요한 jwt 인증 토큰을 위해 미들웨어를 구현하자.
import { PrismaClient } from '@prisma/client';
import jwt from 'jsonwebtoken';

const prisma = new PrismaClient({
  log: ['query', 'info', 'warn', 'error'],
  errorFormat: 'pretty',
});
const authMiddleware = async (req, res, next) => {
  try {
    const authHeader = req.headers.authorization;
    //Authorization header에서 token만 가져옴
    const tokenInfo = authHeader.split(' '); //공백으로 분리

    if (tokenInfo.length != 2) {
      res.status(400).json({ error: '잘못된 인증 정보입니다.' });
      return;
    }

    if (tokenInfo[0] != 'Bearer') {
      res.status(400).json({ error: '잘못된 토큰 타입입니다.' });
      return;
    }

    const token = tokenInfo[1];
    //token이 유효한지 검증
    const decodeToken = jwt.verify(token, 'secretOrPrivateKey');
    const accountId = decodeToken.accountId;
    // 사용자 정보 조회
    const accountInfo = await prisma.account.findUnique({
      where: { accountId: accountId },
      select: { accountId: true, password: false, userName: true },
    });
    if (!accountInfo) {
      res.status(400).json({ error: '계정 정보를 찾을 수 없습니다.' });
      return;
    }

    req.accountInfo = accountInfo;
    next();
  } catch (error) {
    console.log('토큰에 문제가 있습니다.', error);
  }
};

export default authMiddleware;
그 다음 데이터 검증 및 스키마 유효성 검사 라이브러리인 joi를 가져와서 회원가입 api 구현을 진행해보자.
npm install joiconst joinSchema = joi.object({
accountId: joi.string().alphanum().lowercase().required(),
// alphanum = 알파벳과 숫자 구성, lowercase = 소문자
password: joi.string().min(6).required(), // 비밀번호는 최소 6자리
confirmPassword: joi.valid(joi.ref('password')).required(),
userName: joi.string().required(),
});
const validateResult = joinSchema.validate(req.body); // 유효성 검사
console.log(validateResult);
if (validateResult.error) {
res.status(400).json({ error: '입력된 값이 잘못됐어요.' });
return;
}
const inputValue = validateResult.value;
const accountId = inputValue.accountId; // 영어 소문자랑 숫자로만 구성 필요
const password = inputValue.password; // 최소 여섯자 이상이며 비밀번호 확인과 일치해야 한다.
const userName = inputValue.userName;그다음 회원가입 성공 시, 비밀번호를 제외 한 사용자의 정보를 반환해야 하므로 bcrypt를 이용해 해싱해서 저장하자
// 비밀번호는 평문으로 쓰지말고 해싱해서 저장필요
// 단방향 암호화
const hashedPassword = await bcrypt.hash(password, 10);
const existAccount = await prisma.account.findUnique({
where: {
accountId: accountId,
},
});
if (existAccount) {
res.status(400).json({ error: '중복된 아이디에요!' });
return;
}
const joinAccount = await prisma.account.create({
data: {
accountId: accountId,
password: hashedPassword,
userName: userName,
},
});
res.status(200).json({
message: '회원가입이 완료 되었습니다.',
account_info: { accountId: joinAccount.accountId, userName: joinAccount.userName },
}); // 회원가입 시, 비밀번호를 제외 한 사용자의 정보를 반환
} catch (error) {
console.log(error);
}
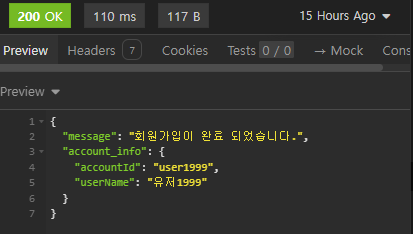
});코드가 완성되면 insomnia를 통해 테스트 해보자
그럼 비밀번호를 제외한 정보가 등록되게 된다.
로그인 API
구현조건
-
아이디, 비밀번호로 로그인을 요청합니다.
-
계정 정보가 일치하지 않을 경우 알맞은 HTTP 상태코드와 에러 메세지를 반환해야 합니다.
- 아이디가 존재하지 않는 경우
- 아이디는 존재하는데 비밀번호가 틀리는 경우
-
로그인 성공 시, 엑세스 토큰을 생성하여 반환합니다.
- 이 때, 엑세스 토큰의 Payload는 로그인 한 계정의 ID를 담고 있어야겠죠?로그인 api도 위 회원가입때와 마찬가지로 joi를 이용해 유효성검사를 먼저 해준다.
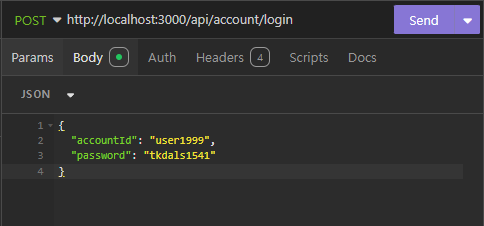
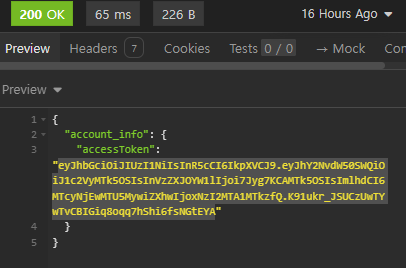
router.post('/account/login', async (req, res) => {
 const loginSchema = joi.object({
   accountId: joi.string().alphanum().lowercase().required(),
   // alphanum = 알파벳과 숫자 구성, lowercase = 소문자
   password: joi.string().min(6).required(),
   // 비밀번호는 최소 6글자 이상
 });

 const validateResult = loginSchema.validate(req.body);
 if (validateResult.error) {
   res.status(400)({ error: '잘못된 요청입니다.' });
   return;
 }

 const inputValue = validateResult.value;
 const accountId = inputValue.accountId;
 const password = inputValue.password;

 const account = await prisma.account.findUnique({ where: { accountId: accountId } });
 if (account == null) {
   res.status(400).json({ error: '계정이 존재하지 않습니다.' });
   return;
 }

 const passwordValidate = await bcrypt.compare(password, account.password); // 입력한 password와 등록된 password 일치 여부 확인
 if (!passwordValidate) {
   res.status(400).json({ error: '비밀번호가 일치하지 않습니다.' });
   return;
 }
// jwt 를 통해 엑세스 토큰을 발급 받자
 const accessToken = jwt.sign(
   { accountId: accountId, userName: account.userName },
   'secretOrPrivateKey',
   { expiresIn: '1h' },
 );

 res.status(200).json({ account_info: { accessToken: accessToken } });
});
export default router;
아까 회원가입한 아이디와 패스워드를 입력 후,
 아래와 같이 엑세스 토큰이 발급되는 모습을 확인 할 수 있다.

TIL