java 기초 문법 강의
반복문
for문
public class Main {
    public static void main(String[] args) {
        int sum = 0;
        for (int i = 0; i < 10; i++) {
            sum += (i + 1);
        }
        System.out.println(sum);
    }
}
:
4번째 줄
int i = 0; : i는 0부터 시작한다, 처음 한번만 적용
i < 10; : i는 10 미만까지 반복, for문 반복하는 조건
i++ : 반복문이 반복될 때 마다 i에 1을 더해준다
5번째 줄
sum += (i + 1); : sum 이라는 변수에 i+1 이라는 값을 더해간다.(i는 0부터 시작하므로 +1이 붙어야 한다)
for - each문
public class Main {
    public static void main(String[] args) {

        String[] days = {"Monday", "Tuesday", "Wednesday", "Thursday", "Friday", "Saturday", "Sunday"};

        for (String day : days) {
            System.out.println(day);
        }
    }
}
:
4번 줄
문자열들을 days라는 변수에 넣는다.
6번 줄
days에 있는 문자열들을 하나씩 day라는 변수에 나열하라
while문
public class Main {
    public static void main(String[] args) {
        int i = 0;
        int sum = 0;
        while (i < 10) {	// i가 10보다 작으면 항상 아래의 구문을 수행
            sum += (i + 1);	// i+1 값을 sum에 더한다
            i++;			// i에 1을 더해준다
        }
        System.out.println(sum);
    }
}
:
코드에 설명
public class Main {
    public static void main(String[] args) {
        int i = 0;
        int sum = 0;
        while (i < 10) {
            sum += (i + 1);
            i++;
            if (i == 5) {
                break;
            }
        }
        System.out.println(sum);
    }
}
: 만약 while문 도중 i가 5가 될 때 멈추고 싶다면 위와 같이 break를 사용한다.
public class Main {
    public static void main(String[] args) {
        int i = 0;
        int sum = 0;
        while (i < 10) {
            if (i == 4) {
                i++;
                continue;
            }
            sum += (i + 1);
            i++;
        }
        System.out.println(sum);
    }
}
: i가 4일 때(5의 값)만 빼고 다 더하고 싶다면
중간에 if문으로 i만 1을 더하고 continue를 사용
do - while문
조건을 확인하지 않고 수행부터 하는 while문
public class Main {
    public static void main(String[] args) {
        int i = 0;
        int sum = 0;
        do {
            sum += (i + 1);
            i++;
        } while (i < 10);
        System.out.println(sum);
    }
}
연습문제 - 1
5초에서부터 카운트다운을 출력해라
public class Main {
    public static void main(String[] args) {
        // 5초부터 시작되는 카운트다운
        for (int i = 5; i >= 0; i--) {
            System.out.println("카운트다운: " + i);
        }
    }
}
:카운트다운: 5
카운트다운: 4
카운트다운: 3
카운트다운: 2
카운트다운: 1
카운트다운: 0
연습문제 - 2
1부터 30까지 의 숫자들 중 홀수와 짝수를 각각 더하고 출력하라.
public class Main {
    public static void main(String[] args) {
        // 1부터 30까지 숫자들 중 홀수와 짝수의 합을 각각 출력
        int sumOdd = 0;
        int sumEven = 0;
        for (int i = 0; i < 30; i++){
            int value = i + 1;
            if (value % 2 == 0){
                sumEven += value;
            }else{
                sumOdd += value;
            }
        }
        System.out.println("odd : " + sumOdd);
        System.out.println("even : " + sumEven);
    }
}
:odd : 225
even : 240
객체지향언어(클래스, 인스턴스, 메소드, 생성자, 상속, 접근제어자, 추상클래스, 인터페이스)
클래스
클래스 : 붕어빵 틀
인스턴스 : 붕어빵, 어떠한 클래스로부터 만들어진 객체를 그 클래스의 인스턴스 라고 한다.
예제 - 클래스,인스턴스
class Phone {
    String model;
    String color;
    int price;
}

public class Main {
    public static void main(String[] args) {
        Phone galaxy = new Phone();
        galaxy.model = "Galaxy10";
        galaxy.color = "Black";
        galaxy.price = 100;

        Phone iphone =new Phone();
        iphone.model = "iPhoneX";
        iphone.color = "Black";
        iphone.price = 200;


        System.out.println("철수는 이번에 " + galaxy.model + galaxy.color + " + 색상을 " + galaxy.price + "만원에 샀다.");
        System.out.println("영희는 이번에 " + iphone.model + iphone.color + " + 색상을 " + iphone.price + "만원에 샀다.");
    }
}
:철수는 이번에 Galaxy10Black + 색상을 100만원에 샀다.
영희는 이번에 iPhoneXBlack + 색상을 200만원에 샀다.
메소드
method : 어떤 작업을 수행하는 코드를 하나로 묶어놓은 것
int add(int x, int y){
	int result = x + y;
	return result;
}
: 첫번째 줄
int는 결과값이 전달되는 type(return type)
(int x, int y)는 parameter라고 하며, type과 변수이름으로 구성된다.
두번째 줄
result라는 변수 x + y 매개변수의 값을 수행한다.
세번째 줄
return은 int라는 type에 맞게 실제로 넘겨준 값이 어떤 것인지 쓴다. 특정 값을 넣으면 그 값을 반환할수도있다.
예제 - 메소드
class Calculation {             // 계산 기능을 넣기 위한 클래스를 만든다.
    int add(int x, int y) {
        return x + y;           // add에서 x,y는 +기를 수행
    }

    int subtract(int x, int y) { // 여기서의 x,y는 위에 더하기에서 x,y와 다르다.
        return x - y;           // subtract에서 x,y는 -를 수행
    }
}

public class Main {
    public static void main(String[] args) {
        Calculation calculation = new Calculation();    // new라는 키워드를 통해 클래스의 인스턴스를 생성
        int addResult = calculation.add(1, 2);
        int substractResult = calculation.subtract(5, 3);

        System.out.println(addResult);
        System.out.println(substractResult);
    }
}
:3
2
생성자
method의 일종으로, (new 라는 키워드로) 클래스의 인스턴스가 생성 될 때 불리는 초기화 method.
생성자는 인스턴스가 생성될 때 사용되는 '인스턴스 초기화 메소드'
생성자의 이름은 클래스의 이름과 똑같이 지어줘야 한다.
return값이 없다.
생성자를 자동으로 작성하는 방법 :
commend + N 을 누른 후 생성하고자 하는 변수를 선택하고 확인을 누르면 자동으로 작성 완료. 인텔리제이 기능.
class Phone {
    String model;
    String color;
    int price;

// 'commend + N' -> constructor -> 선택 후 확인 하면 자동으로 작성됨
    Phone (String model, String color, int price){  // model, color, price를 모두 세팅할 수 있는 constructor를 만든다
        this.model = model;     // 2번 줄에 있는 모델이라는 변수에 6번 줄에 있는 파라미터로 받은 모델을 할당하겠다.
        this.color = color;
        this.price = price;
    }
}

public class Main {
    public static void main(String[] args) {
        Phone galaxy = new Phone("galaxy10", "black", 100);

        Phone iphone =new Phone("iphoneX", "black", 200);

        System.out.println("철수는 이번에 " + galaxy.model + galaxy.color + " + 색상을 " + galaxy.price + "만원에 샀다.");
        System.out.println("영희는 이번에 " + iphone.model + iphone.color + " + 색상을 " + iphone.price + "만원에 샀다.");
    }
}
:
생성자로 아무 값도 입력하지 않았다면 instance는 member 변수의 기본값을 갖게 된다.
class DefaultValueTest {
    byte byteDefaultValue;
    int intDefaultValue;
    short shortDefaultValue;
    long longDefaultValue;
    float floatDefaultValue;
    double doubleDefaultValue;
    boolean booleanDefaultValue;
    String referenceDefaultValue;
}

public class Main {
    public static void main(String[] args) {
        DefaultValueTest defaultValueTest = new DefaultValueTest();
        System.out.println("byte default: " + defaultValueTest.byteDefaultValue);
        System.out.println("short default: " + defaultValueTest.shortDefaultValue);
        System.out.println("int default: " + defaultValueTest.intDefaultValue);
        System.out.println("long default: " + defaultValueTest.longDefaultValue);
        System.out.println("float default: " + defaultValueTest.floatDefaultValue);
        System.out.println("double default: " + defaultValueTest.doubleDefaultValue);
        System.out.println("boolean default: " + defaultValueTest.booleanDefaultValue);
        System.out.println("reference default: " + defaultValueTest.referenceDefaultValue);
    }
}
:
byte default: 0
short default: 0
int default: 0
long default: 0
float default: 0.0
double default: 0.0
boolean default: false
reference default: null
class 에 선언된 변수는 instance 가 생성될 때 값이 초기화(initialize)됩니다. 이 때, 변수의 선언부나 생성자를 통해서 초기화를 해주지 않는다면, 기본값(default value)를 가집니다.
상속
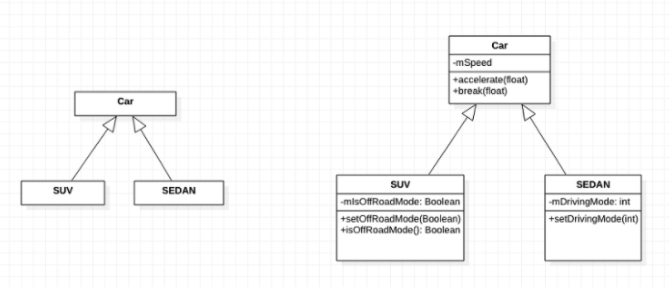
→ 상속을 보여주는 UML Class Diagram입니다. 자동차의 하위 계층으로 SUV와 SEDAN이 존재합니다.
상속이란 기존의 클래스를 재사용하는 방식 중의 하나입니다.한 번 작성한 코드가 재사용이 필요하다면, 변경사항만 코드로 작성하므로 상대적으로 적은 양의 코드를 작성할 수 있게 됩니다. 이렇게 코드를 재사용하면, 코드와 클래스가 많아질수록 관리가 용이하다는 장점이 있습니다.
- 상속의 특징
- 부모 클래스로에서 정의된 필드와 메소드를 물려 받습니다.
- 새로운 필드와 메소드를 추가할 수 있습니다.
- 부모 클래스스에서 물려받은 메소드를 수정할 수 있습니다.
class Animal{}
class Dog extends Animal{} // dog는 animal의 extends 라는 키워드를 통해 상속받는다.
class Cat extends Animal{} // cat은 animal의 extends 라는 키워드를 통해 상속받는다.
예제
class Animal{
    String name;

    public void cry(){
        System.out.println(name + " is crying.");
    }
}

class Dog extends Animal{
    Dog(String name){
        this.name = name;
    }

    public void swim(){
        System.out.println(name + " is swimming.");
    }
}


public class Main {
    public static void main(String[] args) {
        Dog dog = new Dog("코코");
        dog.cry();
        dog.swim();

        Animal dog2 = new Dog("미미");
        dog2.cry();
//        dog2.swim();	<- 애니멀에 상속받은 도그1에는 swim이 있지만, 그냥 애니멀에는 swim이 없으므로 에러가 발생
    }
}
오버로딩(overloading)
한 클래스 내에 동일한 이름의 메소드를 여러개 정의하는 것
- 오버로딩의 조건
→ 메소드 이름이 동일해야 합니다.
→ 매개변수의 개수 혹은 타입이 달라야 합니다.
예제
public class Main {
    public static void main(String[] args) {
        // write your code here

    }

    int add(int x, int y, int z){
        return x+y+z;
    }

    long add(int a, int b, int c){
        return a+b+c;
    }
}
:
// int와 long(return type)이 다르므로 overloading으로 치지 않는다.
public class Main {
    public static void main(String[] args) {
        // write your code here

    }

    int add(int x, int y, int z){
        return x+y+z;
    }

    int add(int a, int b){
        return a+b;
    }
}
: 이름과 매개변수의 개수가 다르기 때문에 overloading에 해당된다.
오버라이딩(overriding)
부모 클래스로부터 상속받은 메소드의 내용을 변경하는 것
상속받은 메소드를 그대로 사용하기도 하지만, 필요에 의해 변경해야할 경우 오버라이딩을 합니다.
- 오버라이딩의 조건
→ 부모 클래스의 메소드와 이름이 같아야 합니다.
→ 부모 클래스의 메소드와 매겨변수가 같아야 합니다.
→ 부모 클래스의 메소드와 반환타입이 같아야 합니다.
예제
class Animal{
    String name;
    String color;

    public Animal(String name, String color) {
        this.name = name;
        this.color = color;
    }

    public void cry(){
        System.out.println(name + " is crying.");
    }
}

class Dog extends Animal {
    public Dog(String name, String color) {
        super(name, color);
    }

    @Override	// 오버라이딩 했다는 표시
    public void cry(){
        System.out.println(name + " is barking.");
    }
}

public class Main {
    public static void main(String[] args) {
        // write your code here
        Animal dog = new Dog("코코", "brown");
        dog.cry();
    }
}
: 코코 is barking.
barking으로 overriding을 했기 때문에 출력값에 crying은 반환되지 않는다.
오버로딩 & 로버라이딩
두 가지 개념을 혼동하기 쉽지만 차이는 명백히 존재합니다.
오버로딩 : 기존에 없는 새로운 메소드를 정의하는 것
오버라이딩 : 상속받은 메소드의 내용을 변경하는 것