1. 도커의 설치와 실행
설치를 완료하면 이제 간단한 컨테이너를 구동해보자.
docker run --env POSTGRES_PASSWORD=ansadmin --publish 5432:5432 postgres:15.7-alpine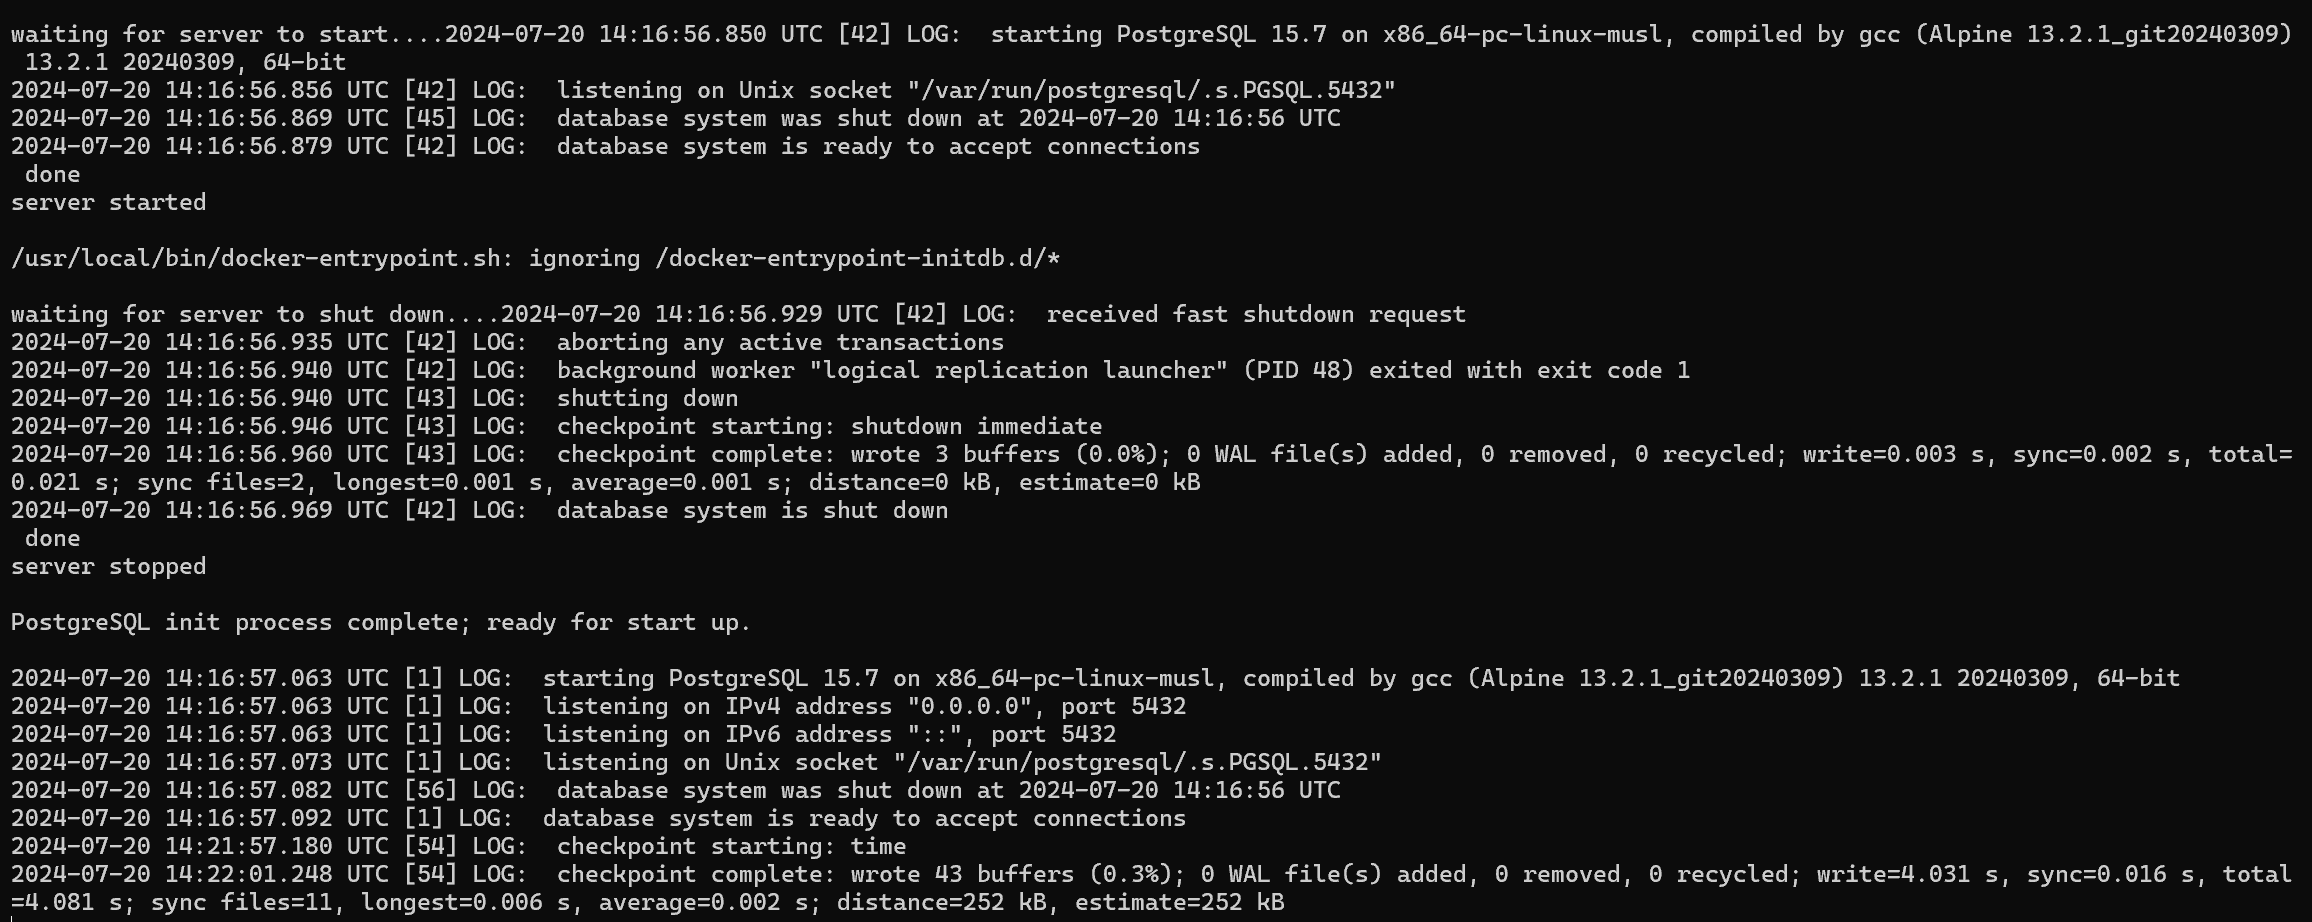

컨테이너 작동이 잘 된다....!
 pgAdmin4 서버 connection에서도 연결이 된다...!
2. 서드파티 컨테이너 사용
데이터의 지속성
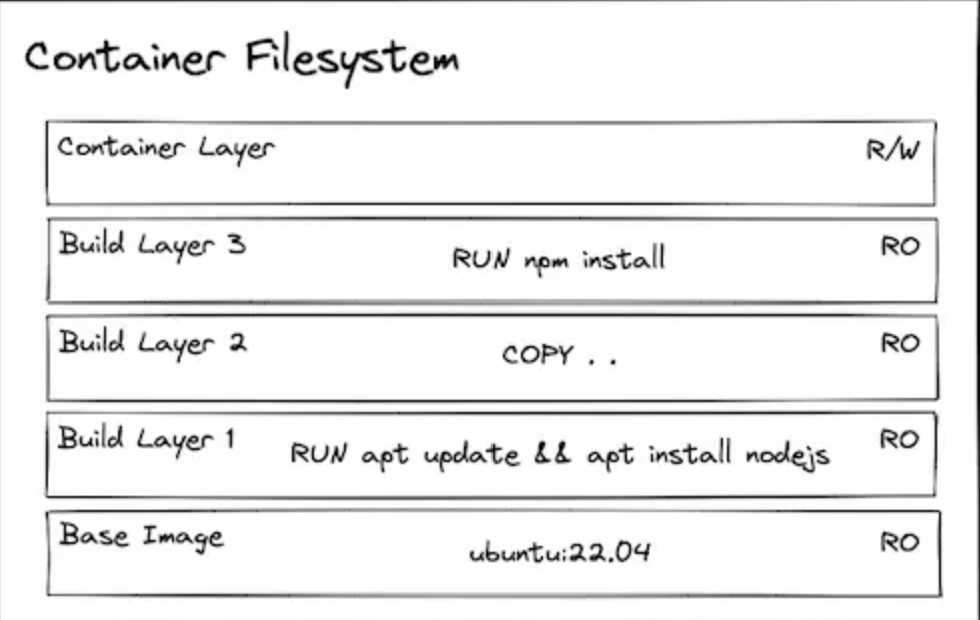
우리가 컨테이너 이미지로 부터 컨테이너를 만들떄, 이미지에 있는 모든것은 read-only로 취급된다. 그리고 맨위에 새로운 layer가 read/wirte로 쒸워진다.
dependency 설치 데이터 보존
이제 컨테이너가 runtime할때 무언가를 설치하는 방법에 대해서 실습을 해보자. 물론 컨테이너가 실행될때 content를 수정하는 것은 주된 행동은 아니지만 학습 목적으로 해보자
# 우분투 이미지로부터 컨태이너 만들기
docker run --interactive --tty --rm ubuntu:22.04
-it (또는 --interactive와 --tty): 컨테이너와 상호 작용하는 대화형 모드로 컨테이너 내부의 터미널에 접속할수 있음. 이 옵션을 사용하면 컨테이너 내부에서 명령어를 실행하고 터미널 세션을 유지가능할 수 있게 해준다.
--rm 옵션은 컨테이너를 일회성으로 실행할 때 주로 쓰이는데 컨테이너가 종료될 때 컨테이너와 관련된 리소스(파일 시스템, 볼륨)까지 깨끗이 제거해준다.
# ping 설치
apt update
apt install iputils-ping --yes
# google.comd에 ping 시도
ping google.com -c 1
이제 다시 시도 해보자.
docker run --interactive --tty --rm ubuntu:22.04
ping google.com -c 1
위에 코드가 될지 안될지 데이터의 지속성에 대해 생각하면서 추측해보자.
.
.
.
.
.
.
.
.
.
답은 당연히 실행이 안된다. 이미지를 삭제하는 순간 원래 있는 데이터는 모조리 날라간다. 그렇다면 데이터를 유지하고 싶다면 어떻게 해결 할 수 있을까?
# 우분투 이미지로부터 컨테이너 생성 (--rm flag 없이)
docker run -it --name my-ubuntu-container ubuntu:22.04
핑을 설치하고 다시 exit 해보자
# Install & use ping
apt update
apt install iputils-ping --yes
ping google.com -c 1
exit
docker ps -a를 통해확인해보니 컨테이너는 stopped 되긴 했지만, 아직 read/write 영역에 존재하고 있는것으 알 수 있다. 다시 컨테이너를 시작해서 ping명령어를 실행해보자
# Restart the container and attach to running shell
docker start my-ubuntu-container
docker attach my-ubuntu-container
# Test ping
ping google.com -c 1 # 성공! 🎉
exit근데 사실 우리가 원하는건 이런식으로 데이터를 보존하는 것이 아니라 아예 처음부터 이미지 자체에 데이터들이 포함되는 것을 원한다. 즉 우리는 dependency가 포함된 우리만의 이미지를 만들어야한다.
# Build a container image with ubuntu image as base and ping installed
docker build --tag my-ubuntu-image -<<EOF
FROM ubuntu:22.04
RUN apt update && apt install iputils-ping --yes
EOF

# Run a container based on that image
docker run -it --rm my-ubuntu-image

# Confirm that ping was pre-installed
ping google.com -c 1 # Success! 🥳
애플리케이션에서 생성된 지속 데이터

이번에는 어플리케이션에 의해 데이터를 보존하는 실습을 해보자.
# 콘테이너 생성
docker run -it --rm ubuntu:22.04

# 디렉토리를 만드고 파일을 그 안에 저장
mkdir my-data
echo "Hello from the container!" > /my-data/hello.txt

# 파일 확인
cat my-data/hello.txt
exit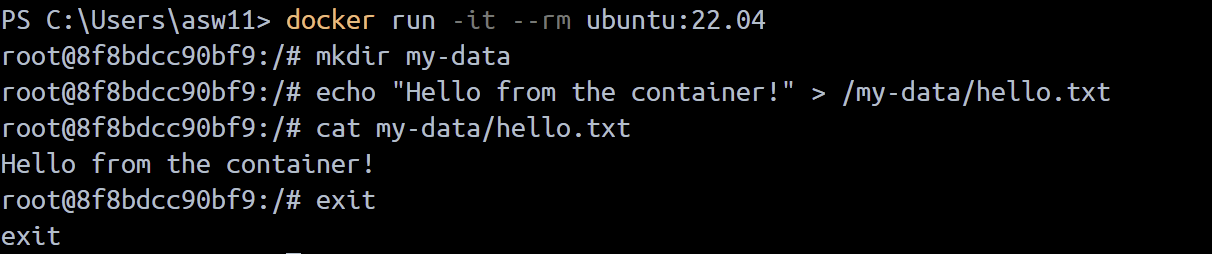
# 우분투 이미지로 부터 콘테이너 생성
docker run -it --rm ubuntu:22.04

# 파일이 아직 남아있는지 확인
cat my-data/hello.txt # Produces error: `cat: my-data/hello.txt: No such file or directory`
짐작했듯이, 새 컨테이너를 만드는 순간 데이터가 싹 날아간다
이를 방지 하기 위해서 volume을 이용해보자.
- 볼륨 마운트
# 이름을 지정한 볼륨 생성
docker volume create my-volume

# 콘테이너를 생성하고 아까 생성한 볼륨을 콘테이너 파일 시스템에 마운트
docker run  -it --rm --mount source=my-volume,destination=/my-data/ ubuntu:22.04

# 의 명령으로도 같은 작업을 실행할 수 있음.
docker run  -it --rm -v my-volume:/my-data ubuntu:22.04

# 이제 마운트한 볼륨에 파일을 저장 할 수 있음.
echo "Hello from the container!" > /my-data/hello.txt
cat my-data/hello.txt
exit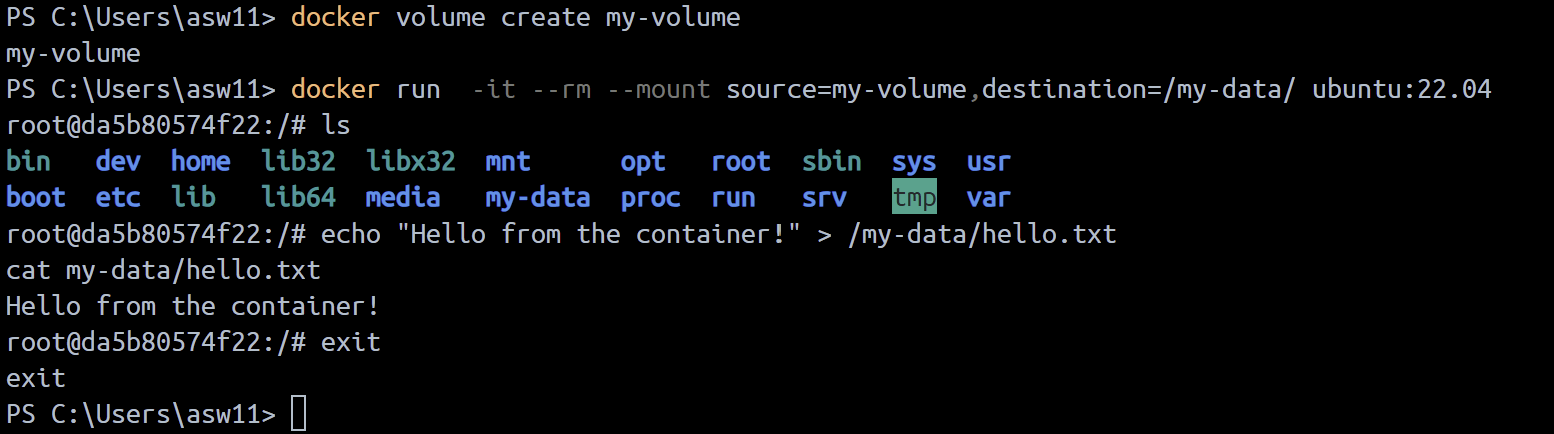
# 원래 컨테이너를 지우가 다른 컨테이너를 다시 생성한후 다시 mount
docker run  -it --rm --mount source=my-volume,destination=/my-data/ ubuntu:22.04
cat my-data/hello.txt # This time it succeeds!
exit
컨테이너를 지웠다가 다시 만들어지만 외부에 있는 볼륨이 마운트 되니까 파일은 그대로다!!!
그렇다면 대체 이 데이터와 볼륨은 어디에 위치 하고 있는걸까?
리눅스 같은 경우, /var/lib/docker/volumes에 위치하고 있지만, 나같은 윈도우나 맥에서 도커 데스크탑을 사용하고 있는 사람들은 Docker가 리눅스 가상 머신안에서 만든다.
VM안에서 파일 시스템을 볼 수 있는 방법중에서 하나는 우리에게 PID 1의 네임스페이스 내에서 컨테이너를 만들수 있도록 허락해주는 justincormat에 의해 생성되는 컨테이너 이미지를 사용하는 것이다.
# 도커 리눅스 vm에 접속할 수 있는 컨테이너 생성
# Pinning to the image hash ensures it is this SPECIFIC image and not an updated one helps minimize the potential of a supply chain attack
docker run -it --rm --privileged --pid=host justincormack/nsenter1@sha256:5af0be5e42ebd55eea2c593e4622f810065c3f45bb805eaacf43f08f3d06ffd8
# 내 볼륨이 존재하는곳으로:
ls /var/lib/docker/volumes/my-volume/_data
cat /var/lib/docker/volumes/my-volume/_data/hello.txt 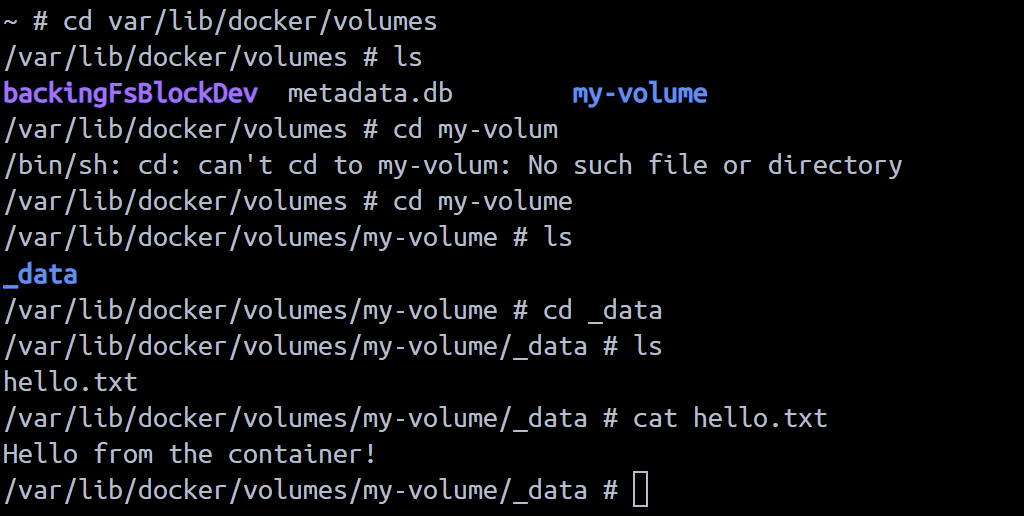 내 볼륨이 잘 존재하고 있다....!
이러한 접근방식은 프로그램이 데이터를 유지하려고 알려진 경로에 위치하고 있는 볼륨을 마운트 하는데에 사용 할 수 있다.
#postgres 컨테이너 이미지로부터  컨테이너를 만들고, pgdata라고 알려진 볼륨을 알려진 저장 장소로 사용하기 위해 마운트
docker run -it --rm -v pgdata:/var/lib/postgresql/data -e POSTGRES_PASSWORD=foobarbaz postgres:15.1-alpine
- 바인드 마운트
# host filesystem에서 컨테이너로 디렉토리를 마운트하는 컨테이너를 생성
docker run  -it --rm --mount type=bind,source="${PWD}"/my-data,destination=/my-data ubuntu:22.04
# 위의 작업과 같은 명령을 해주는 코드
docker run  -it --rm -v ${PWD}/my-data:/my-data ubuntu:22.04

echo "Hello from the container!" > /my-data/hello.txt

# 내 host 파일 시스템에서도 hello.txt를 확인 할 수 있음.
cat my-data/hello.txt
exit
저장되는 데이터를 쉽게 확인하고 싶다면 바인드 마운트가 좋을 수 있지만 링크에 볼륨이 선호되는 여러 가지 이유가 설명되어 있습니다(Windows나 맥에서 Docker Desktop을 실행하는 경우 속도 문제 등)
Using 3rd Party Containers
지금까지 데이터 스토리지가 어떻게 작동하는지 알아봤다. 이제 3rd party 컨테이가 구동되는 다양한 usecase 예시를 알아보자...!
databases, interactive test environments, and CLI utilities.
1. Databases
데이터베이스는 설치와 설정이 계속 변하는 것으로 악명이 높다.
데이터 베이스들의 지침은 복잡하고 버전과 운영체제 별로 상당히 다르다.
개발을 진행할 경우 단일 데이터베이스의 여러 버전을 실행해야 하거나 컨테이너에서 실행되는 테스트 목적으로 새로운 데이터베이스를 생성해야 하는것이 큰 도움이 될 수 있다.
설정과 설치가 컨테이너 이미지에의새 조작되므로, 내가 제공해야 할것은 그냥 몇가지의 설정값 뿐이다. 데이터베이스의 버전을 바꾸려면 그냥 이미지의 tag값을 바꿔주면된다.(e.g. postgres:14.6 vs postgres:15.1 ).
컨테이너에서 데이터 베이스를 구동하는데에 중요한 몇가지 사항들이있다.
- 데이터를 보존하기 위해 볼륨사용
- 추가적인 설정을 위해서 bind mount 사용
- 환경 변수 설정
Postgres
docker run -d --rm \
  -v pgdata:/var/lib/postgresql/data \
  -e POSTGRES_PASSWORD=foobarbaz \
  -p 5432:5432 \
  postgres:15.1-alpine

# With custom postresql.conf file
docker run -d --rm \
  -v pgdata:/var/lib/postgresql/data \
  -v ${PWD}/postgres.conf:/etc/postgresql/postgresql.conf \
  -e POSTGRES_PASSWORD=foobarbaz \
  -p 5432:5432 \
  postgres:15.1-alpine -c 'config_file=/etc/postgresql/postgresql.conf'
Mongo
docker run -d --rm \
  -v mongodata:/data/db \
  -e MONGO_INITDB_ROOT_USERNAME=root \
  -e MONGO_INITDB_ROOT_PASSWORD=foobarbaz \
  -p 27017:27017 \
  mongo:6.0.4

# With custom mongod.conf file
docker run -d --rm \
  -v mongodata:/data/db \
  -v ${PWD}/mongod.conf:/etc/mongod.conf \
  -e MONGO_INITDB_ROOT_USERNAME=root \
  -e MONGO_INITDB_ROOT_PASSWORD=foobarbaz \
  -p 27017:27017 \
  mongo:6.0.4 --config /etc/mongod.conf
Redis
docker run -d --rm \
  -v redisdata:/data \
  redis:7.0.8-alpine

# With custom redis.conf file
docker run -d --rm \
  -v redisdata:/data \
  -v ${PWD}/redis.conf:/usr/local/etc/redis/redis.conf \
  redis:7.0.8-alpine redis-server /usr/local/etc/redis/redis.conf
MySQL
docker run -d --rm \
  -v mysqldata:/var/lib/mysql \
  -e MYSQL_ROOT_PASSWORD=foobarbaz \
  mysql:8.0.32

# With custom conf.d
docker run -d --rm \
  -v mysqldata:/var/lib/mysql \
  -v ${PWD}/conf.d:/etc/mysql/conf.d \
  -e MYSQL_ROOT_PASSWORD=foobarbaz \
  mysql:8.0.32
Elasticsearch
docker run -d --rm \
  -v elasticsearchdata:/usr/share/elasticsearch/data
  -e ELASTIC_PASSWORD=foobarbaz \
  -e "discovery.type=single-node" \
  -p 9200:9200 \
  -p 9300:9300 \
  elasticsearch:8.6.0
Neo4j
docker run -d --rm \
    -v=neo4jdata:/data \
    -e NEO4J_AUTH=neo4j/foobarbaz \
    -p 7474:7474 \
    -p 7687:7687 \
    neo4j:5.4.0-community
2. Interactive Test Environments
Operating systems
# https://hub.docker.com/_/ubuntu
docker run -it --rm ubuntu:22.04

# https://hub.docker.com/_/debian
docker run -it --rm debian:bullseye-slim

# https://hub.docker.com/_/alpine
docker run -it --rm alpine:3.17.1

# https://hub.docker.com/_/busybox
docker run -it --rm busybox:1.36.0 # small image with lots of useful utilities
Programming runtimes
# https://hub.docker.com/_/python
docker run -it --rm python:3.11.1

# https://hub.docker.com/_/node
docker run -it --rm node:18.13.0

# https://hub.docker.com/_/php
docker run -it --rm php:8.1

# https://hub.docker.com/_/ruby
docker run -it --rm ruby:alpine3.17
3. CLI Utilities
가끔 특정한 유틸리티가 현재 내 시스템에 설치되어있지 않거나, 버전별로 큰차이가 있는 경우, 호스트에 아무것도 설치할 필요 없이 컨테이너 안에서 특정한 버전의 유틸리티를 구동 할 수 있다.
jq (json command line utility)
docker run -i stedolan/jq <sample-data/test.json '.key_1 + .key_2'
yq (yaml command line utility)
docker run -i mikefarah/yq <sample-data/test.yaml '.key_1 + .key_2'
sed
docker run -i --rm busybox:1.36.0 sed 's/file./file!/g' <sample-data/test.txt
base64
# Pipe input from previous command
echo "This string is just long enough to trigger a line break in GNU base64." | docker run -i --rm busybox:1.36.0 base64

# Read input from file
docker run -i --rm busybox:1.36.0 base64 </sample-data/test.txt
Amazon Web Services CLI
docker run --rm -v ~/.aws:/root/.aws amazon/aws-cli:2.9.18 s3 ls
Google Cloud Platform CLI
# Bind mount the credentials into the container
docker run --rm -v ~/.config/gcloud:/root/.config/gcloud gcr.io/google.com/cloudsdktool/google-cloud-cli:415.0.0 gsutil ls
# Why is the container image so big 😭?! 2.8GB
3. Improving the Ergonomics
만약 너가 이러한 유틸리티를 컨테이너 안에서 자주 사용할 계획이 있다면 쉘 기능이나 alia를 사용하여 프로그램이 내 호스트 안에 설치되어있는듯한 느낌을 주도록 설계하는것이 효율적이다....!
Here are examples of this for yq:
# Shell function
yq-shell-function() {
  docker run --rm -i -v ${PWD}:/workdir mikefarah/yq "$@"
}
yq-shell-function <sample-data/test.yaml '.key_1 + .key_2'

---

# Alias
alias 'yq-alias=docker run --rm -i -v ${PWD}:/workdir mikefarah/yq'
yq-alias <sample-data/test.yaml '.key_1 + .key_2'