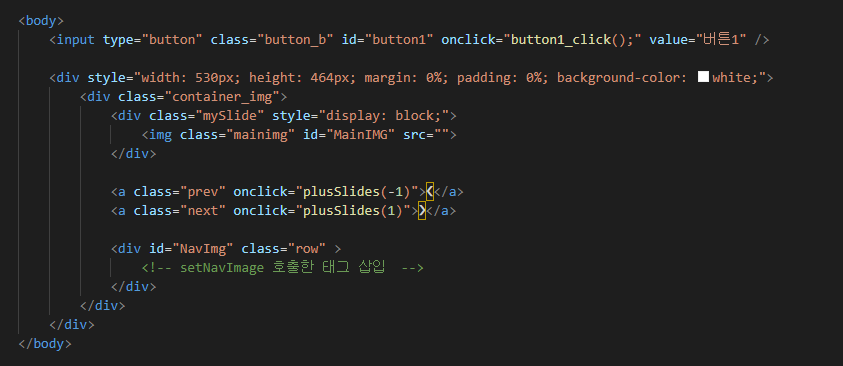
Slideshow Gallery1을 컴포넌트화 시켜서 자바스크립트만 호출해서 사용할 수 있게 제작했다.
https://codepen.io/garam-leee/pen/popPwyWHTML
// 이전 게시글인 Slideshow Gallery1 보다 훨씬 간결한 코드를 볼 수 있다.
// 메인 이미지는 서브이미지 주소만 받아와서 보여준다
JAVASCRIPT
init()
var totalLen = 0;
var slideIndex = 1;
var moveDistance = 80;
var arrPath = [];

window.onload = function () {
    init();
};

function init() {
    console.log('초기화');
    slideIndex = 1;
    arrPath = [];
}
// 윈도우를 실행하면 초기화를 한다.
button1_click()
function button1_click() {
    init();

    var strPath  = "https://via.placeholder.com/400x300/a5b9e6/000000/?text=Temporary+Image,";
        strPath += "https://via.placeholder.com/500x300/a5b9e6/000000/?text=Temporary+Image,";
        strPath += "https://via.placeholder.com/300x200/a5b9e6/000000/?text=Temporary+Image,";
        strPath += "https://via.placeholder.com/300x500/a5b9e6/000000/?text=Temporary+Image,";
        strPath += "https://via.placeholder.com/350x170/a5b9e6/000000/?text=Temporary+Image,";
        strPath += "https://via.placeholder.com/300x300/a5b9e6/000000/?text=Temporary+Image";

    var strIndex = "1,2,3,4,5,6";
    setNavImage(strPath, strIndex);
    showSlides(slideIndex);
}
// strIndex: 이미지 번호
// 값을 담아서 setNavImage와 showSlides에 전송해준다
setNavImage()
function setNavImage(strPath, strIndex) {
    var aPath = strPath.split(',');
    arrPath = aPath;

    var aIndex = strIndex.split(',');

    var tagStr = "";

    totalLen = aPath.length;
    for (var i = 0; i < totalLen; i++) {
        tagStr += '<div class="columnex"> <img class="demo " src="' + aPath[i] + '"token operator">+ aIndex[i] + ')"> </div>\n';
    }

    var navImg = document.getElementById("NavImg");
    navImg.innerHTML = tagStr;
}
// for문을 사용해서 이미지 주소가 끝날때까지 html을 생성하여 tagStr에 담는다.
// 서브 이미지 HTML을 구현한 뒤 tagStr에 저장하고 .innerHTML을 사용해서 삽입한다.
showSlides();
function showSlides(n) {
    var dots = document.getElementsByClassName("demo");

    for (var i = 0; i < dots.length; i++) {
        dots[i].className = dots[i].className.replace(" active", "");
    }

    dots[slideIndex - 1].className += " active";

    x = dots[slideIndex - 1].src
    document.getElementById("MainIMG").src = x;
}
// 활성화 되어있는 이미지 src를 메인 이미지로 넘겨준다
plusSlides()
function plusSlides(n) {
    if (n > 0) {
        slideIndex += 1;
        if (slideIndex > totalLen) {
            slideIndex = 1;
        }
    } else {
        slideIndex -= 1;
        if (slideIndex < 1) {
            slideIndex = totalLen;
        }
    }

    showSlides(slideIndex);

    if (n > 0) {
        var _scrollX = $('.row').scrollLeft();
        $('.row').scrollLeft(_scrollX + moveDistance);
    } else {
        var _scrollX = $('.row').scrollLeft();
        $('.row').scrollLeft(_scrollX - moveDistance);
    }
}
// 버튼에 따라서 스크롤바를 조정해준다
currentSlide()
function currentSlide(n) {
    slideIndex = n;
    showSlides(slideIndex);
}CSS
    /* 이미지 컨테이너를 배치합니다(왼쪽 및 오른쪽 화살표를 배치하는 데 필요). */
    .container_img {
        position: relative;
        padding:  20px;
        border: 1px solid #000;
        background-color: #f0f0f0;
        width: 488px;
        height: 422px;

    }

    /* 기본적으로 이미지 숨기기 */
    .mySlide {
        display: none;
        background-color: rgb(255, 255, 255);
        text-align : center;
        overflow: hidden;
        height: 293px;
        width: 486px;
        margin-bottom: 20px;
    }

    .mainimg{
        width: 100%;
        height: 100%;
        object-fit: contain;
    }


    /* 다음 및 이전 버튼 */
    .prev,
    .next {
        cursor: pointer;
        position: absolute;
        top: 29%;
        width: 48px;
        font-weight: bold;
        font-size: 50px;
    }

    /* '다음 버튼'을 오른쪽에 배치합니다*/
    .next {
        right: 0;
        border-radius: 3px 0 0 3px;
    }

    /* 호버 위에 검은색 배경색 추가 */
    .prev:hover,
    .next:hover {
        color: rgba(0, 0, 0, 0.8);
    }
    .row{
        width: 486px;
        height: 109px;
        object-fit: contain;
        overflow-y: hidden;
        display: flex;
        flex-direction: row;
        flex-wrap: nowrap;
        background-color: white;
    }

    .row:after {
        content: "";
        display: table;
        clear: both;
    }

    .column {
        float: left;
        width: 100px;
    }

    .column img{
        width: 100px;
        height: 100px;
        object-fit: contain;
        background: rgb(255, 255, 255);
    }

    /* Thumnbail 이미지에 투명 효과 추가 */
    .demo {
        width: 100px;
        height: 100px;
        object-fit: contain;
        background: rgb(255, 255, 255);
        opacity: 0.4;
        cursor: pointer;
    }

    .active,
    .demo:hover {
        opacity: 1;
    }


    ::-webkit-scrollbar {
        height:  8px;
    }

    ::-webkit-scrollbar-track {
        box-shadow: inset 0 0 2px grey;
    }
    ::-webkit-scrollbar-thumb {
        background: #A2CAD8;
    }

    .button_b{
        width: 70px;
        height: 30px;
        background-color: aliceblue;
        color: #1a5663;
        position: relative;
        border: none;
        display: inline-block;
        font-family: "paybooc-Light", sans-serif;
        text-decoration: none;
        font-weight: 600;
        margin: 5px;
        border: 3px solid #ff5f2eaf;

    }
- 끝 -