스파르타 Java 단기 심화 과정
코드카타
프로그래머스 86491 최소직사각형
https://school.programmers.co.kr/learn/courses/30/lessons/86491
— 문제 설명
명함 지갑을 만드는 회사에서 지갑의 크기를 정하려고 합니다. 다양한 모양과 크기의 명함들을 모두 수납할 수 있으면서, 작아서 들고 다니기 편한 지갑을 만들어야 합니다. 이러한 요건을 만족하는 지갑을 만들기 위해 디자인팀은 모든 명함의 가로 길이와 세로 길이를 조사했습니다.
아래 표는 4가지 명함의 가로 길이와 세로 길이를 나타냅니다.
| 명함 번호 | 가로 길이 | 세로 길이 |
|---|---|---|
| 1 | 60 | 50 |
| 2 | 30 | 70 |
| 3 | 60 | 30 |
| 4 | 80 | 40 |
가장 긴 가로 길이와 세로 길이가 각각 80, 70이기 때문에 80(가로) x 70(세로) 크기의 지갑을 만들면 모든 명함들을 수납할 수 있습니다. 하지만 2번 명함을 가로로 눕혀 수납한다면 80(가로) x 50(세로) 크기의 지갑으로 모든 명함들을 수납할 수 있습니다. 이때의 지갑 크기는 4000(=80 x 50)입니다.
모든 명함의 가로 길이와 세로 길이를 나타내는 2차원 배열 sizes가 매개변수로 주어집니다. 모든 명함을 수납할 수 있는 가장 작은 지갑을 만들 때, 지갑의 크기를 return 하도록 solution 함수를 완성해주세요.
— 제한 조건
- sizes의 길이는 1 이상 10,000 이하입니다.
- sizes의 원소는 [w, h] 형식입니다.
- w는 명함의 가로 길이를 나타냅니다.
- h는 명함의 세로 길이를 나타냅니다.
- w와 h는 1 이상 1,000 이하인 자연수입니다.
— 입출력 예
| sizes | result |
|---|---|
| [[60, 50], [30, 70], [60, 30], [80, 40]] | 4000 |
| [[10, 7], [12, 3], [8, 15], [14, 7], [5, 15]] | 120 |
| [[14, 4], [19, 6], [6, 16], [18, 7], [7, 11]] | 133 |
입출력 예 #1
문제 예시와 같습니다.
입출력 예 #2
명함들을 적절히 회전시켜 겹쳤을 때, 3번째 명함(가로: 8, 세로: 15)이 다른 모든 명함보다 크기가 큽니다. 따라서 지갑의 크기는 3번째 명함의 크기와 같으며, 120(=8 x 15)을 return 합니다.
입출력 예 #3
명함들을 적절히 회전시켜 겹쳤을 때, 모든 명함을 포함하는 가장 작은 지갑의 크기는 133(=19 x 7)입니다.
— 문제 풀이
import java.util.*;

class Solution {
    public int solution(int[][] sizes) {

        int w = 0;
        int h = 0;

        for(int i=0;i<sizes.length;i++){
            w = Math.max(w, Math.max(sizes[i][0],sizes[i][1]));
            h = Math.max(h, Math.min(sizes[i][0],sizes[i][1]));
        }

        return w*h;
    }
}
프로그래머스 12926 시저 암호
https://school.programmers.co.kr/learn/courses/30/lessons/12926
— 문제 설명
어떤 문장의 각 알파벳을 일정한 거리만큼 밀어서 다른 알파벳으로 바꾸는 암호화 방식을 시저 암호라고 합니다. 예를 들어 "AB"는 1만큼 밀면 "BC"가 되고, 3만큼 밀면 "DE"가 됩니다. "z"는 1만큼 밀면 "a"가 됩니다. 문자열 s와 거리 n을 입력받아 s를 n만큼 민 암호문을 만드는 함수, solution을 완성해 보세요.
— 제한 조건
- 공백은 아무리 밀어도 공백입니다.
- s는 알파벳 소문자, 대문자, 공백으로만 이루어져 있습니다.
- s의 길이는 8000이하입니다.
- n은 1 이상, 25이하인 자연수입니다.
— 입출력 예
| s | n | result |
|---|---|---|
| "AB" | 1 | "BC" |
| "z" | 1 | "a" |
| "a B z" | 4 | "e F d" |
— 문제 풀이
class Solution {
    public String solution(String s, int n) {
        int a = (int)'a';
        int A = (int)'A';
        for(int i=0;i<s.length();i++){
            if(s.charAt(i)==' ')continue;
            int cur = (int)s.charAt(i);
            if(cur>=a){
                cur = ((cur-a)+n)%26 + a;
            }else {
                cur = ((cur-A)+n)%26 + A;
            }
            s = s.substring(0,i) + (char)cur + s.substring(i+1);
        }
        String answer = s;
        return answer;
    }
}
서비스 디스커버리 - Eureka
서비스 디스커버리란?
- 서비스 디스커버리는 MSA에서 각 서비스의 위치를 동적으로 관리하고 찾아주는 기능
- 각 서비스는 등록 서버에 자신의 위치를 등록하고, 다른 서비스는 이를 조회하여 통신
- 주요 기능 : 서비스 등록, 서비스 조회, 헬스 체크 등
Eureka란?
- 넷플릭스가 개발한 서비스 디스커버리 서버
- 모든 서비스 인스턴스의 위치를 저장하는 중앙 저장소 역할을 하고, 서비스 인스턴스의 상태를 주기적으로 확인하여 가용성을 보장
- 여러 인스턴스를 지원하여 고가용성을 유지할 수 있음
서비스 등록
- 각 서비스 App은 Eureka 서버에 자신의 위치를 등록
- spring-cloud-starter-netflix-eureka-client 의존성 사용
- App 이름 설정 필수 (ex) spring.application.name=spring-app)
서비스 디스커버리
- 클라이언트 App은 Eureka 서버에서 필요한 서비스의 위치를 조회
- RestTemplate을 사용하는 경우
- 클라이언트 App은 Eureka 서버에서 필요한 서비스의 위치를 조회
- SpringBootApplication에서 @LoadBalanced 어노테이션을 사용하여 RestTemplate에 로드 밸런싱 기능을 추가
- FeignClient를 사용하는 경우
- 클라이언트 App은 Eureka 서버에서 필요한 서비스의 위치를 조회
- SpringBootApplication에서 @EnableFeignClients 어노테이션을 사용하여 FeignClent 활성화
헬스 체크 및 장애 처리
- 헬스 체크
- Eureka 서버가 주기적으로 서비스 인스턴스의 상태를 확인하여 가용성을 유지
- 기본 헬스 체크 엔드포인트 /actuator/health 를 사용
- 장애 처리
- 서비스 장애 시 Eureka 서버는 해당 인스턴스를 레지스트리에서 젝하여 다른 서비스의 접근을 차단
Eureka 고가용성 구성
클러스터 구성
- Eureka 서버의 고가용성을 위해 여러 인스턴스를 구성할 수 있음
- 다중 인스턴스로 구성하여 고가용성을 유지, 각 인스턴스는 서로를 피어로 등록하여 상호 백업
- 각 서버의 피어 설정을 통해 서로를 인식하고 백업 가능
Eureka 실습
Eureka Server
- Eureka Server Project
org.springframework.cloud:spring-cloud-starter-netflix-eureka-server- port 19090
- application.properties
spring.application.name=server
server.port=19090

eureka.client.register-with-eureka=false

eureka.client.fetch-registry=false

eureka.instance.hostname=localhost

eureka.client.service-url.defaultZone=http://localhost:19090/eureka/
Eureka Client
- Eureka Client Server 2개 생성
org.springframework.cloud:spring-cloud-starter-netflix-eureka-clientorg.springframework.boot:spring-boot-starter-web- port
- 19091 - first
- application.properties
spring.application.name=first

server.port=19091

eureka.client.service-url.defaultZone=http://localhost:19090/eureka/
- application.properties
- 19092 - second
- application.properties
spring.application.name=second

server.port=19092

eureka.client.service-url.defaultZone=http://localhost:19090/eureka/
- application.properties
- 19091 - first
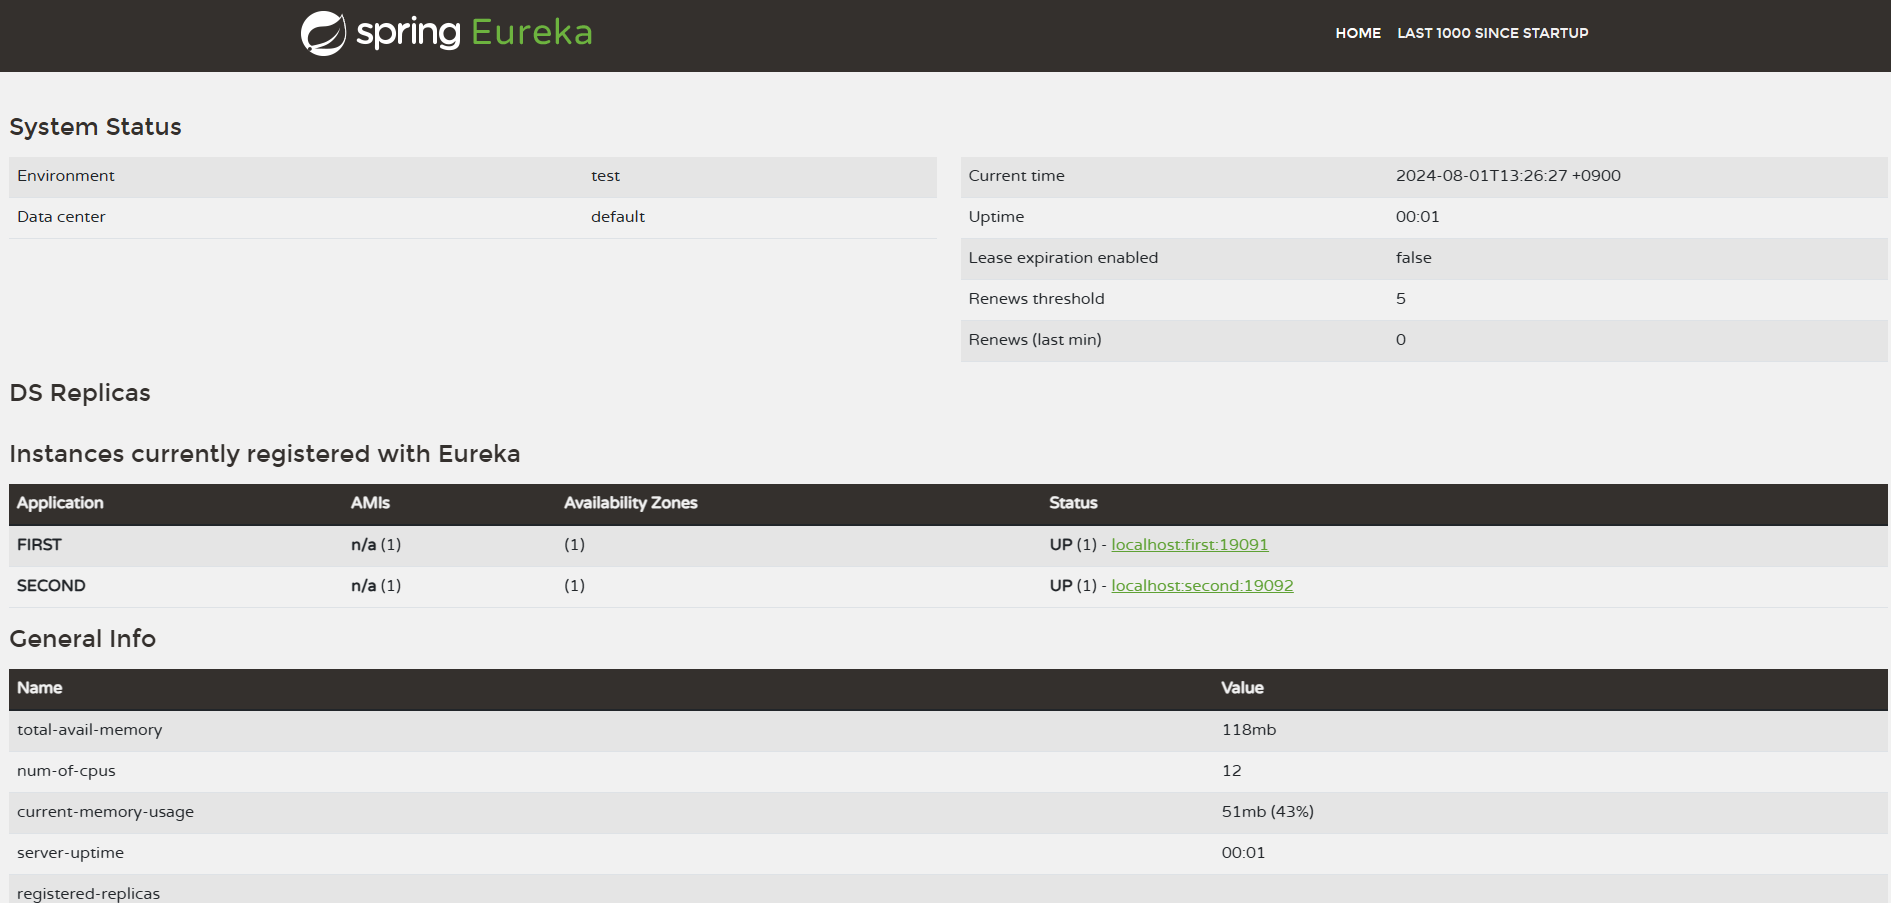
실행 후 localhost:19090 접속 결과
클라이언트 사이드 로드 밸런싱 ( FeignClient, Ribbon )
로드 밸런싱이란?
- 로드 밸런싱은 네트워크 트래픽을 여러 서버로 분산시켜 서버의 부하를 줄이고, 시스템의 성능과 가용성을 높이는 기술
- 서버 간 트래픽을 고르게 분배하여 특정 서버에 부하가 집중되는 것을 방지
- 종류 : 클라이언트 사이드 로드 밸런싱, 서버 사이드 로드 밸런싱
클라이언트 사이드 로드 밸런싱이란?
- 클라이언트 사이드 로드 밸런싱은 클라이언트가 직접 여러 서버 중 하나를 선택하여 요청을 보내는 방식
- 클라이언트는 서버의 목록을 가지고 있으며, 이를 바탕으로 로드 밸런싱을 수행
FeignClient 과 Ribbon
- FeignClient
- FeignClient는 Spring Cloud에서 제공하는 HTTP 클라이언트로, 선언적으로 RESTful 웹 서비스를 호출할 수 있음
- Eureka와 같은 서비스 디스커버리와 연동하여 동적으로 서비스 인스턴스를 조회하고 로드 밸런싱을 수행
- Ribbon
- 넷플릭스가 개발한 클라이언트 사이드 로드 밸런서, MSA에서 서비스 인스턴스 간의 부하를 분산
- 다양한 로드 밸런싱 알고리즘을 지원하며, Eureka와 같은 서비스 디스커버리와 연동하여 사용
FeignClient 과 Ribbon의 주요 특징
- FeignClient
- 선언적 HTTP 클라이언트 : 인터페이스와 어노테이션을 사용해 REST API를 호출할 수 있음
- Eureka 연동 : Eureka와 통합하여 서비스 인스턴스 목록을 동적으로 조회하고 로드 밸런싱을 수행
- 자동 로드 밸런싱 : Ribbon이 통합되어 있어 자동으로 로드 밸런싱을 수행
- Ribbon
- 서버 리스트 제공자 : Eureka 등으로부터 서비스 인스턴스 리스트를 제공받아 로드 밸런싱에 사용
- 로드 밸런싱 알고리즘 : 라운드 로빈, 가중치 기반 등 다양한 로드 밸런싱 알고리즘 지원
- Failover : 요청 실패 시 다른 인스턴스로 자동 전환
FeignClient 설정
- FeignClient와 Ribbon을 사용하려면 Spring Boot App에 의존성 추가 필요
org.springframework.cloud:spring-cloud-starter-openfeign- SpringBootApplication에 @EnableFeignClients 어노테이션 추가
FeignClient 인터페이스 작성
- FeignClient 인터페이스를 작성해서 서비스 호출 수행
- 예시
@FeignClient(name = "my-service")
public interface MyServiceClient {

    @GetMapping("/endpoint")
    String getResponse(@RequestParam(name = "param") String param);
}
- 예시
로드 밸런싱 알고리즘
- 라운드 로빈
- 각 서버에 순차적으로 요청을 분배하는 방식
- 간단하고 공평하게 트래픽 분산
- 가중치 기반 로드 밸런싱
- 각 서버에 가중치를 부여하고, 가중치에 비례하여 요청을 분배하는 방식
- 서버의 성능이나 네트워크 상태에 따라 가중치를 조절
- 기타 알고리즘
- 최소 연결 : 현재 연결된 클라이언트 수가 가장 적은 서버로 요청을 보내는 방식
- 응답 시간 기반 : 서버의 응답 시간 기준으로 가장 빠른 서버로 요청을 보내는 방식
FeignClient와 Eureka 연동
- Eureka 설정
- Eureka와 FeignClient를 함께 사용하면 동적으로 서비스 인스턴스를 조회하여 로드 밸런싱을 수행
- 설정 예시
eureka.client.service-url.defaultZone=http://localhost:19090/eureka/
FeignClient와 Ribbon 설정
- FeignClient에서 제공하는 서비스 인스턴스를 사용하여 로드 밸런싱을 수행
FeignClient와 Ribbon 동작 원리
- 서비스 이름 : @FeignClient(name = “my-service”) 어노테이션은 Eureka에 등록된 서비스 이름을 참조
- 서비스 인스턴스 조회 : Eureka 서버에서 “my-service”라는 이름으로 등록된 서비스 인스턴스 목록을 조회
- 로드 밸런싱 : 조회된 서비스 인스턴스 목록 중 하나를 선택하여 요청을 보냄. 이는 기본적으로 Ribbon을 사용하여 로드 밸런싱을 수행
- 요청 분배 : 여러 서비스 인스턴스가 있을 경우, 라운드 로빈 혹은 다른 설정된 로드 밸런싱 알고리즘을 사용하여 요청을 분배
FeignClient 실습
Feign Client ( Order 1 , Product 3 )
- Order Server 1개 생성
- Product Server 3개 생성
org.springframework.cloud:spring-cloud-starter-netflix-eureka-clientorg.springframework.cloud:spring-cloud-starter-openfeignorg.springframework.boot:spring-boot-starter-web@EnableFeignClients- SpringBootApplication에 추가- port
- 19091 - order
- application.yml
spring:
  application:
    name: order-service
server:
  port: 19091
eureka:
  client:
    service-url:
      defaultZone: http://localhost:19090/eureka/
- application.yml
- 19092 - product
- application.yml
spring:
  application:
    name: product-service
server:
  port: 19092
eureka:
  client:
    service-url:
      defaultZone: http://localhost:19090/eureka/
- application.yml
- 19091 - order
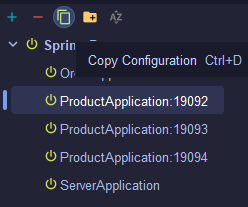
- Product Server를 3개 띄우기 위해 Run - Configuration 수정
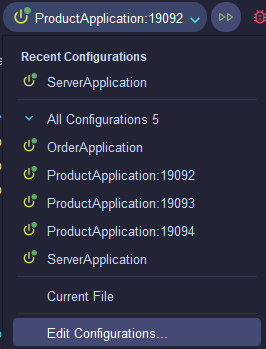
- copy configuration으로 인스턴스 추가 후 Name 뒤에 port 수정 (19092,19093,19094)
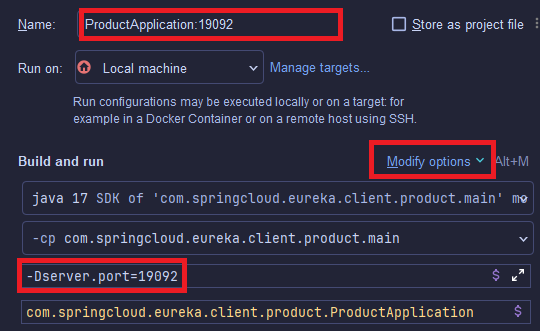
-
Modify options - Add VM options 으로 VM option 추가
-
-Dserver.port={인스턴스 port} 입력
-
Product Controller 작성 ( Product Project )
@RestController
public class ProductController {

    @Value("${server.port}")
    private String serverPort;

    @GetMapping("/product/{id}")
    public String getProduct(@PathVariable String id) {
        return "Product " + id + "info!!! From Port : " + serverPort;
    }
}
- Product Client 작성 (Order Project)
- Order Project 내 FeignClient 추가
@FeignClient(name = "product-service")
public interface ProductClient {

    @GetMapping("/product/{id}")
    String getProduct(@PathVariable String id);
}
- Order Project 내 FeignClient 추가
- Order Service 작성 (Order Project)
- Feign Client를 활용해 Product 서비스를 호출할 Order Service 작성
@Service
@RequiredArgsConstructor
public class OrderService {

    private final ProductClient productClient;

    public String getOrderInfo(String orderId) {
        if(orderId.equals("1")) {
            String productId = "2";
            String productInfo = productClient.getProduct(productId);
            return "Your order is " + orderId + ". And " + productInfo;
        }
        return "Not exist order...";
    }
}
- Feign Client를 활용해 Product 서비스를 호출할 Order Service 작성
- Order Controller 작성 (Order Project)
@RestController
@RequiredArgsConstructor
public class OrderController {

    private final OrderService orderService;

    @GetMapping("/order/{orderId}")
    public String order(@PathVariable("orderId") String orderId) {
        return orderService.getOrderInfo(orderId);
    }
}
실행 결과
-
Eureka Server 실행
-
Order Server 실행
-
Product 19092~19094 서버 실행
-
Eureka 접속 화면
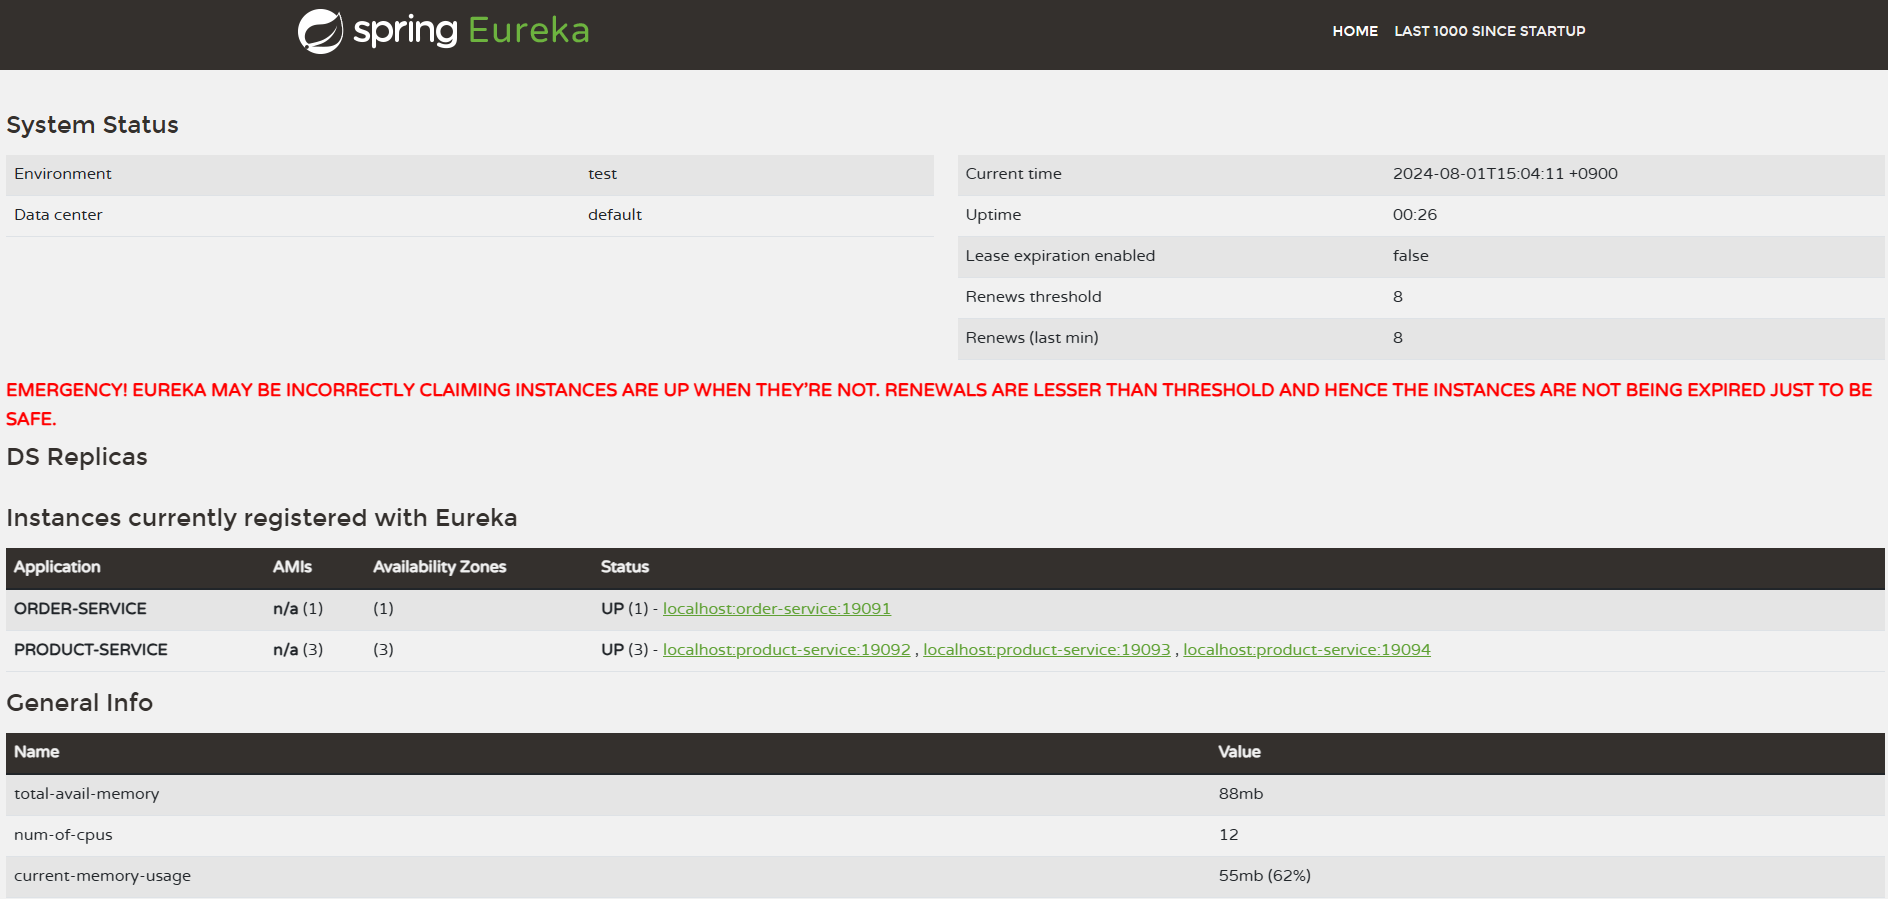
- order api 실행 결과
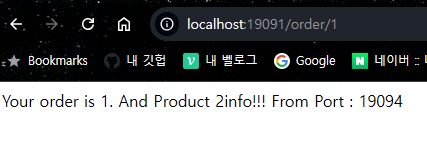
- 새로고침 할 경우 Port가 19092~19094 계속 바뀌는 것 확인 가능
서킷 브레이커
서킷 브레이커란?
- 서킷 브레이커는 마이크로서비스 간의 호출 실패를 감지하고 시스템의 전체적인 안정성을 유지하는 패턴
- 외부 서비스 호출 실패 시 빠른 실패를 통해 장애를 격리하고, 시스템의 다른 부분에 영향을 주지 않도록 합니다.
- 상태 변화: 클로즈드 → 오픈 → 하프-오픈
Resilience4j란?
- Resilience4j는 서킷 브레이커 라이브러리로, 서비스 간의 호출 실패를 감지하고 시스템의 안정성을 유지함
- 다양한 서킷 브레이커 기능을 제공하며, 장애 격리 및 빠른 실패를 통해 복원력을 높임
Resilience4j 주요 특징
- 서킷 브레이커 상태 : 클로즈드, 오픈, 하프-오픈 상태를 통해 호출 실패를 관리
- 클로즈드 (Closed)
- 기본 상태, 모든 요청을 통과시킴
- 이 상태에서 호출이 실패하면 실패 카운터가 증가
- 실패율이 설정된 임계값( ex) 50% )을 초과하면 서킷 브레이커가 오픈 상태로 전환됨
- 오픈 (Open)
- 서킷 브레이커가 오픈 상태로 전환될 시 모든 요청을 즉시 실패로 처리
- 이 상태에서 요청일 실패하지 않고 바로 에러 응답 반환
- 설정된 대기 시간이 지난 후, 서킷 브레이커는 하프-오픈 상태로 전환
- ex) 서킷 브레이커 오픈 상태 전환 후 20초 동안 모든 요청이 차단됨
- 하프-오픈 (Half-Open)
- 오픈 상태에서 대기 시간이 지나면 서킷 브레이커는 하프-오픈 상태로 전환
- 하프-오픈 상태에서는 제한된 수의 요청을 허용하며 시스템이 정상 상태로 복구되었는지 확인
- 요청이 성공하면 서킷 브레이커는 클로즈드 상태로 전환됨
- 요청이 다시 실패하면 서킷 브레이커는 다시 오픈 상태로 전환됨
- 클로즈드 (Closed)
- Fallback : 호출 실패 시 대체 로직을 제공하여 시스템 안정성 확보
- 모니터링 : 서킷 브레이커 상태를 모니터링하고 관리할 수 있는 다양한 도구 제공
Resilience4j 설정
- 의존성 💡 resilience4j 의존성은 spring starter에서 추가하여 사용하지 않고 ”io.github.resilience4j:resilience4j-spring-boot3:2.2.0” 를 사용 ”boot3” 임을 주의 !!! - `io.github.resilience4j:resilience4j-spring-boot3:2.2.0` - `org.springframework.boot:spring-boot-starter-aop`
- application.yml
resilience4j: circuitbreaker: configs: default: # 기본 구성 이름 registerHealthIndicator: true # 애플리케이션의 헬스 체크에 서킷 브레이커 상태를 추가하여 모니터링 가능 # 서킷 브레이커가 동작할 때 사용할 슬라이딩 윈도우의 타입을 설정 # COUNT_BASED: 마지막 N번의 호출 결과를 기반으로 상태를 결정 # TIME_BASED: 마지막 N초 동안의 호출 결과를 기반으로 상태를 결정 slidingWindowType: COUNT_BASED # 슬라이딩 윈도우의 타입을 호출 수 기반(COUNT_BASED)으로 설정 # 슬라이딩 윈도우의 크기를 설정 # COUNT_BASED일 경우: 최근 N번의 호출을 저장 # TIME_BASED일 경우: 최근 N초 동안의 호출을 저장 slidingWindowSize: 5 # 슬라이딩 윈도우의 크기를 5번의 호출로 설정 minimumNumberOfCalls: 5 # 서킷 브레이커가 동작하기 위해 필요한 최소한의 호출 수를 5로 설정 slowCallRateThreshold: 100 # 느린 호출의 비율이 이 임계값(100%)을 초과하면 서킷 브레이커가 동작 slowCallDurationThreshold: 60000 # 느린 호출의 기준 시간(밀리초)으로, 60초 이상 걸리면 느린 호출로 간주 failureRateThreshold: 50 # 실패율이 이 임계값(50%)을 초과하면 서킷 브레이커가 동작 permittedNumberOfCallsInHalfOpenState: 3 # 서킷 브레이커가 Half-open 상태에서 허용하는 최대 호출 수를 3으로 설정 # 서킷 브레이커가 Open 상태에서 Half-open 상태로 전환되기 전에 기다리는 시간 waitDurationInOpenState: 20s # Open 상태에서 Half-open 상태로 전환되기 전에 대기하는 시간을 20초로 설정- 필요한 값만 설정해서 사용할 것
Fallback 설정
- Fallback 메서드는 외부 서비스 호출이 실패했을 때 대체 로직을 제공하는 메서드
- 예시
@Service
public class MyService {

    @CircuitBreaker(name = "myService", fallbackMethod = "fallbackMethod")
    public String myMethod() {
        // 외부 서비스 호출
        return externalService.call();
    }

    public String fallbackMethod(Throwable t) {
        return "Fallback response";
    }
}
- 예시
Fallback 장점
- 시스템 안정성을 높이고, 장애가 발생해도 사용자에게 일정한 응답을 제공할 수 있음
- 장애가 다른 서비스에 전파되는 것을 방지합니다.
Resilience4j Dashboard
- Resilience4j Dashboard를 사용하여 서킷 브레이커의 상태를 모니터링할 수 있음
- Dashboard 설정
- 의존성
io.github.resilience4j:resilience4j-micrometerio.micrometer:micrometer-registry-prometheusorg.springframework.boot:spring-boot-starter-actuator
- application.yml
- 예시
management:
  endpoints:
    web:
      exposure:
        include: prometheus
  prometheus:
    metrics:
      export:
        enabled: true
- 예시
- http://${hostname}:${port}/actuator/prometheus 에 접속하여 서킷브레이커 항목 확인 가능
- 의존성
- Dashboard 사용
- Prometheus와 Grafana를 사용하여 Resilience4j 서킷 브레이커의 상태를 실시간으로 모니터링할 수 있음
- Prometheus를 통해 수집된 메트릭을 Grafana 대시보드에서 시각화 가능
Resilience4j 와 Spring Cloud 연동
- Resilience4j는 Spring Cloud Netflix 패키지의 일부로, Eureka와 Ribbon 등 다른 Spring Cloud 구성 요소와 쉽게 통합할 수 있음
- Spring Cloud의 서비스 디스커버리와 로드 밸런싱을 활용하여 더욱 안정적인 MSA 구축 가능
Resilience4j 실습
Resilience4j 프로젝트 생성
- 참고 링크
- 의존성
- Spring Web
- Lombok
- Spring Boot Actuator
- Prometheus
io.github.resilience4j:resilience4j-spring-boot3:2.2.0org.springframework.boot:spring-boot-starter-aop
- application.yml
spring:
  application:
    name: sample

server:
  port: 19090

resilience4j:
  circuitbreaker:
    configs:
      default:  # 기본 구성 이름
        registerHealthIndicator: true  # 애플리케이션의 헬스 체크에 서킷 브레이커 상태를 추가하여 모니터링 가능
        # 서킷 브레이커가 동작할 때 사용할 슬라이딩 윈도우의 타입을 설정
        # COUNT_BASED: 마지막 N번의 호출 결과를 기반으로 상태를 결정
        # TIME_BASED: 마지막 N초 동안의 호출 결과를 기반으로 상태를 결정
        slidingWindowType: COUNT_BASED  # 슬라이딩 윈도우의 타입을 호출 수 기반(COUNT_BASED)으로 설정
        # 슬라이딩 윈도우의 크기를 설정
        # COUNT_BASED일 경우: 최근 N번의 호출을 저장
        # TIME_BASED일 경우: 최근 N초 동안의 호출을 저장
        slidingWindowSize: 5  # 슬라이딩 윈도우의 크기를 5번의 호출로 설정
        minimumNumberOfCalls: 5  # 서킷 브레이커가 동작하기 위해 필요한 최소한의 호출 수를 5로 설정
        slowCallRateThreshold: 100  # 느린 호출의 비율이 이 임계값(100%)을 초과하면 서킷 브레이커가 동작
        slowCallDurationThreshold: 60000  # 느린 호출의 기준 시간(밀리초)으로, 60초 이상 걸리면 느린 호출로 간주
        failureRateThreshold: 50  # 실패율이 이 임계값(50%)을 초과하면 서킷 브레이커가 동작
        permittedNumberOfCallsInHalfOpenState: 3  # 서킷 브레이커가 Half-open 상태에서 허용하는 최대 호출 수를 3으로 설정
        # 서킷 브레이커가 Open 상태에서 Half-open 상태로 전환되기 전에 기다리는 시간
        waitDurationInOpenState: 20s  # Open 상태에서 Half-open 상태로 전환되기 전에 대기하는 시간을 20초로 설정

management:
  endpoints:
    web:
      exposure:
        include: prometheus
  prometheus:
    metrics:
      export:
        enabled: true
- Product 생성
@Data @AllArgsConstructor @NoArgsConstructor public class Product { private String id; private String title; } - Service 생성
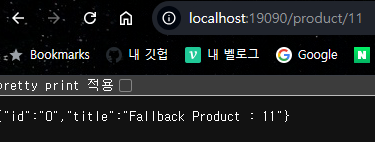
@Service @RequiredArgsConstructor public class ProductService { private final Logger log = Logger.getLogger(this.getClass().getName()); @CircuitBreaker(name = "productService", fallbackMethod = "fallbackGetProductDetail") public Product getProductDetail(String productId) { if ("111".equals(productId)) { throw new RuntimeException("Empty Response Body"); } return new Product(productId, "Sample Product : " + productId); } public Product fallbackGetProductDetail(String productId, Throwable t) { return new Product("0", "Fallback Product : " + productId); } } - Controller 생성
@RestController
@RequiredArgsConstructor
public class ProductController {

    private final ProductService productService;

    @GetMapping("/product/{id}")
    public Product getProduct(@PathVariable String id) {
        return productService.getProductDetail(id);
    }
}
- 실행 후 실패 확인 ( id 111 입력 )

- 서킷 브레이커 Open 상태 전환 확인
- 서킷 브레이커 Closed 상태 전환 확인
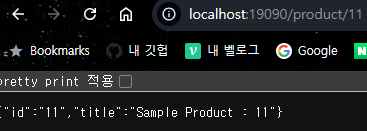
- Service에 서킷 브레이커 로그 추가
@Service
@RequiredArgsConstructor
public class ProductService {
    private final Logger log = LoggerFactory.getLogger(getClass());
    private final CircuitBreakerRegistry circuitBreakerRegistry;

    @PostConstruct
    public void registerEventListener() {
        circuitBreakerRegistry.circuitBreaker("productService").getEventPublisher()
                .onStateTransition(event -> log.info("#######CircuitBreaker State Transition: {}", event)) // 상태 전환 이벤트 리스너
                .onFailureRateExceeded(event -> log.info("#######CircuitBreaker Failure Rate Exceeded: {}", event)) // 실패율 초과 이벤트 리스너
                .onCallNotPermitted(event -> log.info("#######CircuitBreaker Call Not Permitted: {}", event)) // 호출 차단 이벤트 리스너
                .onError(event -> log.info("#######CircuitBreaker Error: {}", event)); // 오류 발생 이벤트 리스너
    }

    @CircuitBreaker(name = "productService", fallbackMethod = "fallbackGetProductDetail")
    public Product getProductDetail(String productId) {
        log.info("###Fetching product details for productId: {}", productId);
        if ("111".equals(productId)) {
            log.warn("###Received empty body for productId: {}", productId);
            throw new RuntimeException("Empty response body");
        }
        return new Product(
                productId,
                "Sample Product"
        );
    }

    public Product fallbackGetProductDetail(String productId, Throwable t) {
        log.error("####Fallback triggered for productId: {} due to: {}", productId, t.getMessage());
        return new Product(
                productId,
                "Fallback Product"
        );
    }
}
- 로그 확인
2024-08-01T16:59:48.516+09:00  INFO 2860 --- [sample] [io-19090-exec-5] c.s.resilience4j.sample.ProductService   : ###Fetching product details for productId: 111
2024-08-01T16:59:48.516+09:00  WARN 2860 --- [sample] [io-19090-exec-5] c.s.resilience4j.sample.ProductService   : ###Received empty body for productId: 111
2024-08-01T16:59:48.516+09:00  INFO 2860 --- [sample] [io-19090-exec-5] c.s.resilience4j.sample.ProductService   : #######CircuitBreaker Error: 2024-08-01T16:59:48.516828300+09:00[Asia/Seoul]: CircuitBreaker 'productService' recorded an error: 'java.lang.RuntimeException: Empty response body'. Elapsed time: 0 ms
2024-08-01T16:59:48.516+09:00  INFO 2860 --- [sample] [io-19090-exec-5] c.s.resilience4j.sample.ProductService   : #######CircuitBreaker Failure Rate Exceeded: 2024-08-01T16:59:48.516828300+09:00[Asia/Seoul]: CircuitBreaker 'productService' exceeded failure rate threshold. Current failure rate: 60.0
2024-08-01T16:59:48.519+09:00  INFO 2860 --- [sample] [io-19090-exec-5] c.s.resilience4j.sample.ProductService   : #######CircuitBreaker State Transition: 2024-08-01T16:59:48.519958500+09:00[Asia/Seoul]: CircuitBreaker 'productService' changed state from CLOSED to OPEN
2024-08-01T16:59:48.519+09:00 ERROR 2860 --- [sample] [io-19090-exec-5] c.s.resilience4j.sample.ProductService   : ####Fallback triggered for productId: 111 due to: Empty response body
API 게이트웨이 ( Spring Cloud Gateway )
API 게이트웨이란?
- API 게이트웨이는 클라이언트의 요청을 받아 백엔드 서비스로 라우팅하고, 다양한 부가 기능을 제공하는 중간 서버
- 클라이언트와 서비스 간의 단일 진입점 역할을 하며, 보안, 로깅, 모니터링, 요청 필터링 등을 처리함
API 게이트웨이의 주요 기능
- 라우팅 : 클라이언트 요청을 적절한 서비스로 전달
- 인증 및 권한 부여 : 요청의 인증 및 권한을 검증
- 로드 밸런싱 : 여러 서비스 인스턴스 간의 부하 분산
- 모니터링 및 로깅 : 요청 및 응답을 로깅하고 모니터링
- 요청 및 응답 변환 : 요청과 응답을 변환하거나 필터링
Spring Cloud Gateway란?
- Spring 프로젝트의 일환으로 개발된 API 게이트웨이, 클라이언트 요청을 적절한 서비스로 라우팅하고 다양한 필터링 기능을 제공
- Spring Cloud Netflix 패키지의 일부로, MSA에서 널리 사용됨
Spring Cloud Gateway의 주요 특징
- 동적 라우팅 : 요청의 URL 패턴에 따라 동적으로 라우팅
- 필터링 : 요청 전후에 다양한 작업을 수행할 수 있는 필터 체인 제공
- 모니터링 : 요청 로그 및 매트릭을 통해 서비스 상태 모니터링
- 보안 : 요청의 인증 및 권한 검증
Spring Cloud Gateway 설정
- 의존성
org.springframework.boot:spring-boot-starter-weborg.springframework.boot:spring-boot-starter-actuatororg.springframework.cloud:spring-cloud-starter-gatewayorg.springframework.cloud:spring-cloud-starter-netflix-eureka-client
- application.yml
spring:
  cloud:
    gateway:
      discovery:
        locator:
          enabled: true  # 서비스 디스커버리를 통해 동적으로 라우트를 생성하도록 설정
      routes:
        - id: users-service  # 라우트 식별자
          uri: lb://users-service # 'users-service'라는 이름으로 로드 밸런싱된 서비스로 라우팅
          predicates:
            - Path=/users/** # /users/** 경로로 들어오는 요청을 이 라우트로 처리
        - id: orders-service  # 라우트 식별자
          uri: lb://orders-service  # 'orders-service'라는 이름으로 로드 밸런싱된 서비스로 라우팅
          predicates:
            - Path=/orders/** #/orders/** 경로로 들어오는 요청을 이 라우트로 처리

eureka:
  client:
    service-url:
      defaultZone: http://localhost:19090/eureka/
Spring Cloud Gateway 필터링
- 종류
- Global Filter : 모든 요청에 대해 작동하는 필터
- Gateway Filter : 특정 라우트에만 적용되는 필터
- 구현
- GlobalFilter 혹은 GatewayFilter 인터페이스를 구현하고, filter 메서드를 오버라이드 해야 함
- 주요 객체
- Mono
- 리액티브 프로그래밍에서 0 또는 1개의 데이터를 비동기적으로 처리
- Mono는 아무 데이터도 반환하지 않음을 의미
- ServerWebExchange
- ServerWebExchange는 HTTP 요청과 응답을 캡슐화한 객체
- exchange.getRequest()로 HTTP 요청을 가져옴
- exchange.getResponse()로 HTTP 응답을 가져옴
- GatewayFilterChain
- GatewayFilterChain은 여러 필터를 체인처럼 연결
- chain.filter(exchange)는 다음 필터로 요청을 전달
- Mono
- 필터 시점 별 종류
- Pre 필터
- 요청이 처리되기 전에 실행
- 예시
@Component
public class PreFilter implements GlobalFilter, Ordered {

    @Override
    public Mono<Void> filter(ServerWebExchange exchange, GatewayFilterChain chain) {
        // 요청 로깅
        System.out.println("Request: " + exchange.getRequest().getPath());
        return chain.filter(exchange);
    }

    @Override
    public int getOrder() {  // 필터의 순서를 지정합니다.
        return -1;  // 필터 순서를 가장 높은 우선 순위로 설정합니다.
    }
}
- Post 필터
- 요청이 처리된 후, 응답이 반환되기 전에 실행. 체인의 다음 필터가 완료된 후에 실행되어야 하는 추가적인 작업을 then 메서드를 사용해서 작성
- 예시
@Component
public class PostFilter implements GlobalFilter, Ordered {

    @Override
    public Mono<Void> filter(ServerWebExchange exchange, GatewayFilterChain chain) {
        return chain.filter(exchange).then(Mono.fromRunnable(() -> {
            // 응답 로깅
            System.out.println("Response Status: " + exchange.getResponse().getStatusCode());
        }));
    }

    @Override
    public int getOrder() {
        return -1;
    }
}
- Pre 필터
Spring Cloud와의 통합
- Spring Cloud Gateway는 Spring Cloud Netflix 패키지의 일부로, Eureka와 쉽게 통합할 수 있음
- Eureka를 통해 동적으로 서비스 인스턴스를 조회하여 로드 밸런싱과 라우팅을 수행할 수 있음
Spring Cloud Gateway 실습
프로젝트 환경 세팅
Eureka Server와 Order, Product 서버 생성은 FeignClient 실습 참고 !!!
- Eureka Server 19090
- Cloud Gateway 19091
- Order 인스턴스 1개 19092
- Product 인스턴스 2개 19093, 19094
Cloud Gateway 서버 세팅
- application.yml
server: port: 19091 # 게이트웨이 서비스가 실행될 포트 번호 spring: main: web-application-type: reactive # Spring 애플리케이션이 리액티브 웹 애플리케이션으로 설정됨 application: name: gateway-service # 애플리케이션 이름을 'gateway-service'로 설정 cloud: gateway: routes: # Spring Cloud Gateway의 라우팅 설정 - id: order-service # 라우트 식별자 uri: lb://order-service # 'order-service'라는 이름으로 로드 밸런싱된 서비스로 라우팅 predicates: - Path=/order/** # /order/** 경로로 들어오는 요청을 이 라우트로 처리 - id: product-service # 라우트 식별자 uri: lb://product-service # 'product-service'라는 이름으로 로드 밸런싱된 서비스로 라우팅 predicates: - Path=/product/** # /product/** 경로로 들어오는 요청을 이 라우트로 처리 discovery: locator: enabled: true # 서비스 디스커버리를 통해 동적으로 라우트를 생성하도록 설정 eureka: client: service-url: defaultZone: http://localhost:19090/eureka/ # Eureka 서버의 URL을 지정 - CustomPreFilter
@Component public class CustomPreFilter implements GlobalFilter, Ordered { private static final Logger loggger = Logger.getLogger(CustomPreFilter.class.getName()); @Override public Mono<Void> filter(ServerWebExchange exchange, GatewayFilterChain chain) { ServerHttpRequest request = exchange.getRequest(); loggger.info("Pre Filter: Request URI : " + request.getURI()); return chain.filter(exchange); } @Override public int getOrder() { return Ordered.HIGHEST_PRECEDENCE; } } - CustomPostFilter
@Component
public class CustomPostFilter implements GlobalFilter, Ordered {
    private static final Logger logger = Logger.getLogger(CustomPostFilter.class.getName());

    @Override
    public Mono<Void> filter(ServerWebExchange exchange, GatewayFilterChain chain) {
        return chain.filter(exchange).then(Mono.fromRunnable(() -> {
            ServerHttpResponse response = exchange.getResponse();
            logger.info("Post Filter : Response status code is " + response.getStatusCode());

        }));
    }

    @Override
    public int getOrder() {
        return Ordered.LOWEST_PRECEDENCE;
    }
}
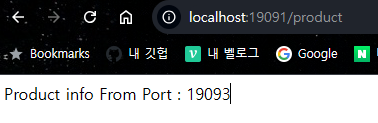
- 실행 결과
- Gateway로 보낸 요청이 Product 서버로 라우팅 된 것 확인
보안 구성 ( OAuth2 + JWT )
OAuth2란?
- OAuth2는 토큰 기반의 인증 및 권한 부여 프로토콜
- 클라이언트 어플리케이션이 리소스 소유자의 권한을 얻어 보호된 리소스에 접근할 수 있도록 함
- OAuth2는 네 가지 역할을 정의 : 리소스 소유자, 클라이언트, 리소스 서버, 인증 서버
OAuth2의 주요 개념
- Authorization Code Grant : 인증 코드를 사용하여 액세스 토큰을 얻는 방식
- Implicit Grant : 클라이언트 어플리케이션에서 직접 액세스 토큰을 얻는 방식
- Resource Owner Password Credentials Grant : 사용자 이름과 비밀번호를 사용하여 액세스 토큰을 얻는 방식
- Client Credentials Grant : 클라이언트 어플리케이션이 자신의 자격 증명을 사용하여 액세스 토큰을 얻는 방식
JWT란?
- JWT(JSON Web Token)은 JSON형식의 토큰으로, 클레임(claim)을 포함해서 사용자에 대한 정보를 전달
- JWT는 헤더, 페이로드, 서명으로 구성
- 암호화를 통해 데이터의 무결성과 출처를 보장
JWT의 주요 특징
- 토큰 자체에 모든 정보가 포함되어 있어 별도의 상태 저장이 필요 없음
- 간결성 : 짧고 간결한 문자열로, URL, 헤더 등에 쉽게 포함될 수 있음
- 서명 및 암호화 : 데이터의 무결성과 인증을 보장
보안구성 실습
💡 Cloud Gateway에서 사용된 PreFilter에서 JWT 인증을 진행Auth 프로젝트
- 의존성
dependencies { implementation 'io.jsonwebtoken:jjwt:0.12.6' implementation 'org.springframework.boot:spring-boot-starter-actuator' implementation 'org.springframework.boot:spring-boot-starter-security' implementation 'org.springframework.boot:spring-boot-starter-web' implementation 'org.springframework.cloud:spring-cloud-starter-netflix-eureka-client' compileOnly 'org.projectlombok:lombok' annotationProcessor 'org.projectlombok:lombok' testImplementation 'org.springframework.boot:spring-boot-starter-test' testImplementation 'org.springframework.security:spring-security-test' testRuntimeOnly 'org.junit.platform:junit-platform-launcher' testImplementation 'io.projectreactor:reactor-test' } - application.yml
spring: application: name: auth-service eureka: client: service-url: defaultZone: http://localhost:19090/eureka/ service: jwt: access-expiration: 3600000 secret-key: "401b09eab3c013d4ca54922bb802bec8fd5318192b0a75f201d8b3727429080fb337591abd3e44453b954555b7a0812e1081c39b740293f765eae731f5a65ed1" server: port: 19095 - AuthConfig
@Configuration @EnableWebSecurity public class AuthConfig { // SecurityFilterChain 빈을 정의합니다. 이 메서드는 Spring Security의 보안 필터 체인을 구성합니다. @Bean public SecurityFilterChain securityFilterChain(HttpSecurity http) throws Exception { http // CSRF 보호를 비활성화합니다. CSRF 보호는 주로 브라우저 클라이언트를 대상으로 하는 공격을 방지하기 위해 사용됩니다. .csrf(csrf -> csrf.disable()) // 요청에 대한 접근 권한을 설정합니다. .authorizeRequests(authorize -> authorize // /auth/signIn 경로에 대한 접근을 허용합니다. 이 경로는 인증 없이 접근할 수 있습니다. .requestMatchers("/auth/signIn").permitAll() // 그 외의 모든 요청은 인증이 필요합니다. .anyRequest().authenticated() ) // 세션 관리 정책을 정의합니다. 여기서는 세션을 사용하지 않도록 STATELESS로 설정합니다. .sessionManagement(session -> session .sessionCreationPolicy(SessionCreationPolicy.STATELESS) ); // 설정된 보안 필터 체인을 반환합니다. return http.build(); } } - AuthService
@Service public class AuthService { @Value("${spring.application.name}") private String issuer; @Value("${service.jwt.access-expiration}") private Long accessExpiration; private final SecretKey secretKey; public AuthService(@Value("${service.jwt.secret-key}") String secretKey) { this.secretKey = Keys.hmacShaKeyFor(Decoders.BASE64.decode(secretKey)); } public String createAccessToken(String user_id){ return Jwts.builder() .claim("user_id", user_id) .issuer(issuer) .issuedAt(Date.from(Instant.now())) .expiration(Date.from(Instant.now().plusMillis(accessExpiration))) .signWith(secretKey, SignatureAlgorithm.HS256) .compact(); } } - AuthController
@RestController
@RequiredArgsConstructor
public class AuthController {

    private final AuthService authService;

    @GetMapping("/auth/signIn")
    public ResponseEntity<?> createAuthToken(@RequestParam String user_id){
        return ResponseEntity.ok(new AuthResponse(authService.createAccessToken(user_id)));
    }

    @Data
    @AllArgsConstructor
    @NoArgsConstructor
    static class AuthResponse {
        private String access_token;
    }
}
- 로그인 요청 및 토큰 생성

- Gateway Project 수정
- application.yml 에 아래 부분 추가
- id: auth-service # 라우트 식별자 uri: lb://auth-service # 'auth-service'라는 이름으로 로드 밸런싱된 서비스로 라우팅 predicates: - Path=/auth/signIn # /auth/signIn 경로로 들어오는 요청을 이 라우트로 처리 - JWT 처리 필터 작성
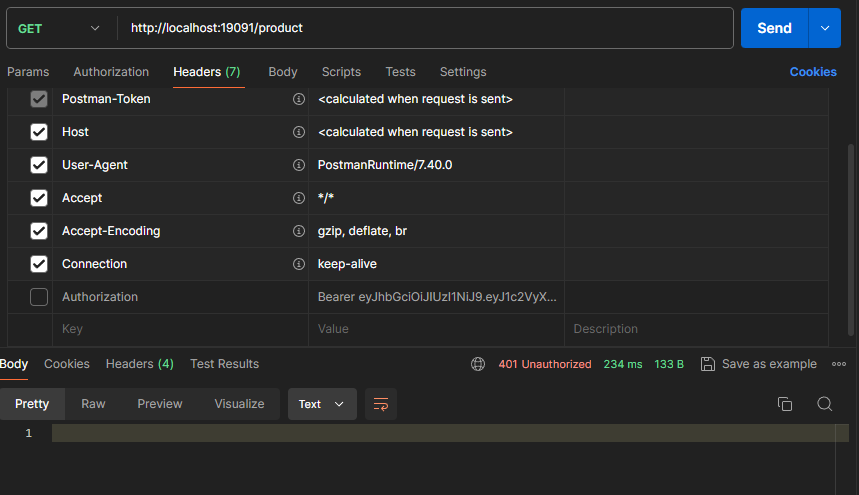
@Slf4j
@Component
public class LocalJwtAuthenticationFilter implements GlobalFilter{

    @Value("${service.jwt.secret-key}")
    private String secretKey;

    @Override
    public Mono<Void> filter(ServerWebExchange exchange, GatewayFilterChain chain) {
        String path = exchange.getRequest().getURI().getPath();
        if (path.equals("/auth/signIn")) {
            return chain.filter(exchange);
        }

        String token = extractToken(exchange);
        if(token == null || !validateToken(token)) {
            exchange.getResponse().setStatusCode(HttpStatus.UNAUTHORIZED);
            return exchange.getResponse().setComplete();
        }

        return chain.filter(exchange);
    }

    private String extractToken(ServerWebExchange exchange) {
        String authHeader = exchange.getRequest().getHeaders().getFirst("Authorization");
        if(authHeader != null && authHeader.startsWith("Bearer ")) {
            return authHeader.substring(7);
        }
        return null;
    }

    private boolean validateToken(String token) {
        try {
            SecretKey key = Keys.hmacShaKeyFor(Decoders.BASE64URL.decode(secretKey));
            Jws<Claims> claimsJws = Jwts.parser()
                    .verifyWith(key)
                    .build().parseSignedClaims(token);
            log.info("#####payload :: " + claimsJws.getPayload().toString());

            // 추가적인 검증 로직 (예: 토큰 만료 여부 확인 등)을 여기에 추가할 수 있습니다.
            return true;
        } catch (Exception e) {
            return false;
        }
    }
}
- application.yml 에 아래 부분 추가
- 토큰 없이 product api 요청 결과
토이프로젝트 - GetherTube
진행 상황
- 유저 정보 조회 API 구현
- 유저 정보 수정 API 구현
- Response 양식을 통일 하기로 얘기가 되어서 수정이 필요
- Response 제네릭 클래스 생성
@Getter @Builder public class Response<T> { private String status; private String message; @JsonInclude(JsonInclude.Include.NON_NULL) private T data; private LocalDateTime timestamp; } - Response 제네릭 메서드 생성
public class ResponseUtil {

    public static <T> Response<T> success(String message, T data) {
        return new Response<>(200,message,data, LocalDateTime.now());
    }

    public static <T> Response<T> error(String message, int status) {
        return new Response<>(status,message, LocalDateTime.now());
    }

}
- Response 제네릭 클래스 생성
- 유저 API에 Response 적용
- 정보 조회 API에 적용된 부분
public ResponseEntity<?> getUserInfo(String userId) {
        User user = userRepository.findOneByUserId(userId).orElse(null);
        return ResponseEntity.ok(ResponseUtil.success("회원 정보 조회 성공", user.toUserDto()));
    }
- 정보 조회 API에 적용된 부분
- 회원가입에서 401 에러가 발생
- Spring Security Config에서 회원가입 permit 누락 확인 후 추가
.requestMatchers(HttpMethod.POST, "/user").permitAll()
- Spring Security Config에서 회원가입 permit 누락 확인 후 추가
- 플레이리스트 추가 API 구현
- 회원 정보 조회 시 Playlist의 ID만 불러오는 부분을 Playlist의 ID와 URL까지 불러오게 수정
- 0801 작업 후 dev-back으로 PR 완료
- playlist 수정한 커밋 내역
특이 사항
- X

정말 많은 것을 학습해 주신게 TIL 에 잘 드러나네요 수고하셨습니다👍🏻