알림(Notification)
-
상단바에 시스템 정보, 알림, 앱정보 등을 출력하는 것
-
상태바는 원래 시스템에서 관리하므로 앱이 직접 제어를 할 수 없다. 따라서 앱에서 API를 통해 시스템에 요청을 해서 알림을 출력한다.
-
NotificationChannel -> NotificationCompat.Builder() -> Notification -> notify()
-
API 레벨 26 버전부터는 채널 개념을 도입하여 앱마다 채널별로 받고싶은 알람을 선택해서 받을 수 있다. ( 기존에는 앱 알림을 끄면 모든 알림이 꺼졌다. )
-
알림 중요도
- NotificationManager.IMPORTANCE_HIGH : 긴급 알림음, 헤드업 표시
- NotificationManager.IMPORTANCE_DEFAULT : 높은 중요도, 알림음 울림
- NotificationManager.IMPORTANCE_LOW : 중간 중요도, 알림음 없음
- NotificationManager.IMPORTANCE_MIN : 낮은 중요도, 알림음/상태바 표시 없음
-
같이 사용되는 알림 관련 함수들
- setShowBadge() : 홈화면 아이콘에 배지 아이콘 출력 여부
- setSound() : 알림음 재생 여부
- enableLights() : 불빛 표시 여부
- enableVibration() : 진동 여부
-
알림 빌더 설정
val manager = getSystemService(AppCompatActivity.NOTIFICATION_SERVICE) as NotificationManager
val builder: NotificationCompat.Builder

if(Build.VERSION.SDK_INT >= Build.VERSION_CODES.O){
    val channelId = "Channel-Id"
    val channelName = "Channel Name"
    val channel = NotificationChannel(channelId, channelName, NotificationManager.IMPORTANCE_HIGH)

    //채널 정보 설정
    channel.description = "Description"
    channel.setShowBadge(true)
    val uri : Uri = RingtoneManager.getDefaultUri(RingtoneManager.TYPE_NOTIFICATION)
    val audioAttributes = AudioAttributes.Builder()
        .setContentType(AudioAttributes.CONTENT_TYPE_SONIFICATION)
        .setUsage(AudioAttributes.USAGE_ALARM)
        .build()
    channel.setSound(uri, audioAttributes)
    channel.enableLights(true)
    channel.lightColor = Color.BLUE
    channel.enableVibration(true)
    channel.vibrationPattern = longArrayOf(100,200,200,100)

    manager.createNotificationChannel(channel)
    builder = NotificationCompat.Builder(this,channelId)

}else{
    builder = NotificationCompat.Builder(this)
}
알림 객체
- 알림 빌더를 이용해 Notification 객체를 생성한다.
- 객체 안에 출력할 이미지, 문자열 등의 정보를 담는다.
- 상단바에 작게 뜨는 아이콘을 '스몰 아이콘'이라고 한다.
builder.setSmallIcon(android.R.drawable.ic_notification_overlay)
builder.setWhen(System.currentTimeMillis())
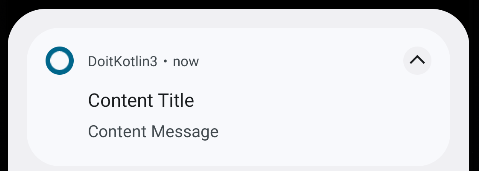
builder.setContentTitle("Content Title")
builder.setContentText("Content Message")
manager.notify(11, builder.build())-
빌더에 알림 내용 설정 후 manager를 통해 notify()를 실행한다.( 아래는 실행 결과 )
-
notify() 의 첫번째 매개변수값은 알림을 식별하는 데 사용하며 개발자가 임의로 지정한다.
-
아래와 같이 알림을 지우지 못하도록 설정했을 경우, 특정 이벤트 때 cancel()을 사용하여 알림을 지워야 한다.
builder.setAutoCancel(false) //알림 터치 시 알림이 사라지지 않음
builder.setOngoing(true) //스와이프로 알림 지워지지 않음manager.cancel(11) // 매개변수는 notify()에서 개발자가 지정한 값알림 터치 이벤트
- 알림을 터치해서 앱의 액티비티를 실행하기 위해서는 터치 이벤트를 구현해야한다.
- 알림을 터치했을 때의 실행할 이벤트를 Notification 객체에 담아두고, 알림 터치 이벤트가 발생하면 해당 Notification 이벤트를 실행한다.
- 이때, Intent를 통해 전달되며 실제 수행시간을 앱에서 정할 수 없으므로 PendingIntent 를 통해 이벤트가 발생했을 때 전달되도록 설정한다.
val intent = Intent(this, MainActivity::class.java)
val pendingIntent = PendingIntent.getActivity(this, 10, intent, PendingIntent.FLAG_IMMUTABLE)
builder.setContentIntent(pendingIntent)- getActivity(), getService(), getBroadcast() 를 사용할 수 있다.
- 4번째 매개변수를 FLAG_IMMUTABLE, FLAG_MUTABLE 중 1개를 사용한다. ( API 31 기준 )
클래스 타입 레퍼런스 추가
- 코틀린에서
KClass<*>로 선언 된 API면 Sample::class 로 작성 Class<*>로 선언되었으면 자바로 작성된 API 이므로 Sample::class.java 로 작성
액션
- 터치 이벤트 이외에, 알림 아래 최대 3개의 버튼을 통해서 원하는 동작을 설정할 수 있다.
- 터치 이벤트와 유사하게 PendingIntent를 설정해서 적용하며 addAction()으로 추가할 수 있다.
val actionIntent = Intent(this, OneReceiver::class.java)
val actionPendingIntent = PendingIntent.getBroadcast(this, 20, actionIntent, PendingIntent.FLAG_IMMUTABLE)
builder.addAction(
NotificationCompat.Action.Builder(android.R.drawable.stat_notify_more, "Action", actionPendingIntent).build()
)
원격 입력
- 원격 입력 ( remoteInput ) 은 알림에서 답장과 같은 사용자 입력을 직접 받는 기법이다.
- 액션의 한 종류로 RemoteInput에 사용자 입력을 받는 정보를 설정 후 액션에 추가한다.
- import androidx.core.app.RemoteInput 사용
//원격 입력
val KEY_TEXT_REPLY = "key_text_reply"
var replyLabel : String = "답장 입력"
var remoteInput : RemoteInput = RemoteInput.Builder(KEY_TEXT_REPLY).run{
    setLabel(replyLabel)
    build()
}

//인텐트 준비
val replyIntent = Intent(this, ReplyReceiver::class.java)
val replyPendingIntent = PendingIntent.getBroadcast(this, 30, replyIntent, PendingIntent.FLAG_MUTABLE)

//원격 입력 액션 등록하기
builder.addAction(
NotificationCompat.Action.Builder(android.R.drawable.send, "답장", replyPendingIntent)
.addRemoteInput(remoteInput).build()
)- 아래와 같이 전송된 데이터를 받을 수 있다.
val replyTxt = RemoteInput.getResultsFromIntent(intent)?.getCharSequence("key_text_reply")프로그레스
- 진행 상황을 프로그레스 바를 통해 알려줄 수 있다.
- 빌더에 setProgress() 함수 추가
builder.setProgress(100, 0, false)
manager.notify(11, builder.build())

thread{
    for(i in 1..100){
        builder.setProgress(100, i, false)
        manager.notify(11, builder.build())
        SystemClock.sleep(100)
    }
}- thread를 통해 지속적으로 값을 업데이트 시켜준다.
- 3번째 매개변수가 true일 경우 프로그레스 바에서 0~100까지 차려대로 진행되는 것이 아니라, 왼쪽에서 오른쪽으로 흐르는 프로그래스 바가 생성된다.
알림 스타일
큰 이미지 스타일
- 화면 캡처 등을 했을 때 사진이 알림에 크게 뜨는 스타일
val bigPicture = BitmapFactory.decodeResource(resources, R.drawable.test)
val bigStyle = NotificationCompat.BigPictureStyle()
bigStyle.bigPicture(bigPicture)
builder.setStyle(bigStyle)
긴 텍스트 스타일
- 이메일, 상세 내용 등의 긴 문자열을 보여줄 수 있다.
val bigTextStyle = NotificationCompat.BigTextStyle()
bigTextStyle.bigText(resources.getString(R.string.long_text))
builder.setStyle(bigTextStyle)
상자 스타일
- 하나의 알림에 문자열 여러개를 나열할 때 사용한다.
val style = NotificationCompat.InboxStyle()
style.addLine("Line 1")
style.addLine("Line 2")
builder.setStyle(style)
메세지 스타일
- 여러 사람이 주고받은 메세지를 구분해서 출력할 때 적용한다.
- Person 은 androidx.core.app.Person 사용
val sender1 : Person = Person.Builder()
    .setName("lumineko")
    .build()

val sender2 : Person = Person.Builder()
    .setName("lumine")
    .build()

val message1 = NotificationCompat.MessagingStyle.Message(
    "hello", System.currentTimeMillis(), sender1
)

val message2 = NotificationCompat.MessagingStyle.Message(
    "hi", System.currentTimeMillis(), sender2
)
val messageStyle = NotificationCompat.MessagingStyle(sender1)
.addMessage(message1)
.addMessage(message2)
builder.setStyle(messageStyle)
:)