Index
1. 프로젝트 개요
1.1 프로젝트 목적
1.2 프로젝트 환경
1.3 아키텍처 설계
2. 프로젝트 과정
**2.1 vpc 구축
2.2 Bastion Host 구축
2.3 Web Server 구축
2.4 RDS 구축
2.5 2.5 AMI 생성
2.6 AutoScaling 및 Load Balancing
3. 결과
3.1 wordpress
1. 1. 프로젝트 개요
1.1 프로젝트 목적
- AWS의 다양한 서비스를 사용하여 wordpres를 구현해 보는 것
1.2 프로젝트 환경
- EC2 (Elastic Copmpute Cloud)
- RDS (Relational Database Service)
- AutoScaling
- VPC
- Wordpress 버전 : 4.9.5
- Apache : 2.4.52-1.amzn2.x86_64
- php : 7.2.34-1.amzn2.x86_64
1.3 아키텍처 설계

2. 프로젝트 과정
2.1 vpc 구축
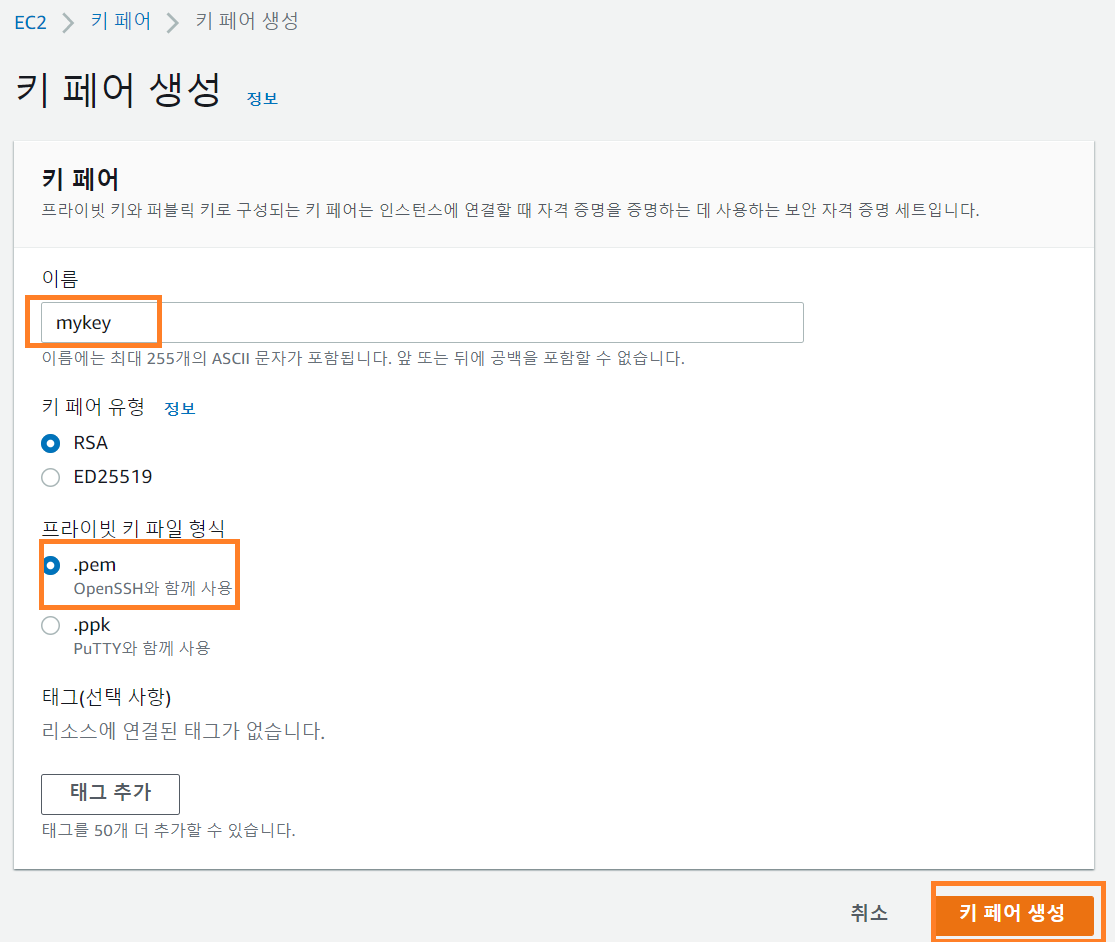
1) vpc 구축 전 키 생성

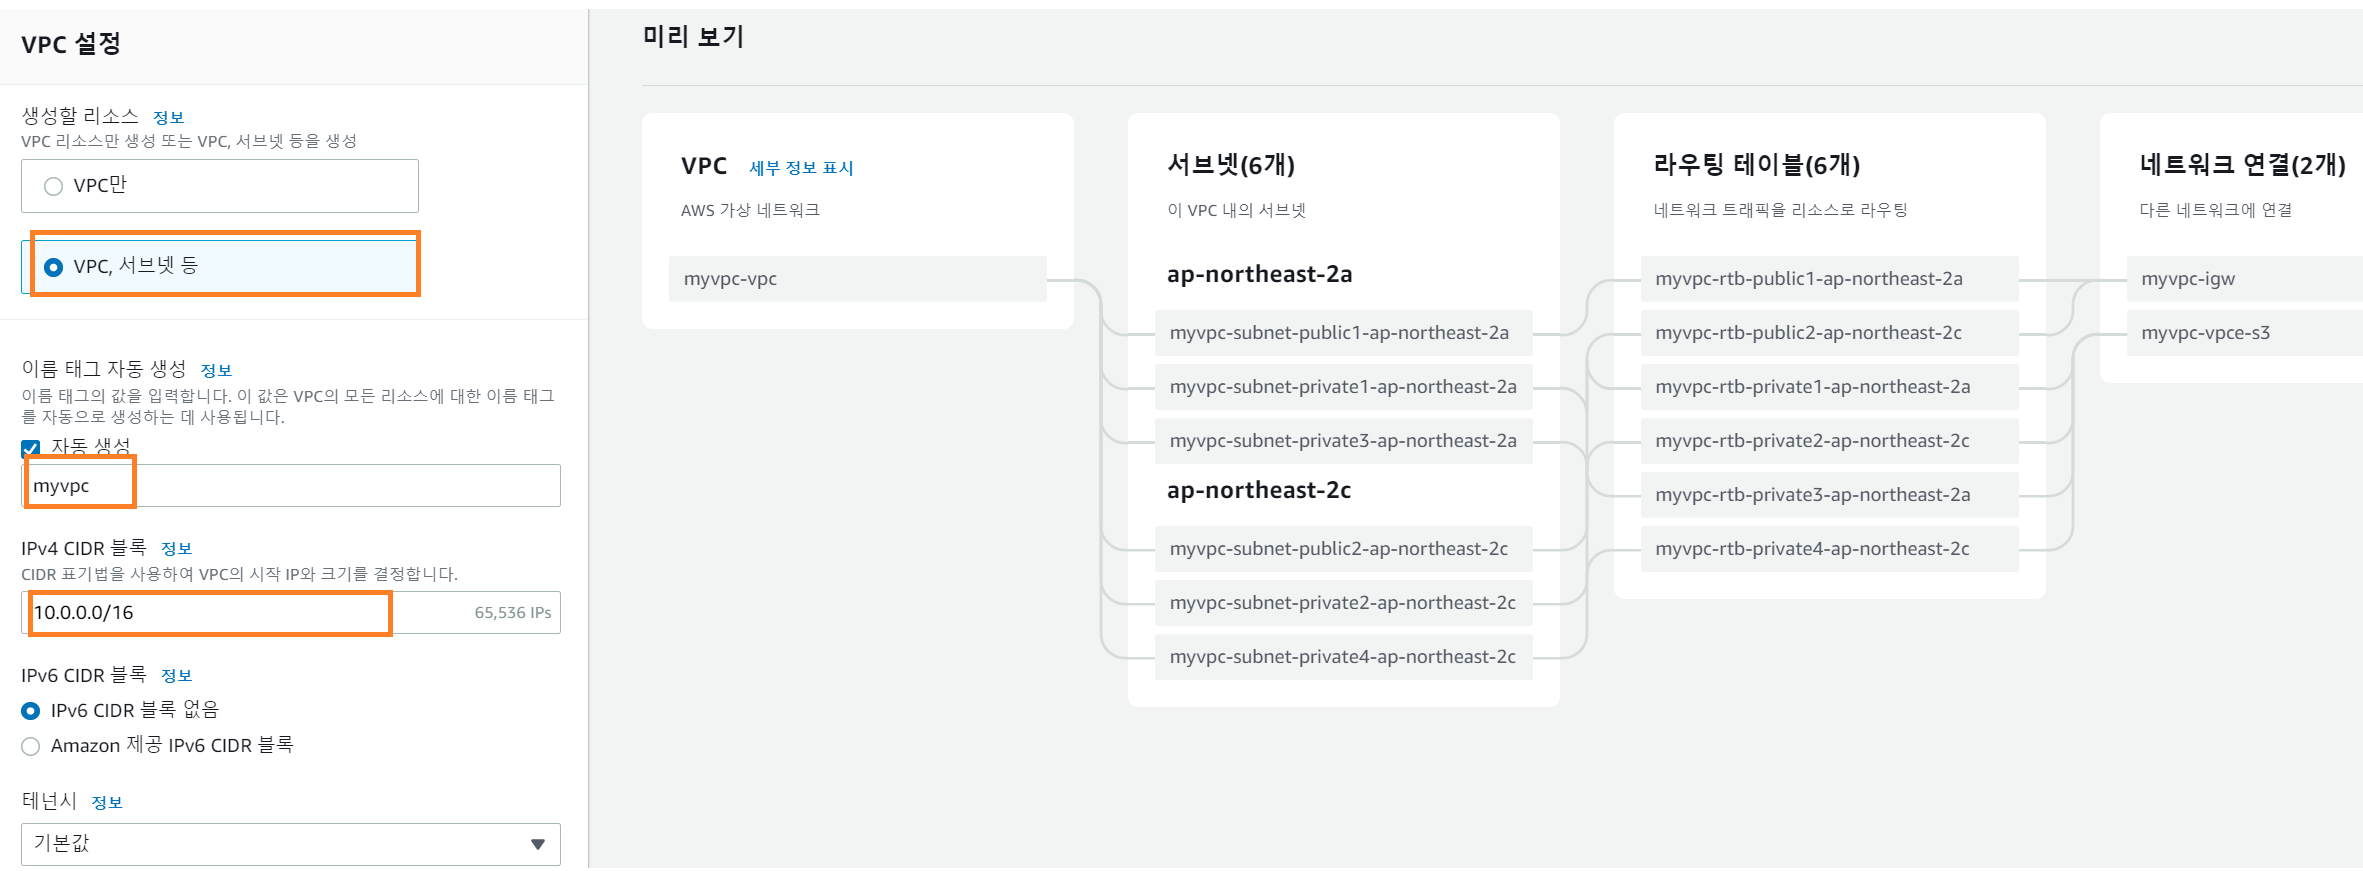
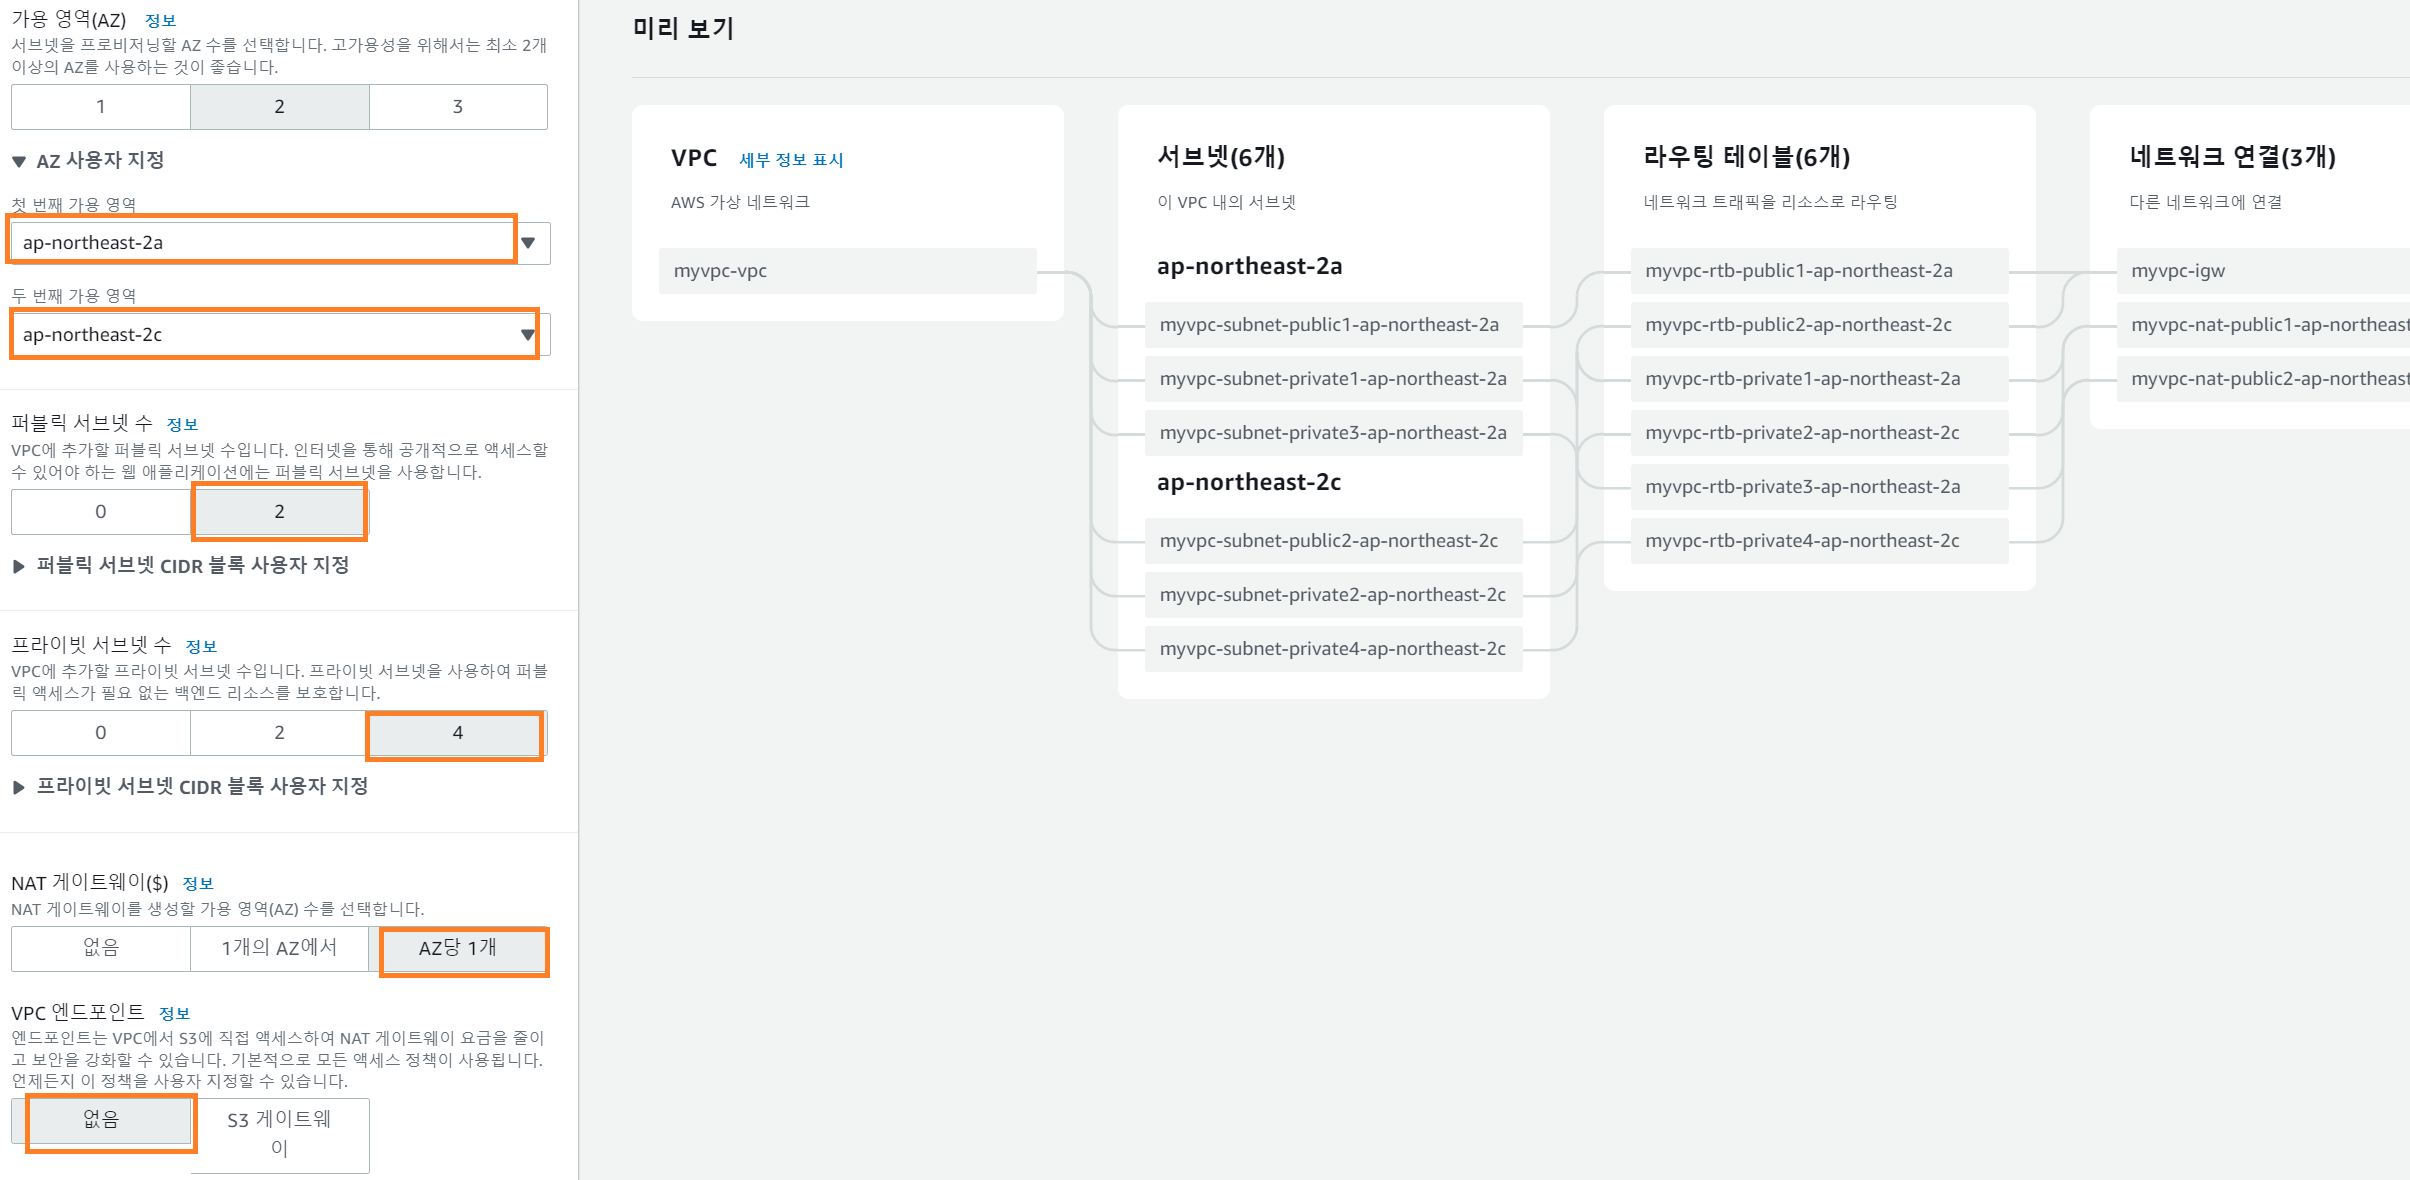
2) VPC 마법사
- vpc 와 서브넷 생성
2.2 Bastion Host 구축
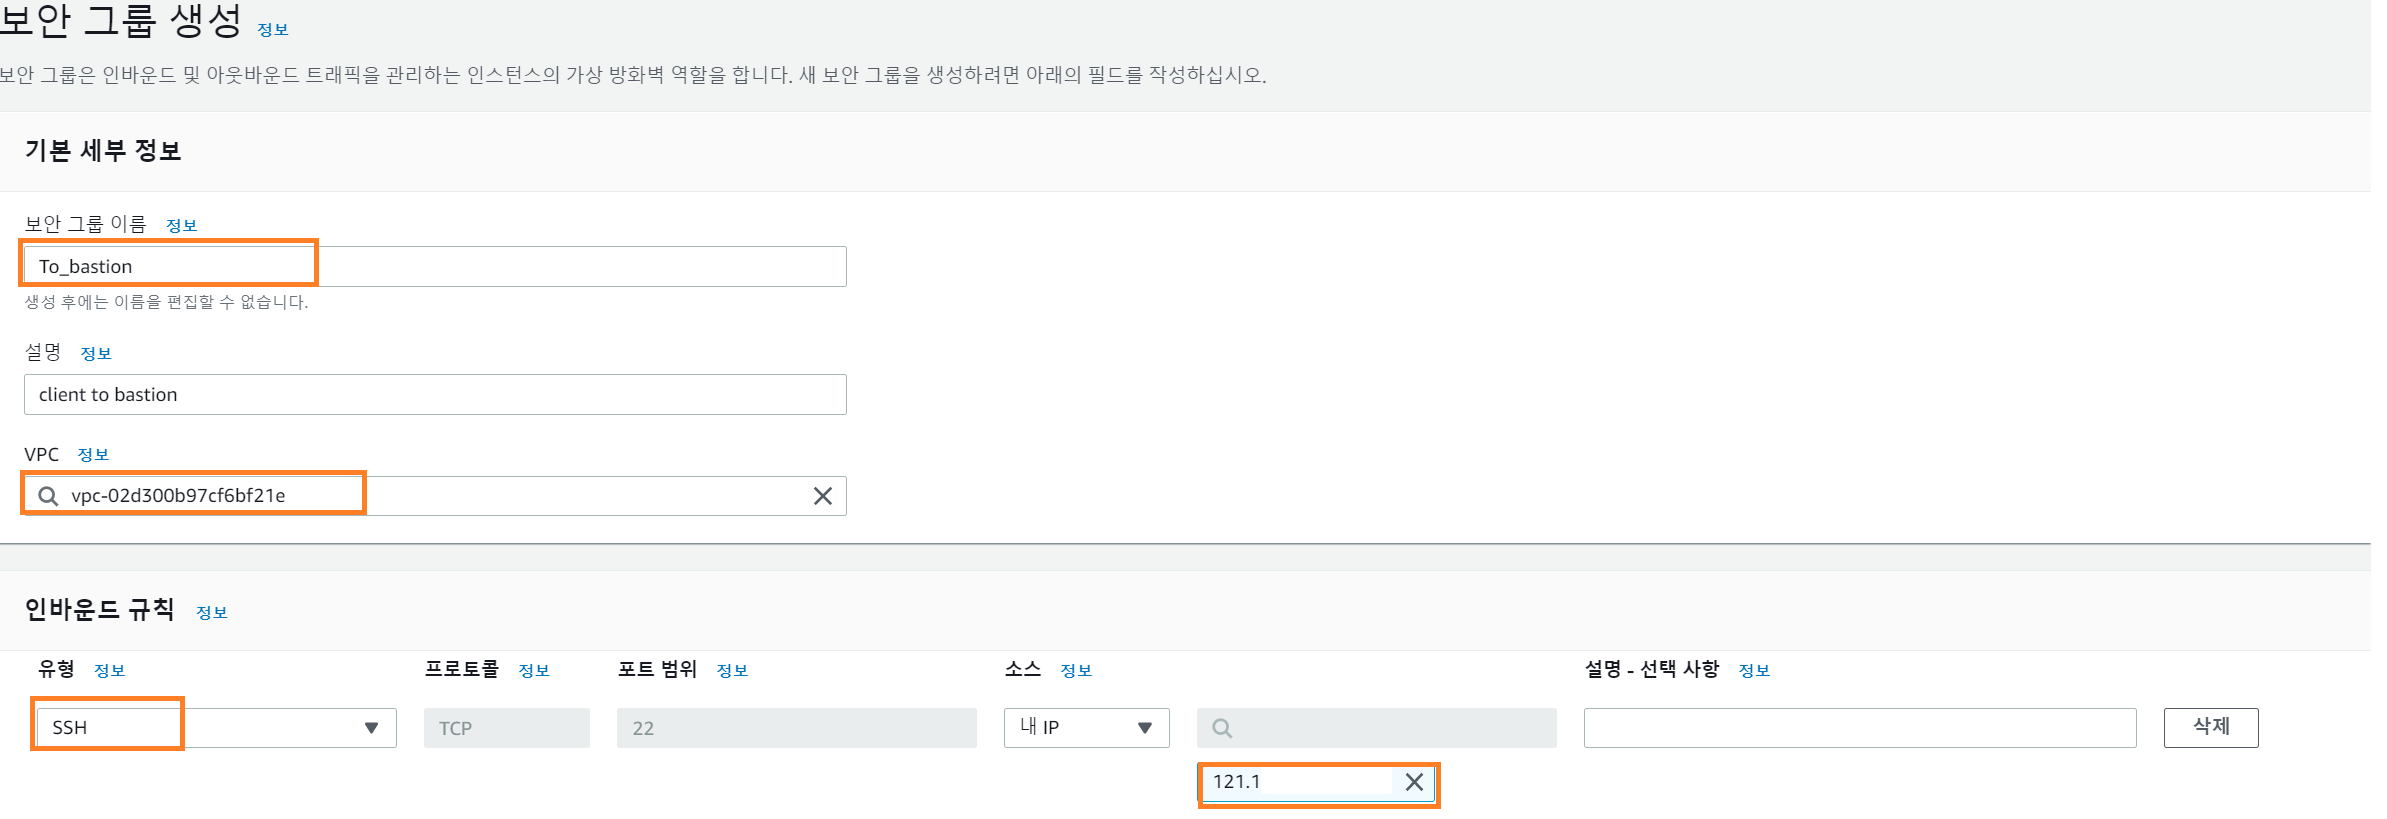
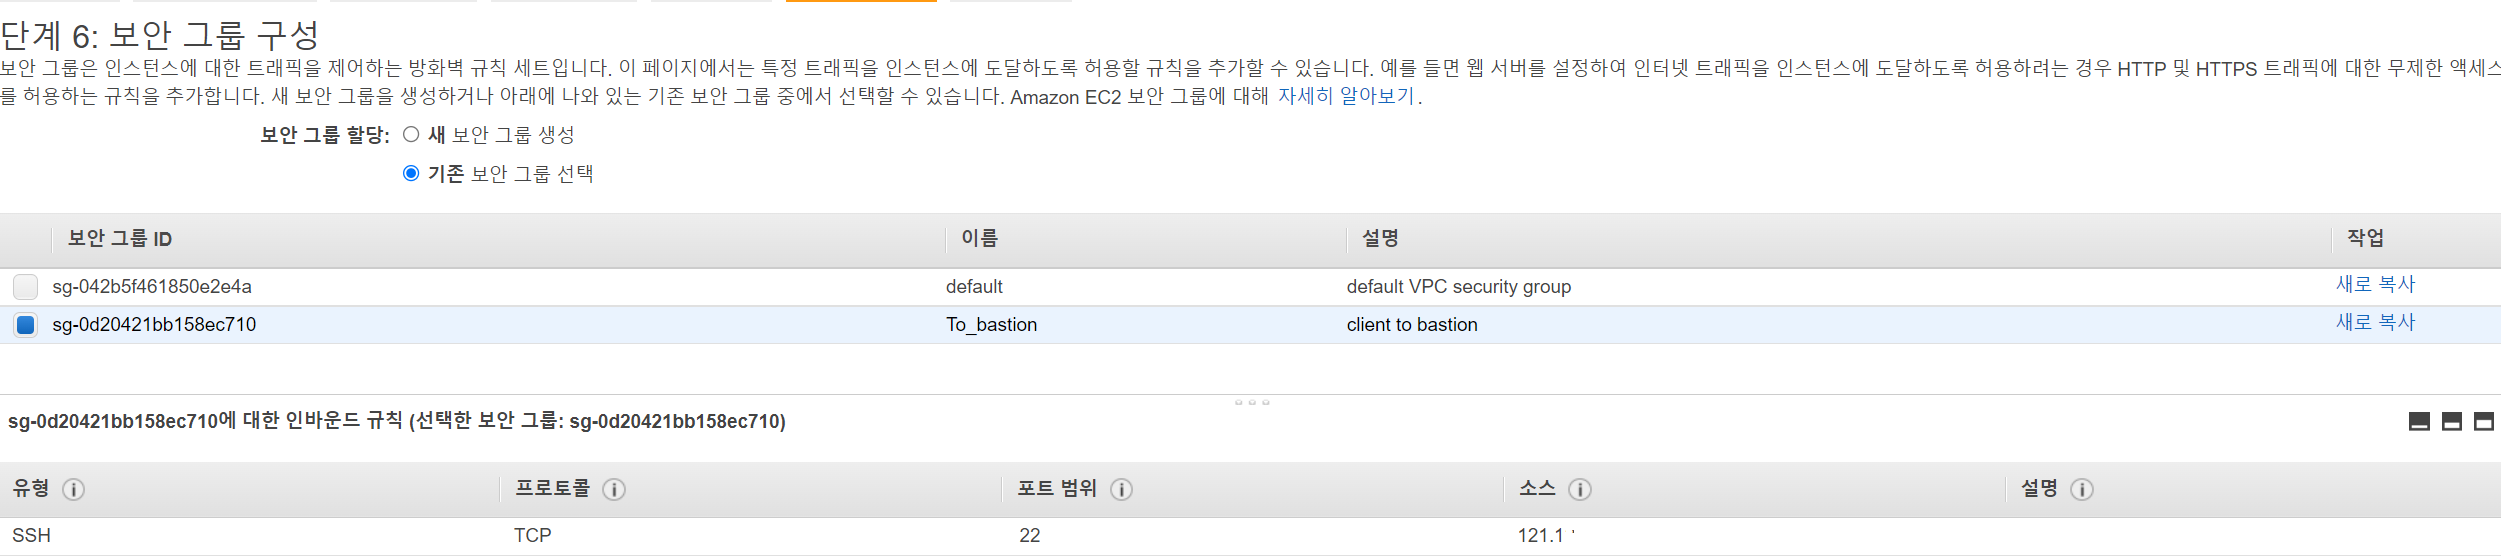
1) 보안 그룹 생성
- vpc > 보안 그룹 > 보안 그룹 생성
- 기존에 생성한 myvpc 선택
- Bastion host에 내 IP가 접근할수 있도록 ssh 허용하기 위해 인바운드 규칙 추가
- 아웃바운드 규칙은 디폴트 값 사용함
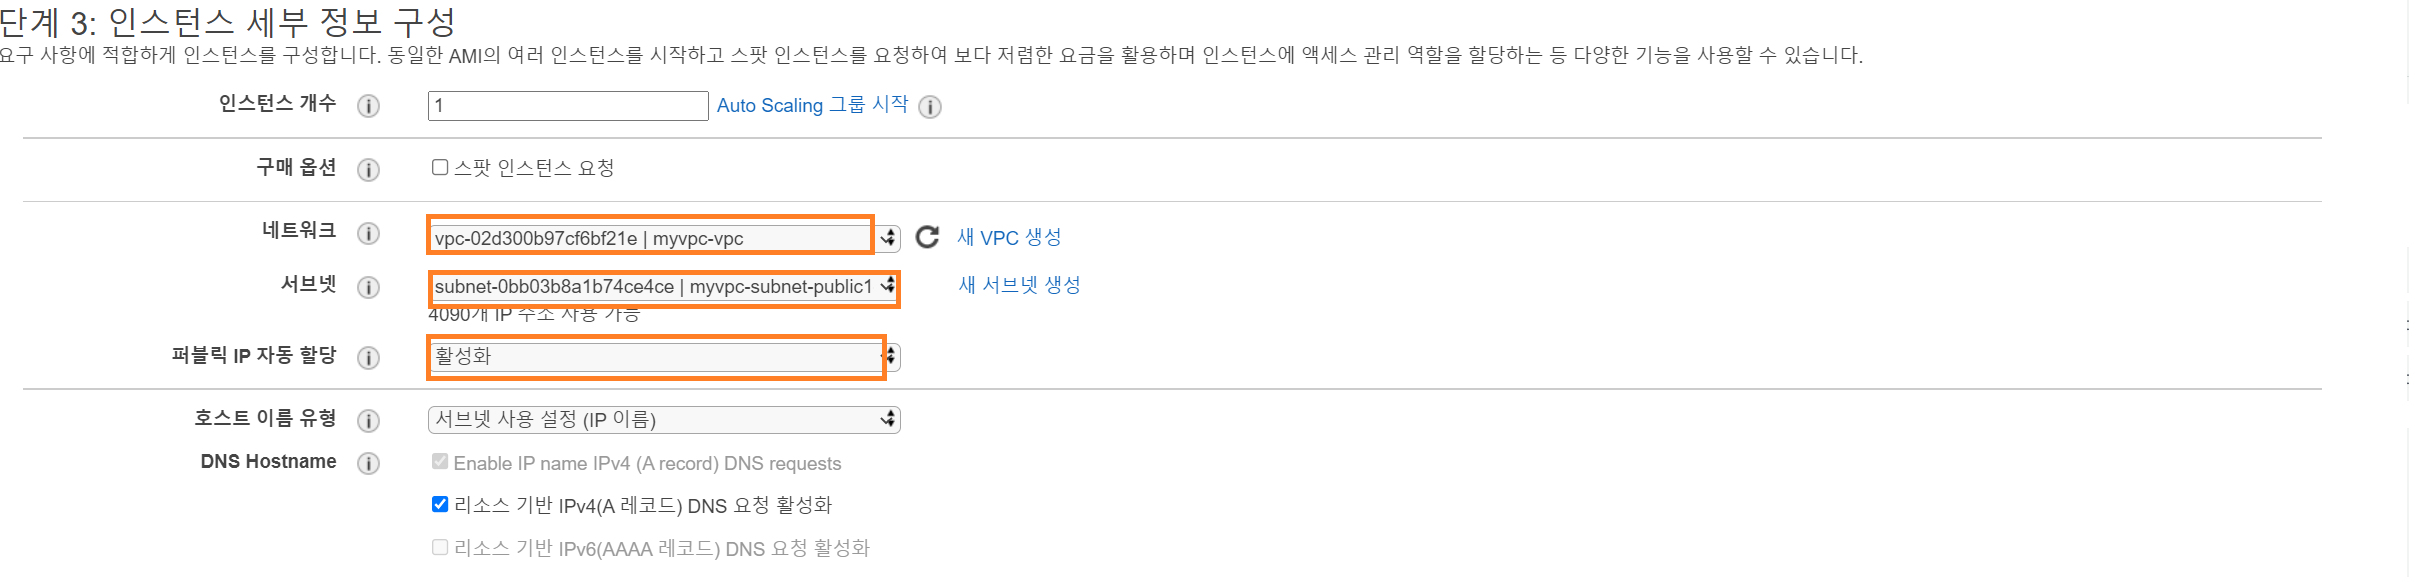
2) EC2 인스턴스 생성
- Amazon Linux 2 AMI > t2.micro (프리 티어)
- myvpc 선택, public subnet 선택 후 외부 접근이 가능하도록 Public IP 자동 할당
-
기존 생성해 놓은 보안 그룹 적용
-
기존 생성해 놓은 키 페어 적용

3) Bastion Host 확인
PS C:\Users\kiki1> ssh -i mykey.pem ec2-user@13.124.148.64
The authenticity of host '13.124.148.64 (13.124.148.64)' can't be established.
ECDSA key fingerprint is SHA256:7S/4ad6+U/zGDugfsUW9hL5iPGiAa9RmkK5Nrn2XWdM.
Are you sure you want to continue connecting (yes/no/[fingerprint])? yes
Warning: Permanently added '13.124.148.64' (ECDSA) to the list of known hosts.

       __|  __|_  )
       _|  (     /   Amazon Linux 2 AMI
      ___|\___|___|

https://aws.amazon.com/amazon-linux-2/
14 package(s) needed for security, out of 17 available
Run "sudo yum update" to apply all updates.
[ec2-user@ip-10-0-7-74 ~]$
AWS에서 생성하는 키페어를 사용 하는 경우, -i 옵션을 붙여서 키 파일을 적어줘야 적용 됨
2.3 Web Server 구축
1) web 인스턴스 생성
- 기존 생성해 놓은 myvpc 선택, ptivate subnet 선택
- 퍼블릭 ip를 비활성화 하여 외부 접근 차단
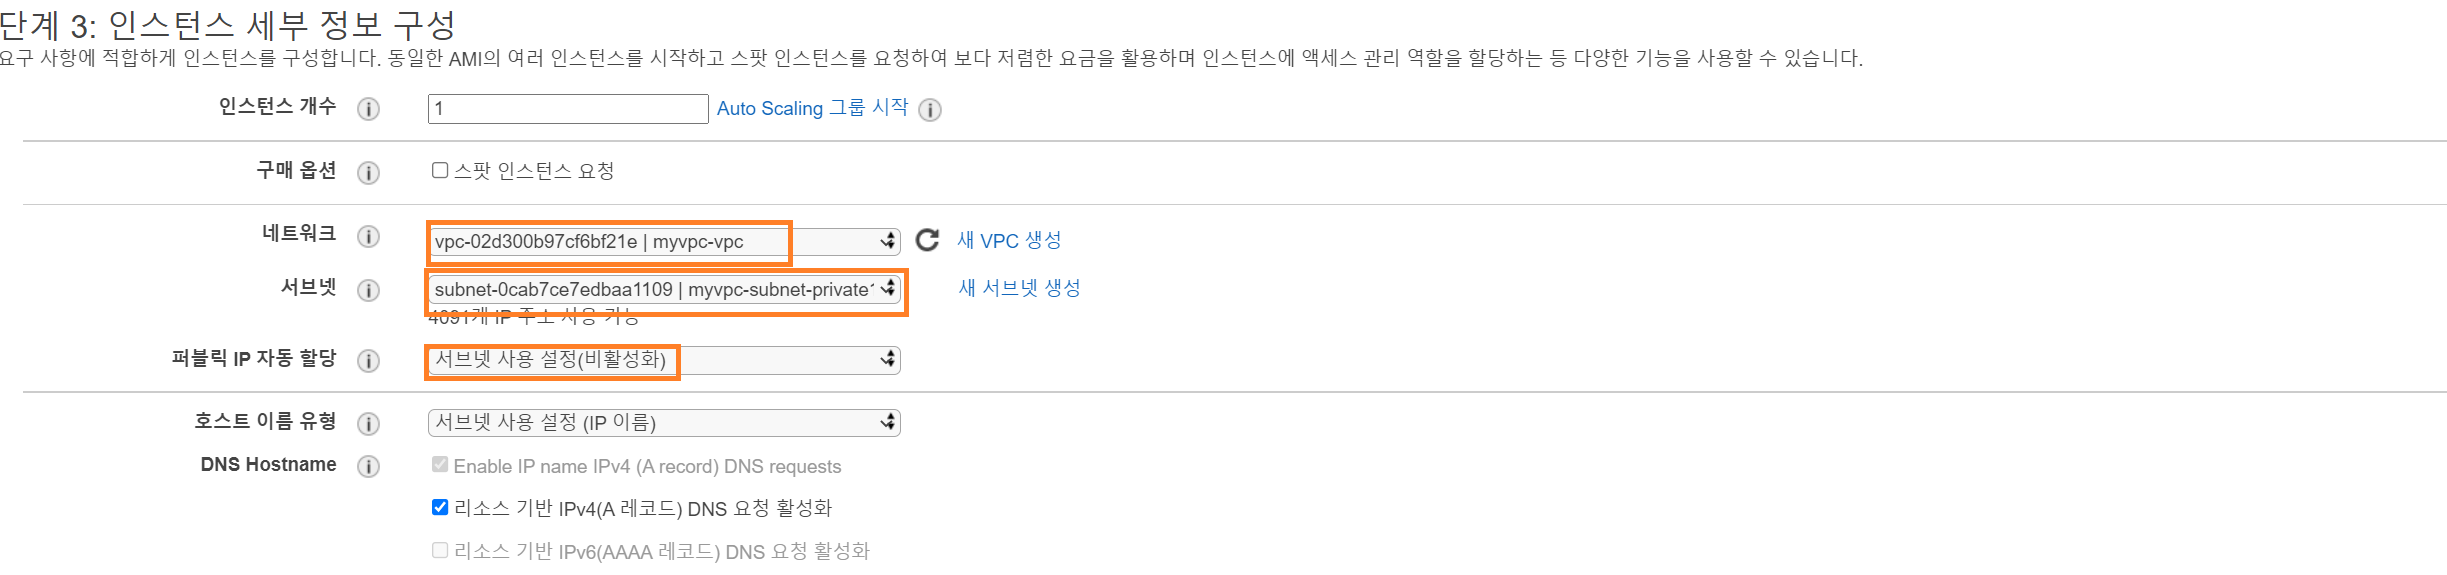
- 새 보안 그룹 생성을 선택해 Bastion host가 접근 가능하도록 ssh 허용
- 키 연결하여 인스턴스 생성

2) bastion host에서 접근 확인
- 생성한 key 내용을 복사하여 bastionhost에 생성
- 읽기만 가능하도록 권한 변경
[ec2-user@ip-10-0-7-74 ~]$ cd .ssh
[ec2-user@ip-10-0-7-74 .ssh]$ vim id_rsa
[ec2-user@ip-10-0-7-74 .ssh]$ chmod 400 id_rsa- Web 접속 확인
[ec2-user@ip-10-0-7-74 .ssh]$ ssh ec2-user@10.0.137.80
The authenticity of host '10.0.137.80 (10.0.137.80)' can't be established.
ECDSA key fingerprint is SHA256:NWrSyp+3BwirI1x9vnhhJtFNtkf7/k3ItXp3OhA0ltY.
ECDSA key fingerprint is MD5:a2:16:fe:10:89:dd:aa:7b:78:80:bf:04:e7:db:53:0d.
Are you sure you want to continue connecting (yes/no)? yes
Warning: Permanently added '10.0.137.80' (ECDSA) to the list of known hosts.

       __|  __|_  )
       _|  (     /   Amazon Linux 2 AMI
      ___|\___|___|

https://aws.amazon.com/amazon-linux-2/
14 package(s) needed for security, out of 17 available
Run "sudo yum update" to apply all updates.
[ec2-user@ip-10-0-137-80 ~]$
3) Wordpress 구성
- mysql 설치
[ec2-user@ip-10-0-137-80 ~]$ sudo yum install -y mysql- Apache 설치
[ec2-user@ip-10-0-137-80 ~]$sudo yum install -y httpd- apache 활성화
[ec2-user@ip-10-0-137-80 ~]$ sudo service httpd start
Redirecting to /bin/systemctl start httpd.service
[ec2-user@ip-10-0-137-80 ~]$ sudo systemctl enable httpd.service
Created symlink from /etc/systemd/system/multi-user.target.wants/httpd.service to /usr/lib/systemd/system/httpd.service.- wordpress 설치 후 아카이브 해제
- sample파일 복사 후 수정
[ec2-user@ip-10-0-137-80 ~]$ wget https://wordpress.org/latest.tar.gz
[ec2-user@ip-10-0-137-80 ~]$ sudo tar -xvzf latest.tar.gz -C /var/www/html
[ec2-user@ip-10-0-137-80 ~]$ ls /var/www/html
wordpress
[ec2-user@ip-10-0-137-80 ~]$ cd /var/www/html/wordpress/
[ec2-user@ip-10-0-137-80 ~]$ sudo cp wp-config-sample.php wp-config.php
[ec2-user@ip-10-0-137-80 ~]$ sudo vim wp-config.php- wp-config.php파일 수정
define( 'DB_NAME', 'wordpress' );

/** Database username */
define( 'DB_USER', 'wordpress' );

/** Database password */
define( 'DB_PASSWORD', '암호' );

/** Database hostname */
define( 'DB_HOST', '엔드포인트' );

/** Database charset to use in creating database tables. */
define( 'DB_CHARSET', 'utf8' );

/** The database collate type. Don't change this if in doubt. */
define( 'DB_COLLATE', '' );[ec2-user@ip-10-0-137-80 wordpress]$ sudo amazon-linux-extras install -y lamp-mariadb10.2-php7.2 php7.22.4 RDS 구축
1) DB 서브넷 그룹
- RDS > 서브넷 그룹 > DB 서브넷 그룹 생성
- myvpc 선택후 서로 다른 가용 영역 선택
- private 서브넷 선택
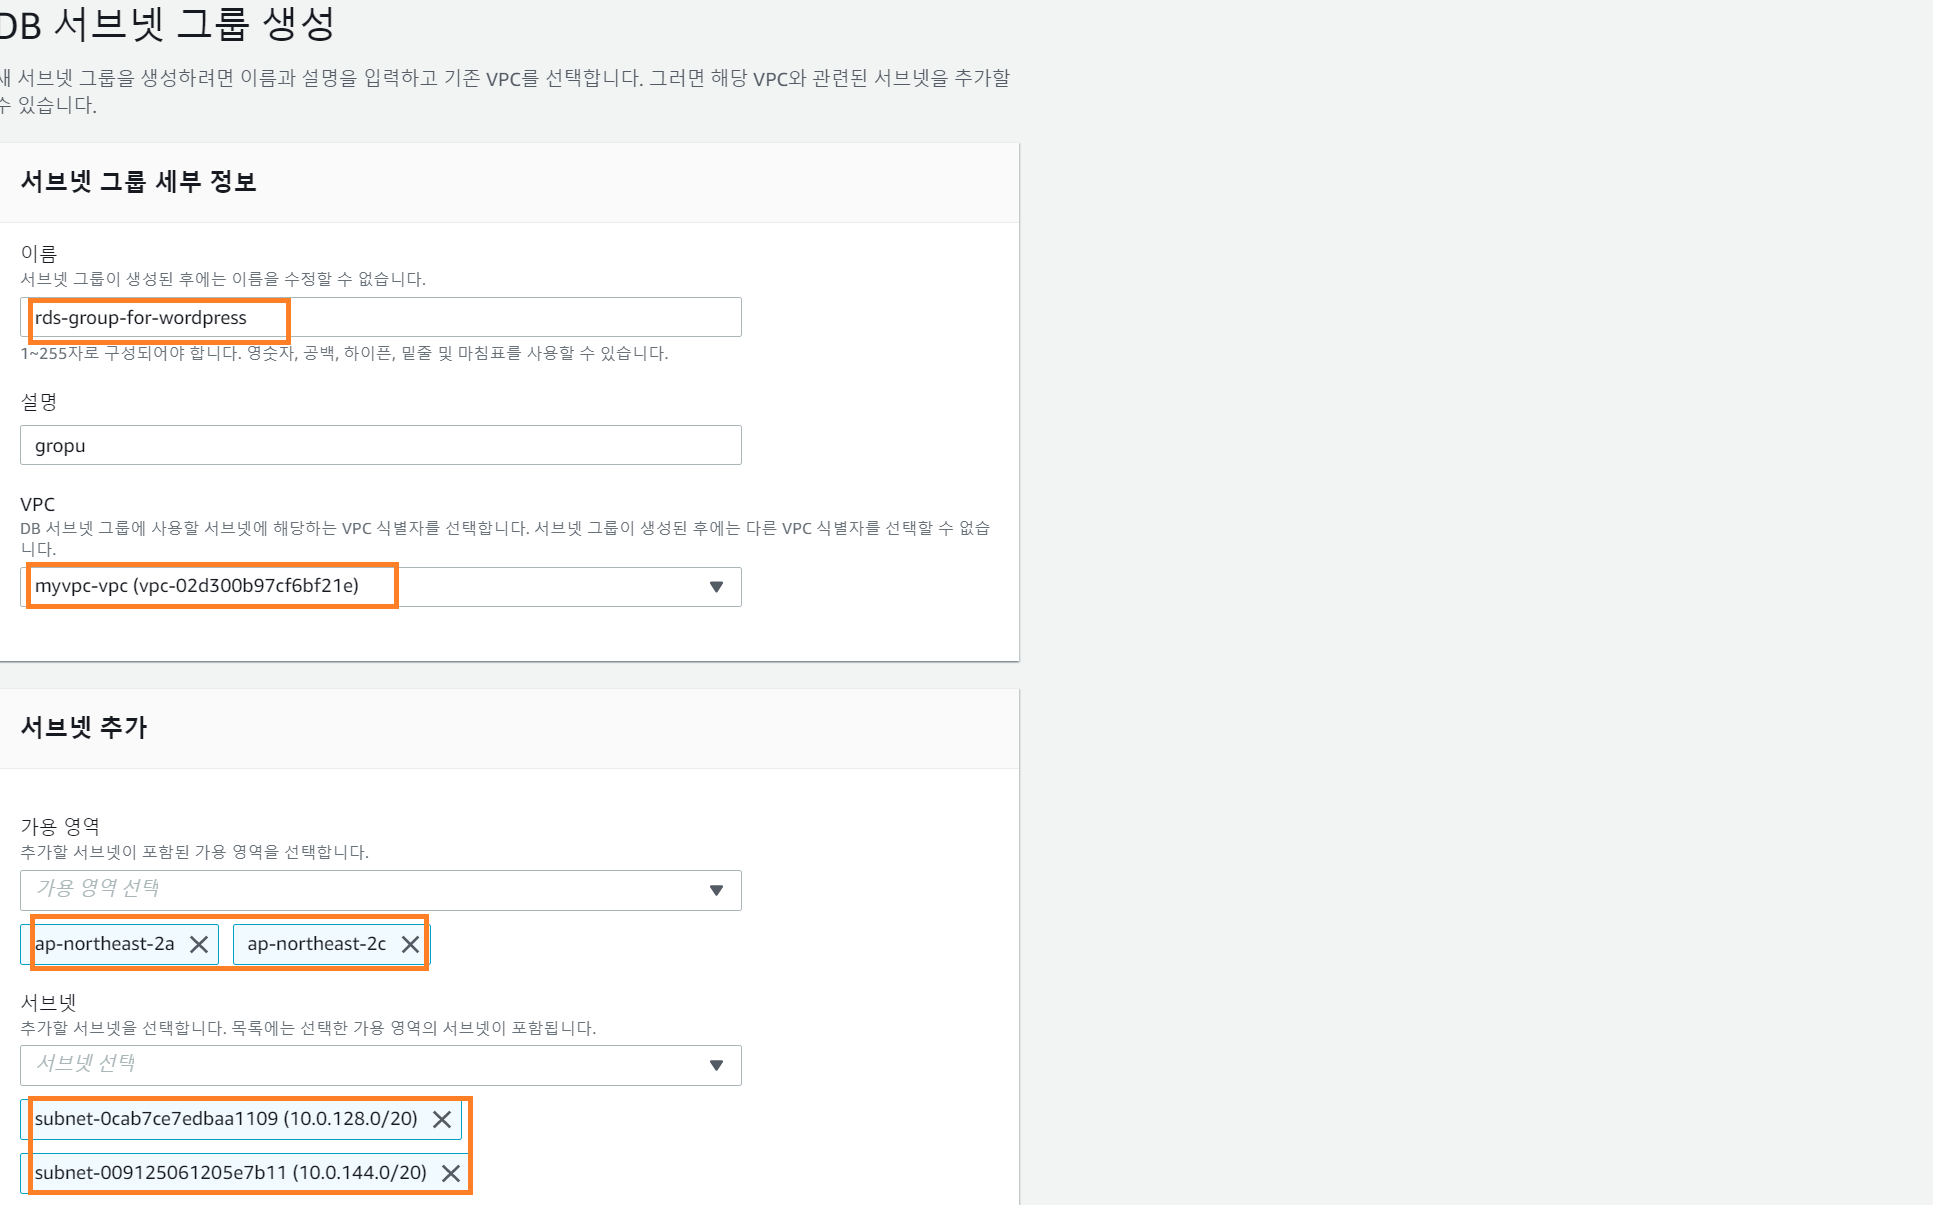
| 가용영역 | CIDR 블록 |
|---|---|
| ap-northeast-2a | 10.0.128.0/20 |
| ap-northeast-2b | 10.0.144.0/20 |
2) RDS 생성
- RDS > 데이터 베이스 생성
- 표준 생성 > MySQL > 프리티어 선택
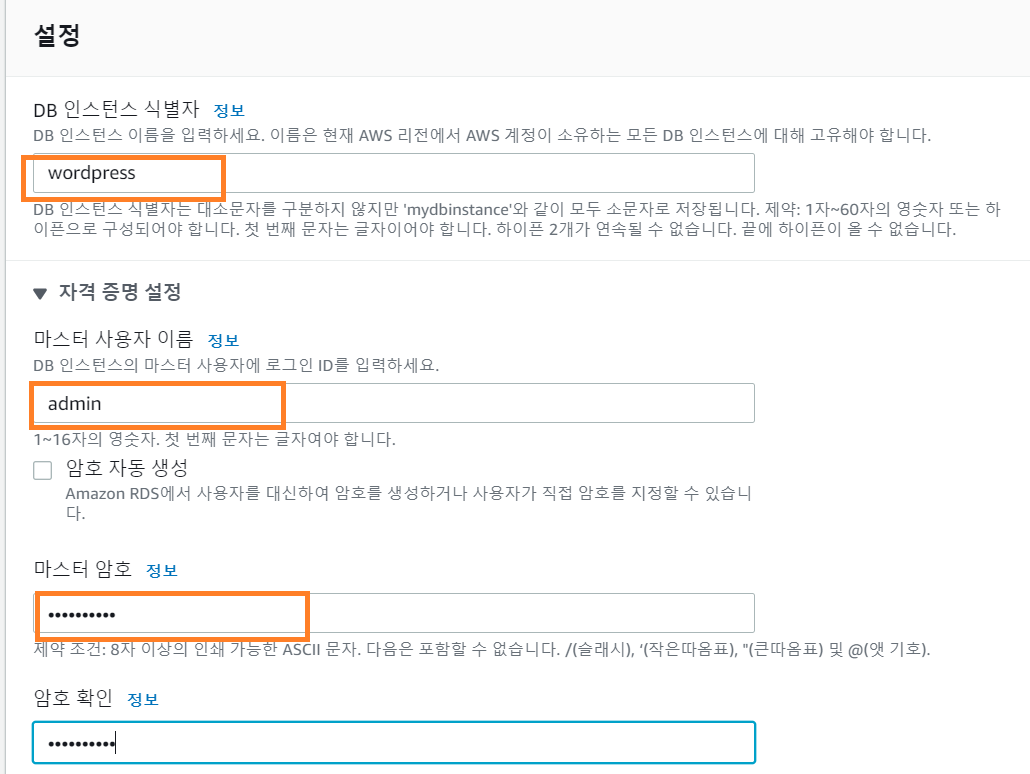
- 생성한 myvpc 선택
- 생성한 서브넷 그룹 적용
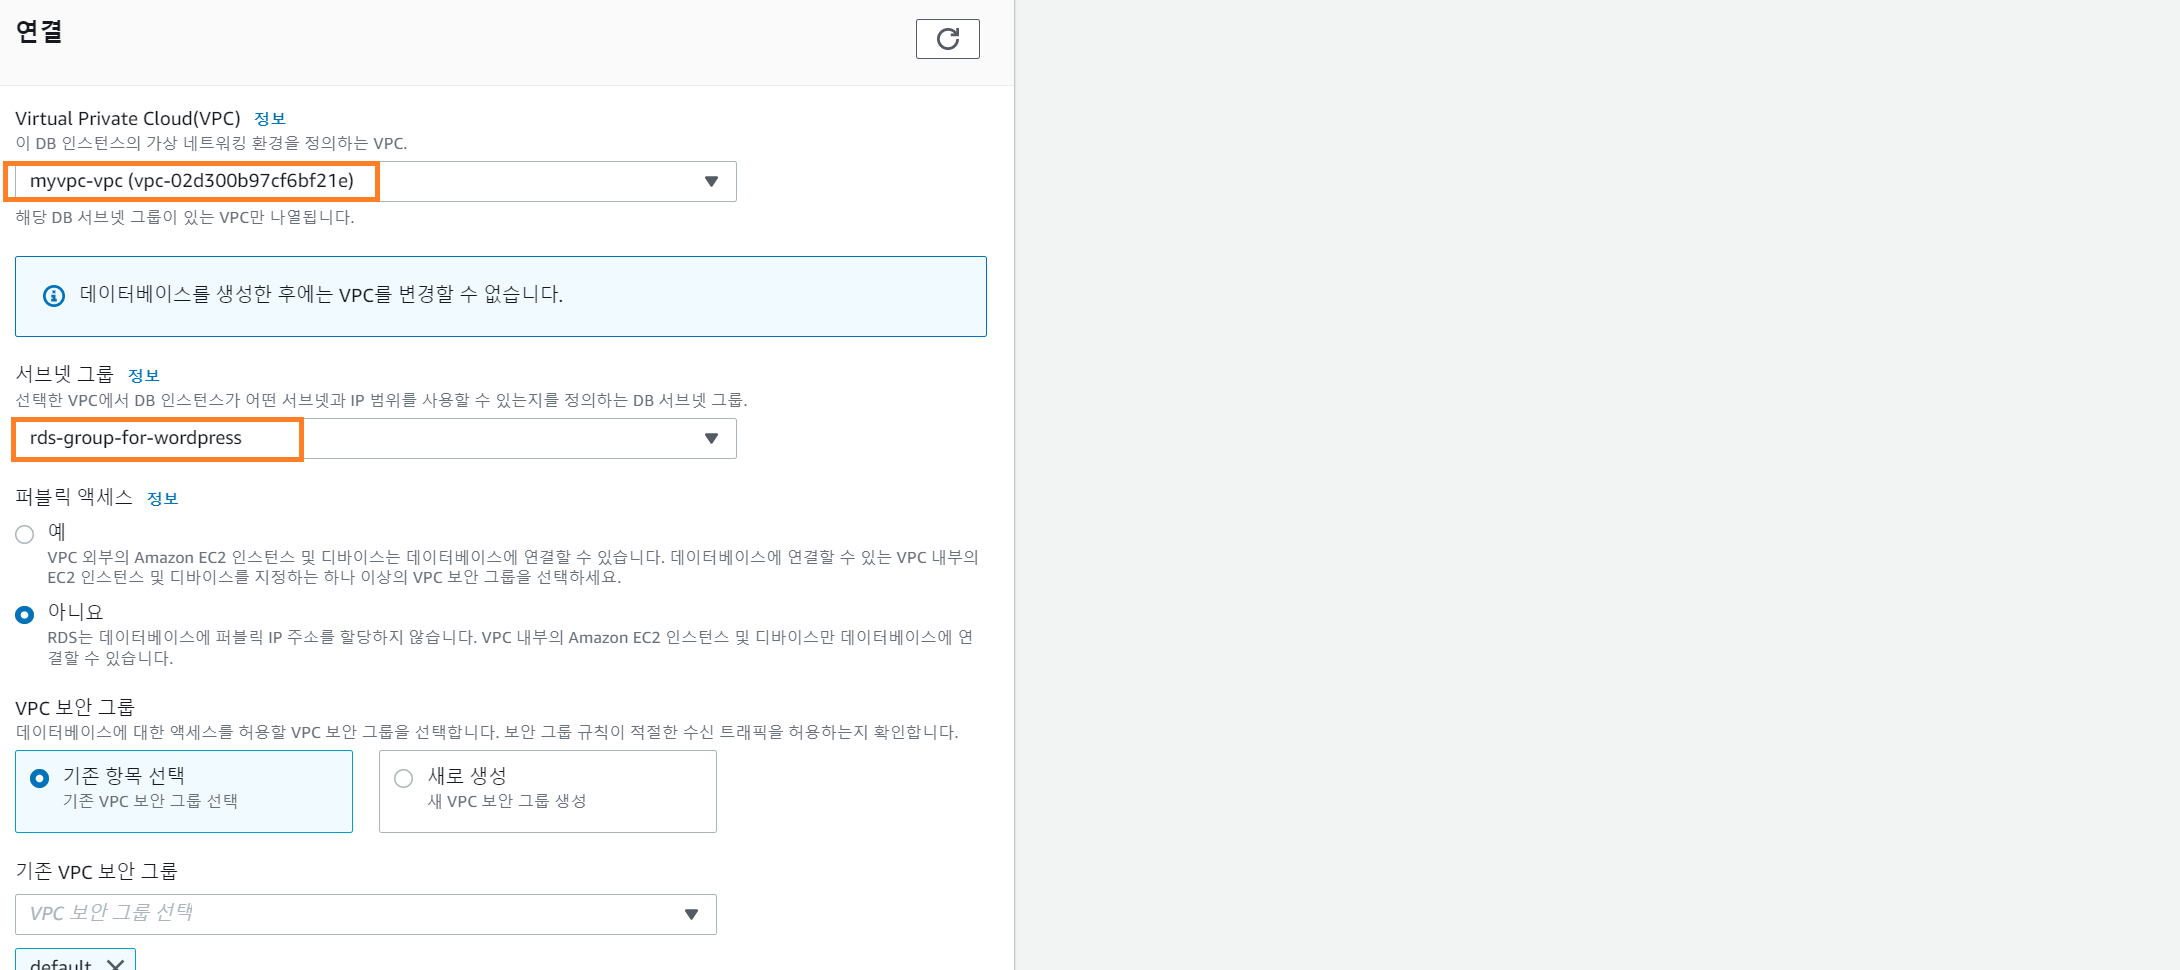
- 추가구성 편집
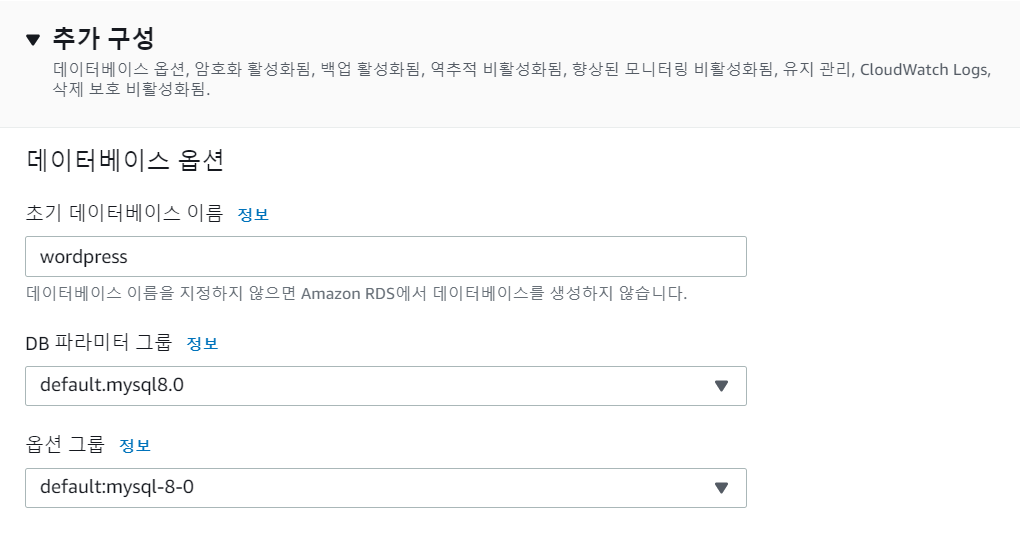
- DB 생성 확인

3) EC2가 DB에 접근하게 허용
- RDS의 보안 그룹에서 인바운드 규칙을 편집해, EC2가 접근하도록 허용
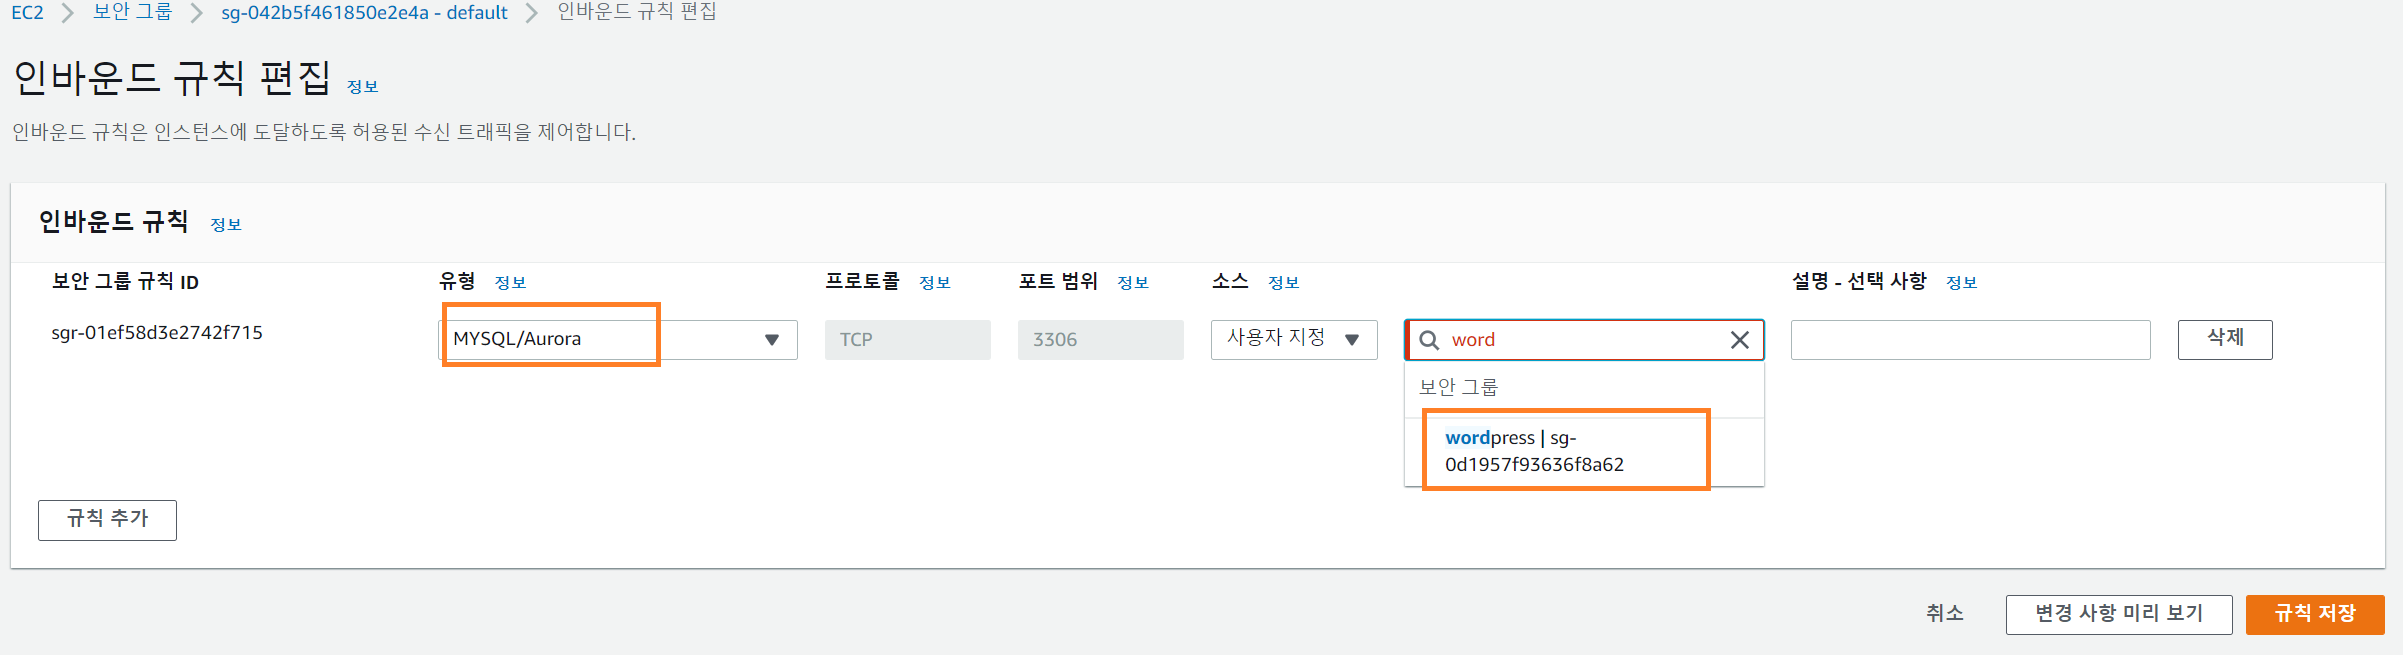
- 생성된 데이터데이스의 엔드포인트 입력하여 연결
[ec2-user@ip-10-0-137-80 ~]$ export MYSQL_HOST=wordpress.cuqtsa49ab89.ap-northeast-2.rds.amazonaws.com
[ec2-user@ip-10-0-137-80 ~]$ mysql -u admin -p
Enter password:
Welcome to the MariaDB monitor.  Commands end with ; or \g.
Your MySQL connection id is 19
Server version: 8.0.28 Source distribution

Copyright (c) 2000, 2018, Oracle, MariaDB Corporation Ab and others.

Type 'help;' or '\h' for help. Type '\c' to clear the current input statement.

MySQL [(none)]>- 사용자 생성, 권한 부여
MySQL [(none)]> use wordpress;
Database changed
MySQL [wordpress]> CREATE USER wordpress IDENTIFIED BY 'dkagh1234!';
Query OK, 0 rows affected (0.01 sec)

MySQL [wordpress]> GRANT ALL PRIVILEGES ON wordpress.* TO wordpress;
Query OK, 0 rows affected (0.01 sec)

MySQL [wordpress]> FLUSH PRIVILEGES;
Query OK, 0 rows affected (0.00 sec)

MySQL [wordpress]> exit
Bye
2.5 AMI 생성
- EC2인스턴스 AMI 생성
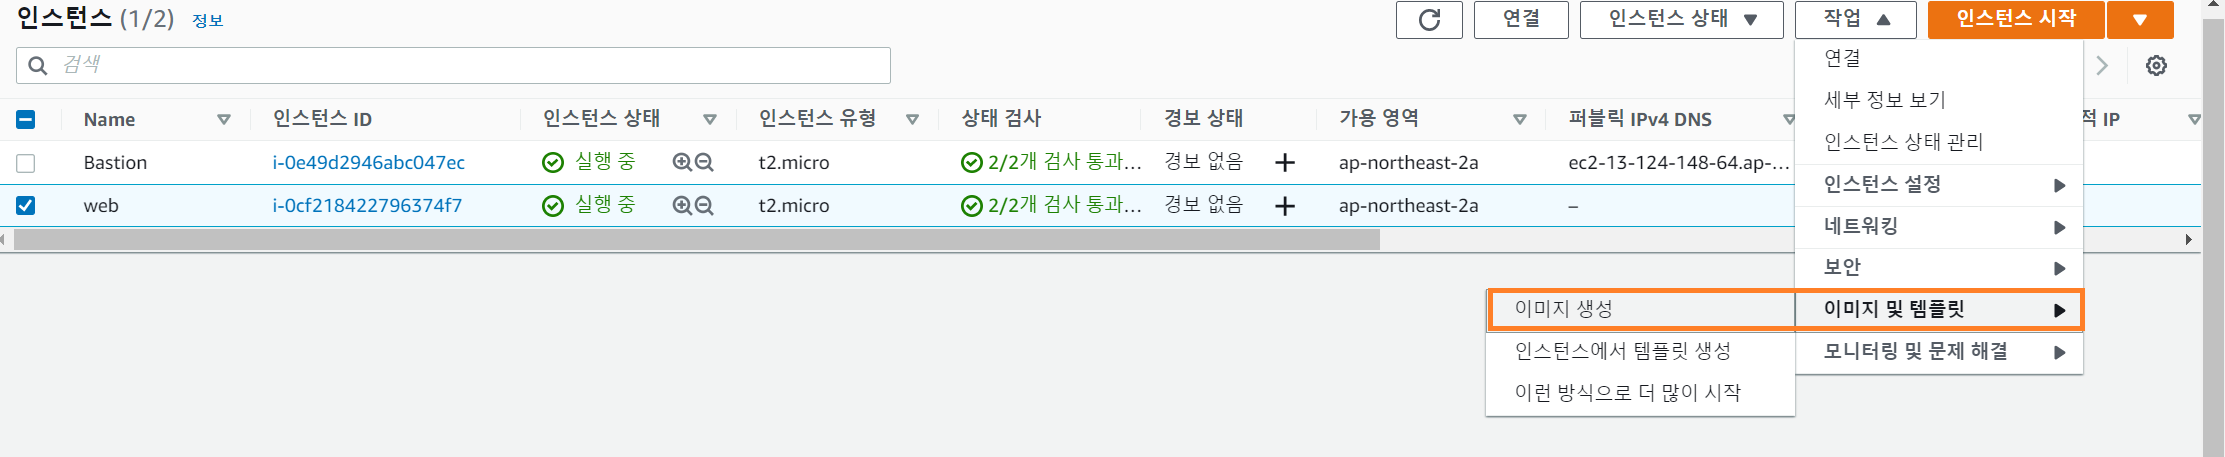
- 생성 확인

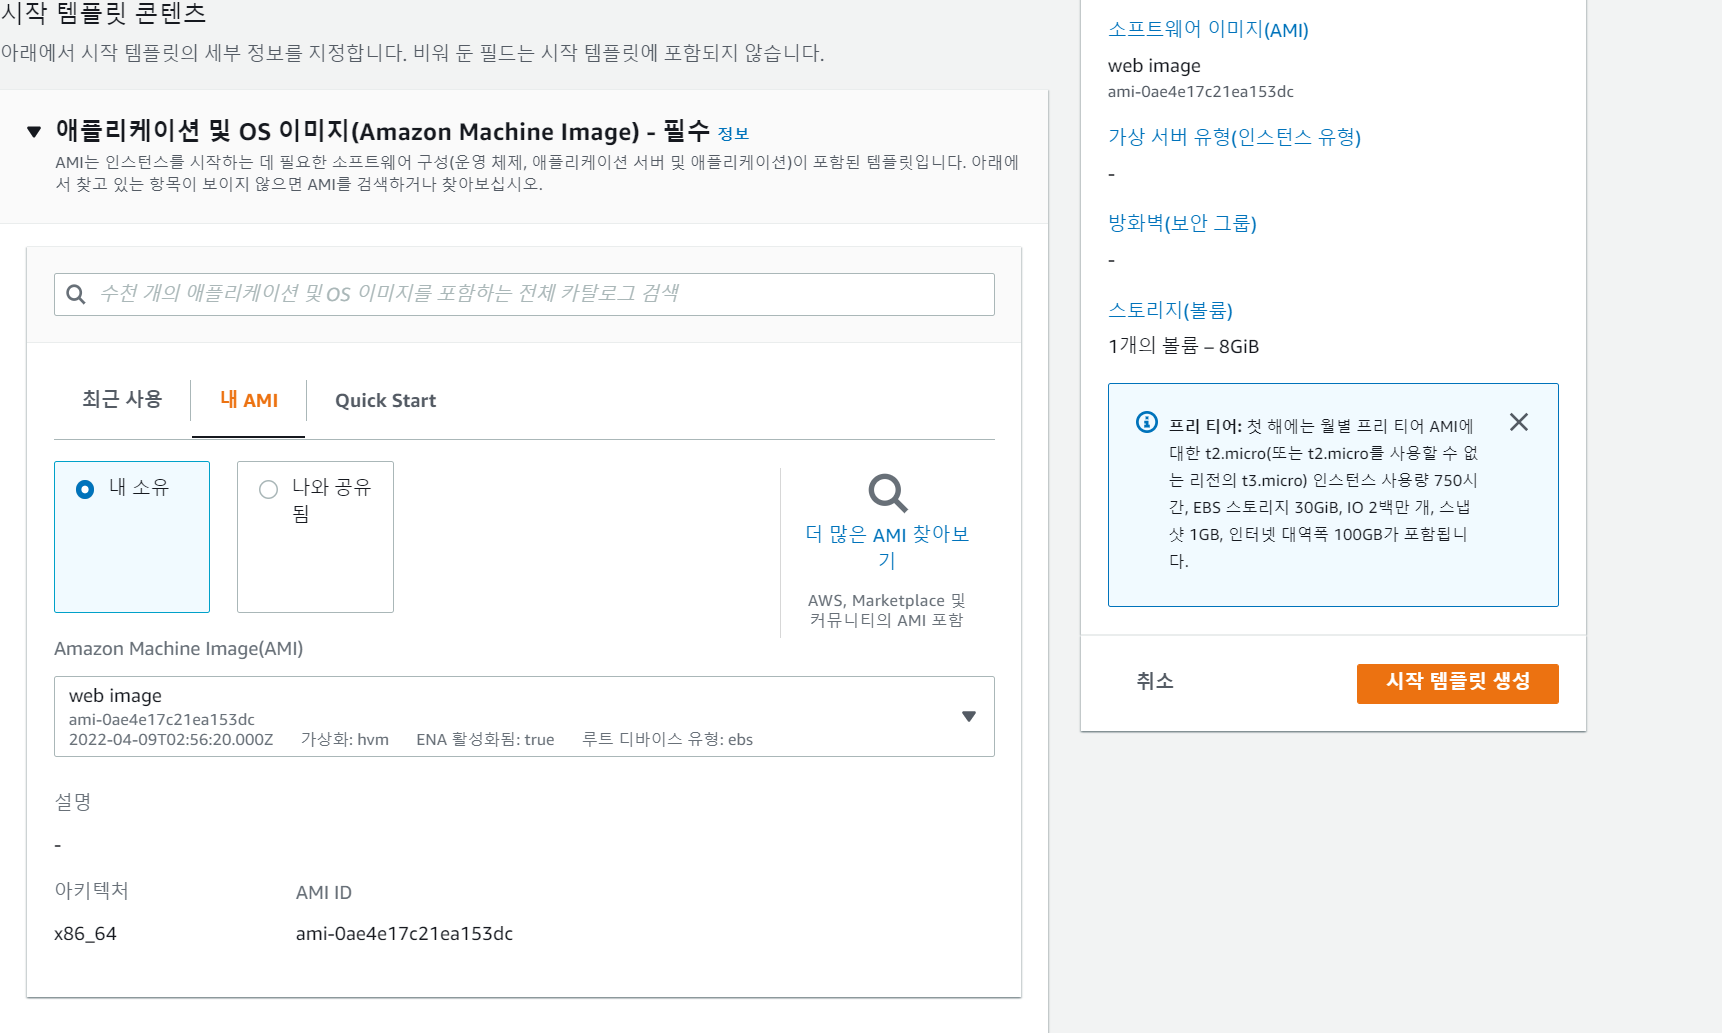
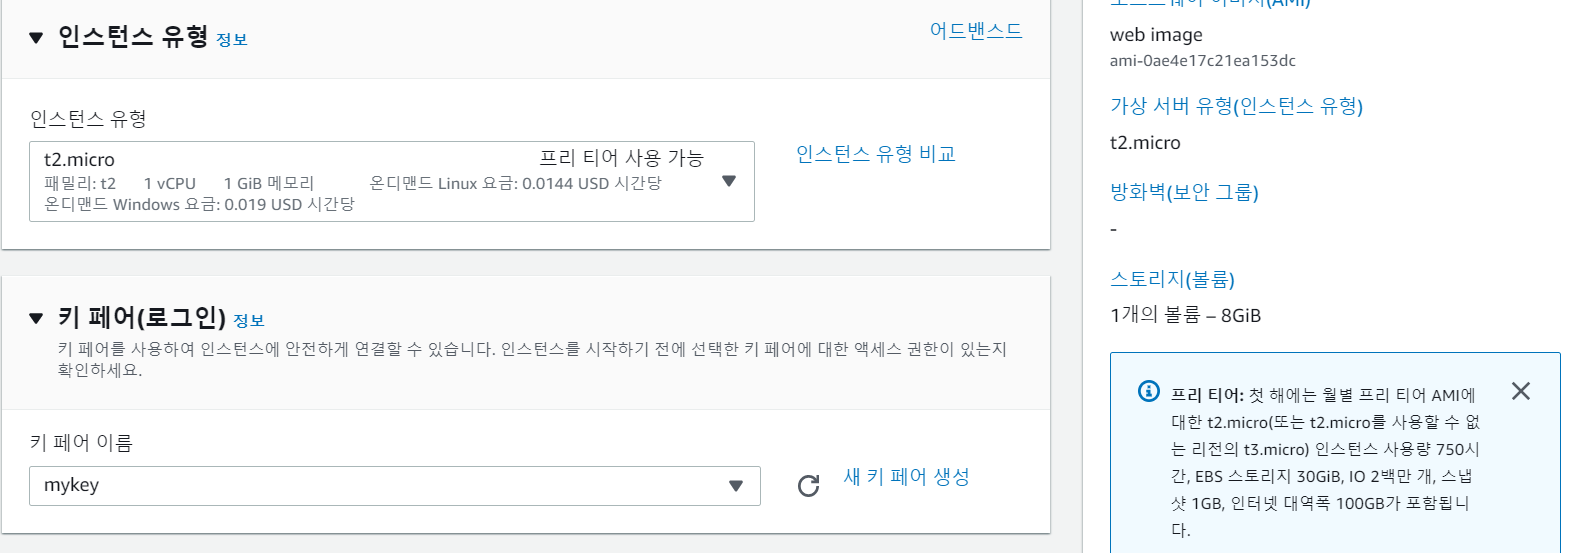
2.6 AutoScaling 및 Load Balancing
1) 시작 템플릿 생성
- EC2 > 시작 템플릿 > 시작 템플릿 생성
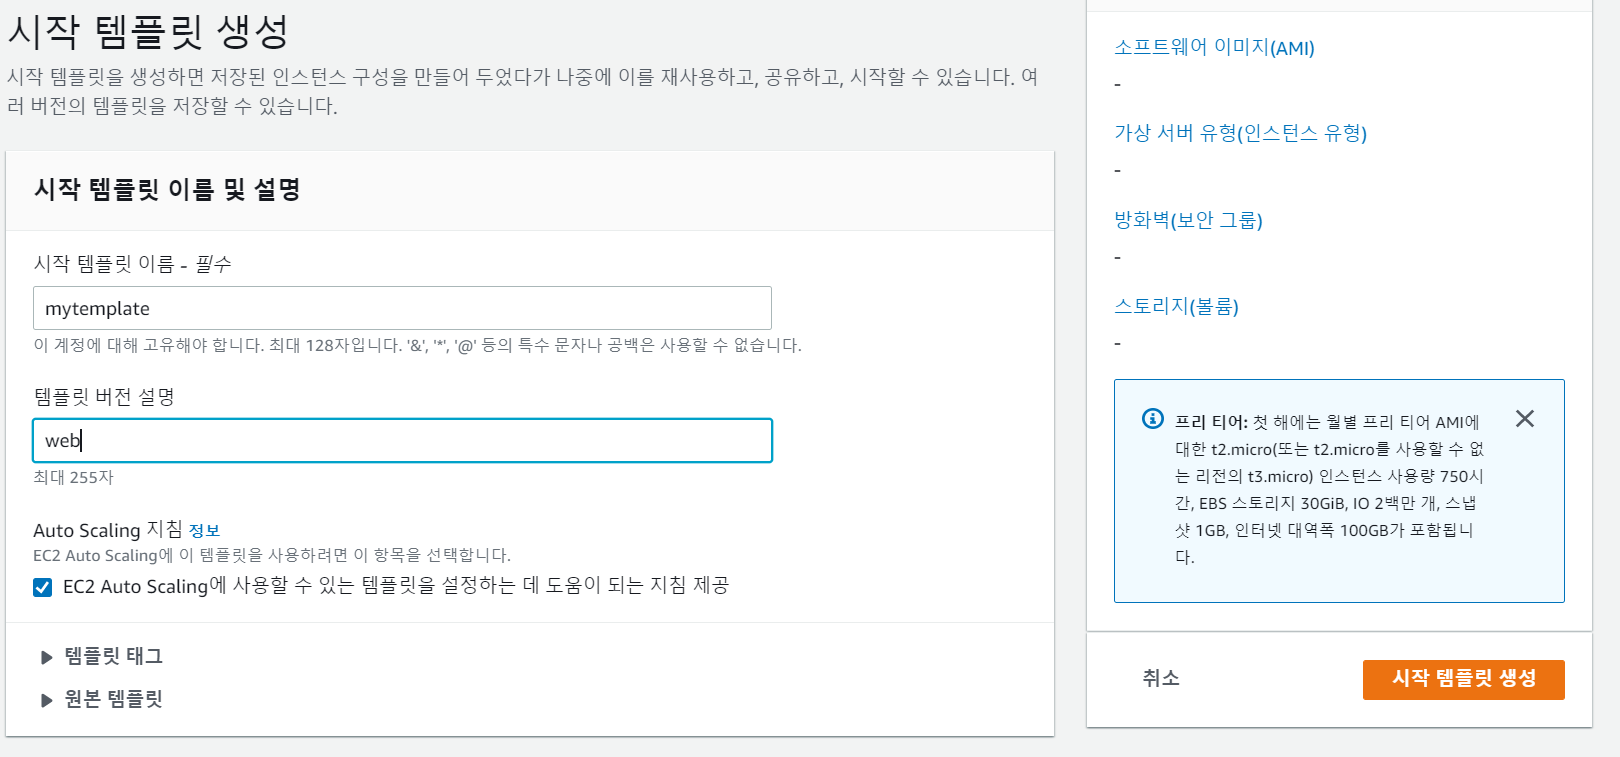
- 생성한 AMI 적용
- 프리티어 선택 및 키페어
2) Auto scaling 그룹 생성
- EC2 > Auto Scaling 그룹 > Auto Scaling 그룹 생성

- myvpc 선택, 각각의 가용영역의 프라이빗 서브넷 선택
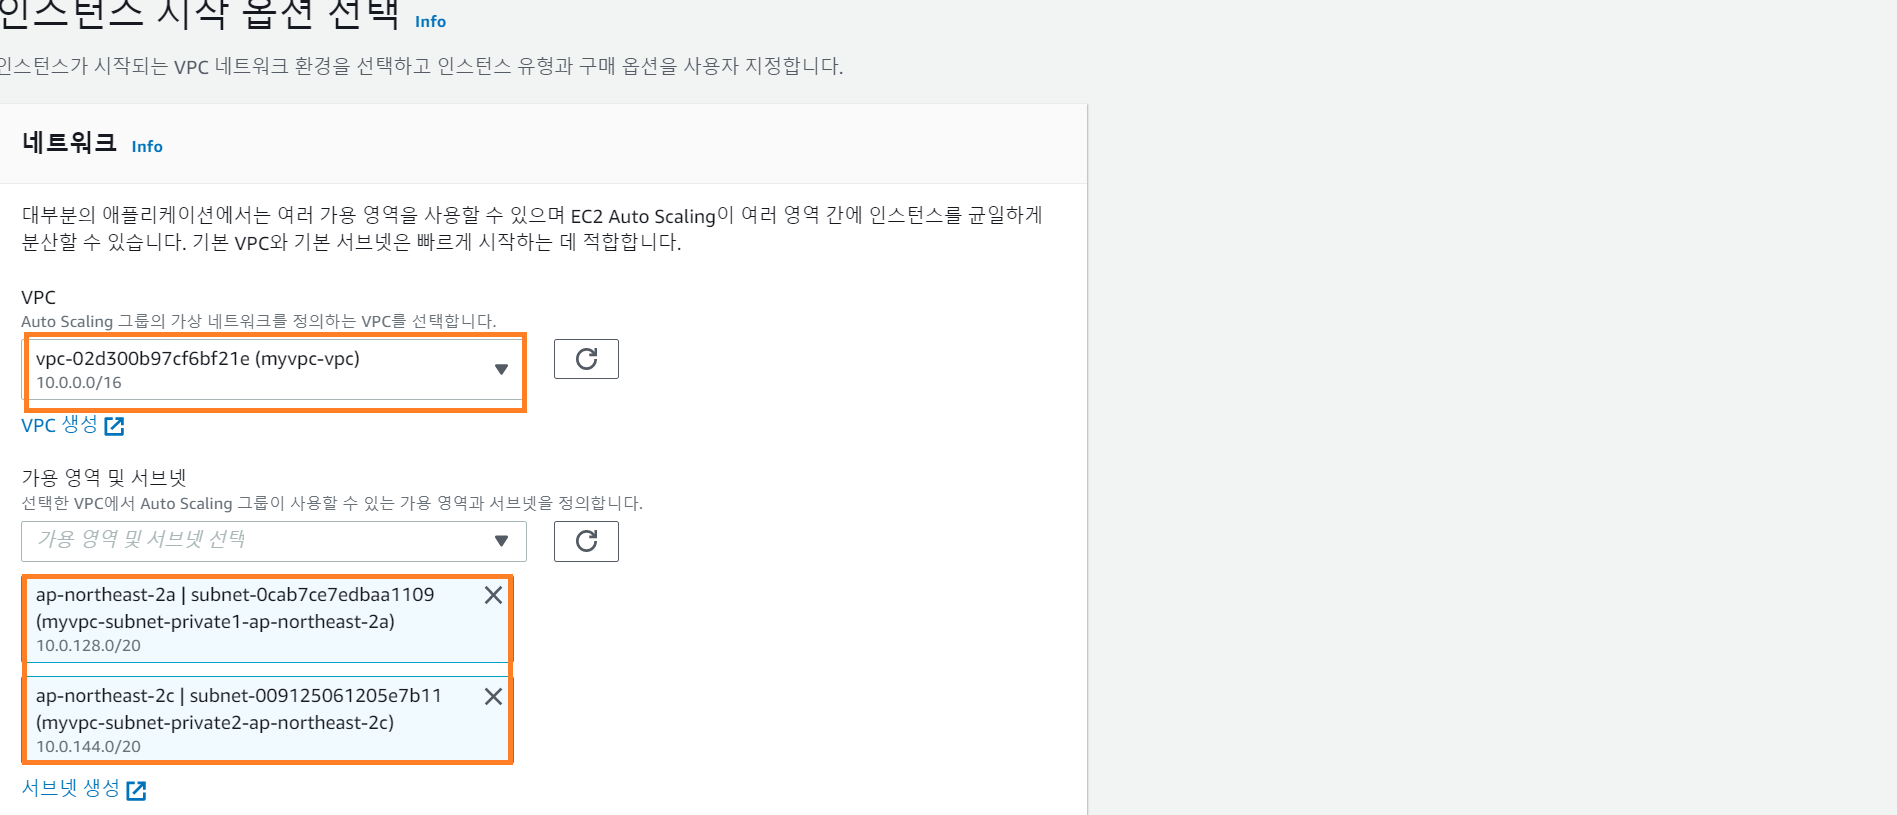
- 새로운 로드 밸런서 생성

- 그룹 크기 설정

- 인스턴스 생성 확인

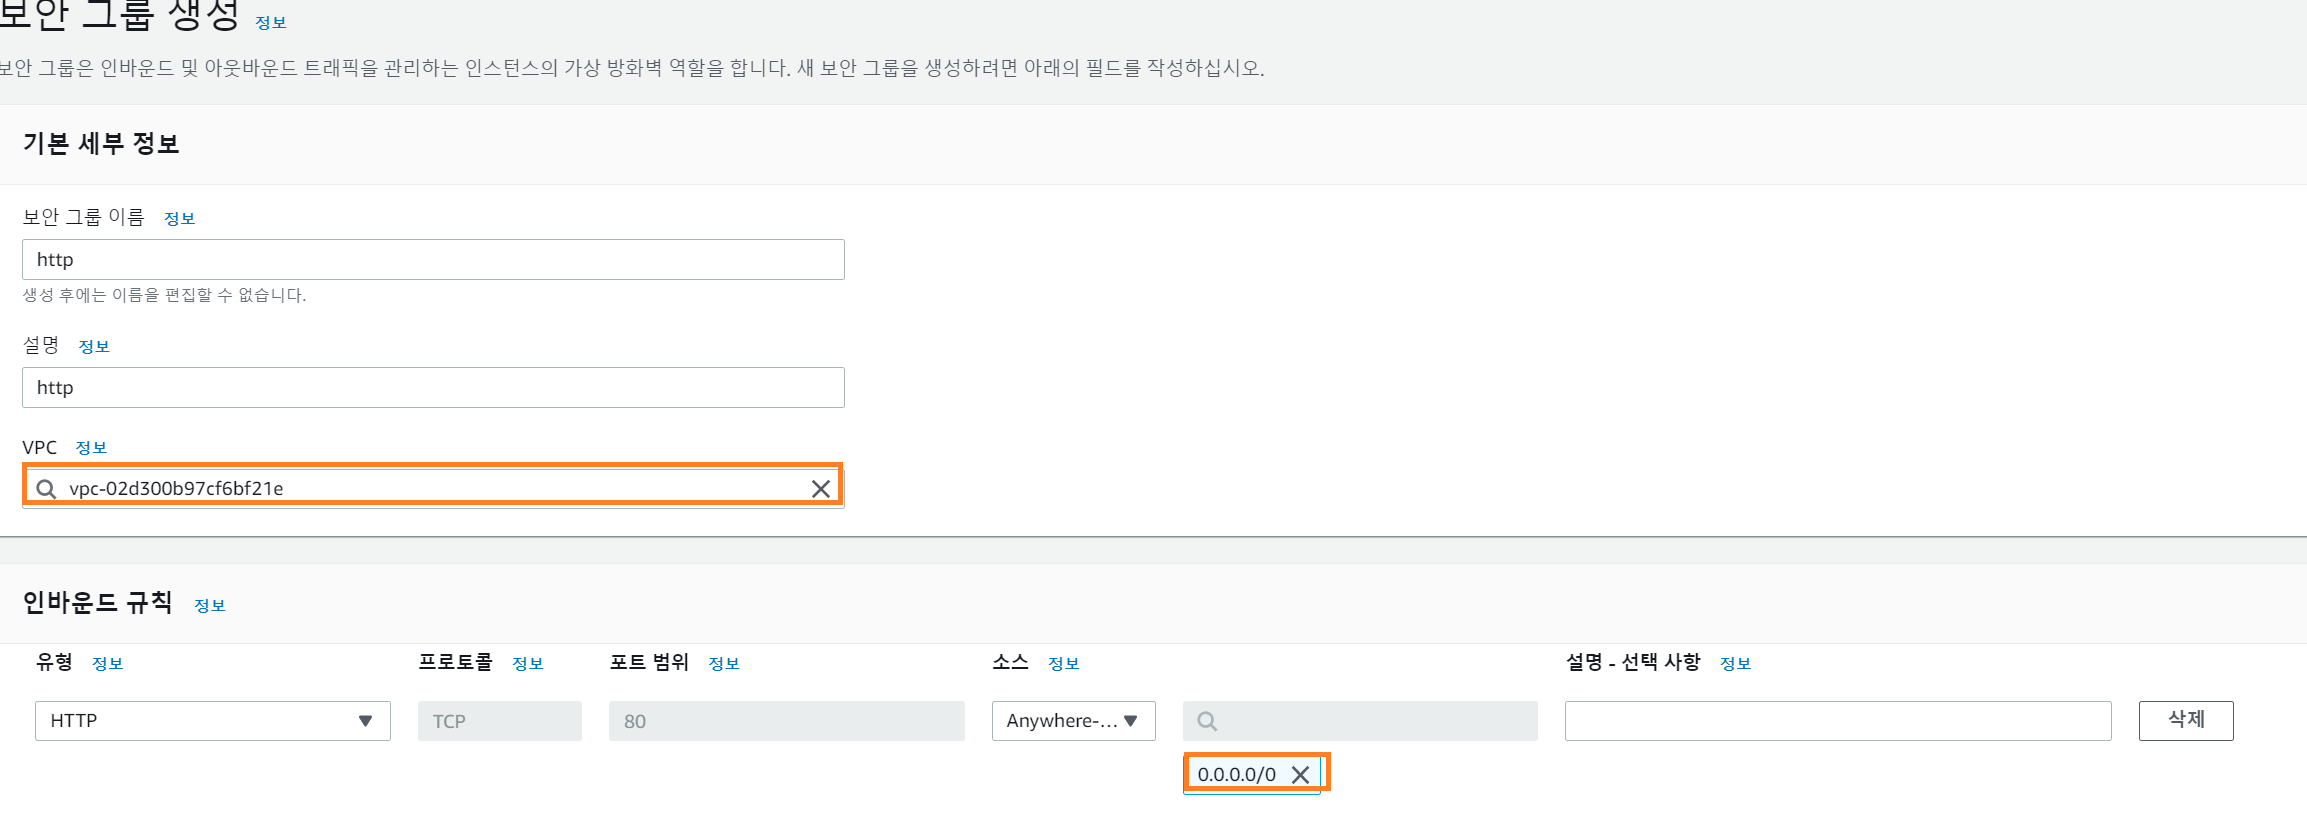
2) 보안그룹 생성
- HTTP에 대한 모든 트래픽 허용
3) 로드 밸런서 보안 그룹 편집
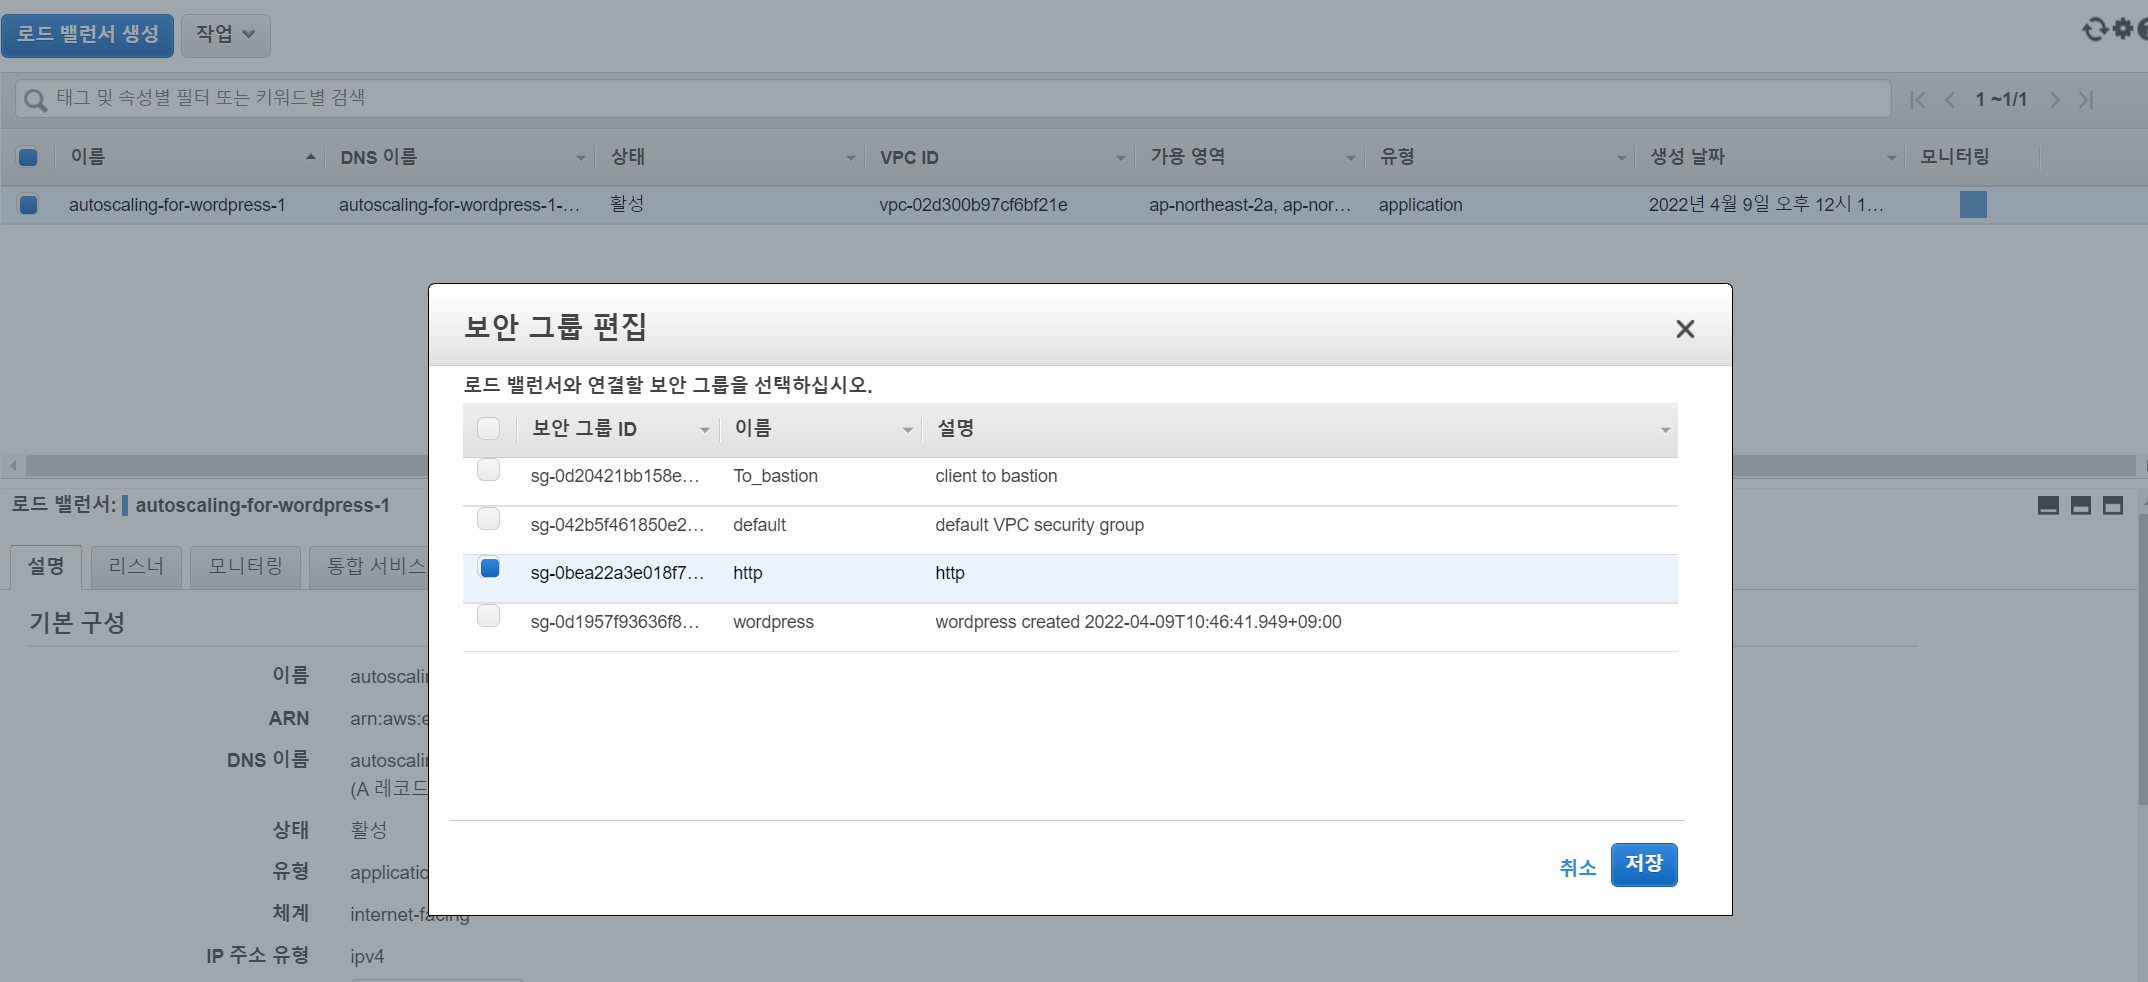
- ec2에 접근 가능하도록 로드벨런서 보안 그룹 편집

3. 결과
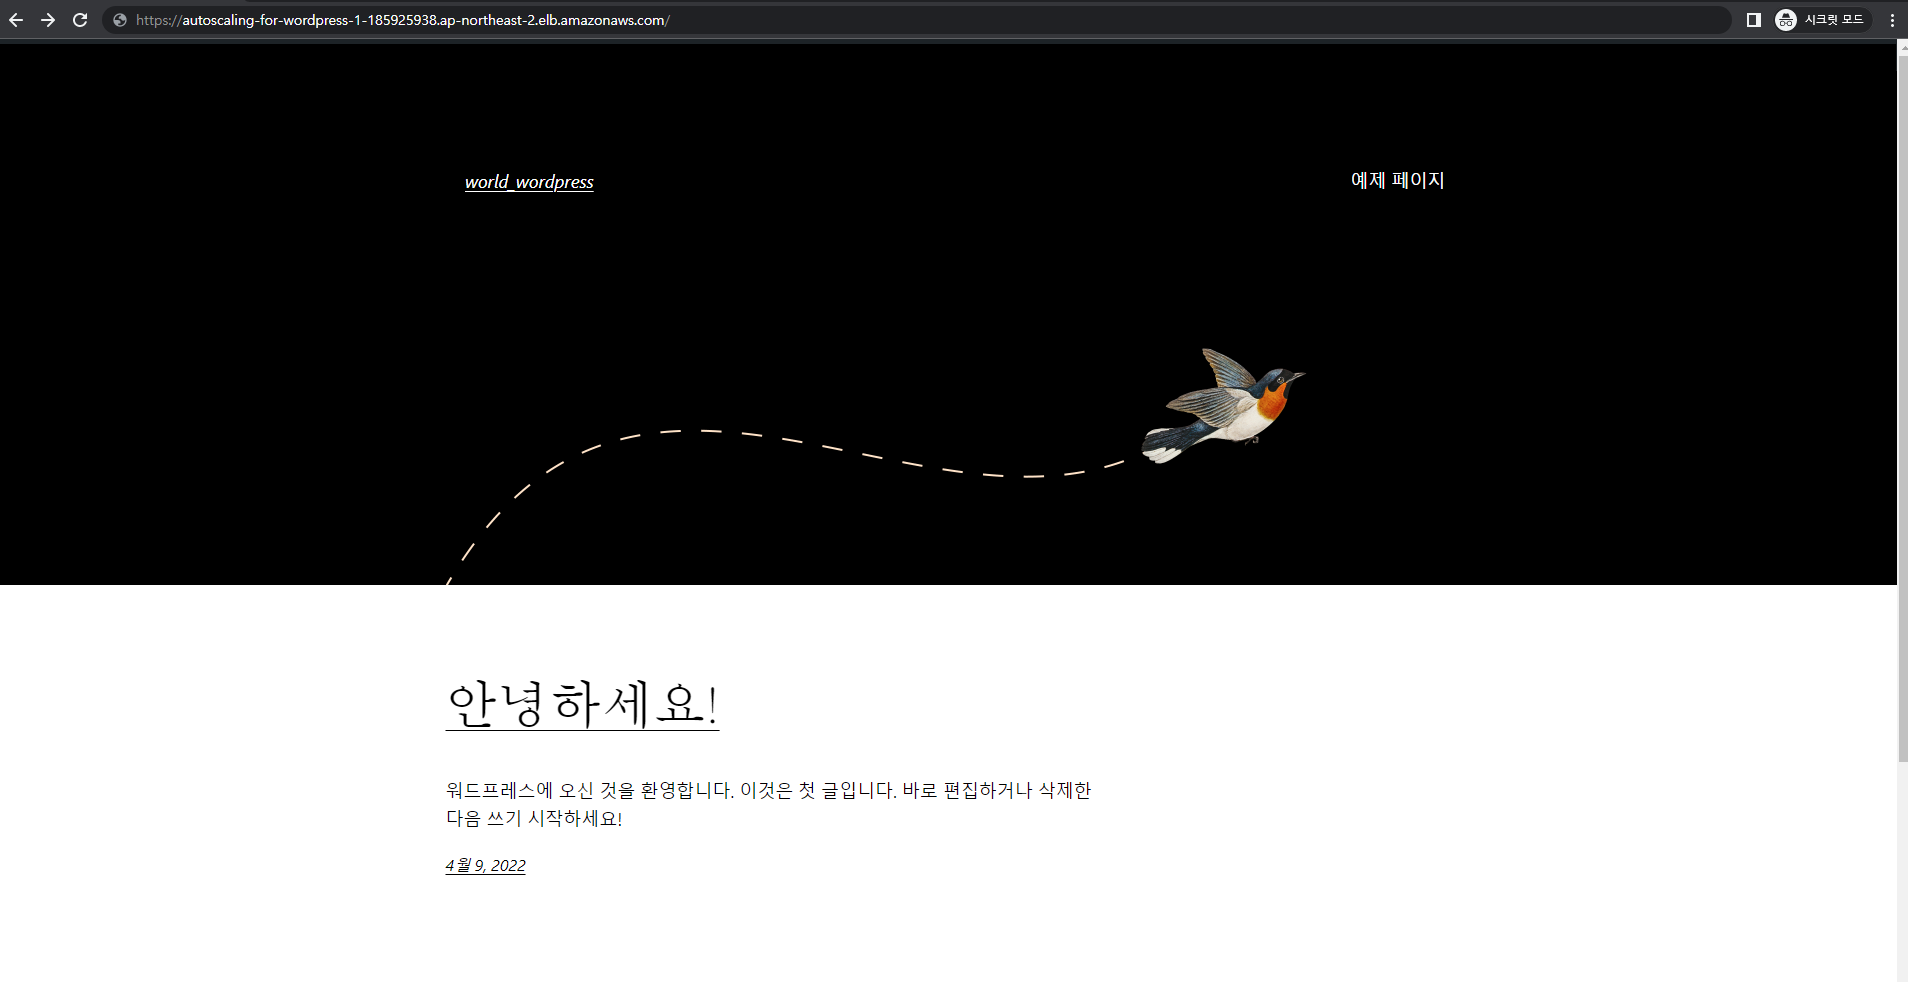

How R U Today :)