Step 3: 사용자 로그인 처리
1. 토큰 유효성검증
토큰 유효성 검증은 카카오 로그인의 토큰정보보기(url: kapi.kakao.com/v1/user/access_token_info) 기능을 이용하면 된다.
request 헤더에는 Authorization: Bearer + ACCESS_TOKEN을 설정해준다. 파라미터는 없다.
그리고 HTTP_OK 응답을 받으면 id 및 토큰만료시간을 확인할 수 있다.
하지만 유효성 검증이 목적이므로 해당 데이터를 따로 사용하지는 않았다.
에러가 발생할 경우에는 각 에러에 맞게 처리해주면 된다.
참고로 아래는 카카오 개발자 문서에 있는 토큰 정보 에러 발생 시 응답 코드이다.
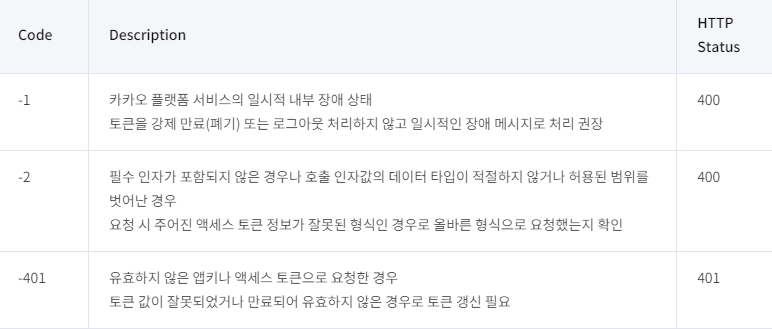
본인은 유효하지 않은 앱키나 액세스 토큰으로 요청한 경우(-401)일 때는 커스텀 익셉션인 InvalidTokenException으로 처리해주었고 그 외의 경우에는 그냥 RuntimeException으로 넘기기로 했다.
    private boolean validateToken(String access_token) throws IOException {
        HttpURLConnection connection = getConnection(KakaoApiConstants.URLs.VALIDATE_TOKEN_URL, "GET", false);
        connection.setRequestProperty("Authorization", "Bearer " + accessToken);

        int responseCode = connection.getResponseCode();

        if (responseCode == HttpURLConnection.HTTP_OK) { // 200 OK
            String result = getResultString(connection.getInputStream());

            JsonParser jsonParser = new JacksonJsonParser();
            Map<String, Object> map = jsonParser.parseMap(result);
            Long id = (Long) map.get("id");
            Integer expires_in = (Integer) map.get("expires_in");

            return true;
        } else { // not 200
            String result = getResultString(connection.getErrorStream());
            JsonParser jsonParser = new JacksonJsonParser();
            Map<String, Object> map = jsonParser.parseMap(result);
            int code = (int) map.get("code");
            String msg = (String) map.get("msg");

            if(code == -401){
                throw new InvalidTokenException(msg, accessToken);
            }else {
                throw new RuntimeException(msg);
            }
        }
    }
2. 사용자 정보 조회
사용자 정보를 가져오기 위해서는 헤더에 access token을 설정해주고, 파라미터로는(선택사항) 가져올 사용자 정보를 설정하면 된다.
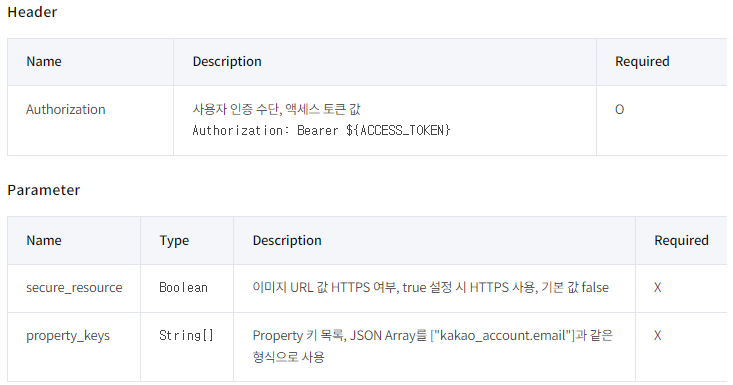
property_keys는 JSON Array를 ["kakao_account.email"]와 같은 형식으로 넣어줘야해서 일단 해당 형식의 배열을 작성한 다음에 String으로 바꿔서 파라미터에 넣어주었다.
  private KakaoMemberInfo getKakaoUserInfo(String access_token) throws IOException {
        KakaoMemberInfo kakaoMemberInfo = null;

        String[] propertyKeys = {"kakao_account.profile", "kakao_account.name", "kakao_account.email", "kakao_account.age_range", "kakao_account.birthday", "kakao_account.gender"};
        // propertyKeys 배열 형식의 스트링으로 변환
        StringBuilder sb = new StringBuilder();
        sb.append("[");
        for (int i = 0; i < propertyKeys.length; i++) {
            sb.append("\"" + propertyKeys[i] + "\"");
            if (i < propertyKeys.length - 1) {
                sb.append(",");
            } else {
                sb.append("]");
            }
        }

        String query = "?property_keys=" + sb.toString();
        HttpURLConnection connection = getConnection(KakaoApiConstants.URLs.GET_USER_INFO + query, "GET", false);
        connection.setRequestProperty("Content-Type", "application/x-www-form-urlencoded;charset=utf-8");
        connection.setRequestProperty("Authorization", "Bearer " + access_token);

        int responseCode = connection.getResponseCode();
        log.info("회원조회 response code : {}", responseCode);
요청을 보낸 후, HTTP_OK 응답을 받으면 응답 받은 JSON을 파싱해서 필요한 정보들을 가져오면 된다. 본인은 kakaoMemberInfo 객체를 생성한 뒤 여기에 값을 넣어 리턴해주었다.
        if (responseCode == HttpURLConnection.HTTP_OK) {
            String result = getResultString(connection.getInputStream());

            JsonParser jsonParser = new JacksonJsonParser();
            Map<String, Object> map = jsonParser.parseMap(result);
            Long id = (Long) map.get("id");

            Map<String, Object> kakaoAccount = (Map<String, Object>) map.get("kakao_account");
            Map<String, Object> profile = (Map<String, Object>) kakaoAccount.get("profile");
            String nickname = (String) profile.get("nickname");
            String email = (String) kakaoAccount.get("email");
            String profileImageUrl = (String) profile.get("profile_image_url");

            kakaoMemberInfo = new KakaoMemberInfo();
            kakaoMemberInfo.setKakaoMemberId(id);
            kakaoMemberInfo.setNickname(nickname);
            kakaoMemberInfo.setEmail(email);
            kakaoMemberInfo.setProfileImageUrl(profileImageUrl);
        }

        return kakaoMemberInfo;
3. 회원가입 및 로그인
위에서 살펴본 getKakaoUserInfo() 메소드를 통해 회원 정보를 가져오면 가져온 회원정보(kakaoMemberId)로 회원 가입 여부를 확인한다.
기존 회원이면 회원 정보를 가져오고, 기존 회원이 아니라면 회원가입 후 로그인 처리를 하면 된다. (기존 회원 정보 가져오기 및 회원 가입 로직은 각자 프로그램에 맞게 작성!)
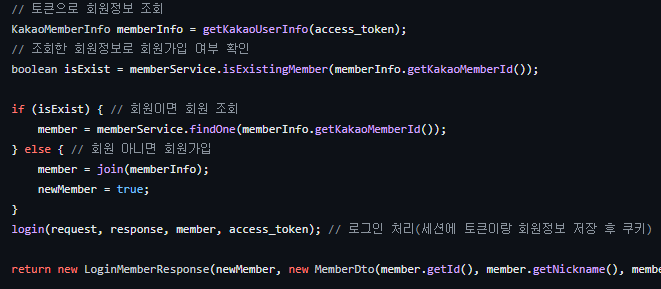
아래는 로그인 처리를 하는 메소드이다.
여기서는 session을 설정해주었지만 session에 회원정보를 저장하는 것은 restful하지 않은 방식이라고 하여 JWT 토큰을 이용한 인증 방식으로 변경할 예정이다.
    private void login(HttpServletRequest request, HttpServletResponse response, Member member, String access_token) {
        HttpSession session = request.getSession();
        session.setAttribute(SessionConstants.LOGIN_MEMBER, member);
        session.setAttribute(SessionConstants.ACCESS_TOKEN, access_token);
        log.info(session.getId());
    }
그 다음 포스트에서는 카카오 로그아웃에 대해 작성하겠다.