▪️ 자바 컬렉션 프레임워크 ▪️
💡 다양한 자료구조들을 쉽게 활용하도록 인터페이스와 구현체(
ArrayList,HashSet,HashMap) 를 제공하는 집합
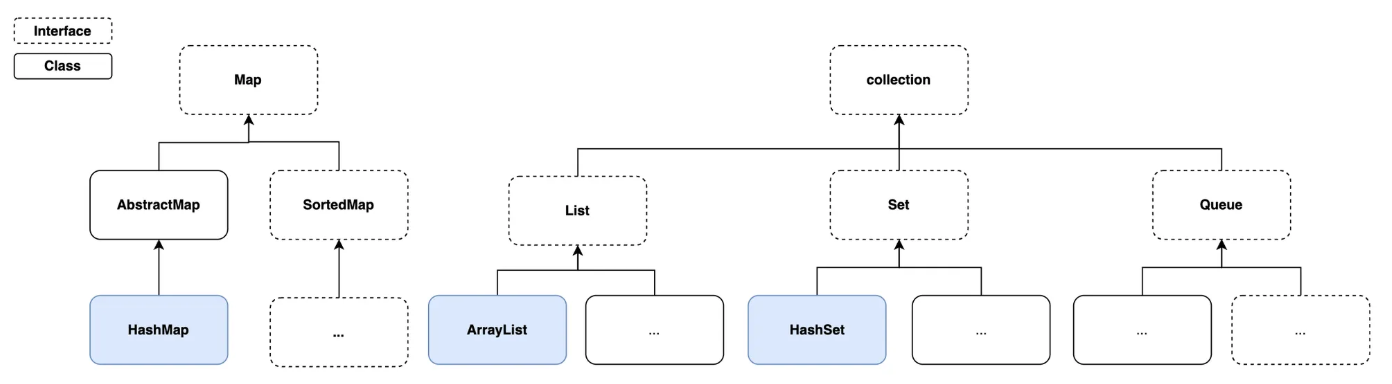
Collection계열은Collection인터페이스를 중심으로 구성됨Map계열은Collection을 상속받지 않지만,컬렉션 프레임워크에 포함
자바 컬렉션 프레임워크
 │
 ├── 📌Collection 인터페이스 (데이터 모음, 요소 중심)
 │     ├── List (순서O, 중복O)
 │     ├── Set (순서X, 중복X)
 │     ├── Queue (FIFO 구조)
 │
 ├── 📌Map 인터페이스 (키-값 쌍, 요소 중심X)
 │     ├── HashMap 등
 │
 ├── 📌기타 유틸리티
       ├── Iterator (반복자)
       ├── Collections (유틸 클래스, 정렬 등 제공)
📖 Collection
- 데이터 저장, 조회, 삭제, 정렬 기능등을 간편하게 구현할 수 있다
- 길이를 동적으로 변경할 수 있다 (배열과 다름)
ArrayList<Integer> arrayList = new ArrayList<>();
arrayList.add(10);
arrayList.add(20);
arrayList.add(30);
arrayList.add(40); // ✅ 정상 동작 (길이 제한 없음)
인터페이스 특징 구현체 List순서 유지, 중복 허용 ArrayListSet순서 없음, 중복 불가 HashSetMap키-값 구조, 키 중복 불가 HashMap
📌 ArrayList (순서유지 중복가능)
List 인터페이스를 상속받고 있다
// List 를 구현한 ArrayList
ArrayList<String> names = new ArrayList<>();
names.add("Spartan");      // 1 번째 요소 추가
names.add("Steve");        // 2 번째 요소 추가
names.add("Isac");         // 3 번째 요소 추가
names.add("1");
names.add("2");

 // ✅ 순서 보장
System.out.println("names = " + names);

// ✅ 중복 데이터 허용
names.add("Spartan");
System.out.println("names = " + names);

// ✅ 단건 조회
System.out.println("1 번째 요소 조회: " + names.get(0)); // 조회 Spartan

// ✅ 데이터 삭제
names.remove("Steve");
System.out.println("names = " + names);
✔️ add() - 데이터 추가
- ()안에 추가할 값
- 중복 데이터를 허용한다
✔️ get() - 데이터 단건 조회
- ()안에는 인덱스 번호
✔️ remove() - 데이터 삭제
- ()안에 삭제할 데이터
📌 HashSet (순서없음 중복가능)
Set 인터페이스를 상속받고 있다
// Set 을 구현한 HashSet
HashSet<String> uniqueNames = new HashSet<>();

// ✅ 추가
uniqueNames.add("Spartan");
uniqueNames.add("Steve");
uniqueNames.add("Isac");
uniqueNames.add("1");
uniqueNames.add("2");

// ⚠️ 순서를 보장 안함
System.out.println("uniqueNames = " + uniqueNames);
uniqueNames.get(0); // ❌ get 사용 불가

// ⚠️ 중복 불가
uniqueNames.add("Spartan");
System.out.println("uniqueNames = " + uniqueNames);

// ✅ 제거
uniqueNames.remove("Spartan");
System.out.println("uniqueNames = " + uniqueNames);
✔️ add() - 데이터 추가
- ()안에 추가할 값
- 중복 데이터는 한번만 나옴
✔️ 데이터 단건 조회 불가 (get❌)
✔️ remove() - 데이터 삭제
- ()안에 삭제할 데이터
📌 HashMap (순서없음)
Map 인터페이스를 상속받고 있다
// Map 을 구현한 HashMap
HashMap<String, Integer> memberMap = new HashMap<>();

// ✅ 추가
memberMap.put("Spartan", 15);
memberMap.put("Steve", 15); // ✅ 값은 중복 가능
memberMap.put("Isac", 1);
memberMap.put("John", 2);
memberMap.put("Alice", 3);

// ⚠️ 순서 보장 안함
System.out.println("memberMap = " + memberMap);

// ⚠️ 키 중복 불가: 값 덮어쓰기 발생
memberMap.put("Alice", 5);
System.out.println("memberMap = " + memberMap);

// ✅ 조회: 15
System.out.println(memberMap.get("Steve"));

// ✅ 삭제 가능
memberMap.remove("Spartan");
System.out.println("memberMap = " + memberMap);

// ✅ 키 확인
Set<String> keys = memberMap.keySet();
System.out.println("keys = " + keys);

// ✅ 값 확인
Collection<Integer> values = memberMap.values();
System.out.println("values = " + values);
키(Key) - 값(Value)구조로 데이터 저장키(Key)중복 불가 /값(Value)중복 가능
✔️ put("키", 값 ) - 데이터 추가
✔️ get("키") - 데이터 단건 조회
- 키값을 이용해 데이터 조회
✔️ remove("키") - 데이터 삭제
- 키값을 이용해 데이터 세트를 삭제
✔️ keySet() - 키 확인
- 모든 키값 무작위 순서로 나옴
✔️ values() - 값 확인
- 모든 벨류들 무작위 순서로 나옴
▪️ 제네릭 (Generic) ▪️
<T>타입 매개변수로 클래스나 메서드에 사용된다. 코드 재사용성, 타입안정성을 보장
📖 Generic Class
🌟 클래스의 선언부에 <T>가 선언된 클래스
[클래스 선언부]
public class GenericBox<T> { // ✅ 제네릭 클래스
    private T item;

    public GenericBox(T item) {
        this.item = item;
    }

    public T getItem() {
        return this.item;
    }
}
객체 생성시에 해당 타입을 <>에 넣는다
인스턴스 생성시에 타입소거후 타입이 결정된다
컴파일 시점에 타입소거가 된다
T -> Object 가 된다
getter 사용시에 알아서 다운캐스팅도 해줌 <>에 넣은걸로!
📖 Generic Method
메서드 선언부에
<T>가 선언된 것 클래스인 제네릭과 메서드인 제네릭은 별개이다
클래스의 타입매개변수와는 달라도 됨 별도로 동작한다
메서드 실행시 () 매개변수에 아무거나 들어가도 된다
▪️ 람다 ▪️
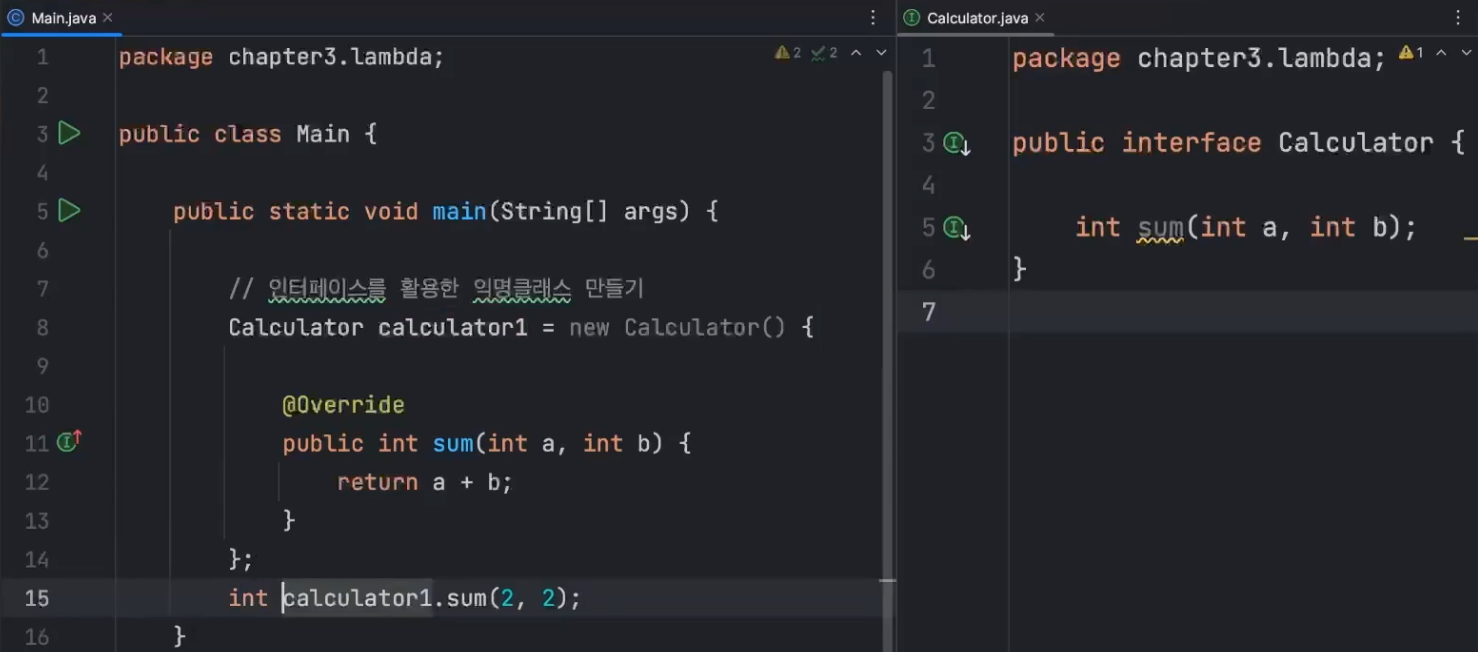
📖 익명 클래스
별도의 클래스파일을 만들지 않고 코드 내에서 일회성으로 정의해 사용하기 때문에
인터페이스나 클래스의 구현과 상속을 통해 구현한다
보통은 클래스를 만들어 사용하는데,
익명 클래스는 그냥 메인에서 바로 new로 정의해서 활용
필요할 때만 1회성으로 활용할수 있다
단점 : 코드가 좀 길어짐..
📖 람다 Lambda
익명클래스를 더 간결하게 표현하는 방법!
함수형 인터페이스를 통해 구현하는 것을 적극 권장한다 -> 하나의 추상메서드만 가져야한다
//함수형 인터페이스
@FunctionalInterface // ✅ 함수형 인터페이스 선언
public interface Calculator {

    int sum(int a, int b); // ✅ 오직 하나의 추상 메서드만 선언해야합니다.
}

// 람다 표현식
Calculator calculator1 = (a, b) -> a + b;

// 람다가 추론한 익명클래스
Calculator calculator1 = new Calculator() {
		@Override
		public int sum(int a, int b) {
				return a + b;
		}
};
함수형 인터페이스를 만들고, 람다 표현식을 쓰면 알아서 추론해서 익명클래스를 구현해준다!
📌 주의할 것
- 꼭 함수형 인터페이스를 선언할 것
- 하나의 추상메서드만 가지고 있을 것! (오버로딩을 통해 같은 메서드를 여러형태로 정의하지 말것)
@FunctionalInterface // ✅ 함수형 인터페이스 선언
public interface Calculator {
    int sum(int a, int b); // ✅ 오직 하나의 추상 메서드만 선언해야합니다.
    int sum(int a, int b, int c); // ❌ 선언 불가 에러발생!
}
여러개의 추상메서드가 있으면 컴파일러가 뭐가 진짜 sum인지 알수가 없어진다!
💡
오버로딩: 같은 클래스내에서 동일한 메서드이름 사용
오버라이딩: 부모클래스의 메서드를 자식클래스에서 재정의하는것
📖 람다식을 매개변수로 전달하는 방법
1️⃣ 익명클래스를 변수에 담아 전달
public class Main {
    public static int calculate(int a, int b, Calculator calculator) {
        return calculator.sum(a, b);
    }

    public static void main(String[] args) {

        Calculator cal1 = new Calculator() {
            @Override
            public int sum(int a, int b) {
                return a + b;
            }
        };

        // ✅ 익명 클래스를 변수에 담아 전달
        int ret3 = calculate(3, 3, cal1);
        System.out.println("ret3 = " + ret3); // 출력: ret3 = 6
    }
}
2️⃣ 람다식을 변수에 담아 전달
public class Main {

    public static int calculate(int a, int b, Calculator calculator) {
        return calculator.sum(a, b);
    }

    public static void main(String[] args) {
        Calculator cal2 = (a, b) -> a + b;

        // ✅ 람다식을 변수에 담아 전달
        int ret4 = calculate(4, 4, cal2);
        System.out.println("ret4 = " + ret4); // 출력: ret4 = 8
    }
}
3️⃣ 람다식을 직접 전달
public class Main {

    public static int calculate(int a, int b, Calculator calculator) {
        return calculator.sum(a, b);
    }

    public static void main(String[] args) {
        // ✅ 람다식을 직접 매개변수로 전달
        int ret5 = calculate(5, 5, (a, b) -> a + b);
        System.out.println("ret5 = " + ret5); // 출력: ret5 = 10
    }
}
▪️스트림▪️
데이터를 효율적으로 처리할 수 있는 흐름
선언형이라 가독성이 뛰어나다
데이터 준비 -> 중간연산 -> 최종연산순으로 처리
| 단계 | 설명 | 주요 API |
|---|---|---|
| 1. 데이터 준비 | 컬렉션을 스트림으로 변환 | stream(), parallelStream() |
| 2. 중간 연산 등록(즉시 실행되지 않음) | 데이터 변환 및 필터링 | map(), filter(), sorted() |
| 3. 최종 연산 | 최종 처리 및 데이터 변환 | collect(), forEach(), count() |
보기 쉽게 3줄로 나열
// 1. 데이터 준비: 스트림 생성
Stream<Integer> stream = arrayList.stream();

// 2. 중간 연산 등록: 각 요소를 10배로 변환 로직 등록
Stream<Integer> mappedStream = stream.map(num -> num * 10);

// 3. 최종 연산: 최종 결과 리스트로 변환
List<Integer> ret2 = mappedStream.collect(Collectors.toList());
이것을 한줄로 표현할 수 있따
// ✅ 한 줄로 표현 가능
List<Integer> ret2 = arrayList.stream() // 1. 데이터 준비
    .map(num -> num * 10)               // 2. 중간 연산 등록
    .collect(Collectors.toList());  // 3. 최종 연산
스트림과 람다를 조합해서 활용하는 세가지 방법
public class Main {

    public static void main(String[] args) {

        // ArrayList 선언
        List<Integer> arrayList = new ArrayList<>(List.of(1, 2, 3, 4, 5));

        // 스트림 없이: 각 요소 * 10 처리
        ArrayList<Integer> ret1 = new ArrayList<>();
        for (Integer num : arrayList) {
            int multipliedNum = num * 10;
            ret1.add(multipliedNum);
        }
        System.out.println("ret1 = " + ret1);

        // 스트림 활용: 각 요소 * 10 처리
        List<Integer> ret2 = arrayList.stream().map(num -> num * 10).collect(Collectors.toList());
        System.out.println("ret2 = " + ret2);

        // 직접 map() 활용해보기
        // 1. 익명클래스를 변수에 담아 전달
        Function<Integer, Integer> function = new Function<>() {

            @Override
            public Integer apply(Integer integer) {
                return integer * 10;
            }
        };
        List<Integer> ret3 = arrayList.stream()
                .map(function)
                .collect(Collectors.toList());
        System.out.println("ret3 = " + ret3);

        // 2. 람다식을 변수에 담아 전달
        Function<Integer, Integer> functionLambda = (num -> num * 10);
        List<Integer> ret4 = arrayList.stream()
                .map(functionLambda)
                .collect(Collectors.toList());
        System.out.println("ret4 = " + ret4);

				// 람다식 직접 활용
        List<Integer> ret5 = arrayList.stream()
                .map(num -> num * 10)
                .collect(Collectors.toList());
        System.out.println("ret5 = " + ret5);
    }
}
스트림 중간 연산 함께 사용하기
List<Integer> arrayList = new ArrayList<>(List.of(1, 2, 3, 4, 5));

// ✅ filter() + map() 사용 예제
List<Integer> ret6 = arrayList.stream() // 1. 데이터 준비: 스트림 생성
        .filter(num -> num % 2 == 0)    // 2. 중간 연산: 짝수만 필터링
        .map(num -> num * 10)           // 3. 중간 연산: 10배로 변환
        .collect(Collectors.toList()); // 4. 최종 연산: 리스트로 변환

System.out.println(ret6); // 출력: [20, 40]
▪️스레드▪️
프로그램 내에서 독립적으로 실행되는 작업 단위!
싱글 스레드-> 한번에 하나의 작업만 /멀티스레드-> 여러 작업 동시에 처리 ( 병렬로 수행)
📖 싱글 쓰레드
- 일꾼이 한명이기에 여러개의 작업이 잇다면 순차적으로 처리
main()도 하나의 쓰레드이다
public class Main {

    public static void main(String[] args) {
        System.out.println("::: main 쓰레드 시작 :::");
        String threadName = Thread.currentThread().getName();

        // ✅ 하나의 작업 단위: 숫자를 0 부터 9 까지 출력
        for (int i = 0; i < 10; i++) {
            System.out.println("현재 쓰레드: " + threadName + " - " + i);
            try {
                Thread.sleep(500); // 0.5 초 대기
            } catch (InterruptedException e) {
                e.printStackTrace();
            }
        }
        // ✅ 추가작업
        for (int i = 0; i < 10; i++) {
            System.out.println("현재 쓰레드: " + threadName + " - " + i);
            try {
                Thread.sleep(500); // 0.5 초 대기
            } catch (InterruptedException e) {
                e.printStackTrace();
            }
        }
        System.out.println("::: 작업 끝 :::");
    }
}
📖 멀티 쓰레드
- 스레드 실행시에는
run()호출하면 안돼고,start()를 사용하자 - 결과가 병렬로, 스레드1,2를 번갈아가면서 작업이 처리된다
// ✅ Thread 클래스 상속으로 쓰레드 구현
public class MyThread extends Thread {

    @Override
    public void run() {
        String threadName = Thread.currentThread().getName();
        System.out.println("::: " + threadName + "쓰레드 시작 :::");
        for (int i = 0; i < 10; i++) {
            System.out.println("현재 쓰레드: " + threadName + " - " + i);
            try {
                Thread.sleep(500); // 딜레이 0.5 초
            } catch (InterruptedException e) {
                e.printStackTrace();
            }
        }
        System.out.println("::: " + threadName + "쓰레드 종료 :::");
    }
}


--------------------

public class Main {

    public static void main(String[] args) {
        System.out.println("::: main 쓰레드 시작");

        MyThread thread0 = new MyThread();
        MyThread thread1 = new MyThread();

        // 1. thread0 실행
        System.out.println("::: main 이 thread0 을 실행");
        thread0.start();

        // 2. thread1 실행
        System.out.println("::: main 이 thread1 을 실행");
        thread1.start();

        System.out.println("::: main 쓰레드 종료");
    }
}
📌 join
- 위 예시에서는 메인스레드가 스레드를 실행시키자마자 끝나버렸음
- 조인 사용시 메인스레드가 다른 스레드가 작업을 끝낼때까지 기다리게 되기 때문에
-> 총 작업시간을 측정할 수 있다
public class Main {

    public static void main(String[] args) {
        System.out.println("::: main 쓰레드 시작");
        MyThread thread0 = new MyThread();
        MyThread thread1 = new MyThread();

        // 시작시간 기록
        long startTime = System.currentTimeMillis();

        // 1. thread0 시작
        System.out.println("thread0 시작");
        thread0.start();

        // 2. thread1 시작
        System.out.println("thread1 시작");
        thread1.start();

        // ⌛️ main 쓰레드 대기 시키기
        try {
            thread0.join();
            thread1.join();
        } catch (InterruptedException e) {
            e.printStackTrace();
        }

        long endTime = System.currentTimeMillis();
        long totalTime = endTime - startTime;
        System.out.println("총 작업 시간: " + totalTime + "ms");
        System.out.println("::: main 쓰레드 종료");
    }
}
📖 Runnable 인터페이스 활용
- 유시보수성, 재사용성 향상
- 기존 클래스를 확장가능
-
지금처럼 Thread를 상속받아서 MyThread를 구현하면?
->실행로직(내가 만든) +제어로직(start(),join(),,등) 이렇게 두가지 역할임 -
Runnable을 활용하면?
실행로직을 별도 구현체로 분리 가능
->Thread: 제어로직 /Runnable 구현체: 실행로직
1️⃣ 기본 사용 예시
public class MyRunnable implements Runnable {
    @Override
    public void run() {
        String threadName = Thread.currentThread().getName();
        for (int i = 0; i < 10; i++) {
            System.out.println("현재 쓰레드: " + threadName + " - " + i);
            try {
                Thread.sleep(500);
            } catch (InterruptedException e) {
                e.printStackTrace();
            }
        }
    }
}

----------------------------------

public class Main {

    public static void main(String[] args) {

        MyRunnable task = new MyRunnable(); // ✅ 하나의 작업 객체 선언

				// ✅ 하나의 작업을 여러 쓰레드에서 공유
        Thread thread0 = new Thread(task); // 작업 객체 공유
        Thread thread1 = new Thread(task); // 작업 객체 공유

				// 실행
        thread0.start();
        thread1.start();
    }
}
2️⃣ 기존 클래스를 유지하면서 확장하는 예시
- Thread를 상속하면 Java는 다중상속을 지원하지 않기에 다른 클래스 상속은 불가능!
- Runnable은 인터페이스이므로 상속까지 해서 확장이 가능
public class MyNewClass { // ✅ 새로운 클래스

    public void printMessage() {
        System.out.println("MyClass 기능 실행");
    }
}
----------

public class MyRunnable extends MyNewClass implements Runnable { // ✅ 다중 상속

...

----------

public class Main {

    public static void main(String[] args) {

        MyRunnable task = new MyRunnable();

        // ✅ 기존 클래스를 유지하면서 확장해서 활용
        task.printMessage();

...