.addClass()
.addClass():선택한 문서 객체에 클래스 속성을 추가하는 메소드
$(선택자).addClass("클래스명");
addClass괄호 안에서는 .을 쓰지 않는다는 것과, 대소문자구분에 주의
<html>
  <head>
    <meta charset="utf-8">
    <script type="text/javascript" src="https://code.jquery.com/jquery-3.2.0.min.js" ></script>
    </script>
    <style>

      div {
        width : 100px;
        height : 100px;
      }

      .first {
        background-color : red;
      }

      .second {
        background-color : yellow;
      }

      .third {
        background-color : blue;
      }

    </style>
  </head>
  <body>
    <button type="button">커져라</button>
    <div class="first">가나다</div>
    <div class="second">라마바</div>
    <div class="third">사아자</div>

  </body>
</html><style>태그 안에 sizeup이라는 클래스의 특성을 설정
.sizeup {
        font-size:30px;
}
sizeup이라는 클래스를 addClass함수를 이용해 첫 번째 div에 추가
<script type="text/javascript">
      function bigger(){
        $(".first").addClass("sizeup");
      }
</script>
bigger라는 함수를 정의.first클래스를 가진 태그에 sizeup이라는 클래스를 추가하라는 뜻
<button type="button" onclick="bigger();">커져라</button>커져라버튼 코드
<html>
  <head>
    <meta charset="utf-8">
    <script type="text/javascript" src="https://code.jquery.com/jquery-3.2.0.min.js" ></script>
    <script>
      function bigger(){
        $(".first").addClass("sizeup");
      }
    </script>
    <style>

      div {
        width : 100px;
        height : 100px;
      }

      .first {
        background-color : red;
      }

      .second {
        background-color : yellow;
      }

      .third {
        background-color : blue;
      }

      .sizeup {
        font-size:30px;
      }

    </style>
  </head>
  <body>
    <button type="button" onclick="bigger()
완성된 코드: 커져라 버튼을 클릭하면 bigger함수의 addClass가 실행되고 첫번째div의 글자가 커지는 것
removeClass
removeClass: 선택한 태그에서 어떤 클래스를 제거하는 함수
$(선택자).removeClass("클래스명");
function white(){
        $(".second").removeClass("second");
}
second클래스를 가진 태그에서 second클래스를 제거하는 white함수를 정의
여기서 removeClass괄호 안을 비워두면 second클래스를 가진 태그에서 모든 클래스를 지워라라는 뜻
<button type="button" onclick="white();">하얘져라</button>white함수를 하얘져라 버튼에 달기
<html>
  <head>
    <meta charset="utf-8">
    <title>jquery - class 다루기</title>
    <script type="text/javascript" src="https://code.jquery.com/jquery-3.2.0.min.js" ></script>
    <script type="text/javascript">
      function bigger(){
        $(".first").addClass("sizeup");
      }
      function white(){
        $(".second").removeClass("second");
      }
    </script>
    <style>

      div {
        width : 100px;
        height : 100px;
      }

      .first {
        background-color : red;
      }

      .second {
        background-color : yellow;
      }

      .third {
        background-color : blue;
      }

      .sizeup {
        font-size:30px;
      }

    </style>
  </head>
  <body>
    <button type="button" onclick="bigger();">커져라</button>
    <button type="button" onclick="white();">하얘져라</button>
    <div class="first">가나다</div>
    <div class="second">라마바</div>
    <div class="third">사아자</div>

  </body>
</html>
하얘져라 버튼을 클릭하면 white함수가 실행되면서 두번째div의 second클래스가 삭제되는 것을 확인
switchClass
switchClass: 인자가 두개.어떤 클래스를 다른 클래스로 바꾸는 함수
$(선택자).switchClass("바꿀 클래스명","바뀔 클래스명");
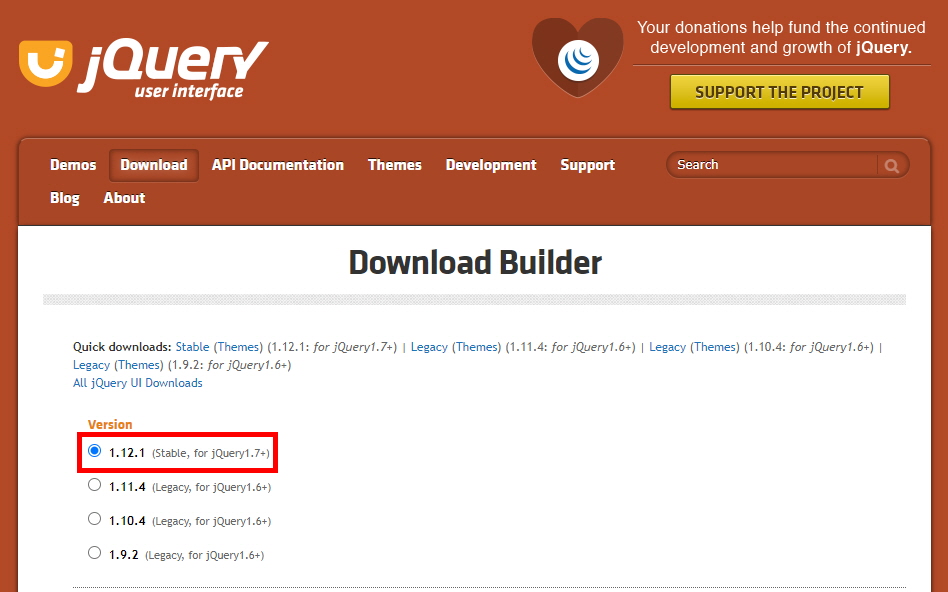
switchClass()는 JQuery주소 한줄만 추가하면 작동하던 addclass, removeclass와 다르게, JQuery UI라는 것을 다운로드해줘야 한다.
https://jqueryui.com/download/
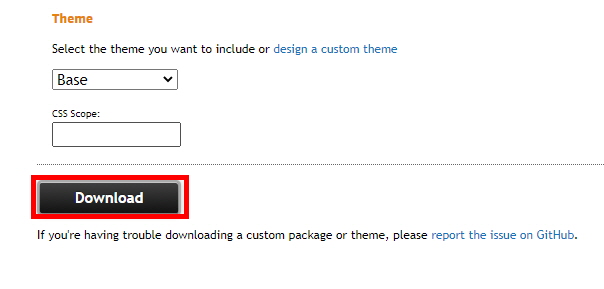
압축을 풀어보면 jquery-ui.css,jquery-ui.js,jquery-ui.min.js가 있을 것.
이 셋을 아까 작성하던 html파일이 위치한 경로에 복사
<link rel="stylesheet" href="jquery-ui.css">
<script src="jquery-ui.min.js"></script>
<script src="jquery-ui.js"></script>
그리고 head태그 안쪽에 위의 코드를 추가해주면 준비완료
function pink(){
        $(".third").switchClass("third","pink");
}
third클래스를 가진 태그에서 third클래스를 pink클래스로 바꿔주는 pink함수를 정의
<button type="button" onclick="pink();">분홍분홍해져라</button>그pink함수를 분홍분홍해져라 버튼에 달기
<!DOCTYPE html>
<html>
  <head>
    <meta charset="utf-8">
    <title>jquery - class 다루기</title>
    <script type="text/javascript" src="https://code.jquery.com/jquery-3.5.0.min.js" ></script>
    <link rel="stylesheet" href="jquery-ui.css">
    <script src="jquery-ui.min.js"></script>
    <script src="jquery-ui.js"></script>
    <script type="text/javascript">

      function bigger(){
        $(".first").addClass("sizeup");
      }

      function white(){
        $(".second").removeClass("second");
      }

      function pink(){
        $(".third").switchClass("sizeup","pink", 1000);
      }

    </script>
    <style>

      div {
        width : 100px;
        height : 100px;
      }

      .first {
        background-color : red;
      }

      .second {
        background-color : yellow;
      }

      .third {
        background-color : blue;
      }

      .pink {
        background-color: pink;
      }

      .sizeup {
        font-size:30px;
      }

    </style>
  </head>
  <body>
    <button type="button" onclick="bigger();">커져라</button>
    <button type="button" onclick="white();">하얘져라</button>
    <button type="button" onclick="pink();">분홍분홍해져라</button>
    <div class="first">가나다</div>
    <div class="second">라마바</div>
    <div class="third sizeup">사아자</div>

  </body>
</html>
분홍분홍해져라버튼을 클릭하면 sizeup클래스가 pink클래스로 바뀌면서 글자크기도 작아지고 분홍색으로 서서히 바뀌는 것을 볼 수 있음
$(".third").switchClass("sizeup","pink", 1000);
한번에 휙 바뀌지않고 서서히 바뀌는 이유는 작동시간을 설정해줬기 때문
hasClass
hasClass: 선택한 태그에서 어떤클래스의 존재여부에 따라 True 또는 False를 return
$(선택자).hasClass("클래스명");
아래의 소스와 같이 if문과 함께 쓸 수 있음
if ( $("#yes").hasClass("myclass") ){
   alert("있습니다.");
}
else {
   alert("없습니다.");
}
third클래스를 가진 div가 존재한다면 third클래스가 지워지는 함수
function getfirst(){
   if($("div").hasClass("third")) {
      $(".third").remove();
   }
}
getfirst함수를 첫번째div만 없어져라 버튼에 달아줌
<button type="button" onclick="getfirst();">첫 번째 div만 없어져라 </button>최종코드
<html>
  <head>
    <meta charset="utf-8">
    <title>jquery - class 다루기</title>
    <script type="text/javascript" src="https://code.jquery.com/jquery-3.5.0.min.js" ></script>
    <link rel="stylesheet" href="jquery-ui.css">
    <script src="jquery-ui.min.js"></script>
    <script src="jquery-ui.js"></script>
    <script type="text/javascript">

      function bigger(){
        $(".first").addClass("sizeup");
      }

      function white(){
        $(".second").removeClass("second");
      }

      function pink(){
        $(".third").switchClass("sizeup","pink", 1000);
      }

      function getfirst(){
        if($("div").hasClass("first")) {
          $(".first").remove();
        }
      }

    </script>
    <style>

      div {
        width : 100px;
        height : 100px;
      }

      .first {
        background-color : red;
      }

      .second {
        background-color : yellow;
      }

      .third {
        background-color : blue;
      }

      .pink {
        background-color: pink;
      }

      .sizeup {
        font-size:30px;
      }

    </style>
  </head>
  <body>
    <button type="button" onclick="bigger();">커져라</button>
    <button type="button" onclick="white();">하얘져라</button>
    <button type="button" onclick="pink();">분홍분홍해져라</button>
    <button type="button" onclick="getfirst();">첫번째div만 없어져라 </button>
    <div class="first">가나다</div>
    <div class="second">라마바</div>
    <div class="third sizeup">사아자</div>

  </body>
</html>