https://nishabe.medium.com/nestjs-serverless-lambda-aws-in-shortest-steps-e914300faed5
https://docs.nestjs.com/openapi/introduction
boiler-plate 세팅은 위 링크 참고
AWS Credentials 설정
cd ~
mkdir .aws
cd .aws
touch credentials
touch config[default]
aws_access_key_id = YOUR_ACCESS_KEY
aws_secret_access_key = YOUR_SECRET_ACCESS_KEY[default]
region = ap-northeast-2
output = json위와 같이 creadentials와 config 세팅
NestJS 설치
npm i -g @nestjs/cliNestJS 동작 테스트
해당 보일러 플레이트 프로젝트를 다운로드하고 풀면 위와 같은 에러가 뜹니다.
터미널을 열고 해당 프로젝트 경로로 이동 후
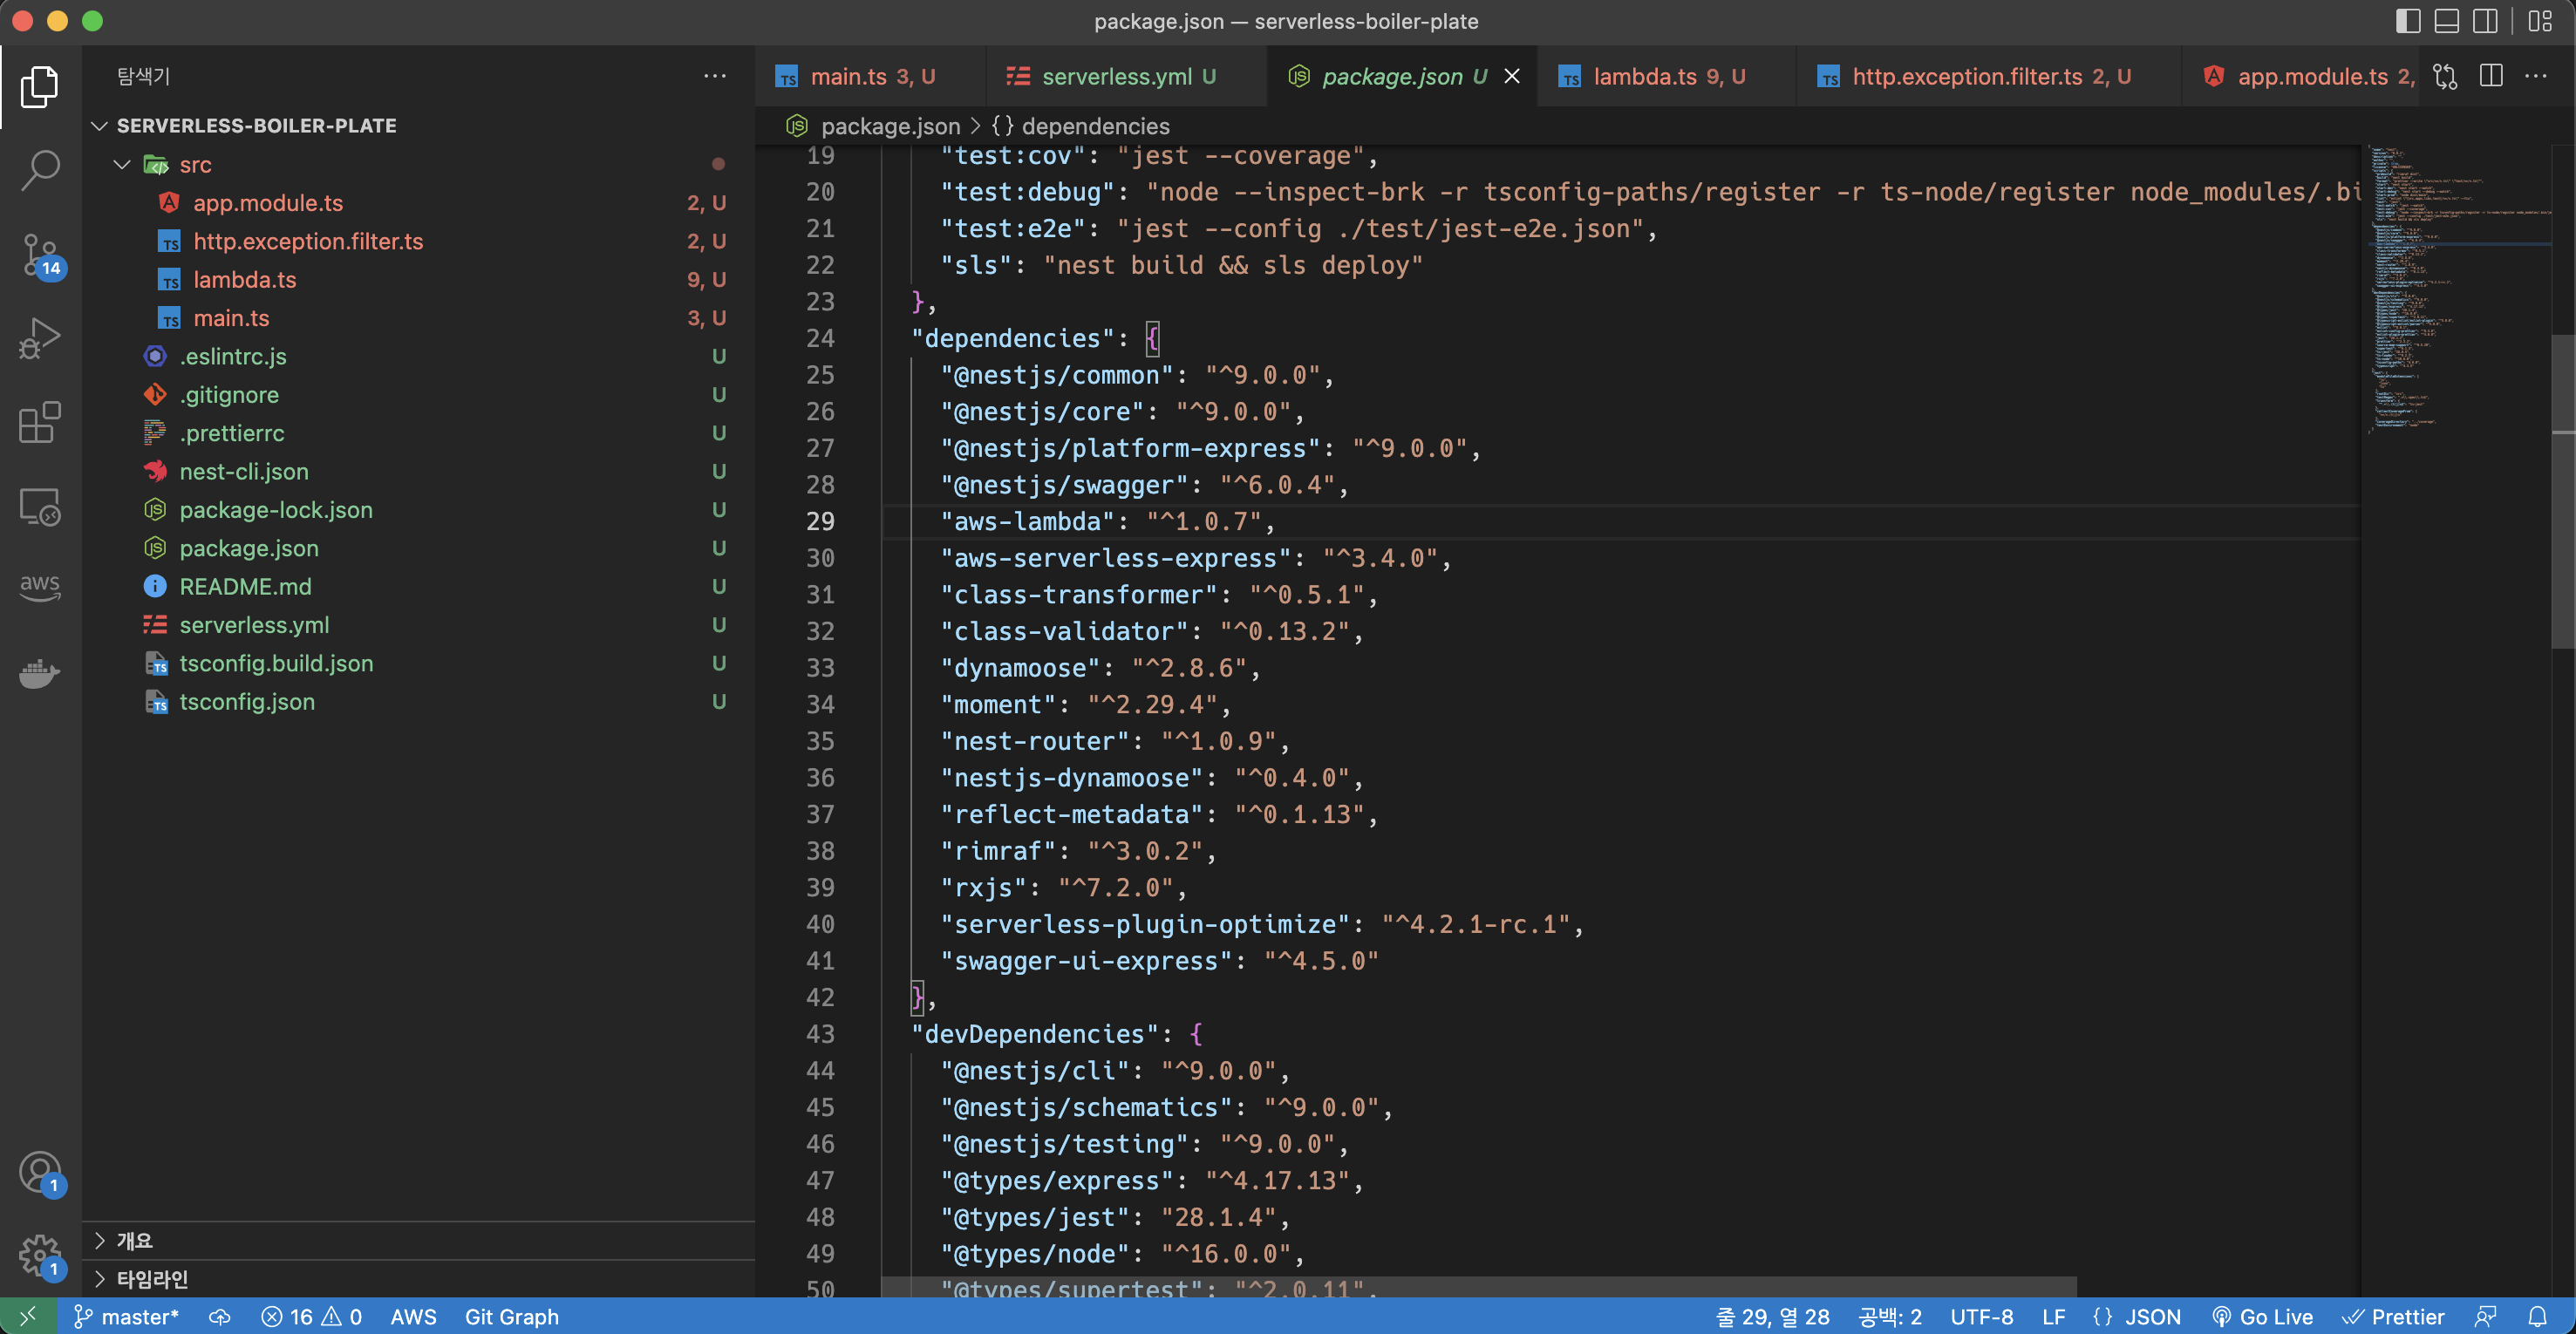
npm install명령을 실행하면 package.json에 등록된 종속성이 설치됩니다.
현재 프로젝트는 비어있기 때문에 실행할 수 있도록 모듈, 컨트롤러, 서비스를 등록해 줘야 합니다.
nest g res hello위 명령을 실행을 하면 선택을 해야 하는데 Rest API를 선택하고 CRUD entry points는 y를 눌러줍니다.
그러면 hello 폴더가 생성되고 dto, entities, controller, service가 자동으로 생성되고 app.module에도
자동으로 등록됩니다.
이 상태에서
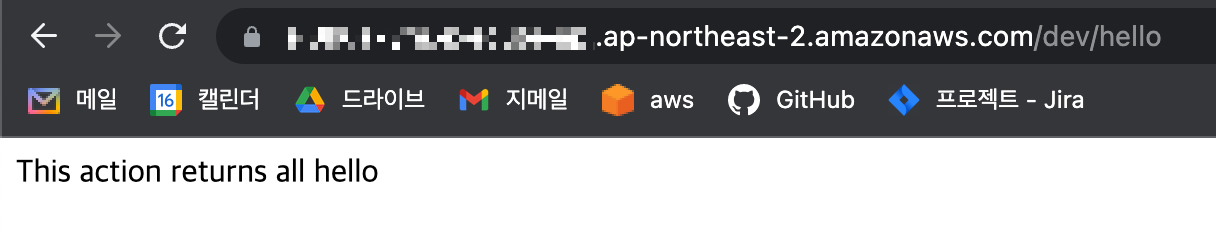
nest start를 입력하여 nest project를 실행 후 크롬 주소창에 loacalhost:3000/hello를 입력합니다.
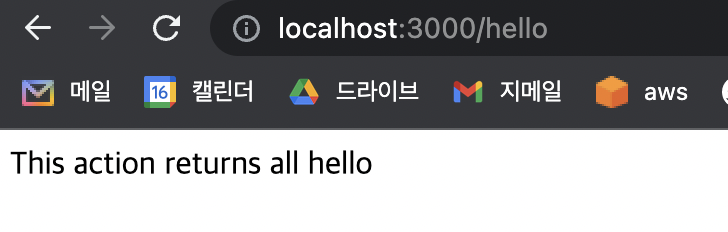
아래와 같이 뜨면 정상입니다.
localhost:3000/api-docs 를 입력하면
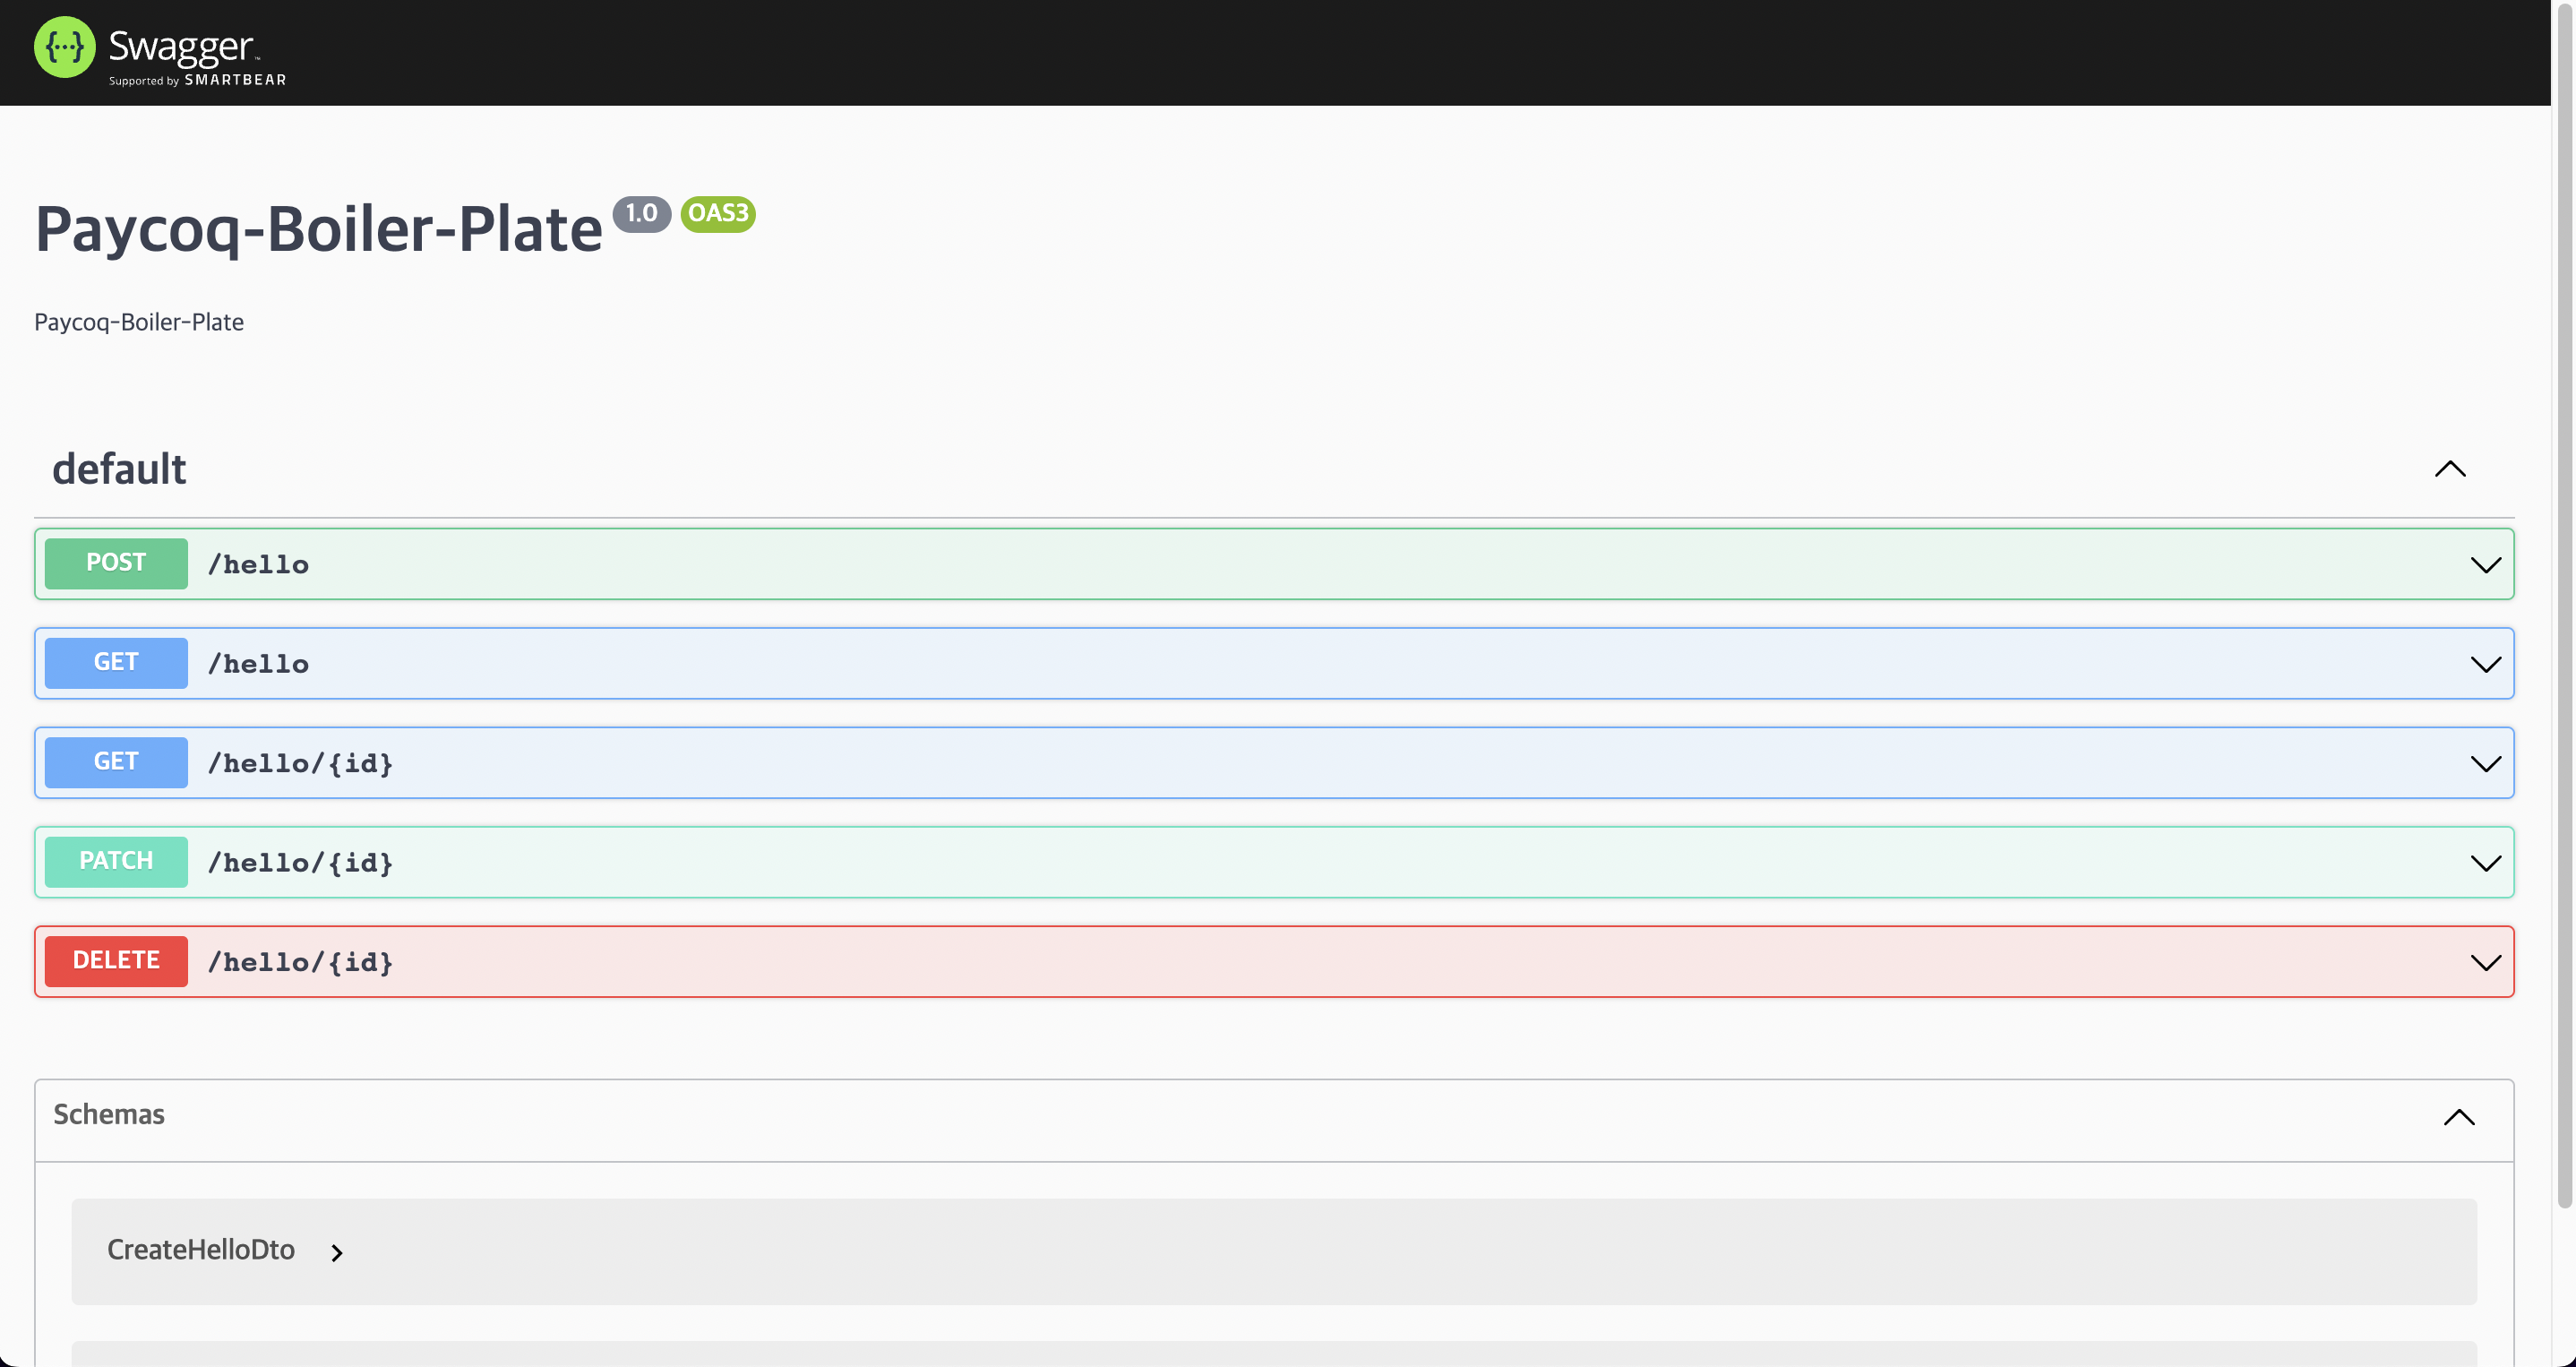
위와 같이 swagger가 뜨게 되는데
main.ts에 가보면
//swagger config
  const config = new DocumentBuilder()
    .setTitle('Paycoq-Boiler-Plate')
    .setDescription('Paycoq-Boiler-Plate')
    .setVersion('1.0')
    .build();
  const document = SwaggerModule.createDocument(app, config);
  SwaggerModule.setup('api-docs', app, document);
해당 코드가 있기 때문입니다.
Serverless 세팅
서버리스 프레임워크를 세팅하기 위해서 맨 위 링크에 종속성들을 설치 해줘야 하지만
boiler-plate 코드에는 이미 등록해 놨기 때문에 npm install 실행하면서 설치되었습니다.
두가지 파일만 추가하면 간단하게 서버리스 프레임 워크 세팅이 끝납니다.
// lambda.ts
import { Handler, Context } from 'aws-lambda';
import { Server } from 'http';
import { createServer, proxy } from 'aws-serverless-express';
import { eventContext } from 'aws-serverless-express/middleware';

import { NestFactory } from '@nestjs/core';
import { ExpressAdapter } from '@nestjs/platform-express';
import { AppModule } from './app.module';
import { DocumentBuilder, SwaggerModule } from '@nestjs/swagger';
import { ValidationPipe } from '@nestjs/common';

const express = require('express');

// NOTE: If you get ERR_CONTENT_DECODING_FAILED in your browser, this is likely
// due to a compressed response (e.g. gzip) which has not been handled correctly
// by aws-serverless-express and/or API Gateway. Add the necessary MIME types to
// binaryMimeTypes below
const binaryMimeTypes: string[] = [];

let cachedServer: Server;

async function bootstrapServer(): Promise<Server> {
  if (!cachedServer) {
    const expressApp = express();
    const nestApp = await NestFactory.create(
      AppModule,
      new ExpressAdapter(expressApp),
    );
    nestApp.use(eventContext());

    //swagger config
    const config = new DocumentBuilder()
      .setTitle('Paycoq-Boiler-Plate')
      .setDescription('Paycoq-Boiler-Plate')
      .setVersion('1.0')
      .build();
    const document = SwaggerModule.createDocument(nestApp, config);
    SwaggerModule.setup('api-docs', nestApp, document);

    //class validator config
    nestApp.useGlobalPipes(new ValidationPipe({ transform: true }));

    await nestApp.init();
    cachedServer = createServer(expressApp, undefined, binaryMimeTypes);
  }
  return cachedServer;
}

export const handler: Handler = async (event: any, context: Context) => {
  cachedServer = await bootstrapServer();

  if (event.path === '/api-docs') {
    event.path = '/api-docs/';
  }
  event.path = event.path.includes('swagger-ui')
    ? `/api-docs${event.path}`
    : event.path;

  return proxy(cachedServer, event, context, 'PROMISE').promise;
};
첫번째로 main.ts와 같은 폴더(아마 src일 것임)에 lamba.ts 파일을 생성합니다.
local에서 실행 할 때 main.ts를 기반으로 실행된다면 serverless 상에서는 lamba.ts 기반으로 동작합니다.
잘 보면 main에 있던 swagger 설정이 있지만 밑에 추가적인 변경 사항이 있는 것을 볼 수 있습니다.
로컬과 서버간에 swagger-ui를 불러오는 경로에 차이가 있기 때문에 그렇습니다. 추후에 한번 더 바꿔야 합니다.
#serverless.yml
service: paycoq-boiler-plate

plugins:
  - serverless-plugin-optimize

provider:
  name: aws
  runtime: nodejs14.x
  region: ap-northeast-2
  apiGateway:
    binaryMediaTypes:
      - '*/*'

functions:
  main:
    handler: dist/lambda.handler
    events:
      - http:
          method: any
          path: /{any+}

custom:
  optimize:
    external: ['swagger-ui-dist']
# npm run sls -> nest build && sls deploy
두번째는 serverless.yml 파일이다.
이 파일을 기반으로 권한을 부여하거나 없는 인스턴스를 생성하거나 합니다. 현재는 사용하고 있진 않지만
CI/CD설정을 하려면 이 파일을 잘 설정 해야 한다고 합니다.
custom:optimize:external 같은 경우도 서버상에서 swagger를 동작할 때 발생하는 경로 문제를 해결 하기 위한 코드입니다.
추가적으로 package.json에 script 부분에 sls라는 스크립트를 추가해 놓았기 때문에
npm run sls 입력시 → nest build && sls deploy와 동일한 효과를 냅니다.
Serverless 실행
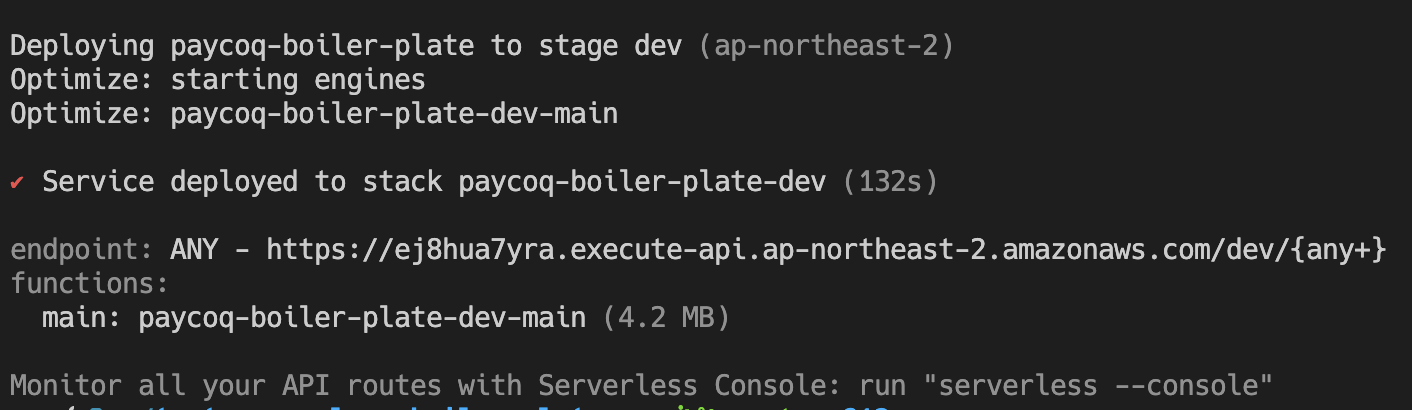
만약 지금까지 실수한것 없이 잘 따라왔다면 npm run sls 입력시 아래와 같이 자동으로 진행될 것입니다.
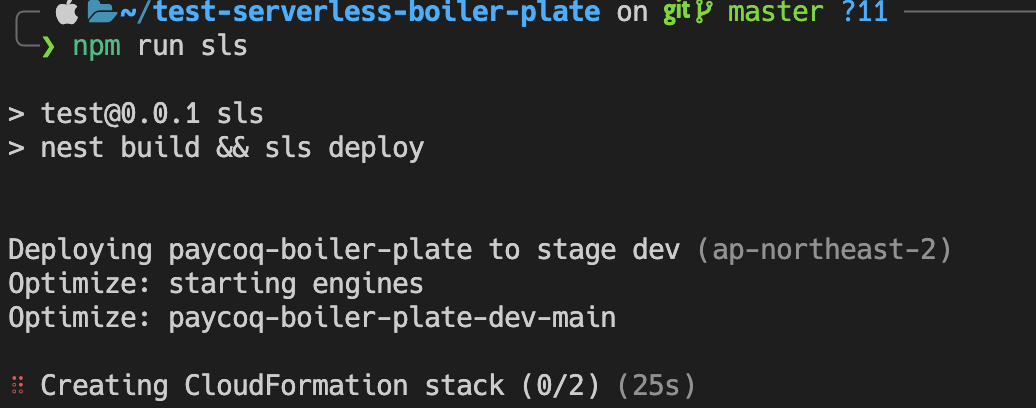
완료시 아래와 같은 결과가 나오는데 endpoint를 사용하여 rest api에 접근 할 수 있습니다.
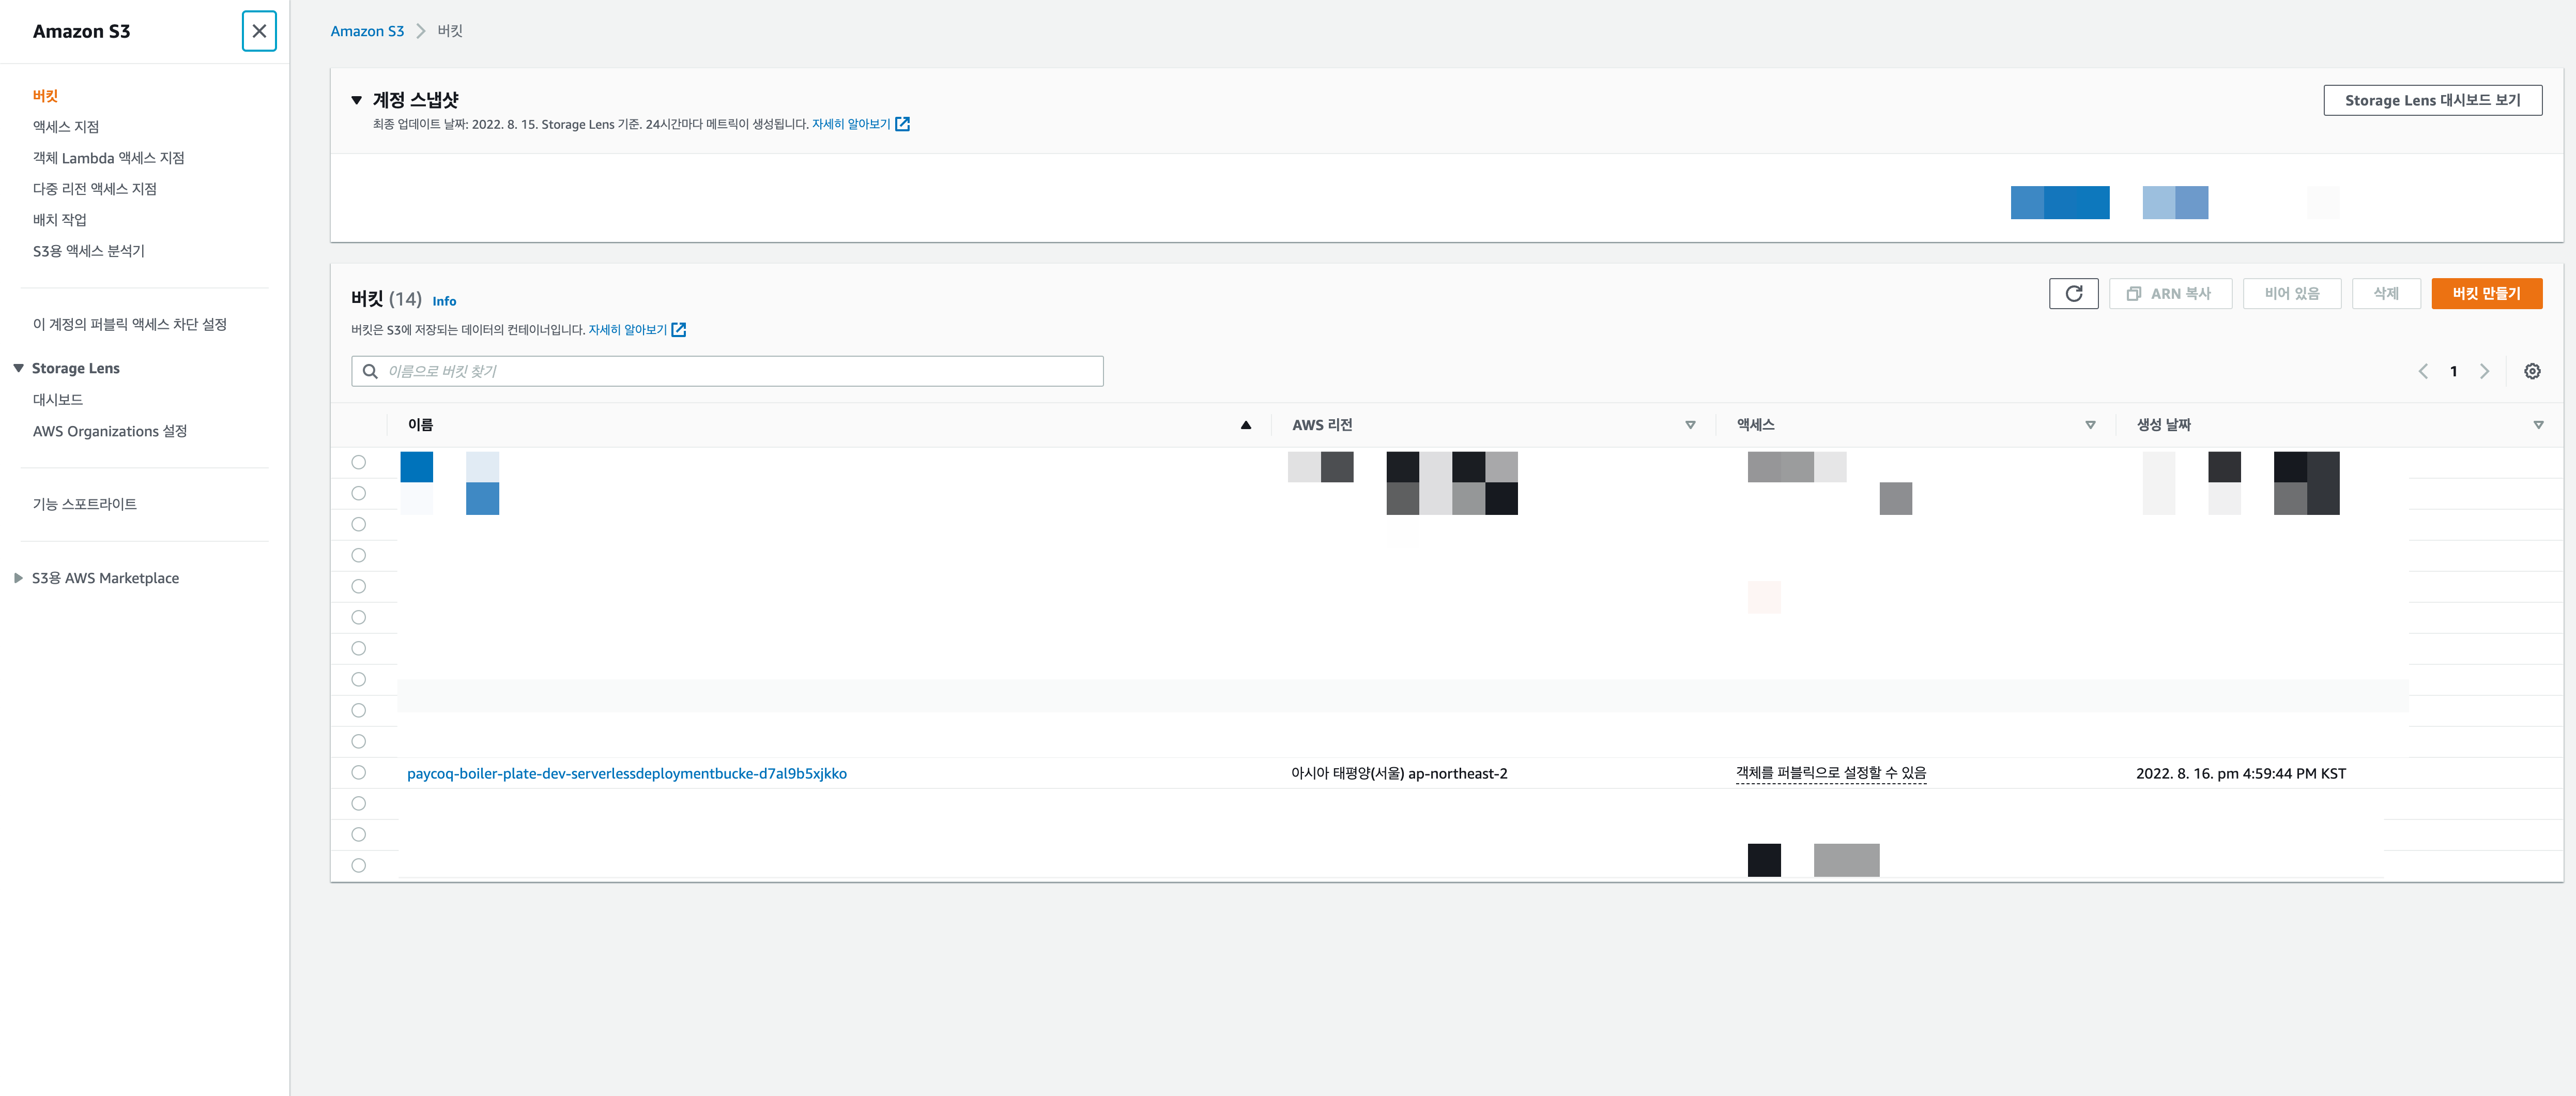
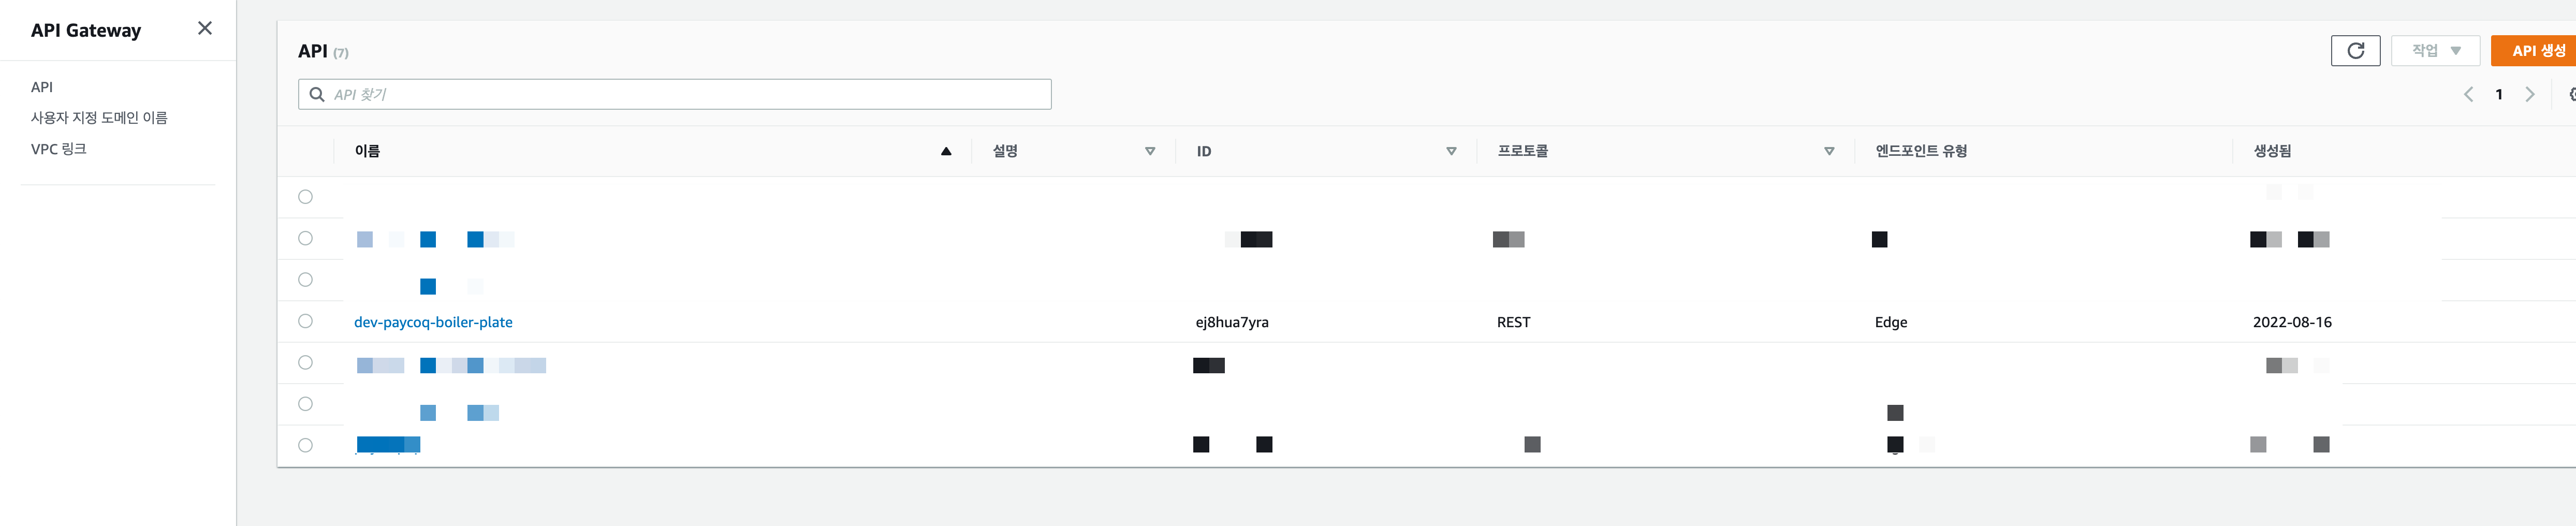
위의 방법으로 프로젝트를 배포하면 aws상에
아래와 같이 s3에 프로젝트를 압축한 파일이 생기고
lambda 함수도 생기고

apigateway도 생기고
cloudformation 스택도 생깁니다.
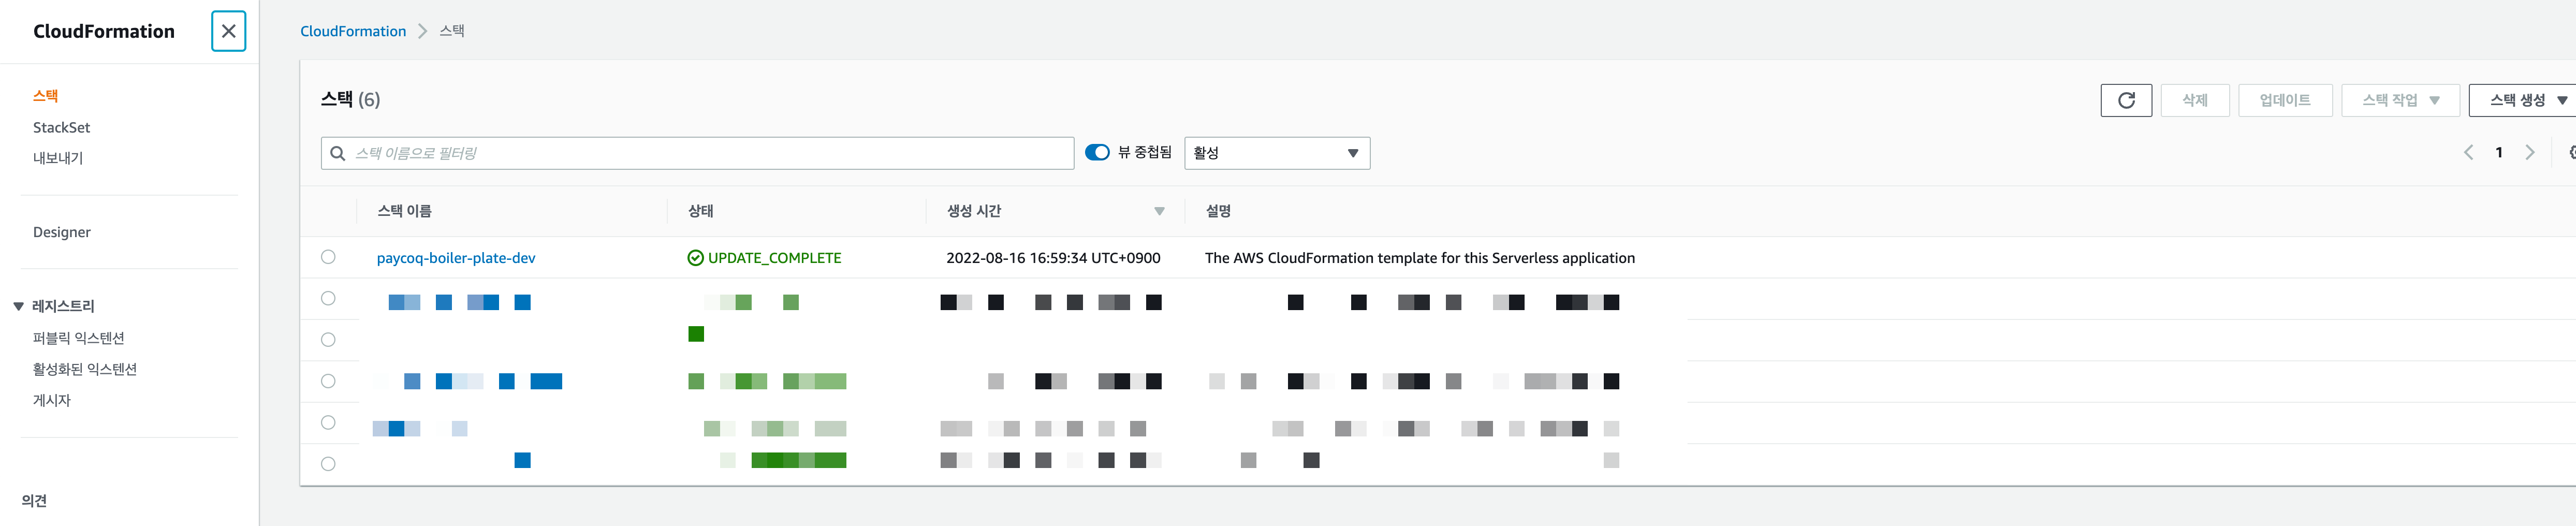
그래서 삭제를 하고 싶으면 s3를 비우고 삭제한 후 cloudformation 스택을 삭제합니다.
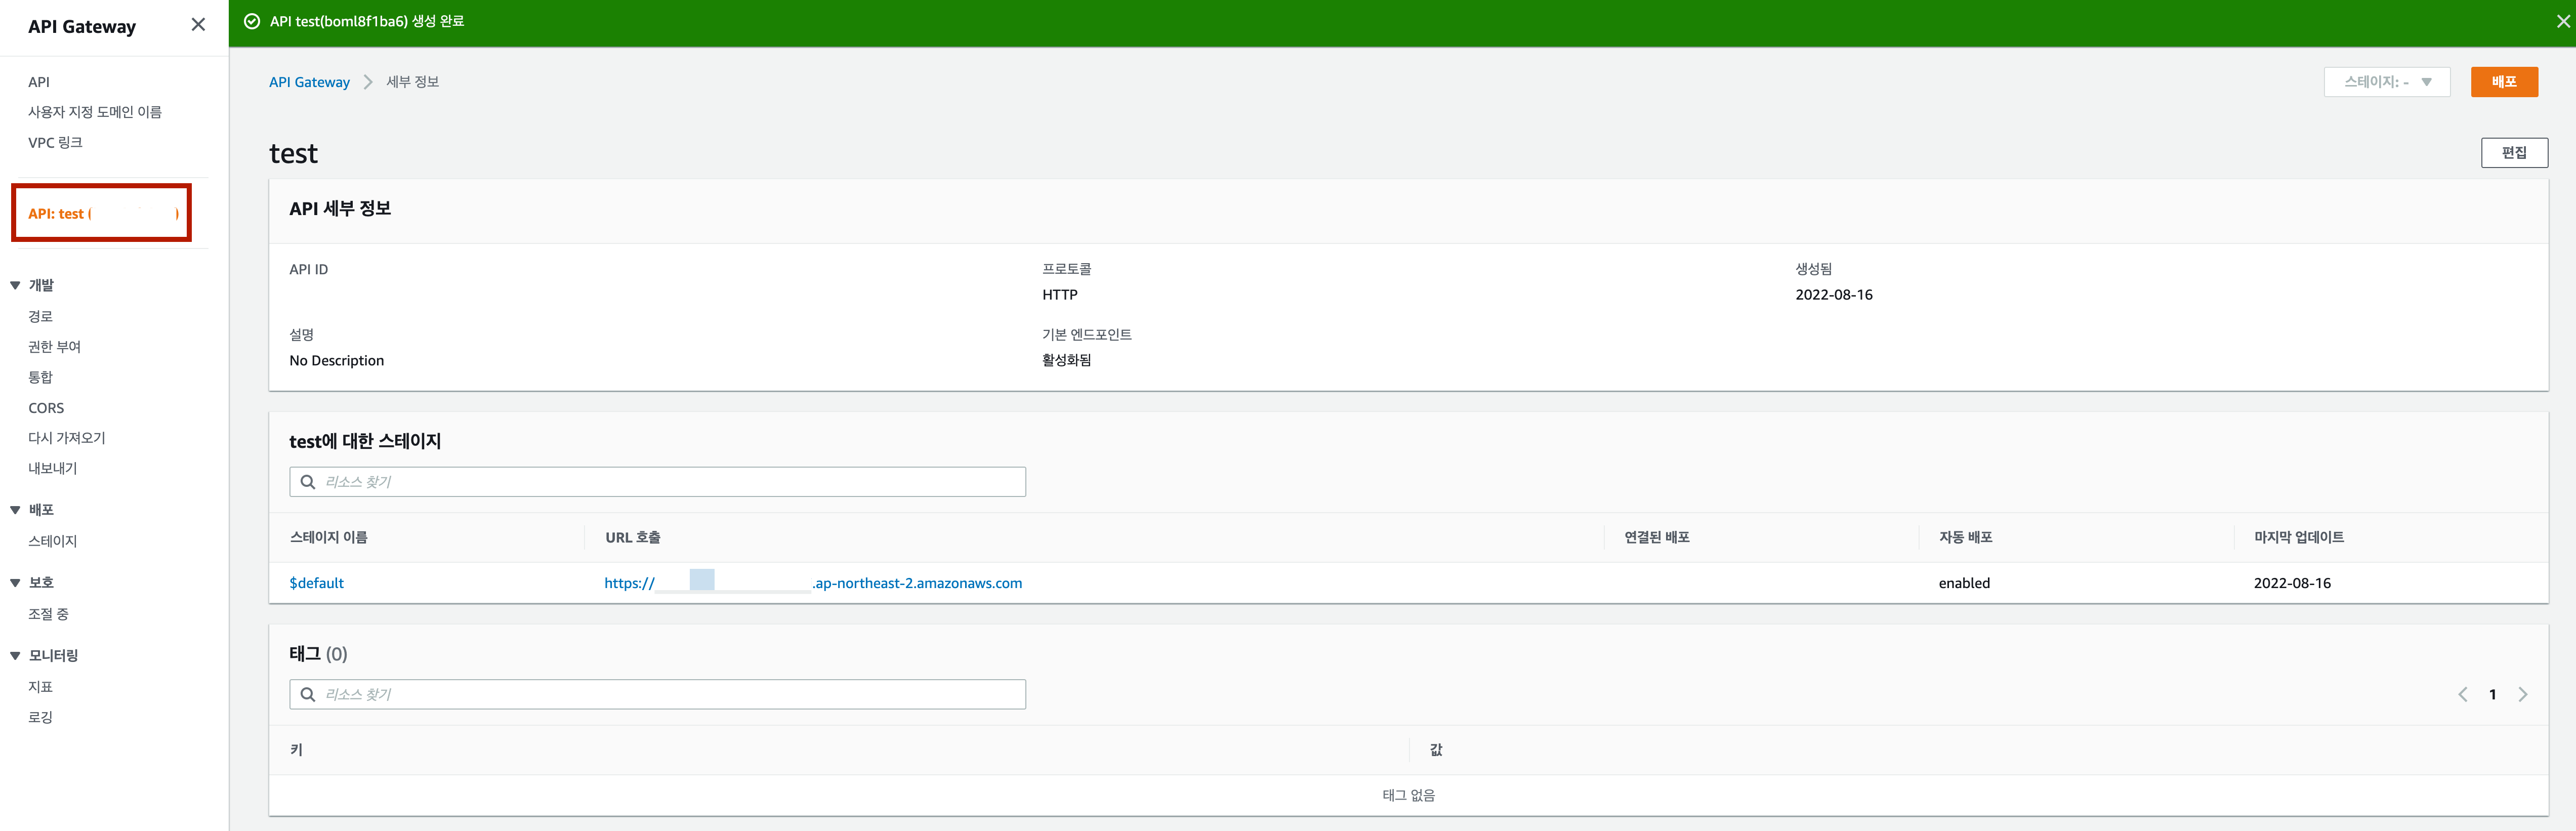
이제 생성된 url을 사용하여 api를 호출 해볼 텐데 까먹었다면 apigateway에 접속해서 만든 api를 들어간 후 스테이지를 선택하면 상단에 url 호출이 있습니다.
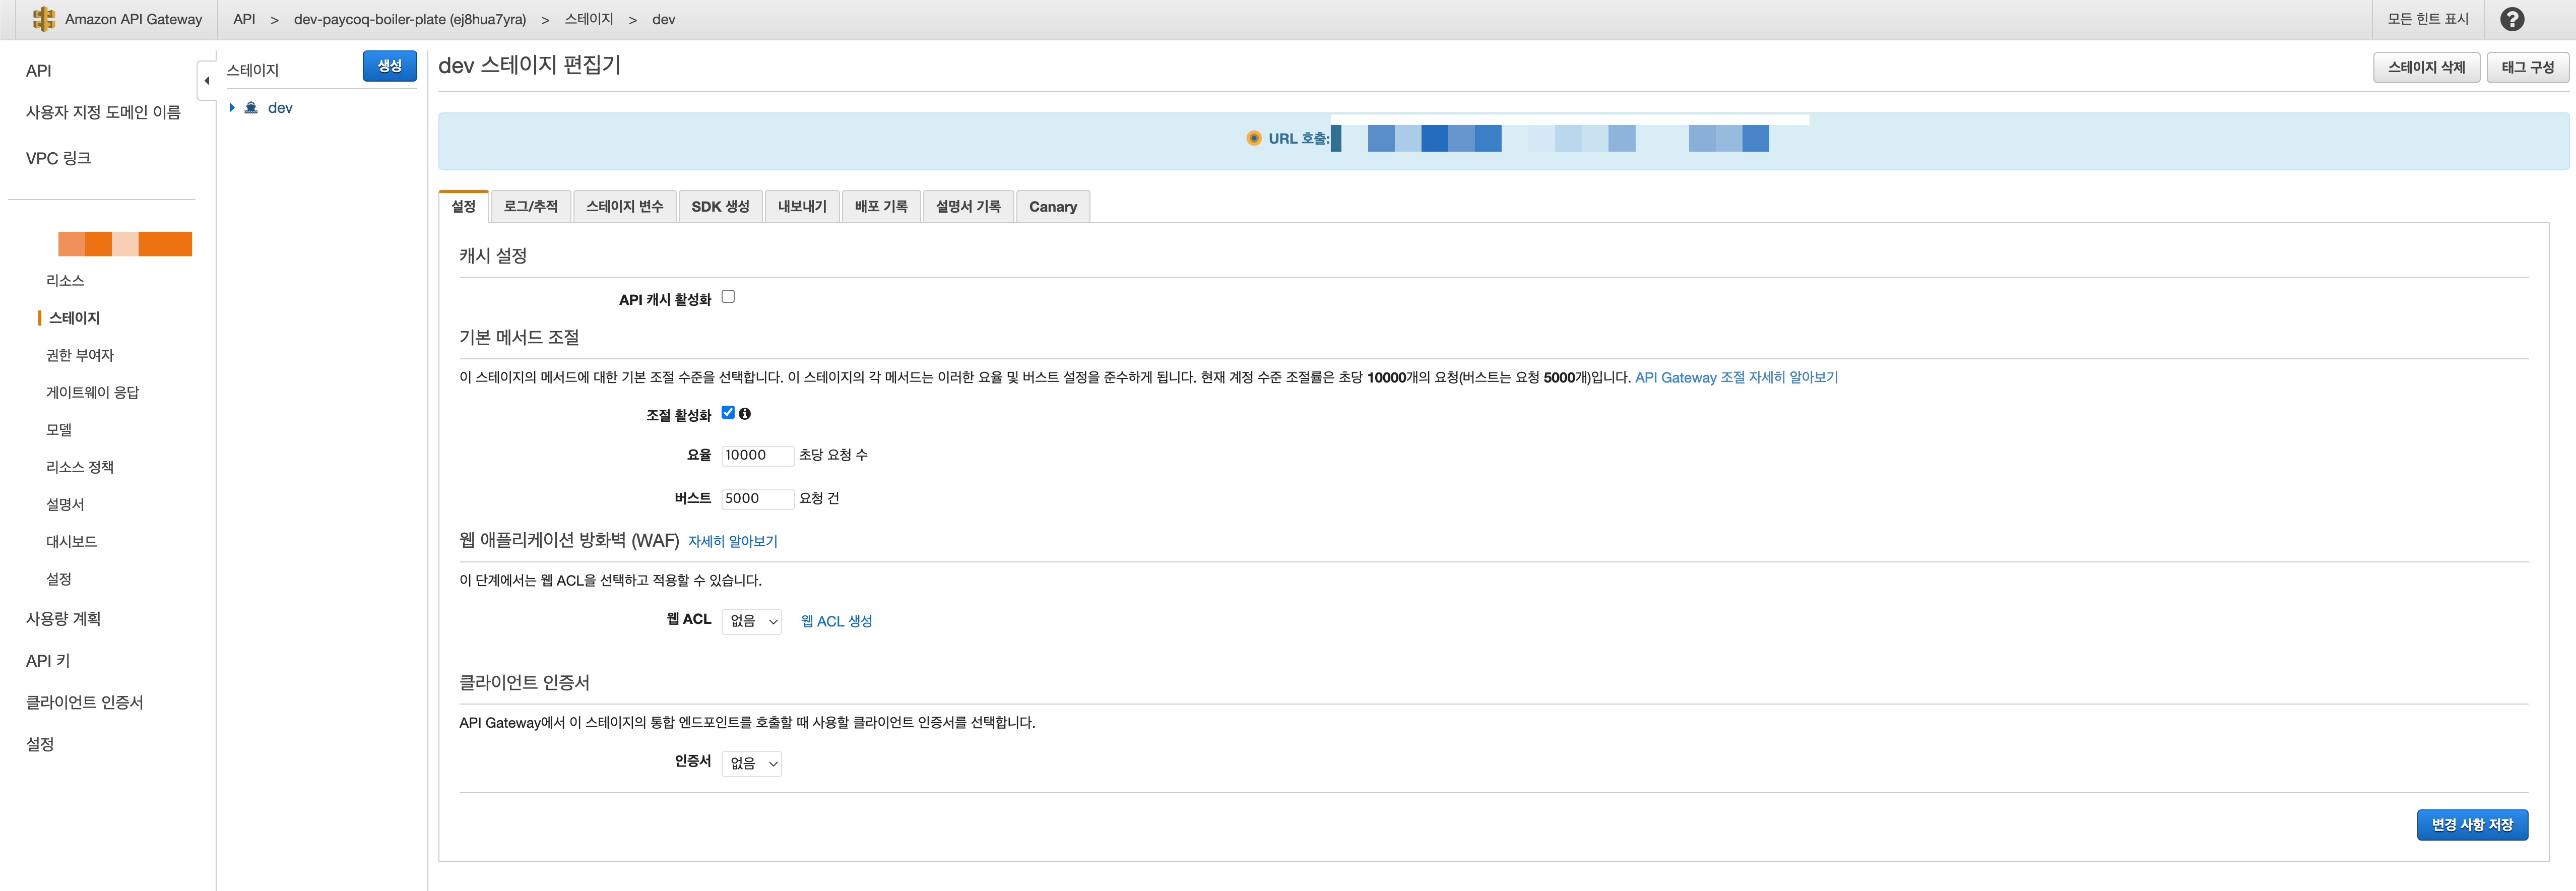
이제 해당 url을 사용하여 api에 접근이 가능해 지는 것을 볼 수 있습니다. swagger도 접근 가능합니다.
여러 api url들을 하나의 url로 묶기 위한 설정
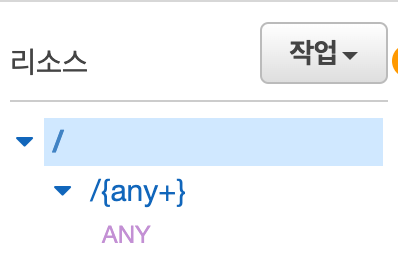
이전에 serverless.yml과 apigateway를 유심히 본 사람은 알겠지만 method와 path가 any로 되어있습니다.
이 상태에서도 경로지정이 가능한지는 모르겠지만 방법을 찾지 못한 사람은 아래의 방법을 따라하면 될 듯 합니다.
#serverless.yml
service: paycoq-boiler-plate

plugins:
  - serverless-plugin-optimize

provider:
  name: aws
  runtime: nodejs14.x
  region: ap-northeast-2
  apiGateway:
    binaryMediaTypes:
      - '*/*'

functions:
  main:
    handler: dist/lambda.handler
    events:
      - http:
          method: post
          path: /hello
      - http:
          method: get
          path: /hello
      - http:
          method: get
          path: /hello/{id}
      - http:
          method: patch
          path: /hello/{id}
      - http:
          method: delete
          path: /hello/{id}

custom:
  optimize:
    external: ['swagger-ui-dist']
# npm run sls -> nest build && sls deploy
yml파일의 functions부분을 하나하나 쪼개줍니다. 이 상태에서 배포 해주면 apigateway도 쪼개져서 만들어집니다.
before
after

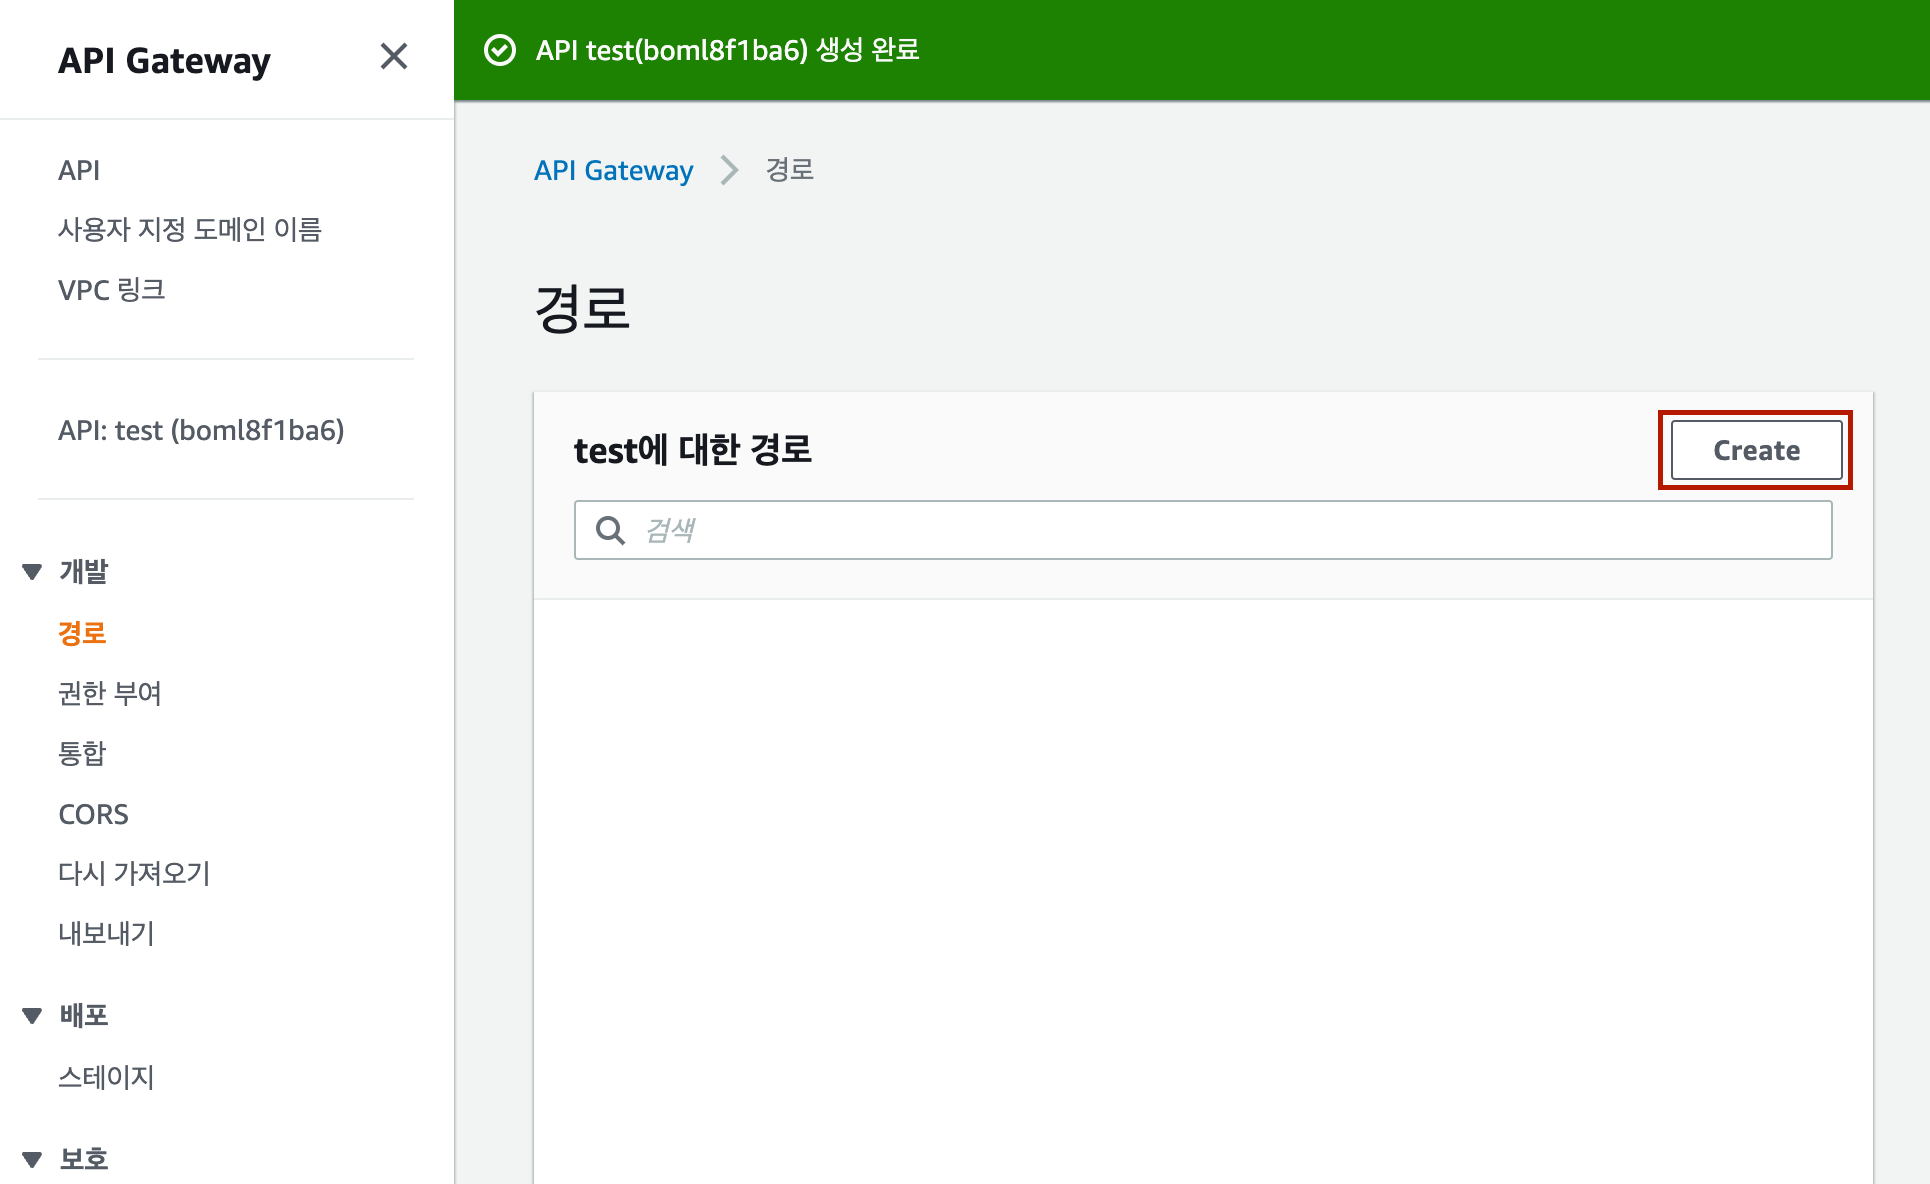
이제 apigateway로 가서 우측상단에 api생성을 누르고 HTTP API를 선택합니다.
따로 설정할 건 없고 api이름만 정하고 다 넘겨줍니다.
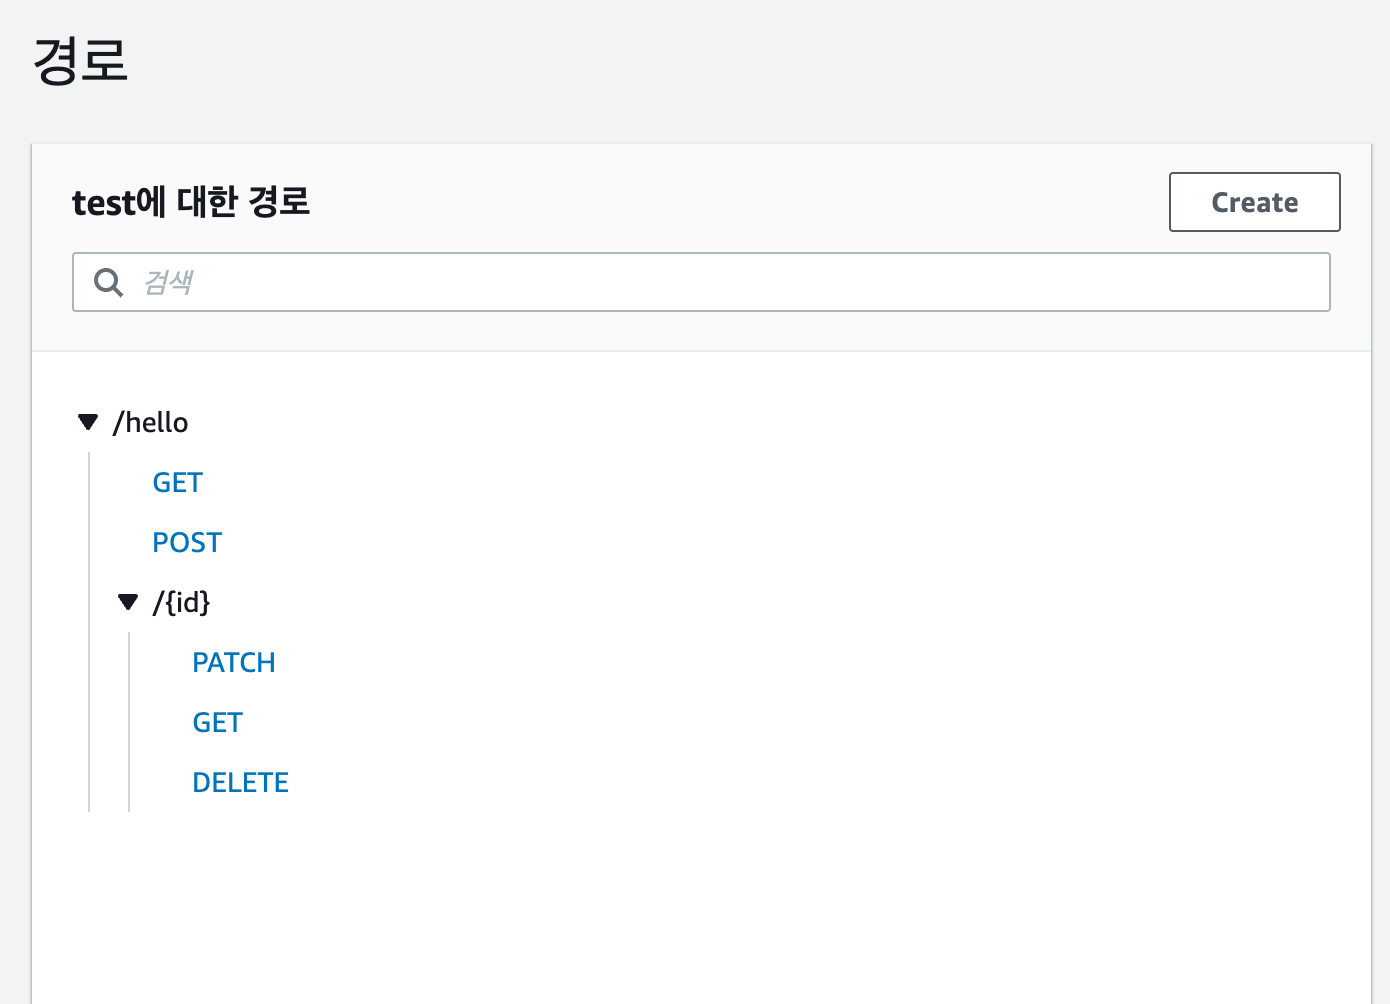
이제 본인의 api에 맞게 경로와 통합을 만들어 주면 되는데
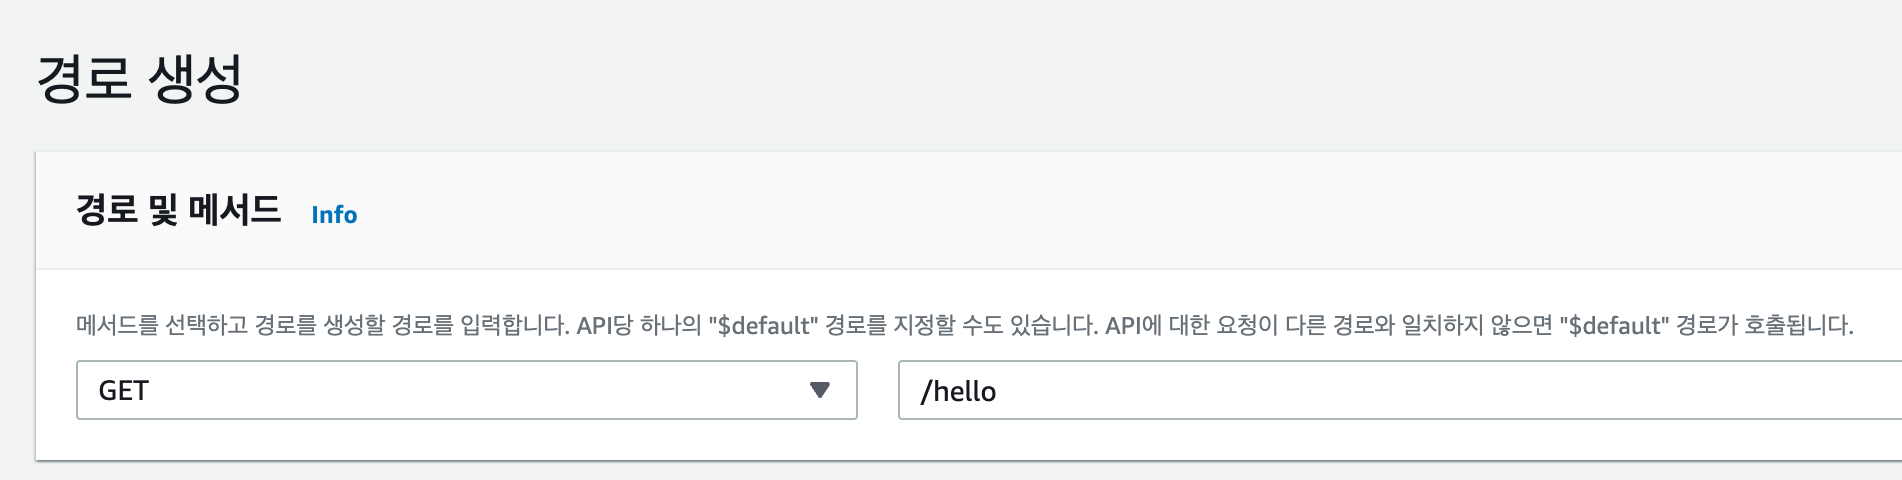
이런 식으로 모든 경로를 설정 해줍니다.
path스트링의 경우에는 {}로 감싸고 query스트링은 따로 처리해주지 않아도 됩니다.
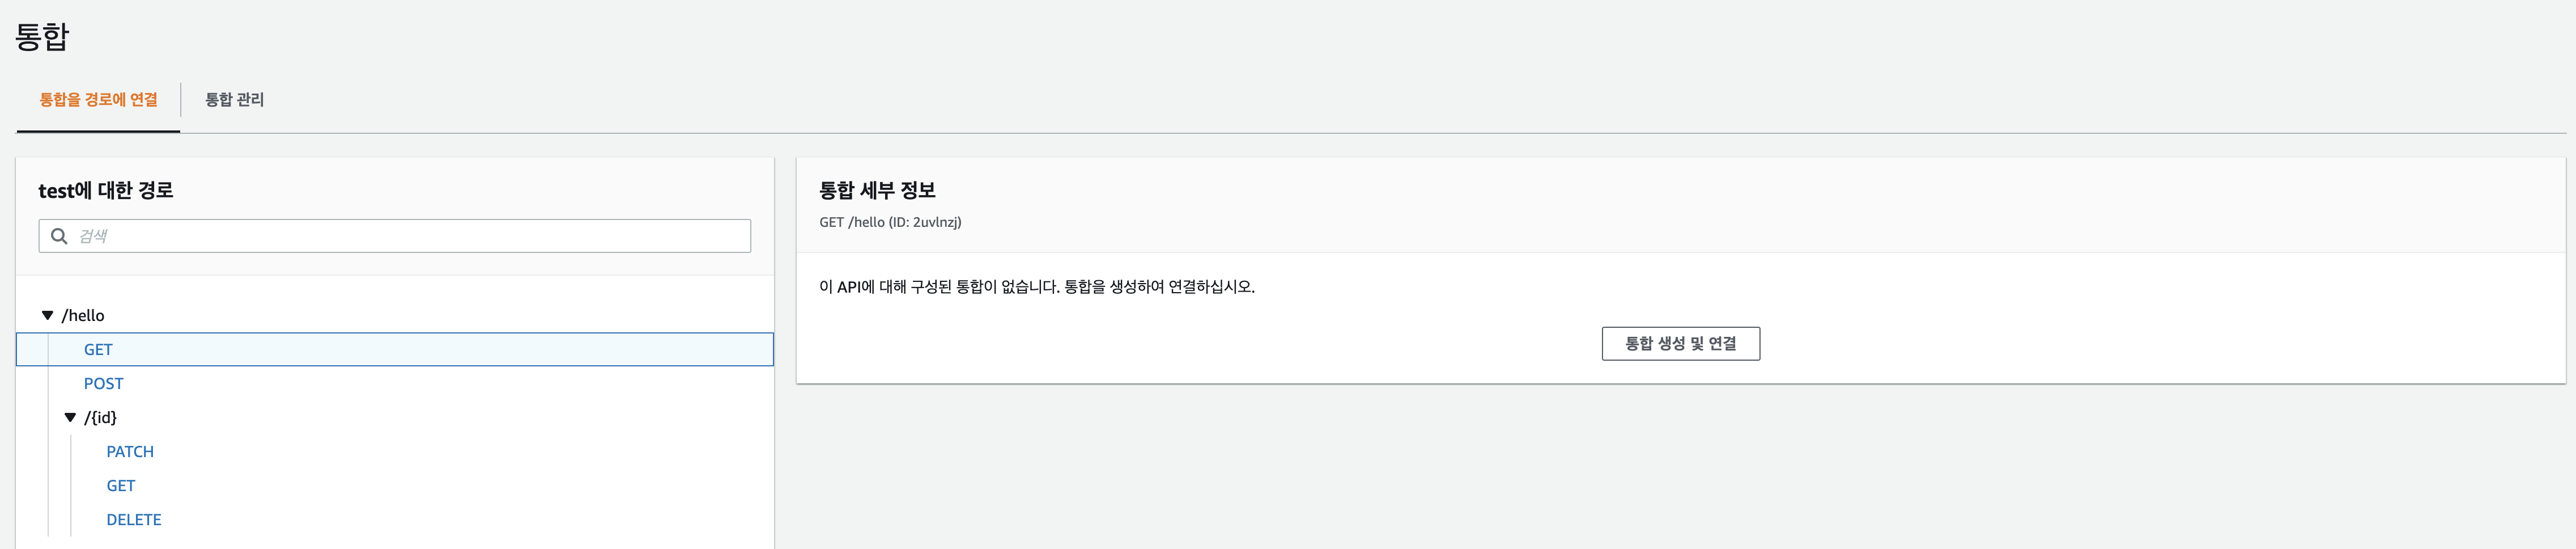
이제 좌측에 통합버튼을 클릭하고 만들어 놓은 경로들을 클릭하면 생기는 통합 생성 및 연결을 눌러줍니다.
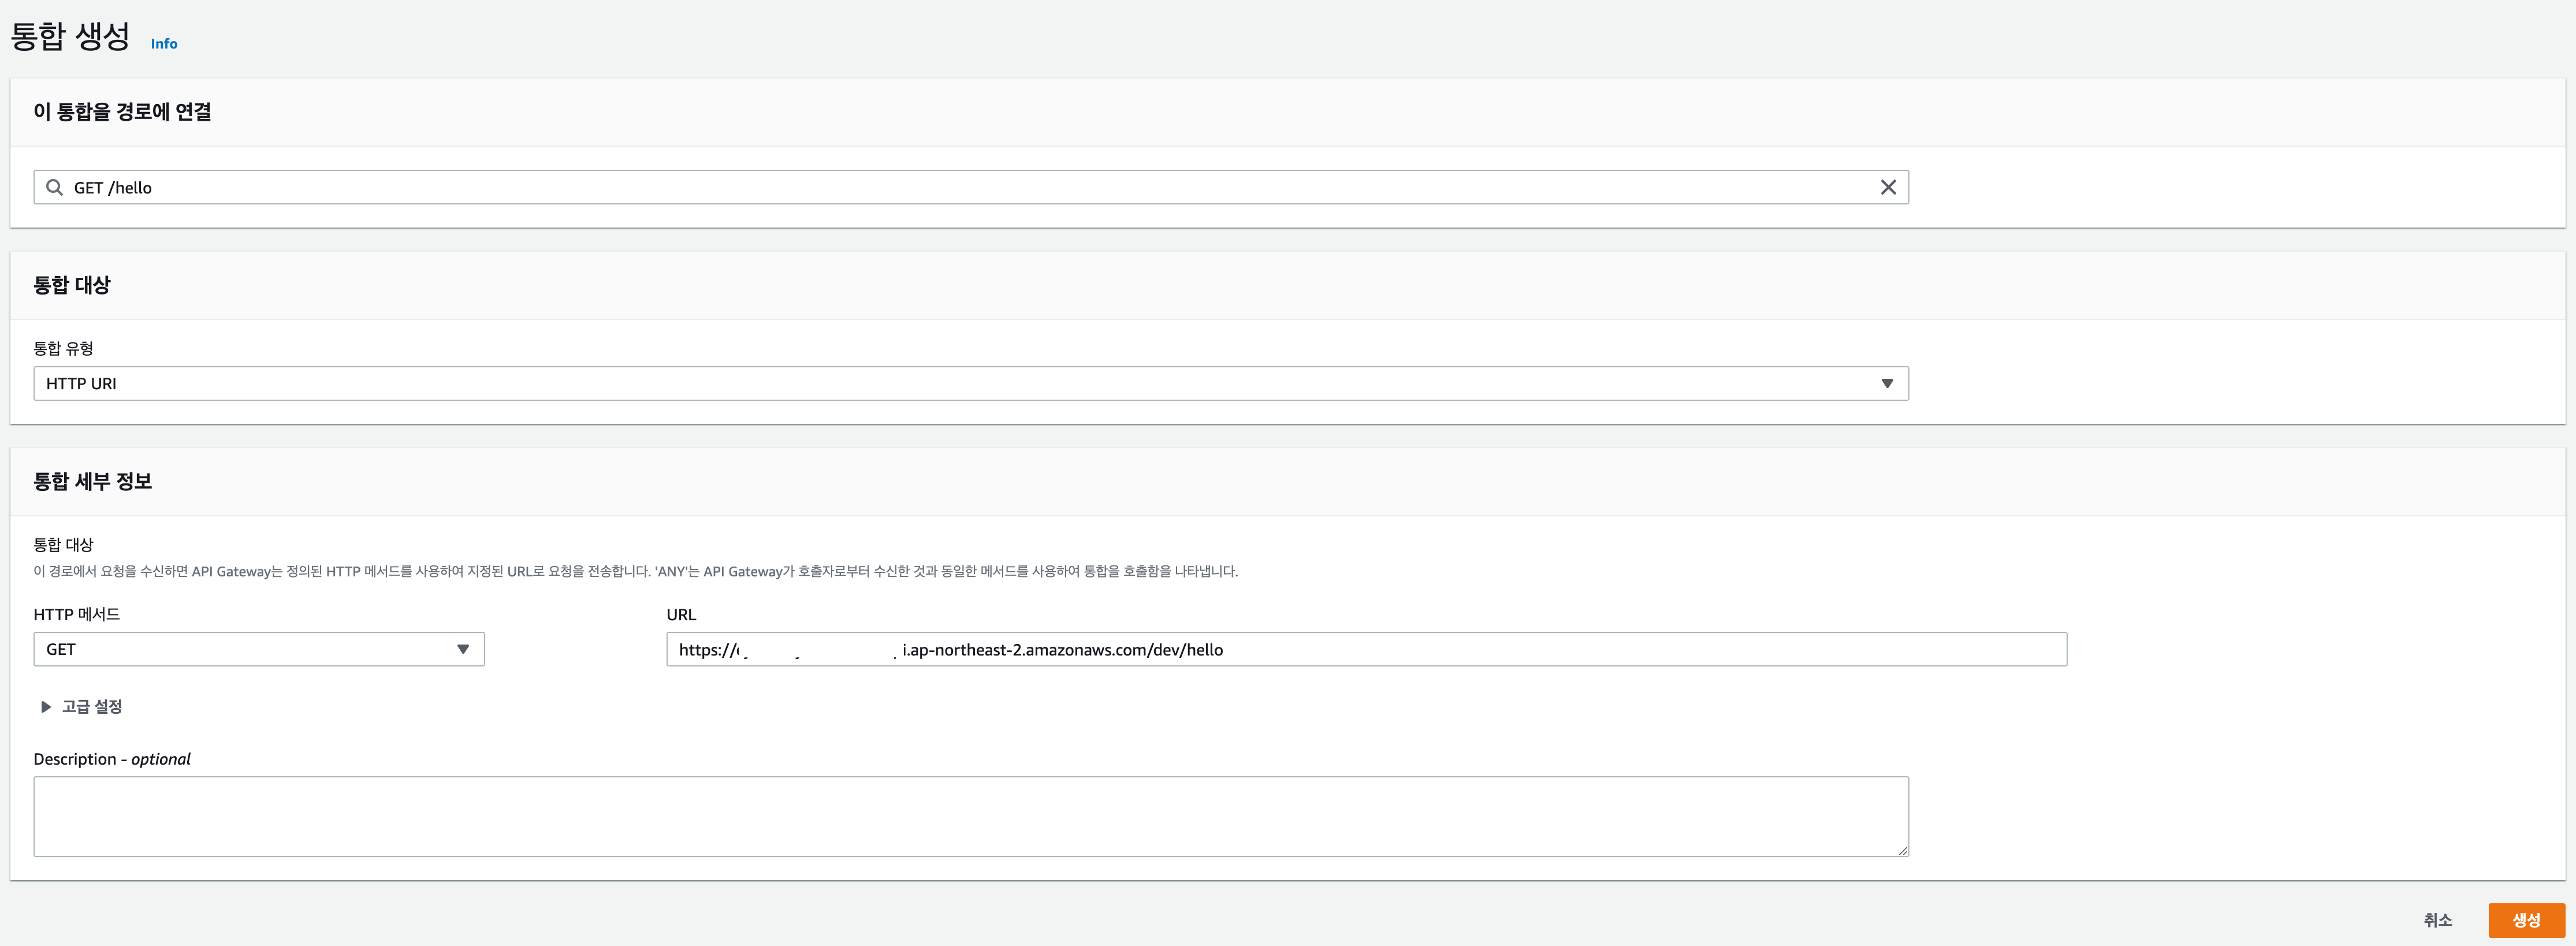
아래와 같이 HTTP URI를 선택하고 URL을 배포한 URL로 입력해 줍니다.
다 진행 한 후 좌측 빨간박스에 해당하는 부분을 클릭하면 URL이 나옵니다.
해당 URL을 사용하여 api를 호출하면

잘 호출 됩니다.
이 방식으로 다른 프로젝트에 속한 URL이 다른 API들도 경로만 잘 지정하면 하나의 URL을 통해 호출할 수 있습니다.
마지막 Swagger
마지막으로 이전에 작성했던 Swagger 문서 경로를 주소창에 한번 입력해보면 안될 것입니다.

이 문제를 해결하기 위해선 serverless.yml과 lambda.ts 그리고 이에 맞게 apigateway를 수정해 주어야 합니다.
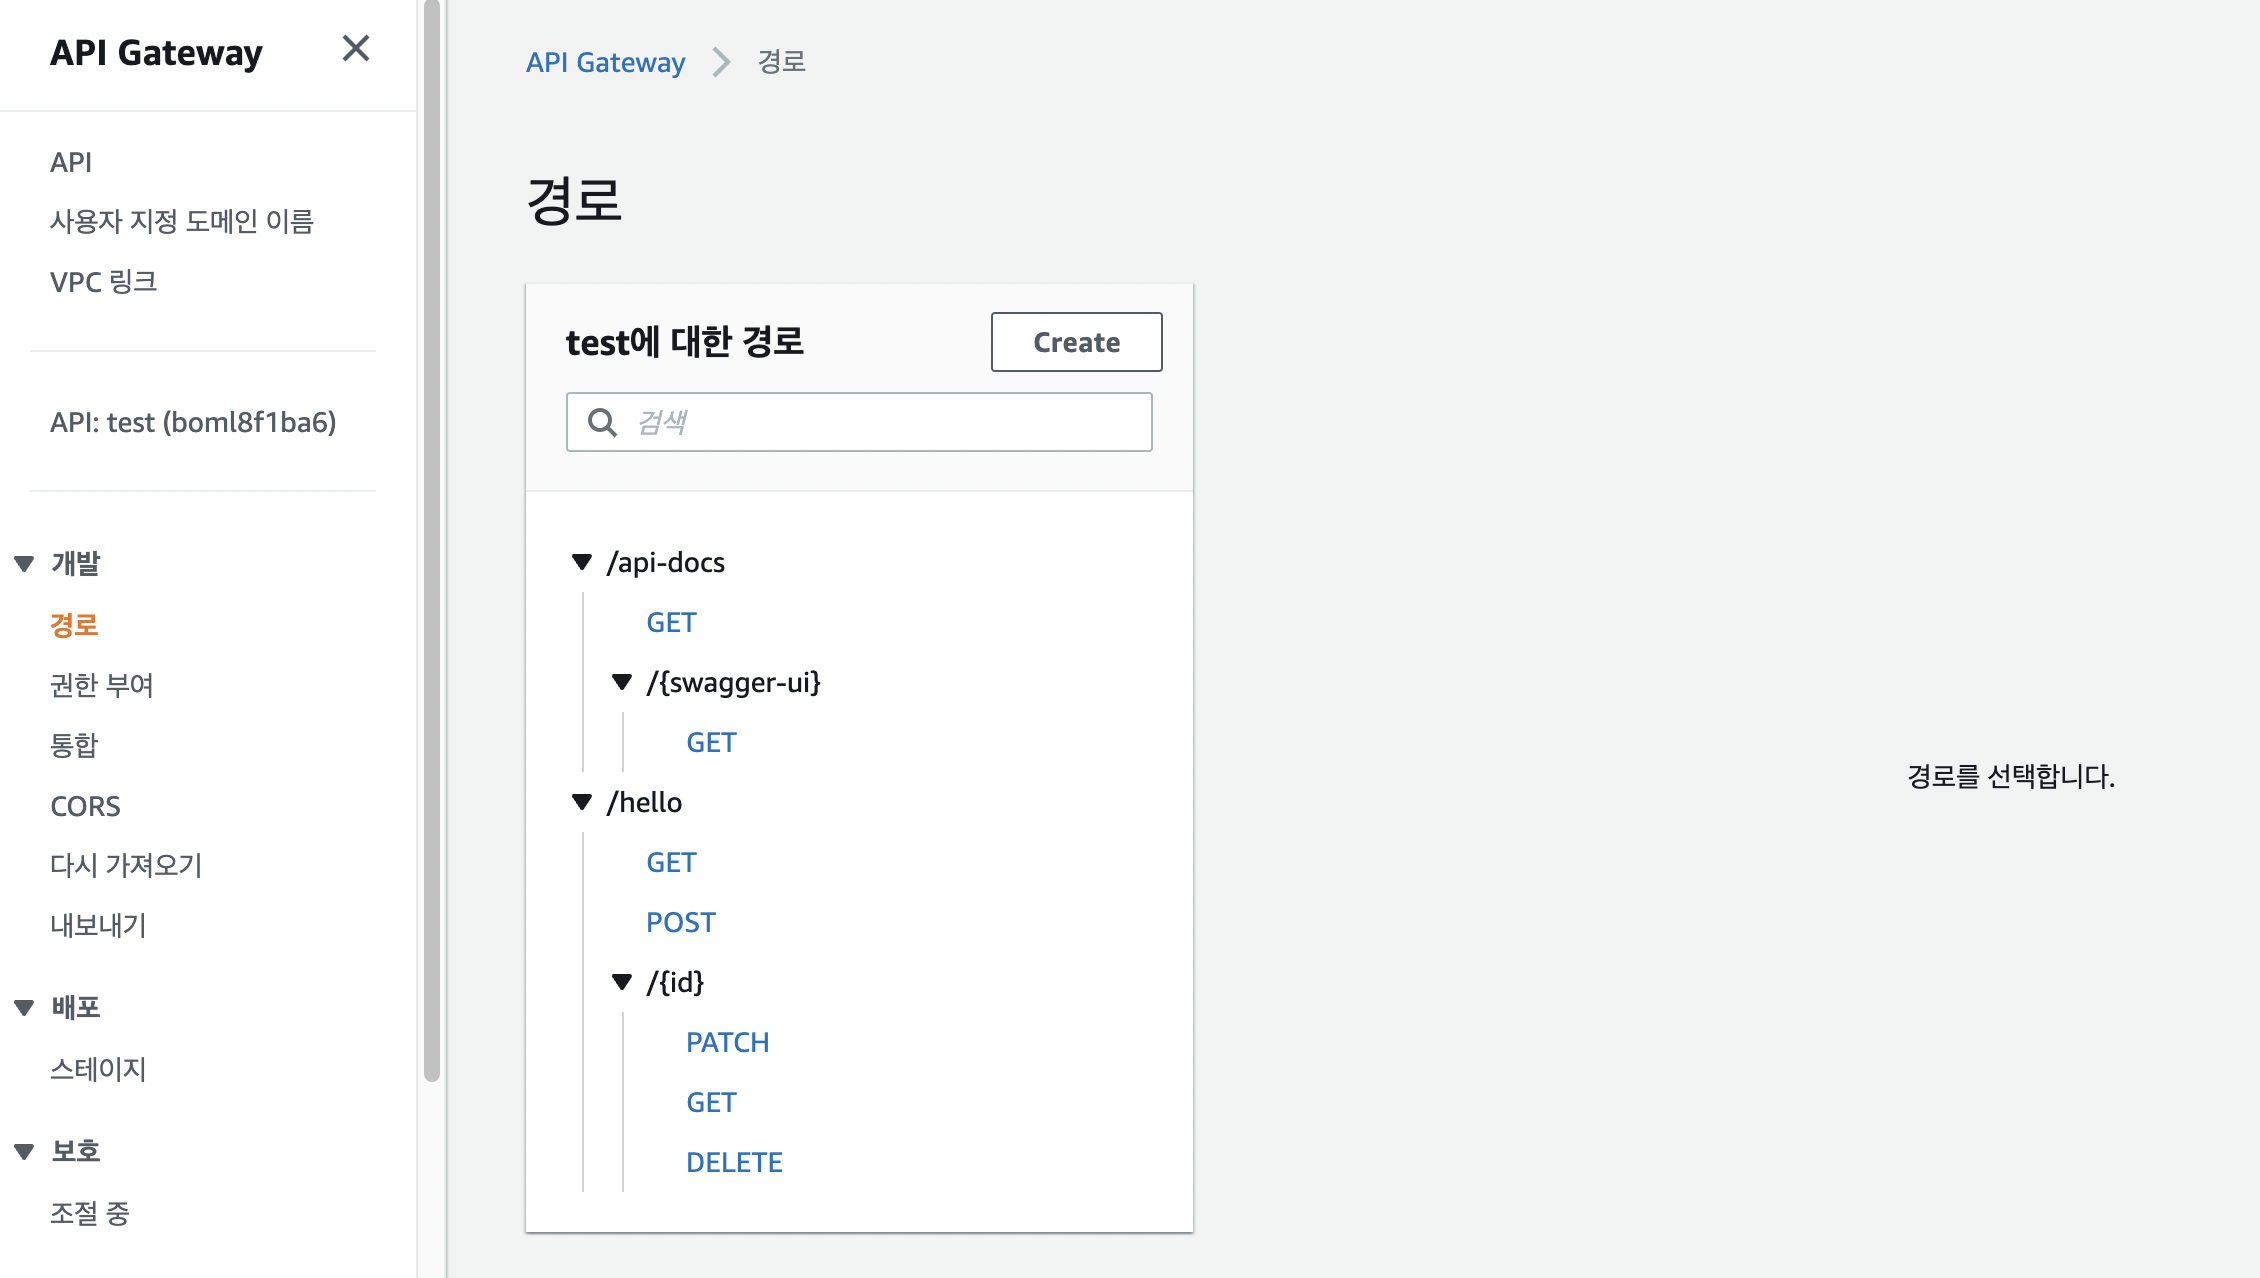
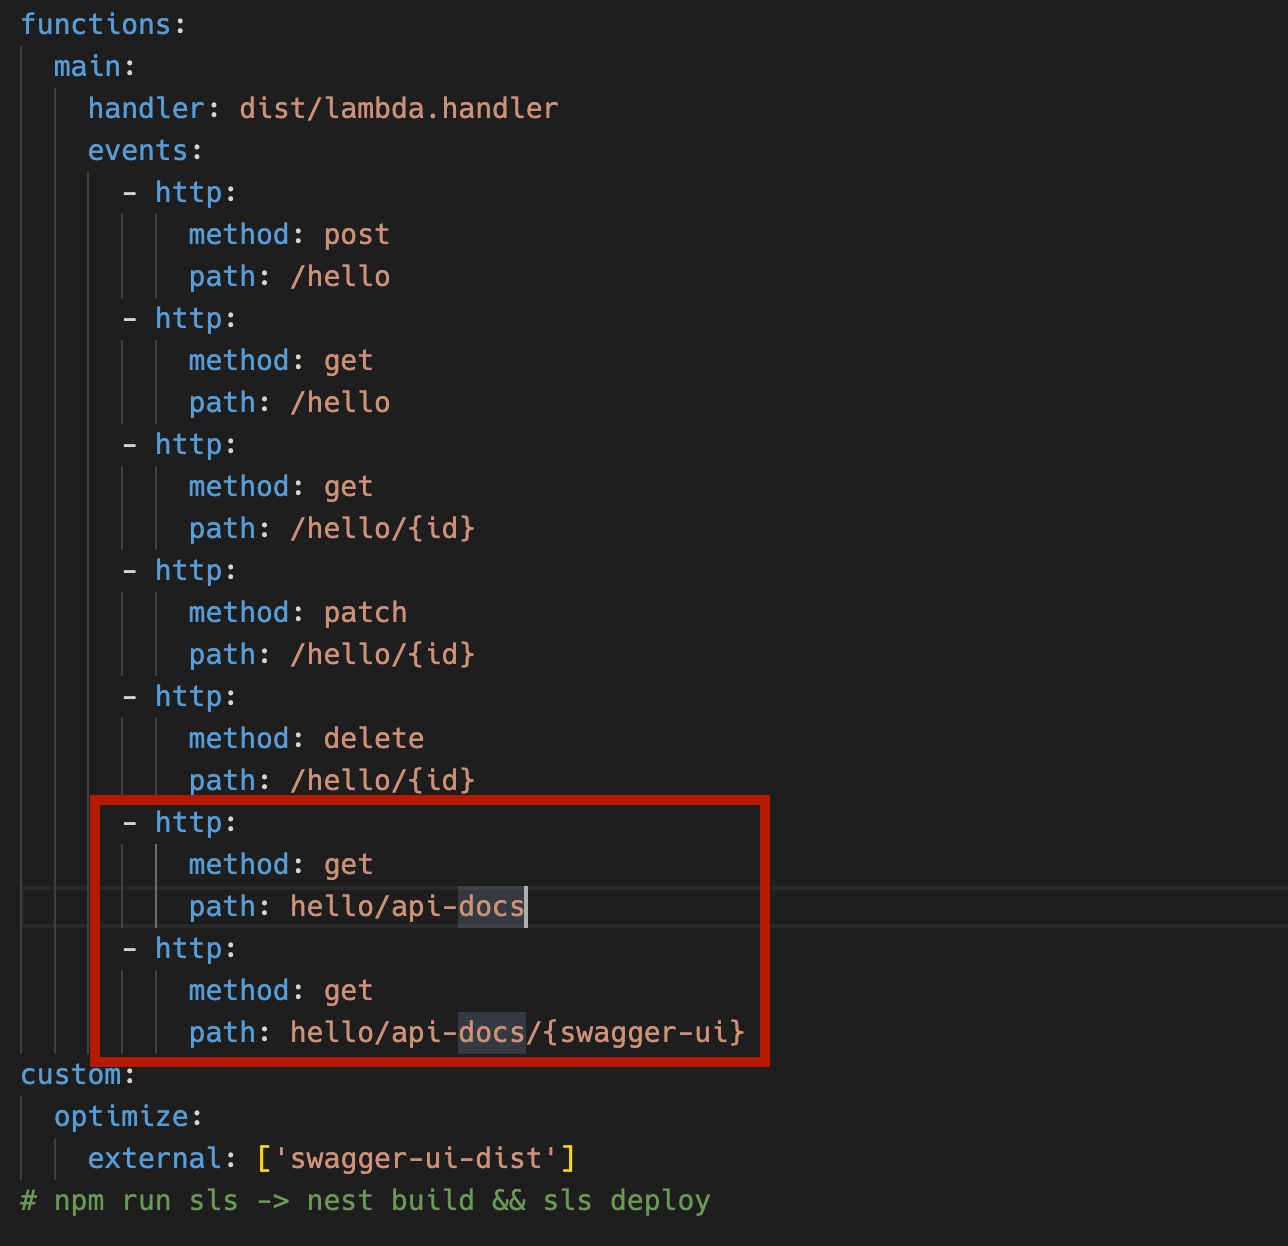
serverless.yml에 경로 추가
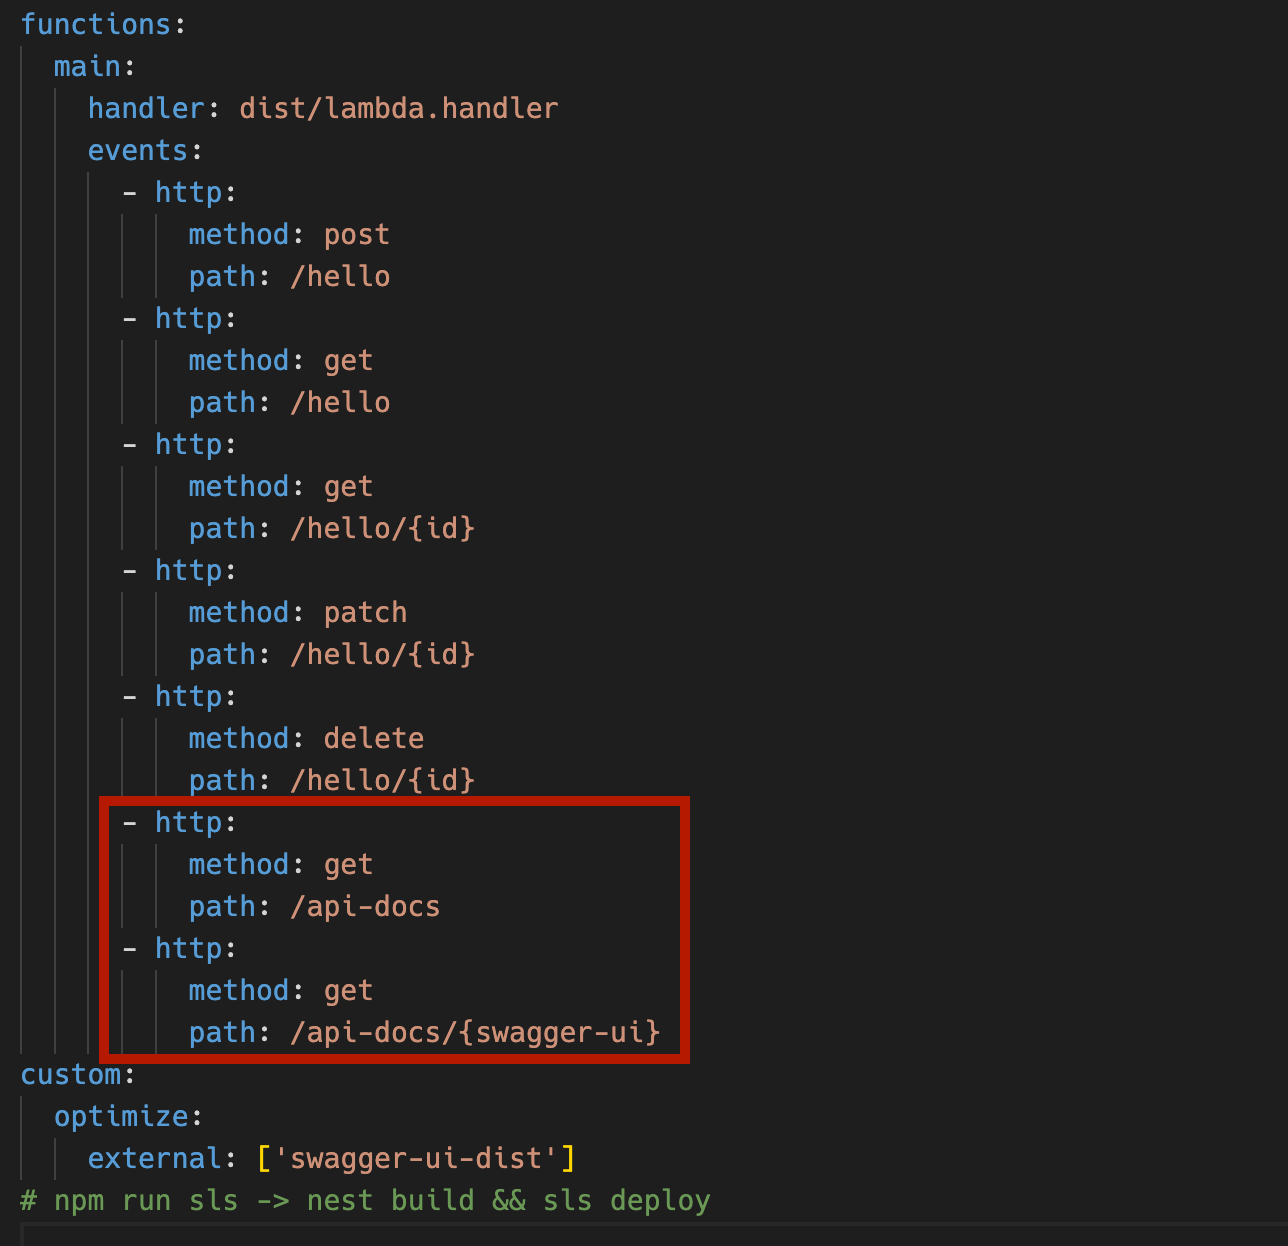
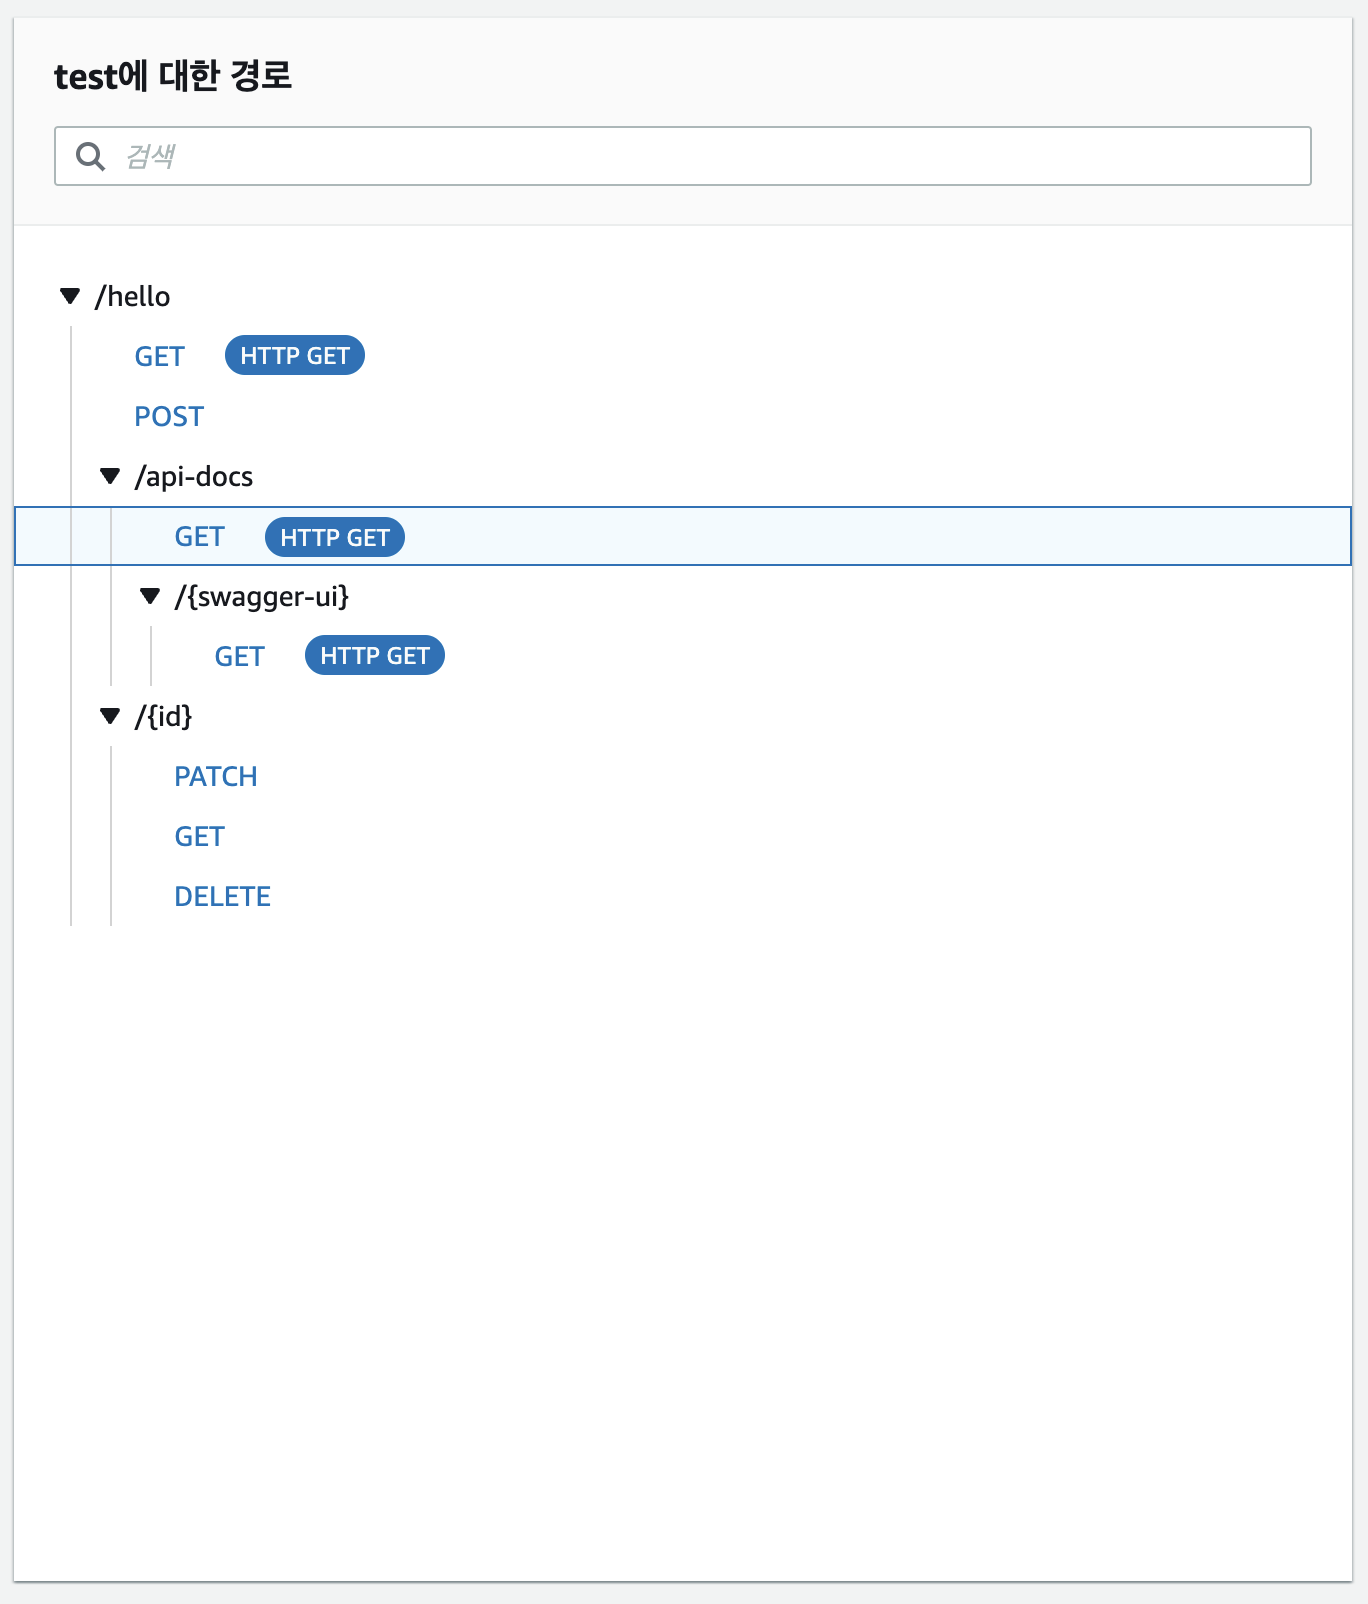
경로에 api-docs와 api-docs/{swagger-ui} 추가
통합에도 마찬가지로 api-docs와 api-docs/{swagger-ui} 와 경로 추가
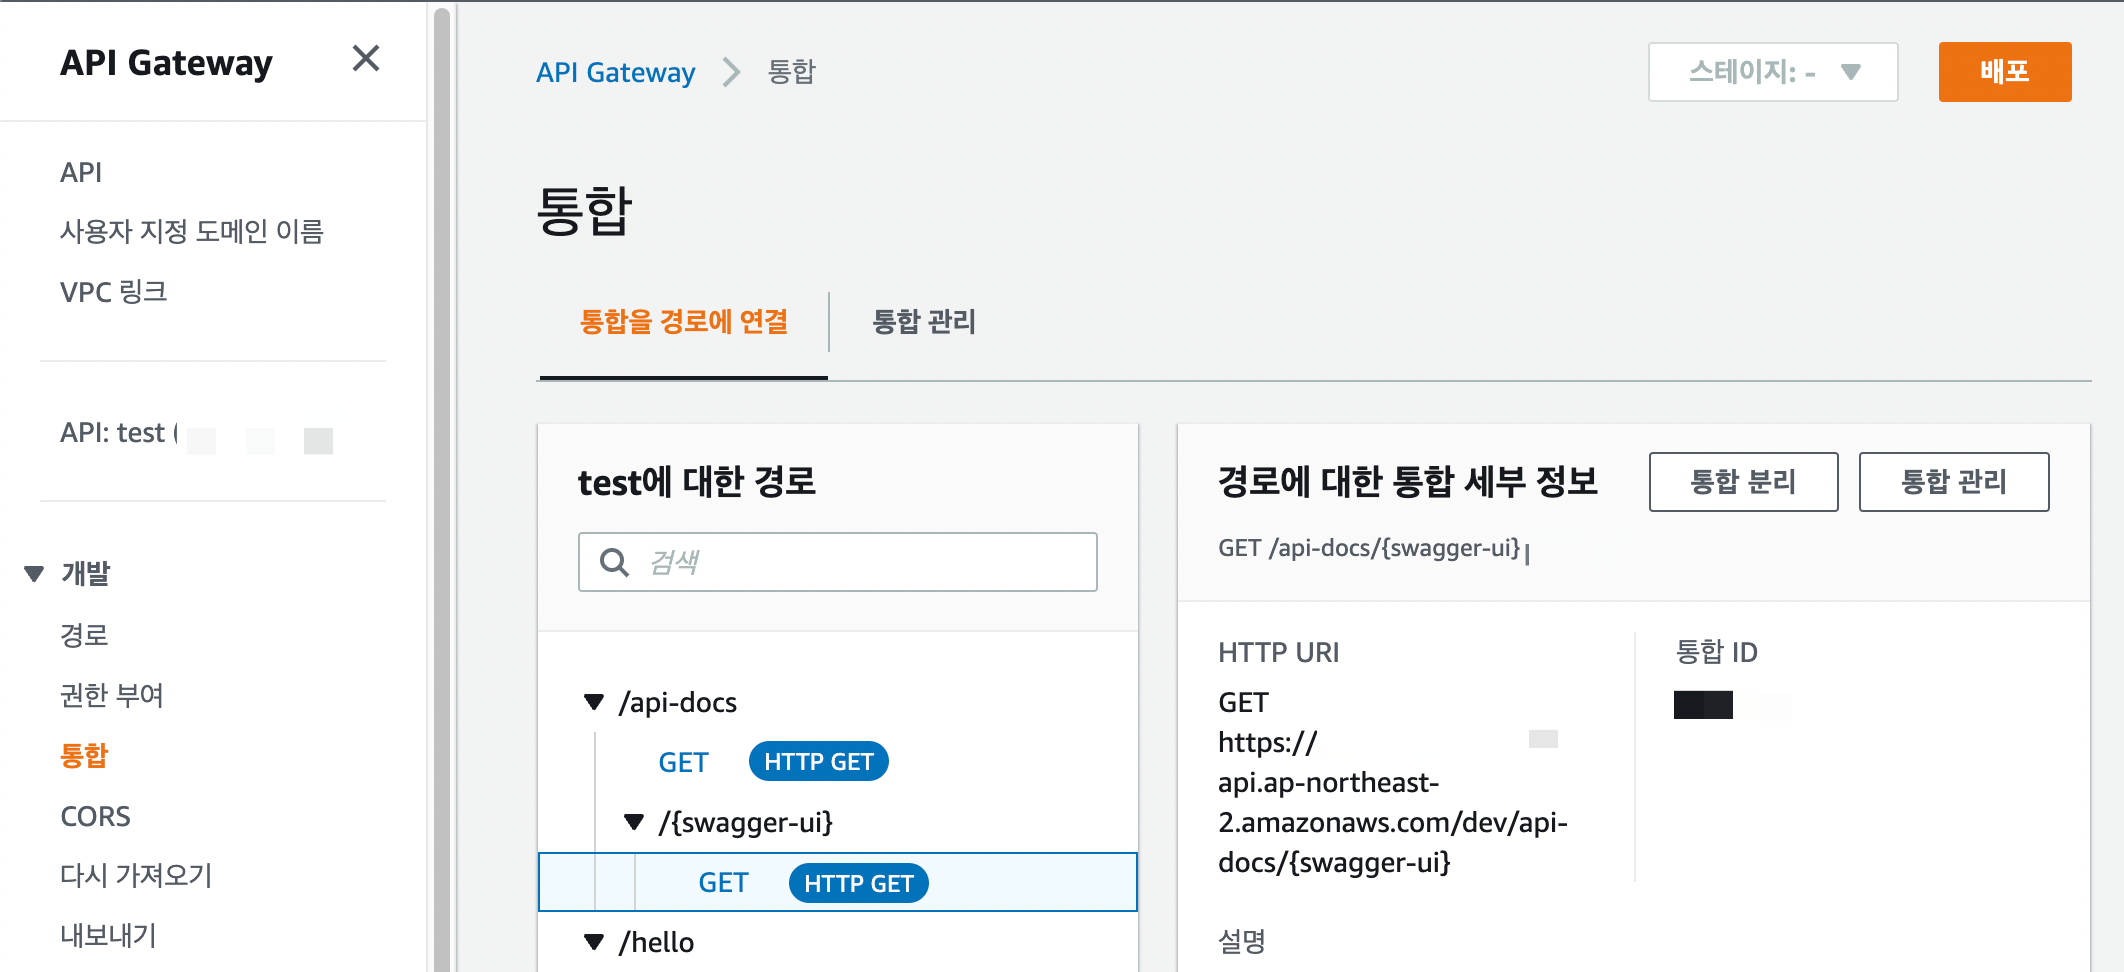
이제 통합 url에도 swagger에 접근 할 수 있습니다.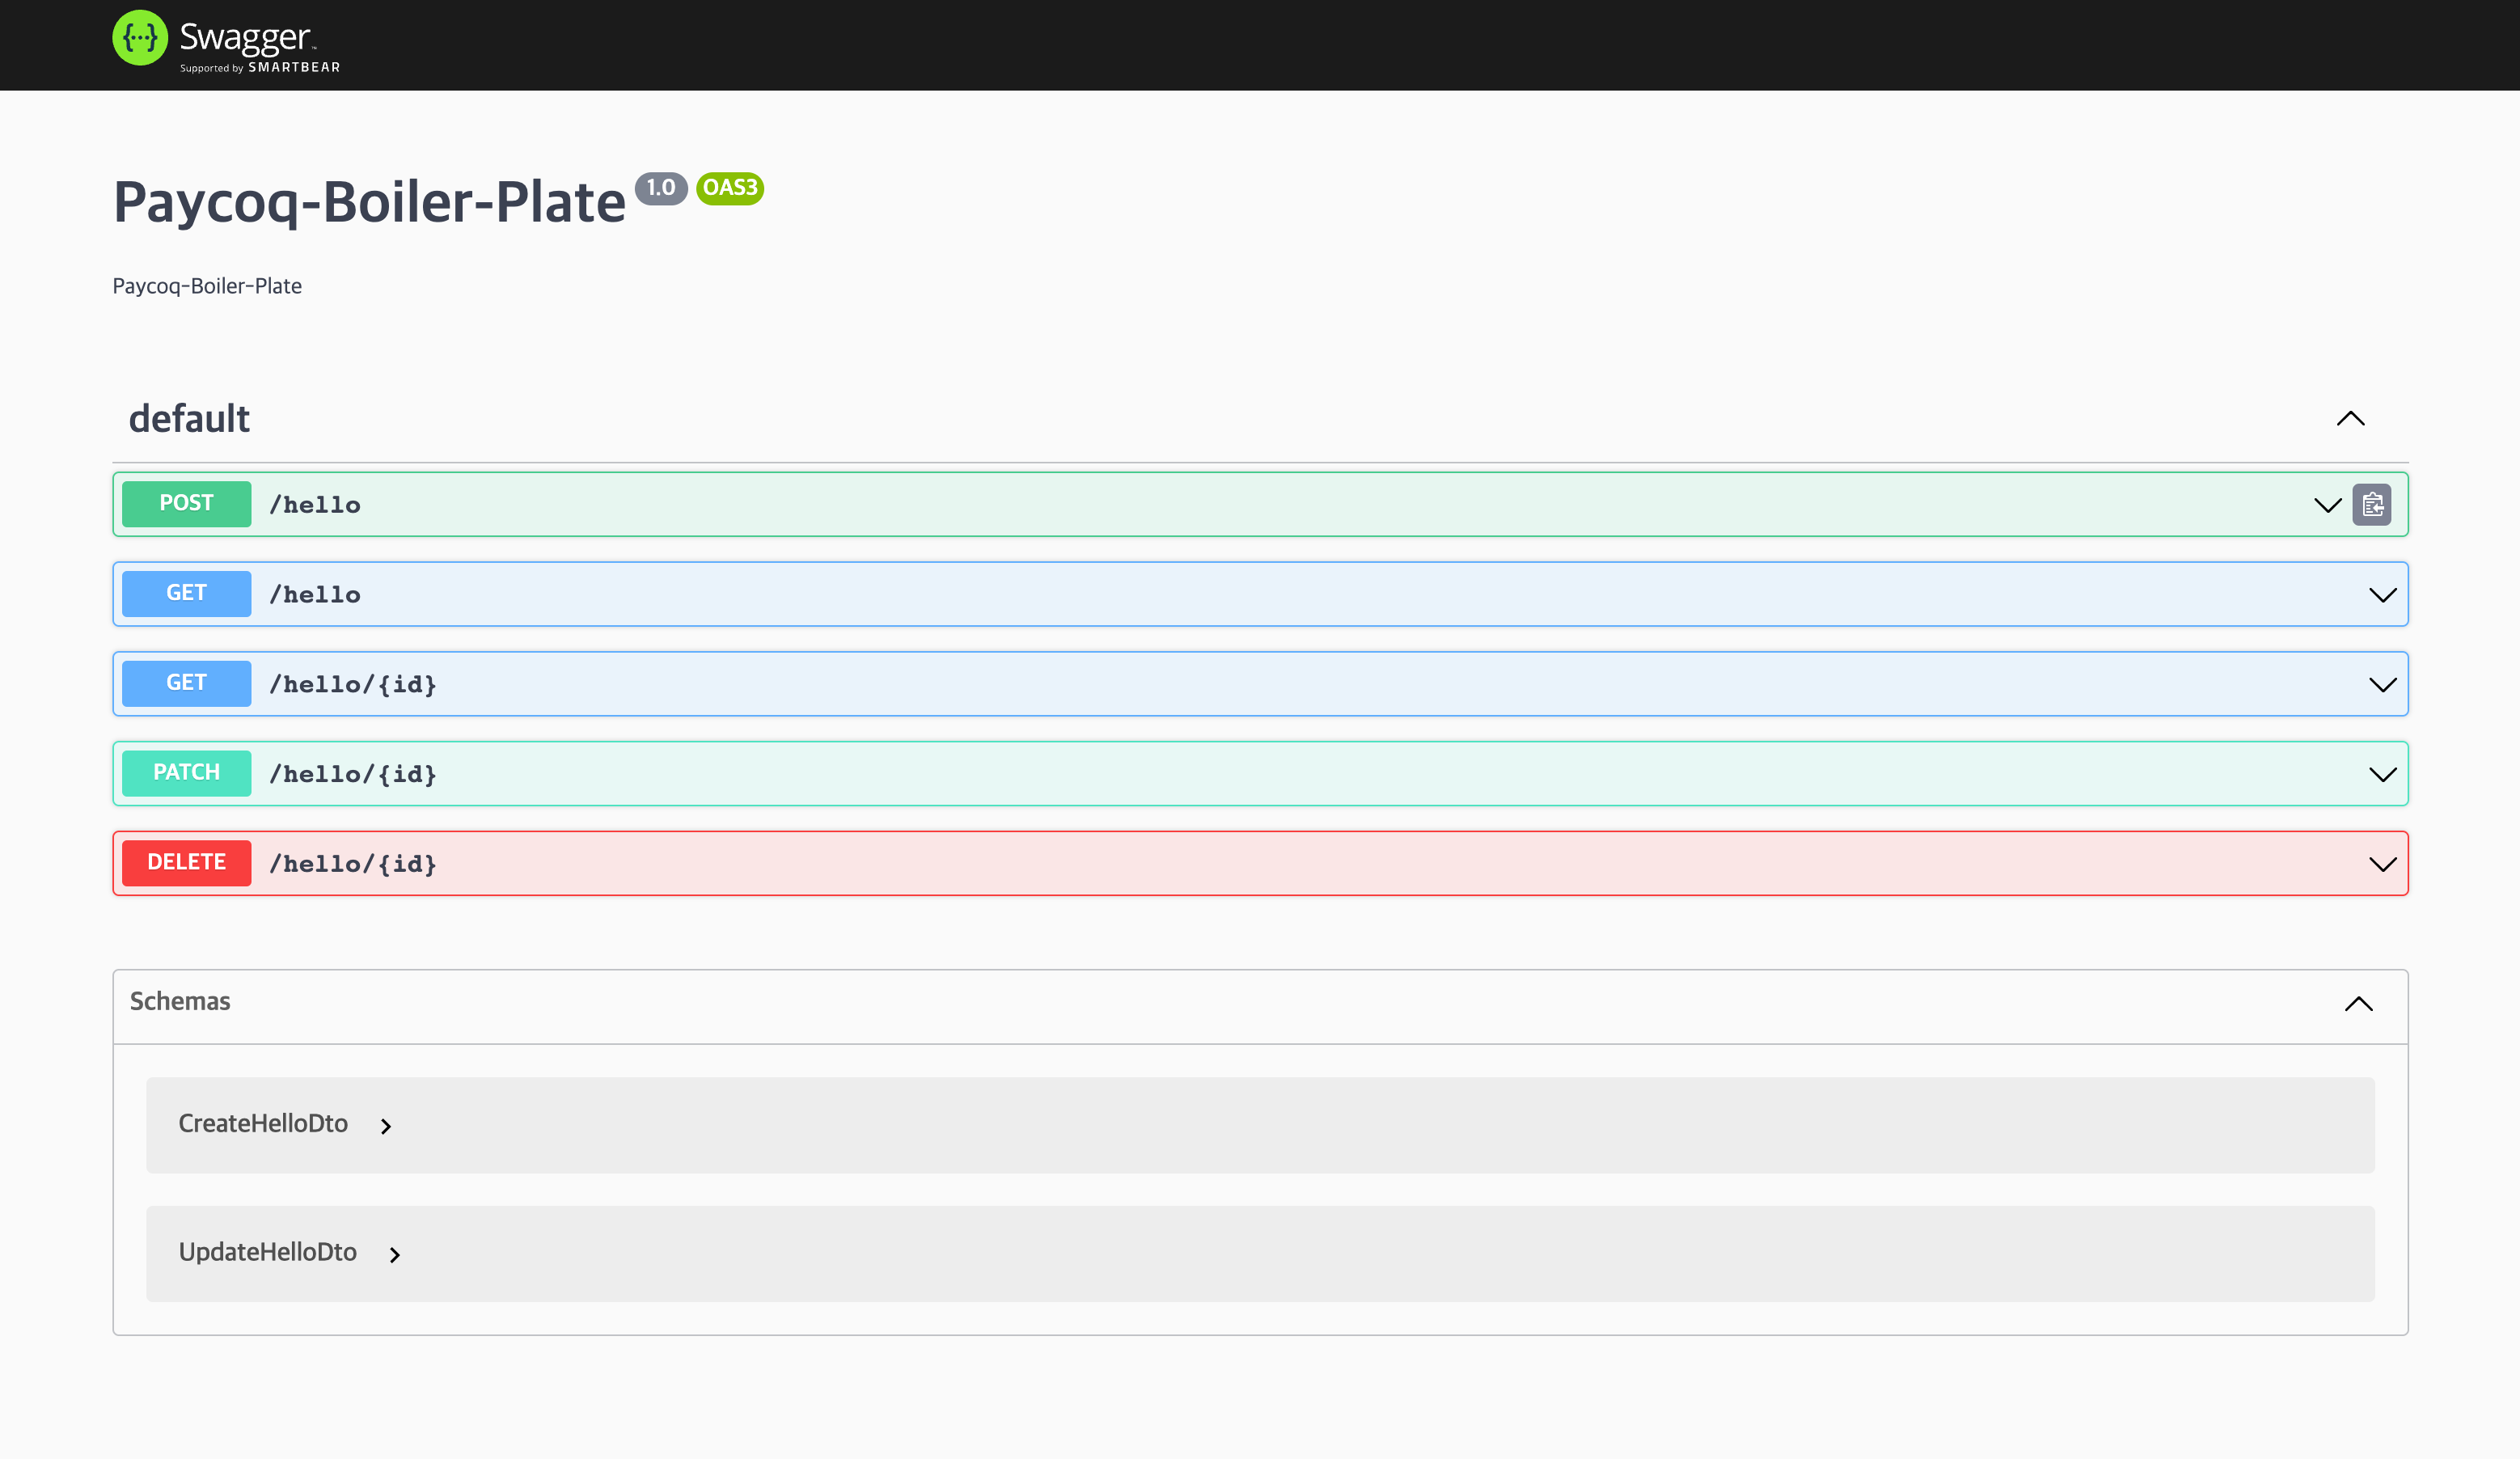
Swagger 경로 수정하기
이제 여러개의 api를 한데 모을 수 있게 되었으니 그에 따라 swagger 문서의 양 또한 비대해질 것입니다.
하나의 swagger문서를 관리하는 방법과 api별로 여러 swagger문서를 나누는 방법이 있을텐데
후자의 경우 swagger 경로를 swagger 문서 마다 다르게해야하기 때문에 경로로 지정하는 것이 편리합니다.
이를 위해선 lambda.ts 파일과 serverless.yaml, apigateway를 수정해야 합니다.
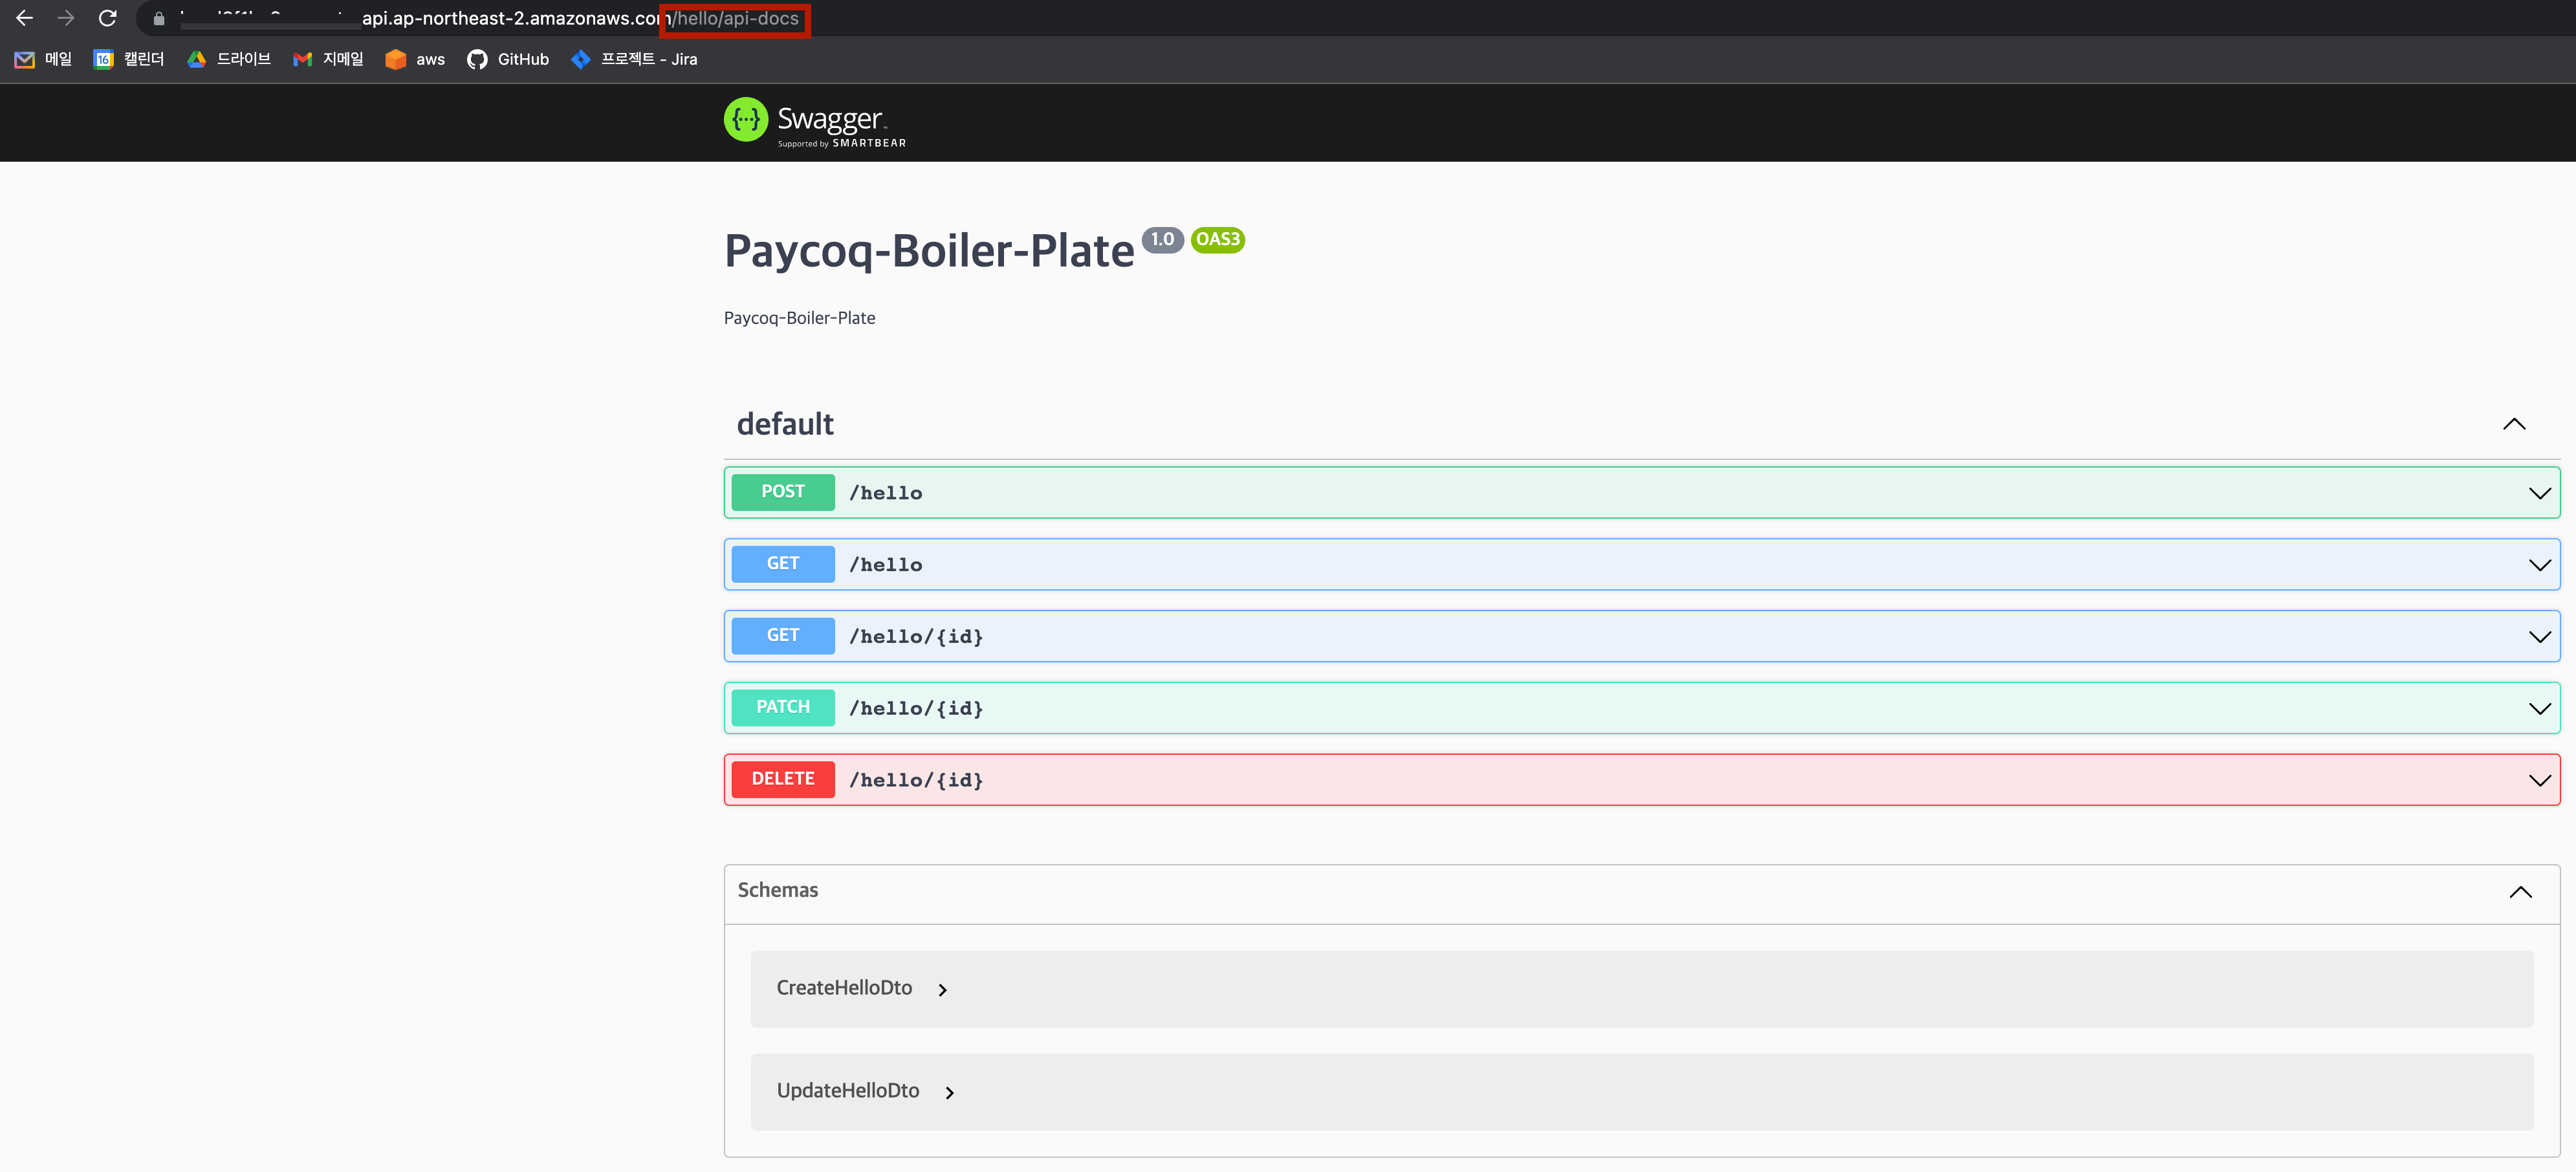
예를 들어 hello/api-docs의 경로로 swagger 문서를 접근하도록 예시를 들어 보겠습니다.
serverless.yml 수정
lambda.ts 수정
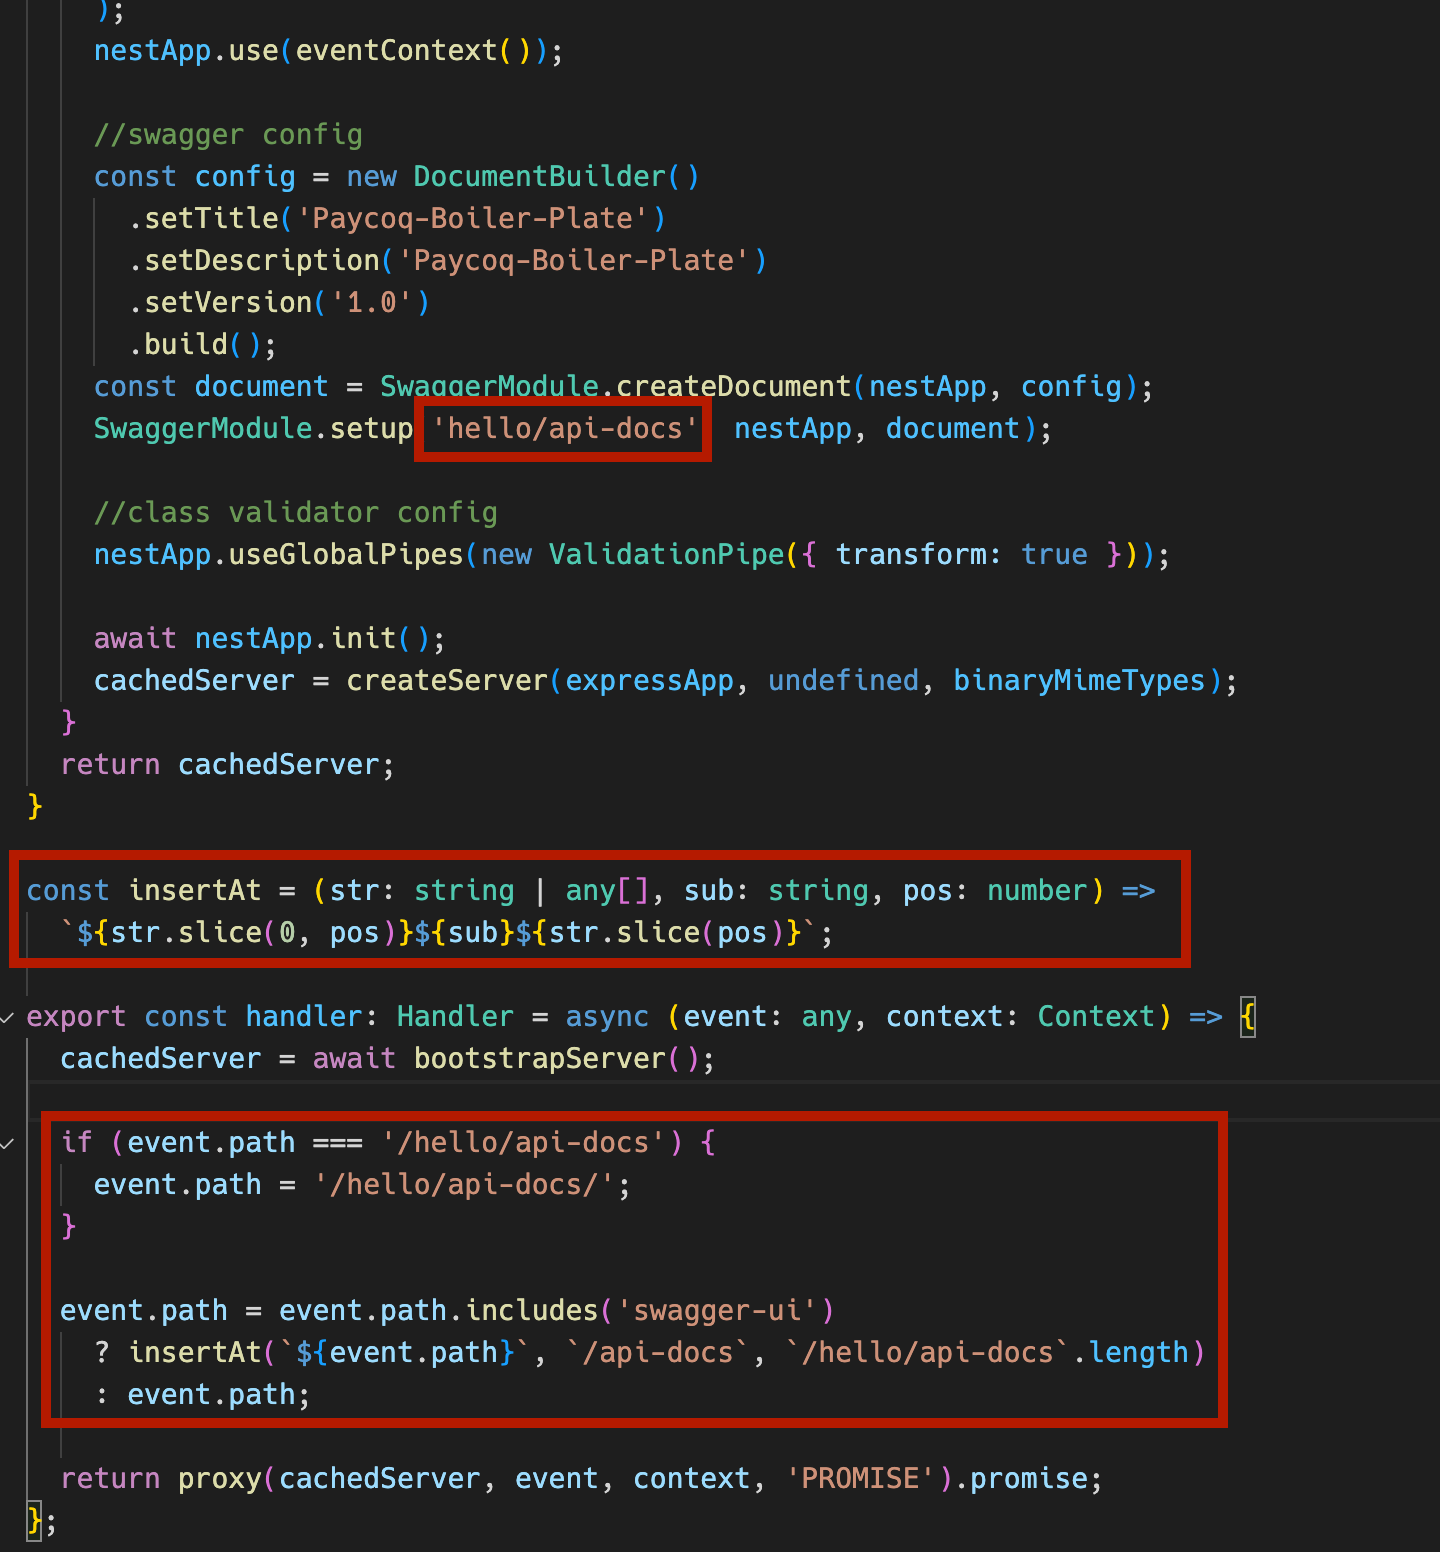
위와 같이 빨간박스 친 부분을 추가하거나 수정해 주시면 됩니다.
이후 배포를 꼭 해주셔야 합니다.
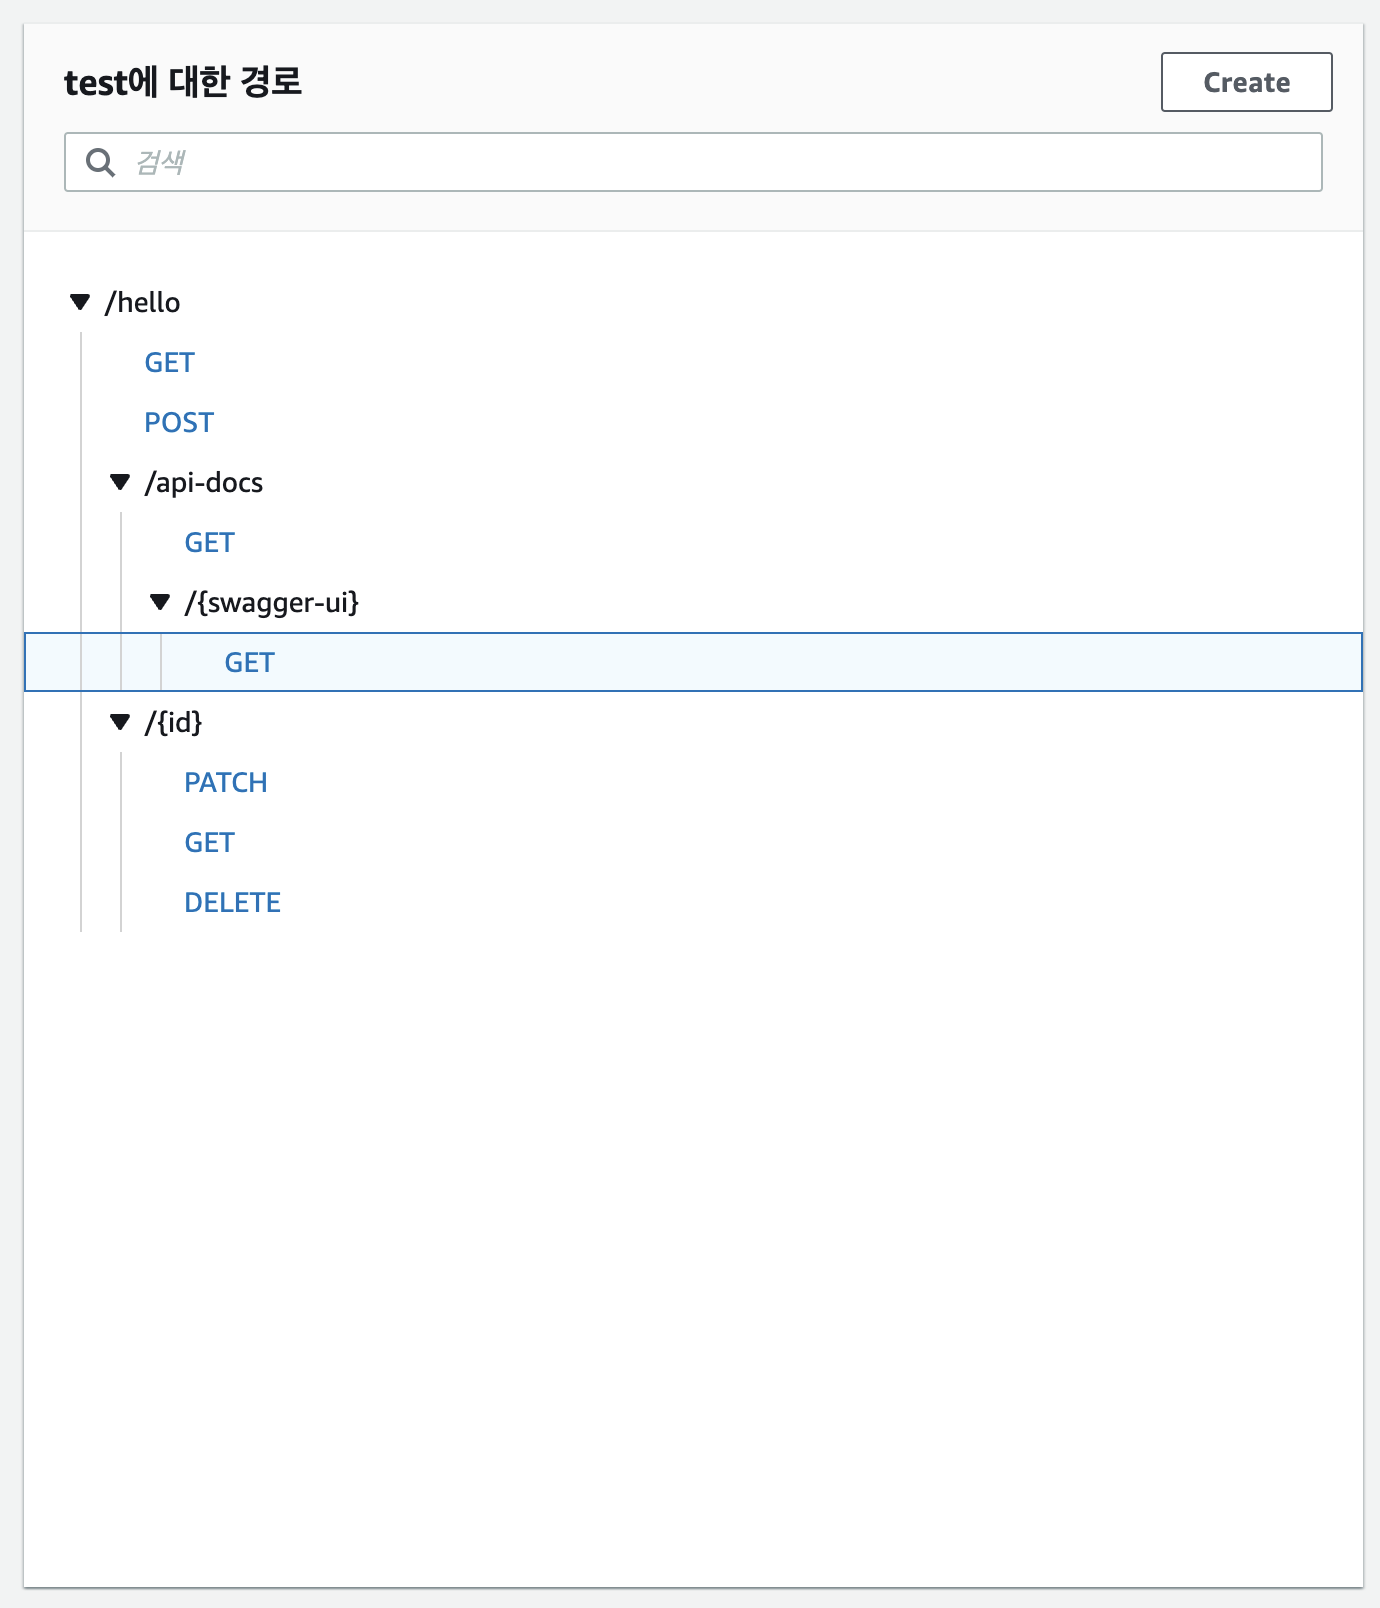
apigateway 경로와 통합도 마찬가지로 수정해줍니다.
여기 까지 완료 했다면
hello/api-docs의 경로로 접근이 가능합니다.

프로젝트를 생성하게 되면 main.ts 가존재하는데
main.ts 를 냅두고 ,
lambda.ts 를 생성하신건가요 ?