
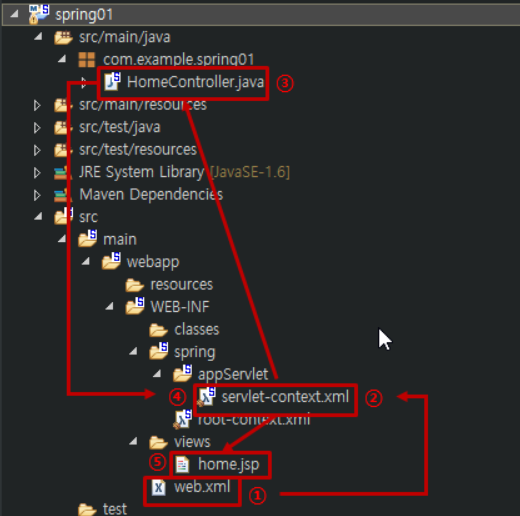
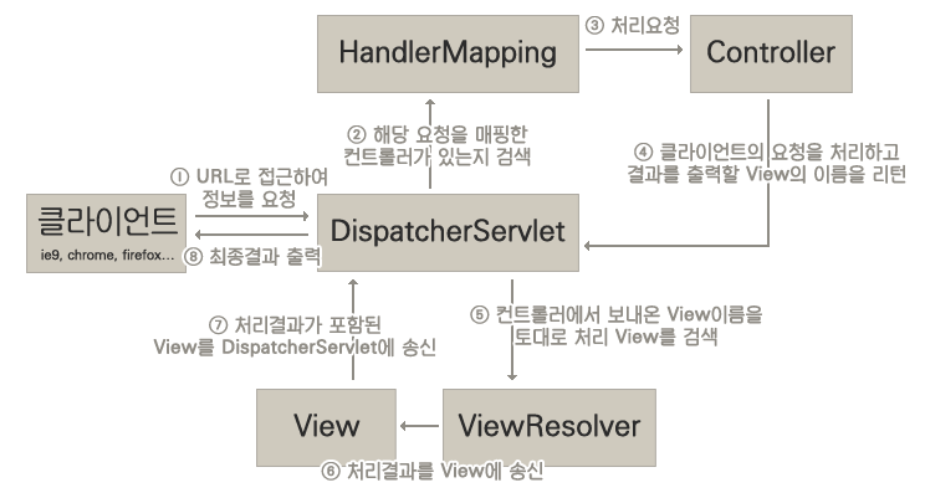
- 클라이언트 요청(/, root페이지 요청)
- web.xml에서 dispatcherServlet가 클라이언트 요청을 핸들링
- servlet-context.xml에서 해당 클래스의 웹요청을 처리하는 컨트롤러 사용(HandlerMapping으로 Controller를 검색)
- 해당 Controller가 요청을 처리 후 , home을 리턴
- View에 출력
📌 DispatcherServlet
Model 파트와 Controller파트 View파트를 조합하여 브라우저로 출력해주는 역할을 수행하는 클래스
📌 /WEN-INF-web.xml
웹프로젝트의 배치 기술서(deploy descriptor, 웹프로젝트의 환경설정파일)
스프링 프로젝트가 실행되면 가장 먼저 web.xml을 읽어 들이게 되고 위에서부터 차례로 태크를 해석하기 시작한다.
<?xml version="1.0" encoding="UTF-8"?>
<web-app version="2.5" xmlns="http://java.sun.com/xml/ns/javaee"
	xmlns:xsi="http://www.w3.org/2001/XMLSchema-instance"
	xsi:schemaLocation="http://java.sun.com/xml/ns/javaee https://java.sun.com/xml/ns/javaee/web-app_2_5.xsd">

	<!-- The definition of the Root Spring Container shared by all Servlets and Filters -->
	<context-param>
		<param-name>contextConfigLocation</param-name>
	<!--  스프링의 환경설정 파일인 root-context.xml을 가장 먼저 참조한다. -->
		<param-value>/WEB-INF/spring/root-context.xml</param-value>
	</context-param>

	<!-- Creates the Spring Container shared by all Servlets and Filters -->
	<listener>
		<listener-class>org.springframework.web.context.ContextLoaderListener</listener-class>
	</listener>

	<!-- Processes application requests -->
	<servlet>
		<servlet-name>appServlet</servlet-name>
		<!--  스프링에 내장된 서블릿 클래스 -->
		<servlet-class>org.springframework.web.servlet.DispatcherServlet</servlet-class>
		<init-param>
			<param-name>contextConfigLocation</param-name>
			<!-- /WEB-INF/spring/appServlet/servlet-context.xml을 참조 -->
			<!--  xml 파일 안제 정의된 객체들을 로딩한다. -->
			<param-value>/WEB-INF/spring/appServlet/servlet-context.xml</param-value>
		</init-param>
		<!-- 가장 첫번째 우선순위를 뜻한다. -->
		<load-on-startup>1</load-on-startup>
	</servlet>

	<servlet-mapping>
		<servlet-name>appServlet</servlet-name>
		<url-pattern>/</url-pattern>
		<!-- DispatcherServlet이 모든 요청을 가로챌 수 있도록 등록 -->
		<!-- 특정 url으로 변경하여 사용가능 ex) *.do -->
	</servlet-mapping>
</web-app>
📌 /WEB-INF/spring/root-context.xml
스프링의 환경설정 파일,
현재는 별다른 내용을 작성하기 않았기 때문에 web.xml에서는 root-context.xml을 건너 뛰게 된다.
<?xml version="1.0" encoding="UTF-8"?>
<beans xmlns="http://www.springframework.org/schema/beans"
	xmlns:xsi="http://www.w3.org/2001/XMLSchema-instance"
	xsi:schemaLocation="http://www.springframework.org/schema/beans https://www.springframework.org/schema/beans/spring-beans.xsd">

	<!-- Root Context: defines shared resources visible to all other web components -->

</beans>
📌 servlet-context.xml
web.xml에서 DispatcherServlet(스프링에 내장된 컨트롤러)로 이동하게 되고, /WEB-INF/spring/appServlet/servlet-context.xml을 참조하게 된다.
<?xml version="1.0" encoding="UTF-8"?>
<beans:beans xmlns="http://www.springframework.org/schema/mvc"
	xmlns:xsi="http://www.w3.org/2001/XMLSchema-instance"
	xmlns:beans="http://www.springframework.org/schema/beans"
	xmlns:context="http://www.springframework.org/schema/context"
	xsi:schemaLocation="http://www.springframework.org/schema/mvc https://www.springframework.org/schema/mvc/spring-mvc.xsd
		http://www.springframework.org/schema/beans https://www.springframework.org/schema/beans/spring-beans.xsd
		http://www.springframework.org/schema/context https://www.springframework.org/schema/context/spring-context.xsd">

	<!-- DispatcherServlet Context: defines this servlet's request-processing infrastructure -->

	<!-- Enables the Spring MVC @Controller programming model -->

	<!-- 매노테이션을 사용가능하도록 설정 -->
	<annotation-driven />

	<!-- Handles HTTP GET requests for /resources/** by efficiently serving up static resources in the ${webappRoot}/resources directory -->
	<resources mapping="/resources/**" location="/resources/" />

	<!-- Resolves views selected for rendering by @Controllers to .jsp resources in the /WEB-INF/views directory -->
	<!-- view resolver(뷰리졸버, 뷰 해석기) -->
	<beans:bean class="org.springframework.web.servlet.view.InternalResourceViewResolver">
		<!-- 뷰(jsp)의 접두어, 접미어 설정 : 파일명만 작성할 수 있게 세팅 -->
		<!-- 접두어(디렉토리) -->
		<beans:property name="prefix" value="/WEB-INF/views/" />
		<!-- 접미어(확장자) -->
		<beans:property name="suffix" value=".jsp" />
	</beans:bean>

	<context:component-scan base-package="com.example.spring01" />


</beans:beans>
📌HomeController
package com.example.spring01;

import java.text.DateFormat;
import java.util.Date;
import java.util.Locale;

import org.slf4j.Logger;
import org.slf4j.LoggerFactory;
import org.springframework.stereotype.Controller;
import org.springframework.ui.Model;
import org.springframework.web.bind.annotation.RequestMapping;
import org.springframework.web.bind.annotation.RequestMethod;

/**
 * Handles requests for the application home page.
 */

// Controller 애노테이션
@Controller
public class HomeController {

	private static final Logger logger = LoggerFactory.getLogger(HomeController.class);

	/**
	 * Simply selects the home view to render by returning its name.
	 */

	//url mapping
	//기본, 루트 페이지 => home매서드 호출
	@RequestMapping(value = "/", method = RequestMethod.GET)
	public String home(Locale locale, Model model) {
		logger.info("Welcome home! The client locale is {}.", locale);

		Date date = new Date();
		DateFormat dateFormat = DateFormat.getDateTimeInstance(DateFormat.LONG, DateFormat.LONG, locale);

		String formattedDate = dateFormat.format(date);

		//모델(서블릿의 request 객체를 대체한 것)
		model.addAttribute("serverTime", formattedDate );

		//home,jsp로 포워딩
		//servlet-context.xml
		//<beans:property name="prefix" value="/WEB-INF/views/" />
		//<beans:property name="suffix" value=".jsp" />
		//디렉토리(접두어)와 jsp(접미어) 확장자를 제외하고 이름만 작성하도록 세팅
		return "home";
	}

}
기억도 기록도