1. Tuist 설치
이전에 설치한 Tuist가 있을 때 충돌이 날 수도 있으니 아래와 같이 터미널에서 명령어를 입력하여 기존 Tuist 삭제부터 진행
curl -Ls https://uninstall.tuist.io
brew install tuist
tuist --version위 명령어로 설치 확인 가능
- brew, tuist 관련 zsh command not found에러 날 때 다음 명령어를 실행해서 homebrew가 설치가 되어있는지 확인
만약 없다고 나오면 설치가 필요(Homebrew)which brew
다음 명령어를 실행해서 tuist가 설치가 되어있는지 확인/bin/bash -c "$(curl -fsSL https://raw.githubusercontent.com/Homebrew/install/HEAD/install.sh)"
만약 없다고 나오면 설치가 필요(tuist)which tuist
근데 brew관련 zsh command not found에러가 난다? 그러면 homebrew에 대한 경로를 설정해줘야 함brew install tuist
여기도 마찬가지로 tuist관련 zsh command not found에러가 발생하면 아래 명령어를 실행해 경로 설정echo 'export PATH="/opt/homebrew/bin:$PATH"' >> ~/.zshrc source ~/.zshrc
아래 명령어를 실행해 잘 설치가 되었는지 확인echo 'export PATH="/opt/homebrew/bin/tuist:$PATH"' >> ~/.zshrc source ~/.zshrcbrew --version tuist --version
2. Tuist 프로젝트 생성
터미널로 현재 경로를 Desktop이나 원하는 디렉토리로 설정하고 아래 명령어 실행
mkdir [프로젝트 이름]
cd [프로젝트 이름]
tuist init // 을 하면 아래 사진처럼 나오는데 적절하게 선택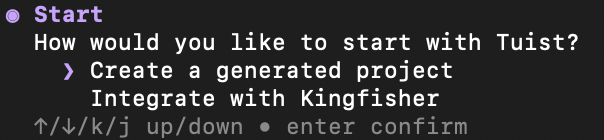 - 프로젝트를 생성하려면 첫 번째 선택
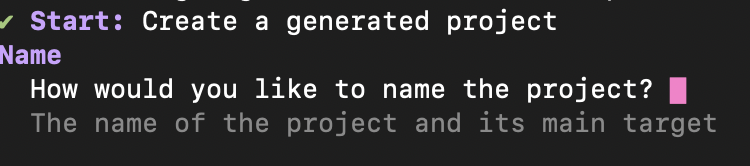 - 프로젝트 이름 작성
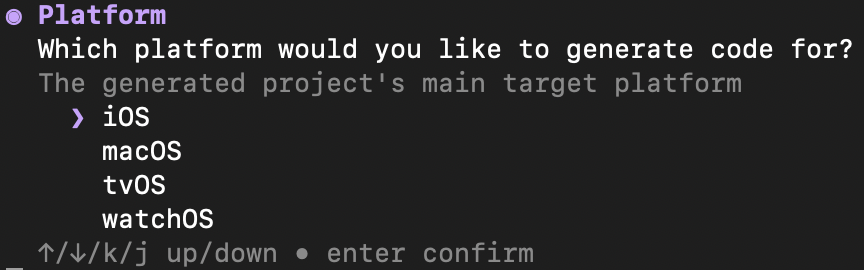 - 플랫폼 선택
 - Tuist를 초기화할 때 서버 기능을 사용할지 여부
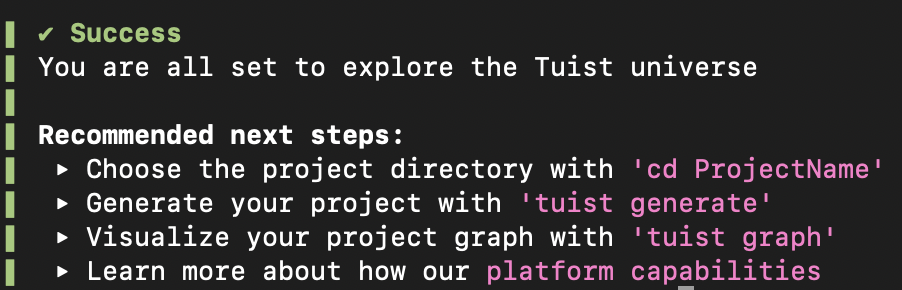 - 프로젝트 생성 완료
[프로젝트 이름] 폴더가 생성되며, 기본 Tuist(Project, Package 등) 프로젝트 파일이 자동 생성됨
[프로젝트 이름]/Project.swift 파일의 sources에 디렉토리의 구조를 미리 정의함
let project = Project(
    name: "프로젝트 이름",
    targets: [
        .target(
            name: "프로젝트 이름",
            destinations: .iOS,
            product: .app,
            bundleId: "io.tuist.프로젝트 이름",
            infoPlist: .extendingDefault(
                with: [
                    "UILaunchScreen": [
                        "UIColorName": "",
                        "UIImageName": "",
                    ],
                ]
            ),
            // 여기처럼 디렉토리 구조 정의
            sources: [
                "프로젝트 이름/Sources/App/**",
                "프로젝트 이름/Sources/Data/**",
                "프로젝트 이름/Sources/Domain/**",
                "프로젝트 이름/Sources/Networking/**",
                "프로젝트 이름/Sources/Presentation/**",
                "프로젝트 이름/Sources/Utils/**",
            ],
            resources: ["프로젝트 이름/Resources/**"],
            // 여기에는 사용할 라이브러리를 적는다 name은 Package.swift 파일에 packageSettings라는 Dictionary가 있는데 여기에 작성한 이름을 적는것 같음
            dependencies: [
                .external(name: "Alamofire"),
                .external(name: "Kingfisher")
            ]
        ),
        .target(
            name: "FitculatorTests",
            destinations: .iOS,
            product: .unitTests,
            bundleId: "io.tuist.프로젝트 이름Tests",
            infoPlist: .default,
            sources: ["프로젝트 이름/Tests/**"],
            resources: [],
            dependencies: [.target(name: "프로젝트 이름")]
        ),
    ]
)
만약 외부 라이브러리를 사용한다면 [프로젝트 이름]/Tuist/Package.swift 경로의 파일에 PackageSettings과 Package의 dependencies를 아래와 같이 작성하면 됨
// swift-tools-version: 6.0
import PackageDescription

#if TUIST
    import struct ProjectDescription.PackageSettings

    let packageSettings = PackageSettings(
        // Customize the product types for specific package product
        // Default is .staticFramework
        // productTypes: ["Alamofire": .framework,]
        productTypes: ["Alamofire": .framework, "Kingfisher": .framework]
    )
#endif

let package = Package(
    name: "프로젝트 이름",
    dependencies: [
        .package(url: "https://github.com/Alamofire/Alamofire", from: "5.0.0"),
        .package(url: "https://github.com/onevcat/Kingfisher.git", from: "7.0.0")
        // Add your own dependencies here:
        // .package(url: "https://github.com/Alamofire/Alamofire", from: "5.0.0"),
        // You can read more about dependencies here: https://docs.tuist.io/documentation/tuist/dependencies
    ]
)
다음과 같이 설정이 완료되었으면 아래 명령어로 tuist 프로젝트를 생성
tuist clean
tuist fetch
tuist install
tuist generate- tuist clean: 기존 캐시 삭제
- tuist fetch → Swift Package Manager(SPM) 패키지 가져오기
- tuist install → Package.swift에 정의된 패키지 설치
- tuist generate → Xcode 프로젝트 생성
위 과정을 모두 완료하면 .xcodeproj / .xcworkspace 파일이 생성될텐데
.xcworkspace파일(흰색)에 개발하는걸 권장?한다고 함
gpt답변:
- .xcworkspace는 Swift Package Manager(SPM) 및 Tuist가 관리하는 외부 의존성(Alamofire, Kingfisher 등)을 포함
- .xcworkspace는 여러 프로젝트와 라이브러리를 함께 관리할 수 있음
- .xcodeproj는 단일 프로젝트 파일만 관리하여 외부 패키지 연동 시 문제 발생 가능
| .xcodeproj (XCode 프로젝트 파일) | .xcworkspace (Xcode 워크스페이스) | |
|---|---|---|
| 외부 라이브러리 관리 | ❌ SPM/CocoaPods/Tuist 연동 어려움 | ✅ Alamofire, Kingfisher 등 연동 가능 |
| 여러 프로젝트 지원 | ❌ 하나의 프로젝트만 관리 가능 | ✅ 여러 모듈 & 프레임워크 포함 가능 |
| SPM/Tuist 통합 | ❌ 기본 지원 X | ✅ Tuist가 .xcworkspace를 생성하여 관리 |
| 권장 여부 | 🚨 작은 프로젝트에서는 사용 가능 | ✅ Tuist를 사용하는 경우 필수! |
3. 버전 및 기본 언어 설정
import ProjectDescription

let project = Project(
    name: "프로젝트 이름",
    // 기본 언어 설정: 여기에 options를 추가해 다음 항목을 추가해준다.
    options: .options(
      automaticSchemesOptions: .disabled,
      defaultKnownRegions: ["en", "ko"],
      developmentRegion: "ko",
      textSettings: .textSettings(usesTabs: false, indentWidth: 2, tabWidth: 2)
    ),
    targets: [
        .target(
            name: "프로젝트 이름",
            destinations: .iOS,
            product: .app,
            bundleId: "io.tuist.프로젝트 이름",
            // deploymentTargets를 추가해 기본 버전을 설정해준다.
            deploymentTargets: .iOS("16.6"),
            infoPlist: .extendingDefault(
                with: [
                    "UILaunchScreen": [
                        "UIColorName": "",
                        "UIImageName": "",
                    ],
                ]
            ),
            sources: [
                "프로젝트 이름/Sources/App/**",
                "프로젝트 이름/Sources/Data/**",
                "프로젝트 이름/Sources/Domain/**",
                "프로젝트 이름/Sources/Networking/**",
                "프로젝트 이름/Sources/Presentation/**",
                "프로젝트 이름/Sources/Utils/**",
            ],
            resources: ["프로젝트 이름/Resources/**"],
            dependencies: [
                .external(name: "Alamofire"),
                .external(name: "Kingfisher")
            ]
        ),
        .target(
            name: "FitculatorTests",
            destinations: .iOS,
            product: .unitTests,
            bundleId: "io.tuist.프로젝트 이름Tests",
            infoPlist: .default,
            sources: ["프로젝트 이름/Tests/**"],
            resources: [],
            dependencies: [.target(name: "프로젝트 이름")]
        ),
    ]
)
4. Tuist 프로젝트 설정 방법
- Tuist 설치 (최초 1회만 실행)
둘 중 하나만 선택 brew를 사용한다면 아래 실행
curl -Ls https://install.tuist.io | bash
brew install tuist- 의존성 패키지 설치
tuist install- Xcode 프로젝트 생성
tuist generate정상적으로 완료됐다면 생성된 fitculator.xcworkspace 실행 후 개발하면 됩니다.
만약 brew나 tuist를 실행할 때 command not found가 나온다면
1. Homebrew가 설치되어 있는지 확인
which brew만약 아무 결과도 나오지 않는다면, 아래 명령어로 Homebrew를 설치
/bin/bash -c "$(curl -fsSL https://raw.githubusercontent.com/Homebrew/install/HEAD/install.sh)"- Tuist가 설치된 경로 확인
which tuist- 다시 Tuist 설치(brew로 할거면)
brew install tuist- Tuist가 설치되었지만 command not found가 발생한다면, 환경 변수 문제일 수 있음 명령어 실행 후, tuist가 정상적으로 실행되는지 확인
export PATH="$HOME/.tuist/bin:$PATH"
tuist version- 만약 시뮬레이터를 실행해도 아무 반응이 없을 경우 Cmd + Shift + , -> Info -> Executable을 Fitculator.app으로 설정하면 시뮬레이터가 실행됩니다.

iOS 개발자가 되고싶은 사람