
RayCaster & MouseEvent
RayCaster
RayCast in Three.js
- Raycaster를 생성한다.
/**
 * Raycaster
 */
const raycaster = new THREE.Raycaster()- Raycaster 세팅해준다.
- raycaster는 set 함수로 설정해준다.
- racaster.set(origin vector3, ray를 쏠 방향 vector3)
- 여기서 ray를 쏠 방향 vector3는 normalize 해주어야한다.
const rayOrigin = new THREE.Vector3(- 3, 0, 0)
const rayDirection = new THREE.Vector3(10, 0, 0)
rayDirection.normalize()

raycaster.set(rayOrigin, rayDirection)- raycaster에 교차하는 object를 확인하는 방법은 intersectObject, intersectObjects이다.
const intersect = raycaster.intersectObject(object2)
console.log(intersect)

const intersects = raycaster.intersectObjects([object1, object2, object3])
console.log(intersects)- 위 결과물의 log를 확인하면 아래와 같다.

distance - ray의 origin과 collision point와의 거리
face - geometry의 어떤 면이 hit되었는지
faceIndex - geometry hit된 면의 index
object - 어떤 object인지
point - collsion point의 vector3
uv - geometry 기준 uv 좌표
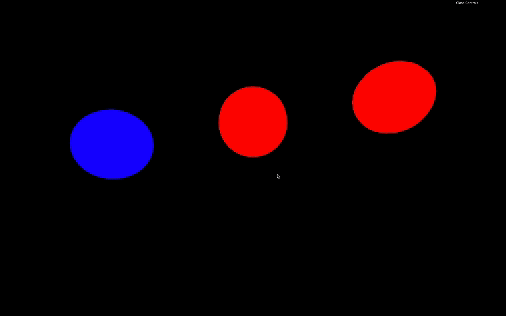
Raycast on Each Frame
매 프레임 마다 racast가 진행되도록 진행
- object들을 움직이게 하자
const clock = new THREE.Clock()

const tick = () =>
{
    const elapsedTime = clock.getElapsedTime()

    // Animate objects
    object1.position.y = Math.sin(elapsedTime * 0.3) * 1.5
    object2.position.y = Math.sin(elapsedTime * 0.8) * 1.5
    object3.position.y = Math.sin(elapsedTime * 1.4) * 1.5

    // ...
}- 매 tick마다 raycst하도록 해보자
const clock = new THREE.Clock()

const tick = () =>
{
    // ...

    // Cast a ray
    const rayOrigin = new THREE.Vector3(- 3, 0, 0)
    const rayDirection = new THREE.Vector3(1, 0, 0)
    rayDirection.normalize()

    raycaster.set(rayOrigin, rayDirection)

    const objectsToTest = [object1, object2, object3]
    const intersects = raycaster.intersectObjects(objectsToTest)
    console.log(intersects)

    // ...
}- intersects를 순회하면서 색상을 변경해주자
- intersects가 안되는경우 다시 색상을 원상복귀시키자
for(const object of objectsToTest)
    {
        object.material.color.set('#ff0000')
    }

    for(const intersect of intersects)
    {
        intersect.object.material.color.set('#0000ff')
    }
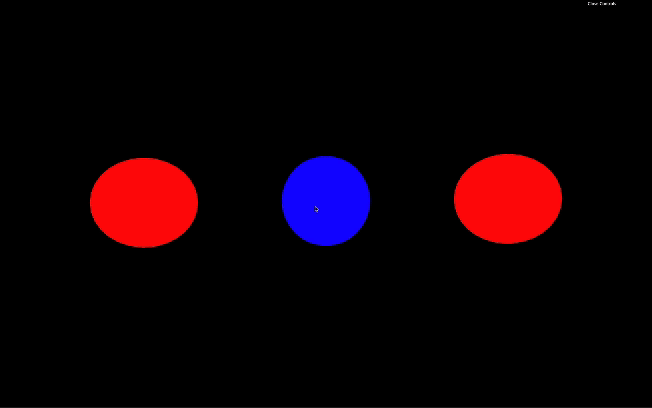
MouseEvent
고정된 raycaster가 아닌 mouseevent를 활용한 raycaster를 만들어보자
- mouse의 vector2 값을 구해야한다.
- x,y 축의 값을 -1,1 사이로 설정하도록 구해야한다.
/**
 * Mouse
 */
const mouse = new THREE.Vector2()

window.addEventListener('mousemove', (event) =>
{
    mouse.x = event.clientX / sizes.width * 2 - 1
    mouse.y = - (event.clientY / sizes.height) * 2 + 1
})
- setFromCamera() 를 활용해서 카메라에서 특정 위치까지 raycaster를 발생시킨다.
- intersect된 object의 색상을 바꾼다.
raycaster.setFromCamera(mouse, camera)

    const objectsToTest = [object1, object2, object3]
    const intersects = raycaster.intersectObjects(objectsToTest)

    for(const intersect of intersects)
    {
        intersect.object.material.color.set('#0000ff')
    }

    for(const object of objectsToTest)
    {
        if(!intersects.find(intersect => intersect.object === object))
        {
            object.material.color.set('#ff0000')
        }
    }
MouseEnter & MouseLeave
- intersects 배열의 길이로 object와 intersect되었는지 확인하고
- currentIntersect 변수를 활용해서 null 초기값이면 mouse가 enter 한거고
- intersects 배열 길이가 0인데 currentIntersect가 초기값이 아니면 mouse가 leave한거다.
let currentIntersect = null

const tick = () =>
{
    // ...
    raycaster.setFromCamera(mouse, camera)
    const objectsToTest = [object1, object2, object3]
    const intersects = raycaster.intersectObjects(objectsToTest)

    if(intersects.length)
    {
        if(!currentIntersect)
        {
            console.log('mouse enter')
        }

        currentIntersect = intersects[0]
    }
    else
    {
        if(currentIntersect)
        {
            console.log('mouse leave')
        }

        currentIntersect = null
    }

    // ...
}
MouseClick
- click의 경우 eventListener의 click을 활용하자
- 위에서 currentIntersect를 활용해서 object를 click하는지 구현할 수 있다.
- 또한 어떤 object를 클릭했는지도 확인할 수 있다.
window.addEventListener('click', () =>
{
if(currentIntersect)
{
switch(currentIntersect.object)
{
case object1:
console.log('click on object 1')
break
case object2:
console.log('click on object 2')
break
case object3:
console.log('click on object 3')
break
}
}
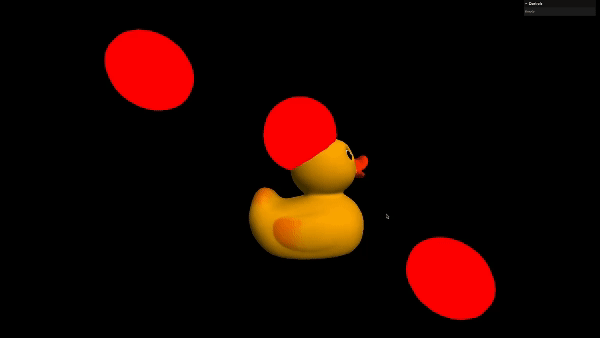
})Raycasting With Models
- model import 하고 scene에 추가하기
let model = null
gltfLoader.load(
    './models/Duck/glTF-Binary/Duck.glb',
    (gltf) =>
    {
        model = gltf.scene
        model.position.y = - 1.2
        scene.add(model)
    }
)- tick 함수에서 raycaster와 intersect하는 object가 model인지 확인하기
const tick = () =>
{
    // ...

    if(model)
    {
        const modelIntersects = raycaster.intersectObject(model)
        console.log(modelIntersects)
    }

    // ...
}
원래는 model은 Group이고 raycaster는 mesh를 체크하기 때문에 정상적으로 작동하면 안된다.
그러나 raycaster는 단지 model만 check하는게 아니고 recursive적으로 children을 다 체크한다.
이 옵션은 raycaster.intersectObject(model,false)로 false를 주면서 끌 수도 있다.
- object raycaster되었을 때 size 키우기
const tick = () =>
{
    // ...

    if(model)
    {
        const modelIntersects = raycaster.intersectObject(model)

        if(modelIntersects.length)
        {
            model.scale.set(1.2, 1.2, 1.2)
        }
        else
        {
            model.scale.set(1, 1, 1)
        }
    }

    // ...
}
https://22-raycaster-and-mouse-events-1veayyu1y-hwangsangjins-projects.vercel.app/

Web FrontEnd Developer