
Nginx
1995년, Apache Http Server가 출시된 이후로 세계에서 가장 유명한 Web Server로 사용 되었지만, 동기적 모델, Process/Thread 기반 모델을 사용하여 각 Connection 마다 별도의 Process/Thread가 필요하였으며, 동시에 처리할 수 있는 요청 수에도 한계가 존재했다.
Nginx는 이러한 문제점을 해결하기 위해 2004년에 출시 되었으며, 이벤트 기반의 비동기 모델 Web Server로 초 당 수 만개의 요청을 동시에 처리할 수 있는 커다란 성능 개선을 이루어 냈다.
더 적은 리소스로 더 많은 동시 처리가 가능하기 때문에 Load Balancer로 많이 사용된다.
Cloud Application Load Balancer
그러나 요즘에는 Cloud 환경이 보편화 되면서, Nginx 조차 사용할 필요가 없어졌다.
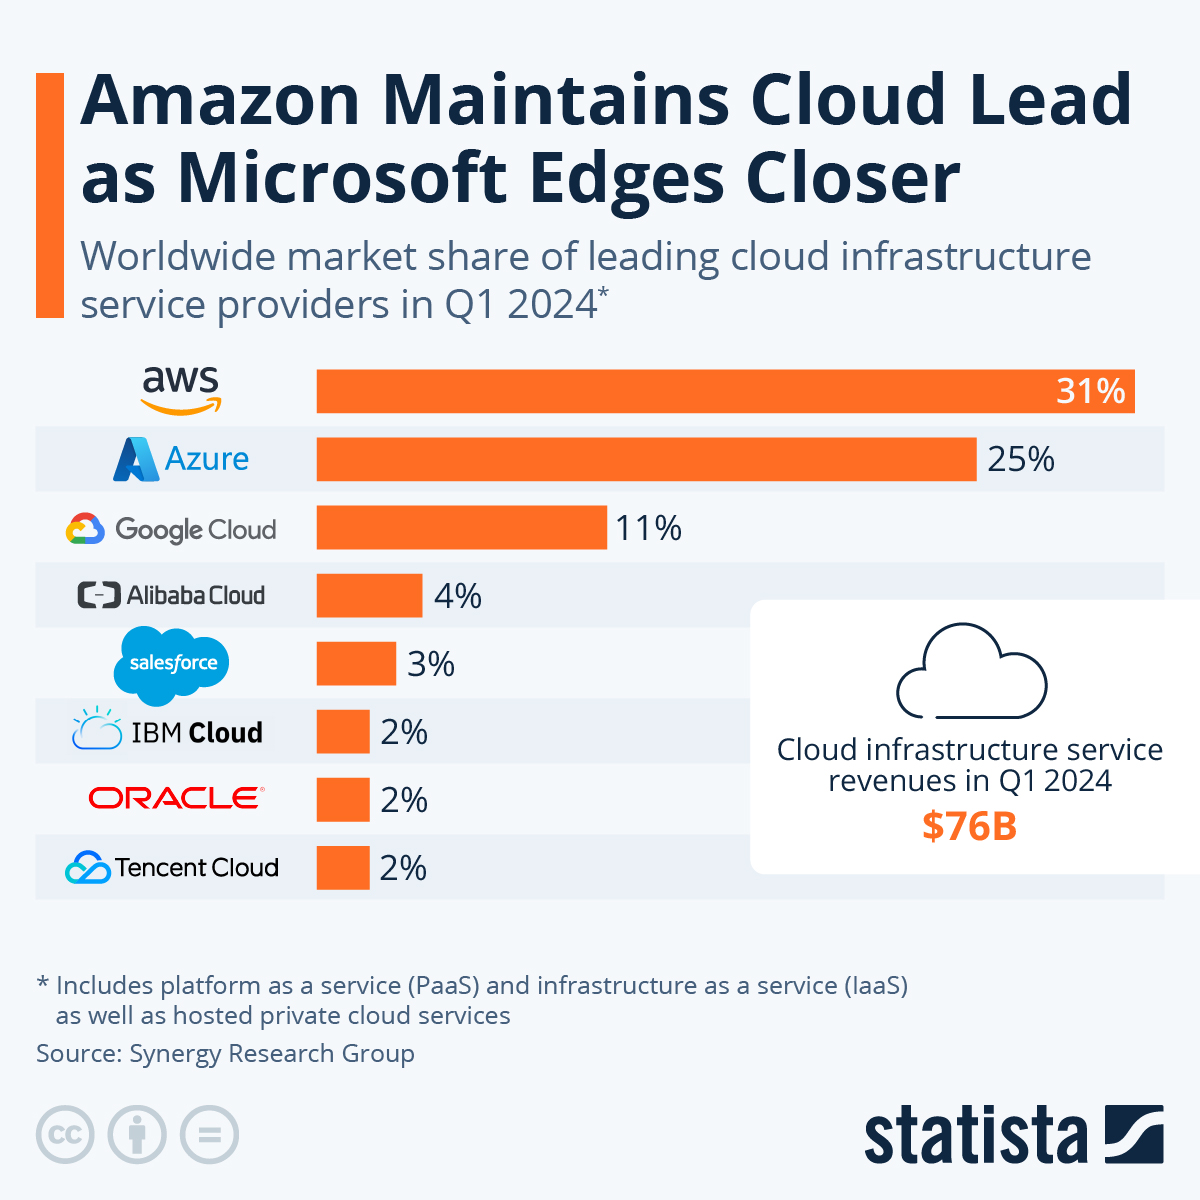
AWS가 전세계 Cloud 시장의 31%를 차지하고 있으며,
소위 Big 3이라고 불리는 AWS, Azure, Google Cloud의 점유율을 합하면 67%에 달하는데, 3사가 모두 자체 Application Load Balancer를 제공하기 때문이다.
Big 3사 중 아무 Cloud나 이용 하더라도 Nginx를 대체할 수 있는 것이다.
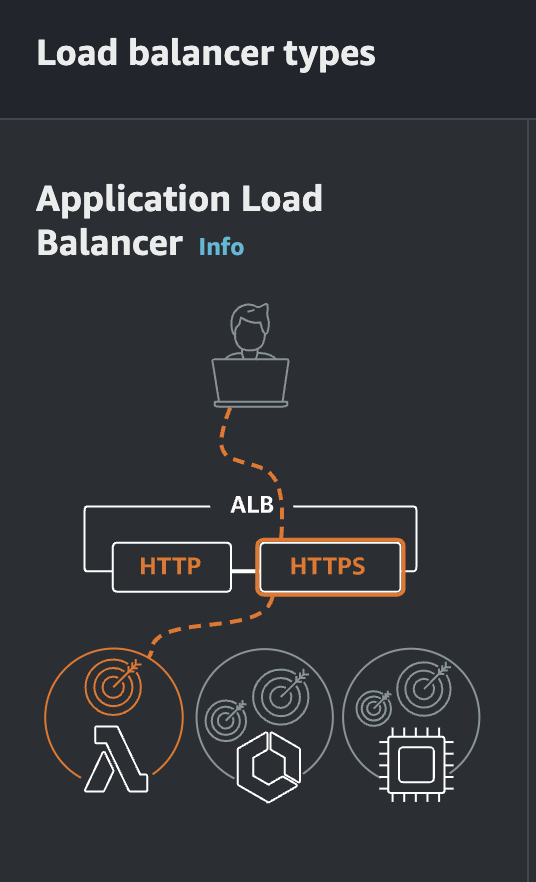
AWS에서는 이러한 L7 Load Balancer인 Application Load Balancer가 제공되며, 줄여서 ALB라고 부른다.
Cloud 환경에서 LB를 사용할 때 Nginx를 사용할 필요가 없어지기는 했지만, 여전히 On-Premise 환경에서는 Nginx가 많이 사용되기도 하고, 토이 프로젝트, 사이드 프로젝트, 혹은 Docker 실습 용도로 사용하기 좋기 때문에 사용법 정도는 익혀 놓는 것이 좋을 것이다.
EC2 Instance 생성
EC2 instance를 하나 생성하고, VM 내부에서 Nginx를 수동으로 설치해보자.
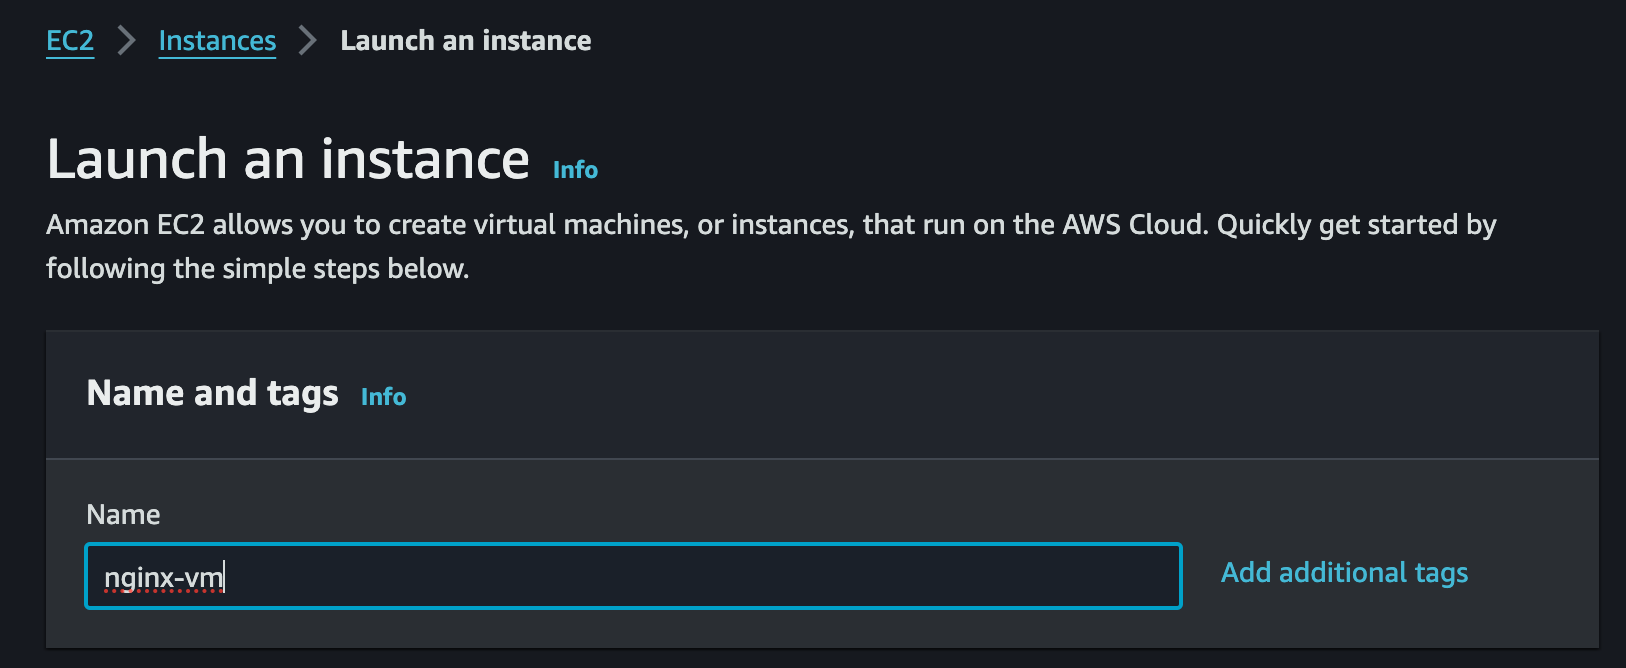
원하는 Instance 이름을 사용하도록 하자.
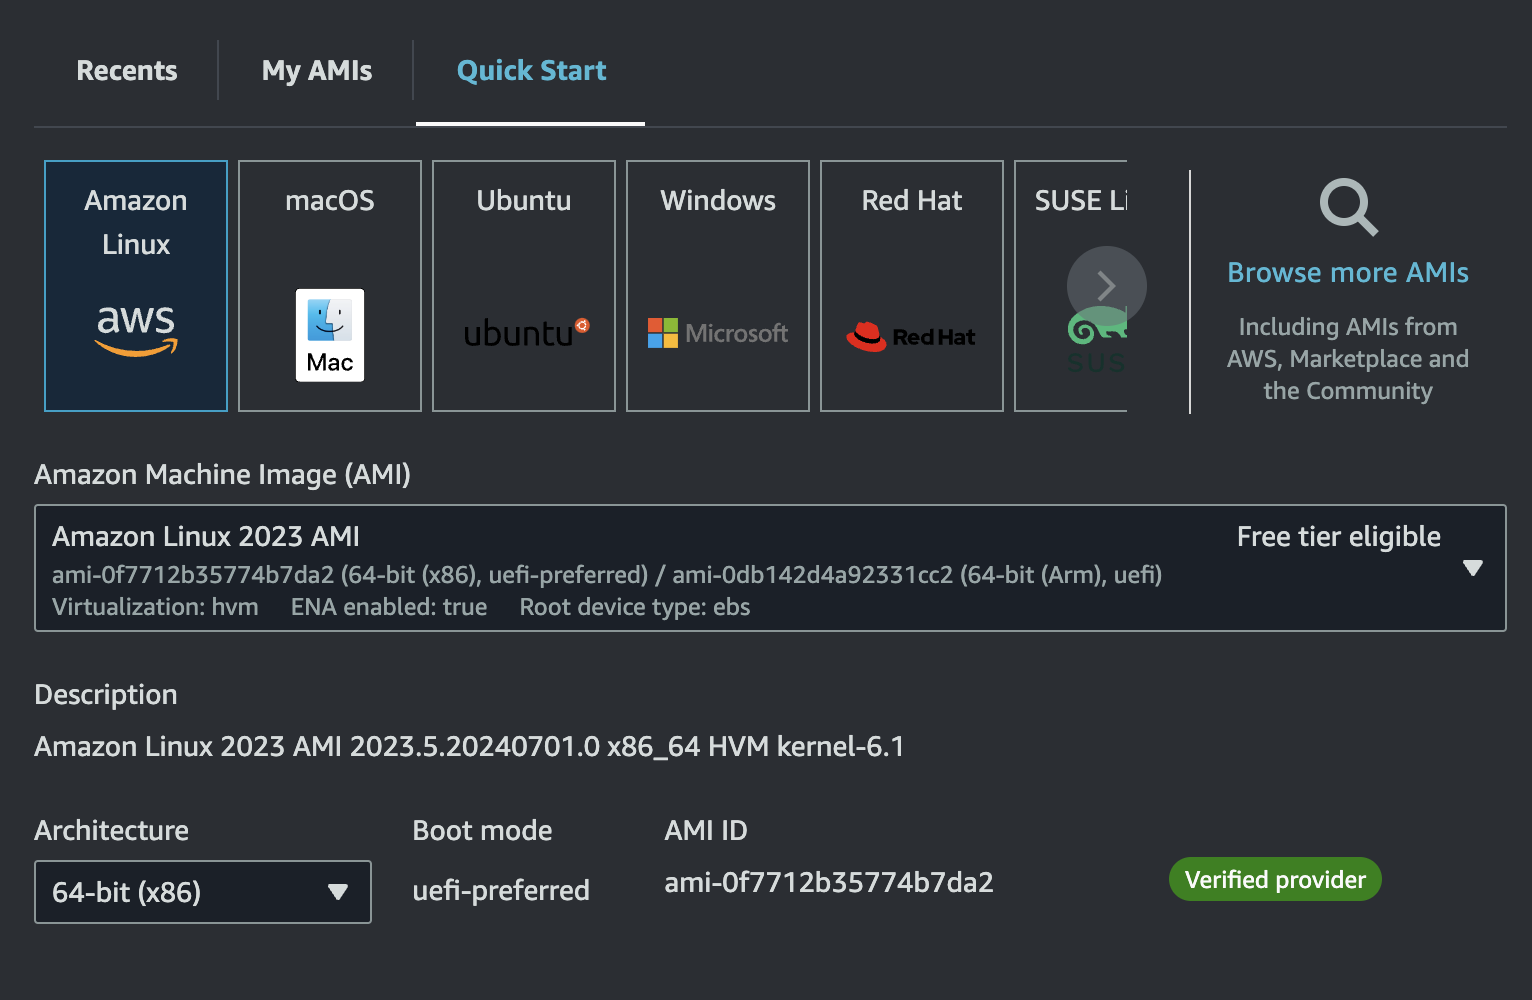
AMI는 Amazon Linux로, Architecture는 x86으로 설정했다.
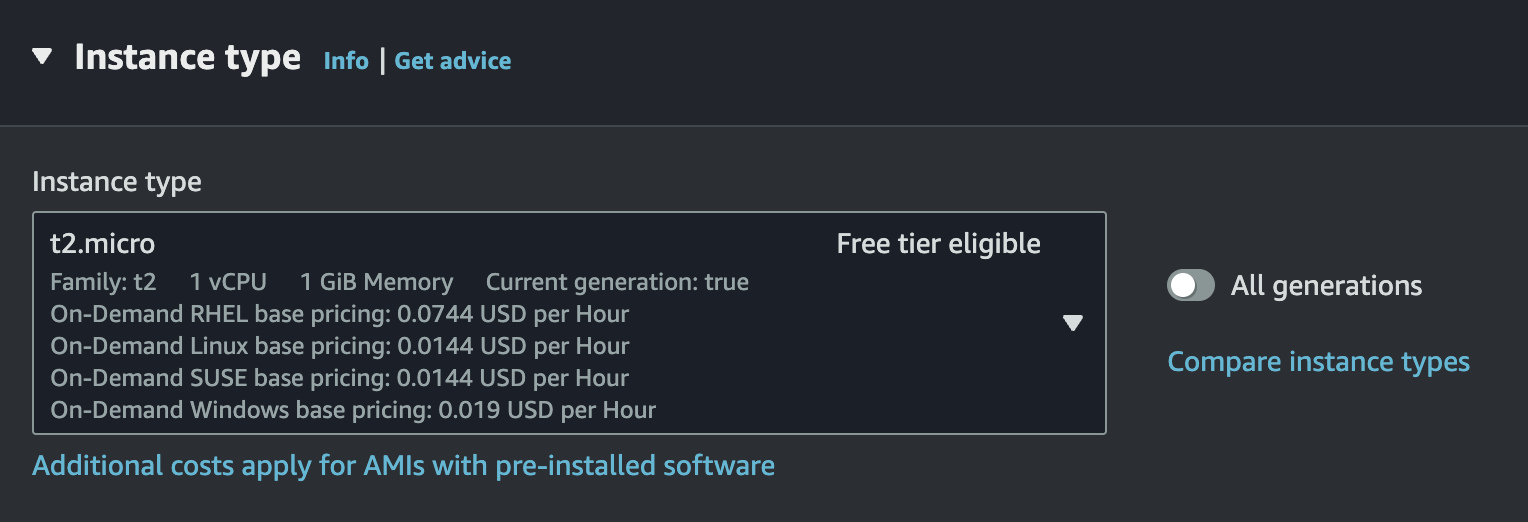
Free Tier를 사용한다면 Instance Type을 t2.micro로 설정하자.
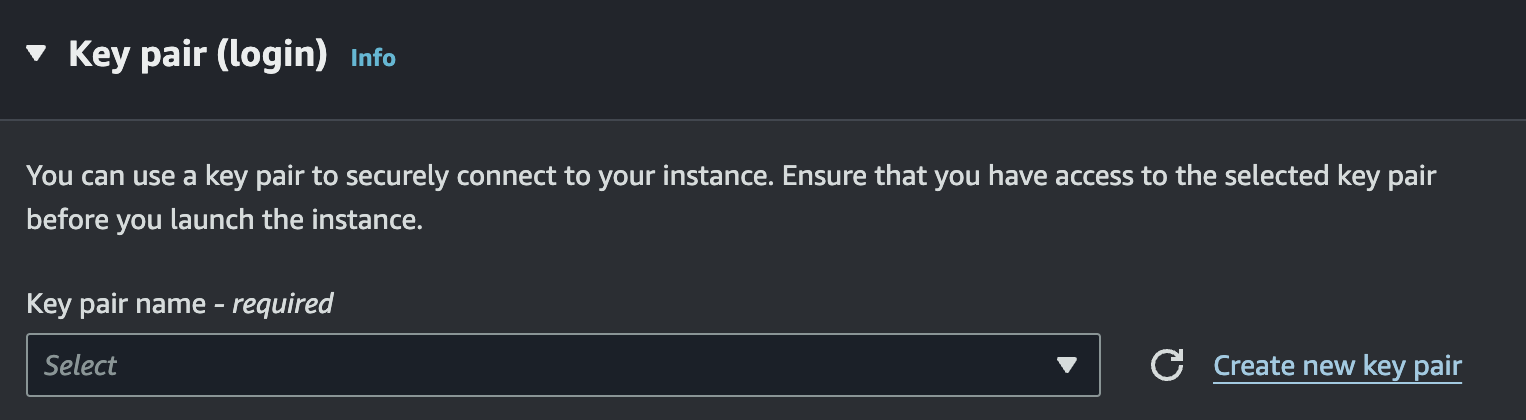
마지막으로 로컬에서 ssh로 접속할 수 있게 key를 만들어서 저장하도록 한다.

생성이 완료되었다.
ssh-add로 다운로드 받은 private key를 ssh agent에 등록하고 잘 접속되는지 확인해보자.
# ssh key agent에 등록
$ ssh-add secret-key.pem

# ssh로 ec2 접속
$ ssh ec2-user@13.125.157.31

The authenticity of host '13.125.157.31 (13.125.157.31)' can't be established.
ED25519 key fingerprint is SHA256:foG3+NVdOKpIpjIXEsxQRMkl9PLzpqKcfjRG7Wgro3k.
This key is not known by any other names.
Are you sure you want to continue connecting (yes/no/[fingerprint])? yes
Warning: Permanently added '13.125.157.31' (ED25519) to the list of known hosts.
   ,     #_
   ~\_  ####_        Amazon Linux 2023
  ~~  \_#####\
  ~~     \###|
  ~~       \#/ ___   https://aws.amazon.com/linux/amazon-linux-2023
   ~~       V~' '->
    ~~~         /
      ~~._.   _/
         _/ _/
       _/m/'
nginx 설치 및 세팅
EC2에 ssh로 접속한 다음 패키지 매니저 yum을 통해 nginx를 설치한다.
yum은 Amazon Linux에서 기본 제공하는 패키지 매니저로, Red hat 계열의 Linux(RHEL, CentOS, Fedora)에서 주로 제공된다.
Debian 계열의 Linux(Ubuntu 포함)를 사용해 봤다면, apt-get을 사용해 봤을 것이고, macOS 사용자라면 brew를 사용해봤을 것이다.
이것과 같다고 보면 된다.
(참고로 Debian의 Package Manager apt는 apt-get과 apt-cache를 통합한 버전이라고 보면 된다. 이 둘을 헷갈려 하는 경우가 많다.)
이제 EC2에서 다음 명령어를 통해 nginx를 설치할 것이다.
$ sudo yum update

# nginx 설치
$ sudo yum install nginx -y-y는 yes flag라고 부르는데, 설치할 때 자꾸 동의 여부를 묻는 것이 귀찮을 때 써주면 동의를 미리 한 셈 친다.
systemctl을 통해 nginx를 실행하고, 잘 실행 되었는지 상태를 확인해보자
# 실행 전 nginx 상태 확인
$ sudo systemctl status nginx
○ nginx.service - The nginx HTTP and reverse proxy server
     Loaded: loaded (/usr/lib/systemd/system/nginx.service; disabled; preset: disab>
     Active: inactive (dead)

# nginx 실행
$ sudo systemctl start nginx

# nginx 상태 확인
$ sudo systemctl status nginx
● nginx.service - The nginx HTTP and reverse proxy server
     Loaded: loaded (/usr/lib/systemd/system/nginx.service; disabled; preset: disab>
     Active: active (running) since Tue 2024-07-02 09:18:05 UTC; 29s ago
    Process: 25939 ExecStartPre=/usr/bin/rm -f /run/nginx.pid (code=exited, status=>
    Process: 25940 ExecStartPre=/usr/sbin/nginx -t (code=exited, status=0/SUCCESS)
    Process: 25941 ExecStart=/usr/sbin/nginx (code=exited, status=0/SUCCESS)
    ...
상태가 Active로 표시되며, 잘 실행되는 것을 볼 수 있다.
systemd, systemctl
systemctl은 systemd에 대한 명령어 도구다.(system control 약자)
systemd는 Linux Kernel은 아니고, Linux Distro라 불리는 여러 배포판(Ubuntu 등)에 내장된 시작 프로그램 및 데몬 프로세스를 관리하는 프로그램이라고 보면 된다.
system daemon의 약자다.
daemon process는 terminal에서 detached 되어 백그라운드에서 돌아가는 프로세스를 의미한다.
이 daemon process를 시작, 중지, 종료하거나 재부팅 시에 자동으로 백그라운드에서 돌아갈 daemon process를 등록하는 enable, disable 등의 명령어를 제공하는 것이 systemctl이다.
말 그대로 daemon process를 컨트롤한다.
참고로
systemd는 docker에는 존재하지 않는다.
Docker는 단일 경량 Linux VM 상에서 돌아가며, N개의 Container가 이를 호출하는 구조로 이루어져 있는데, 애초에 각 Container가 최대한 가볍게, 단일 Process를 실행할 목적으로 설계 되었다 보니, Linux VM 내에서 여러 daemon process를 관리할 필요가 없어서 그런 것 같다.
systemd의 명령어 몇가지를 사용해보면서 익혀보도록 하겠다.
enable/disable
sudo systemctl status nginx의 결과를 다시 보면,
disabled라고 되어 있는 부분이 있다.
● nginx.service - The nginx HTTP and reverse proxy server
     Loaded: loaded (/usr/lib/systemd/system/nginx.service; disabled; preset: disabled)
     Active: active (running) since Tue 2024-07-02 09:18:05 UTC; 19min ago
이게 무슨 이야기냐면, 재부팅 할 때 자동으로 실행하지 않겠다는 소리다.
Windows, macOS도 재부팅 할 때마다 자동으로 켜주는 '시작 프로그램'이 존재하는데, 그것과 같다.
enabled라 써있으면 시작 시 실행 해주고, disabled라 써있으면 실행 안 해준다.
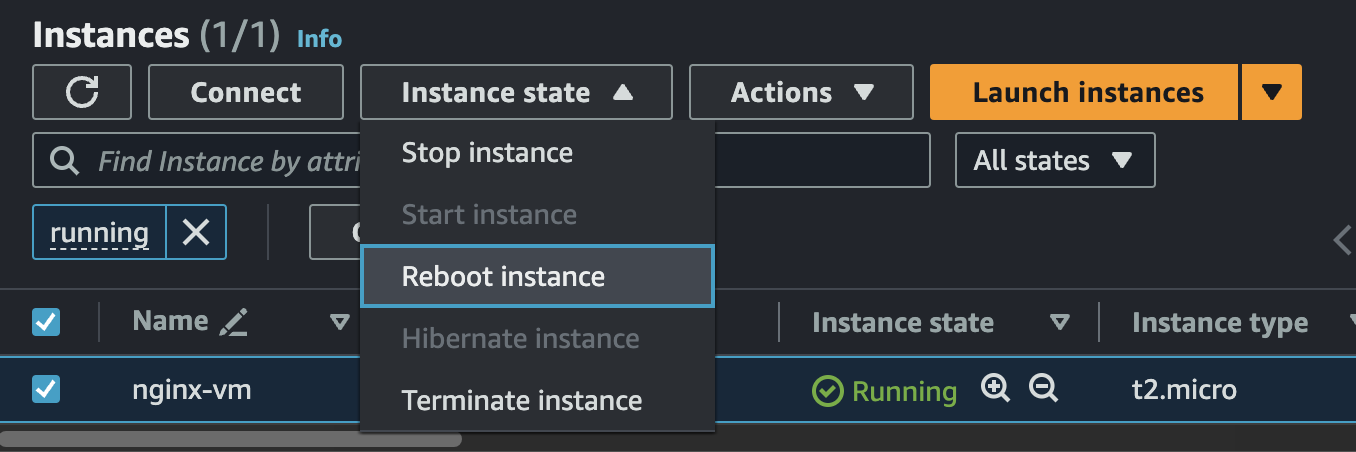
disabled인 상태에서 EC2 Instance를 재부팅 해보자.
그리고 재접속 하여 상태를 확인한다.
# ssh로 ec2 접속
$ ssh ec2-user@13.125.157.31

# nginx 상태 확인
$ sudo systemctl status nginx
○ nginx.service - The nginx HTTP and reverse proxy server
     Loaded: loaded (/usr/lib/systemd/system/nginx.service; disabled; preset: disabled)
     Active: inactive (dead)
상태가 dead로 나온다.
재부팅 시에 자동 실행이 안 되고 있다.
그럼 enable하게 만들어주자.
$ sudo systemctl enable nginx

$ sudo systemctl status nginx
○ nginx.service - The nginx HTTP and reverse proxy server
     Loaded: loaded (/usr/lib/systemd/system/nginx.service; enabled; preset: disabled)
     Active: inactive (dead)
그리고 다시 EC2 Instance를 Reboot 해본다.
# ssh로 ec2 접속
$ ssh ec2-user@13.125.157.31

# nginx 상태 확인
$ sudo systemctl status nginx
● nginx.service - The nginx HTTP and reverse proxy server
     Loaded: loaded (/usr/lib/systemd/system/nginx.service; enabled; preset: disabled)
     Active: active (running) since Tue 2024-07-02 09:43:03 UTC; 14s ago
    Process: 2133 ExecStartPre=/usr/bin/rm -f /run/nginx.pid (code=exited, status=0/SUC>
    Process: 2139 ExecStartPre=/usr/sbin/nginx -t (code=exited, status=0/SUCCESS)
    Process: 2157 ExecStart=/usr/sbin/nginx (code=exited, status=0/SUCCESS)
   Main PID: 2163 (nginx)
      Tasks: 2 (limit: 1114)
     Memory: 5.1M
        CPU: 56ms
     CGroup: /system.slice/nginx.service
             ├─2163 "nginx: master process /usr/sbin/nginx"
             └─2164 "nginx: worker process"
이제 재부팅 해도 nginx가 자동 실행 되는 것을 확인할 수 있다.
systemd는 nginx 전용 명령어가 아니므로, 다른 프로그램들에도 동일하게 써먹을 수 있다.
이 외에도 start, stop, reload, restart 등의 명령어가 존재하므로 필요에 따라 써먹으면 된다.
start UNIT...                       Start (activate) one or more units
stop UNIT...                        Stop (deactivate) one or more units
reload UNIT...                      Reload one or more units
restart UNIT...                     Start or restart one or more units
동일하게 $ sudo systemctl <command> <program> 형태다.
nginx health check
이번에는 local과 EC2를 왔다갔다 하면서 명령어를 수행할 것이기 때문에 주석으로 EC2, local로 정확히 구분할 것이니 잘 확인하길 바란다.
우선 EC2의 public ip 주소를 확인해보자
# EC2
$ curl ifconfig.me # 13.125.157.31
현재 내가 접속한 VM ip는 13.125.157.31로 나오는데, 전세계 고유 ip이므로 사람마다 다 다를 것이다.
local에서 이 IP로 ping을 보내보겠다.
ping(L3 ICMP Protocol)
ping은 ICMP라는 protocol을 사용한다.
이 protocol은 L3에 속한다.
TCP/IP 7계층 중 3계층인 L3 Network Layer에서 작동하는 것이다.
L4가 Transport(TCP), L5~L7이 Application Layer(HTTP)이므로 TCP, HTTP 조차 모르는 순수 패킷만 보내는 Protocol이다.
L4 Transport 계층은 특정 IP에 위치한 서버의 특정 Port에 Application이 Listening 중이냐. 까지 알 수 있지만, L3 Network 계층은 Port 따위는 신경쓰지 않고 그 IP에 위치한 컴퓨터가 켜져있냐. 까지만 알 수 있다.
local에서 EC2에 ping을 날려보겠다.
ping을 날리기 위한 명령어는 매우 간단하다.
ping <ip> 형식이다.
# local
$ ping 13.125.157.31

PING 13.125.157.31 (13.125.157.31): 56 data bytes
Request timeout for icmp_seq 0
Request timeout for icmp_seq 1
Request timeout for icmp_seq 2
^C
--- 13.125.157.31 ping statistics ---
4 packets transmitted, 0 packets received, 100.0% packet loss
Request timeout이 3번 나서 Ctrl + C를 눌러 Interrupt Signal을 보내서 꺼버렸다.
마지막 줄에 4 packets transmitted, 0 packets received, 100.0% packet loss라는 메세지가 나오는데, 응답을 한 개도 못받은 것이다.
분명 ssh로 접속은 잘 되고, EC2 Instance가 켜져 있는 것도 맞다.
그런데 왜 ping을 보내면 응답을 받지 못할까.
ping은 그냥 해당 ip의 컴퓨터가 켜져 있고, 인터넷만 되면 되는건데 말이다.
이유는 우리가 만든 EC2 Instance에 들어가서 아랫 쪽 Security 탭을 누르면 알 수 있다.
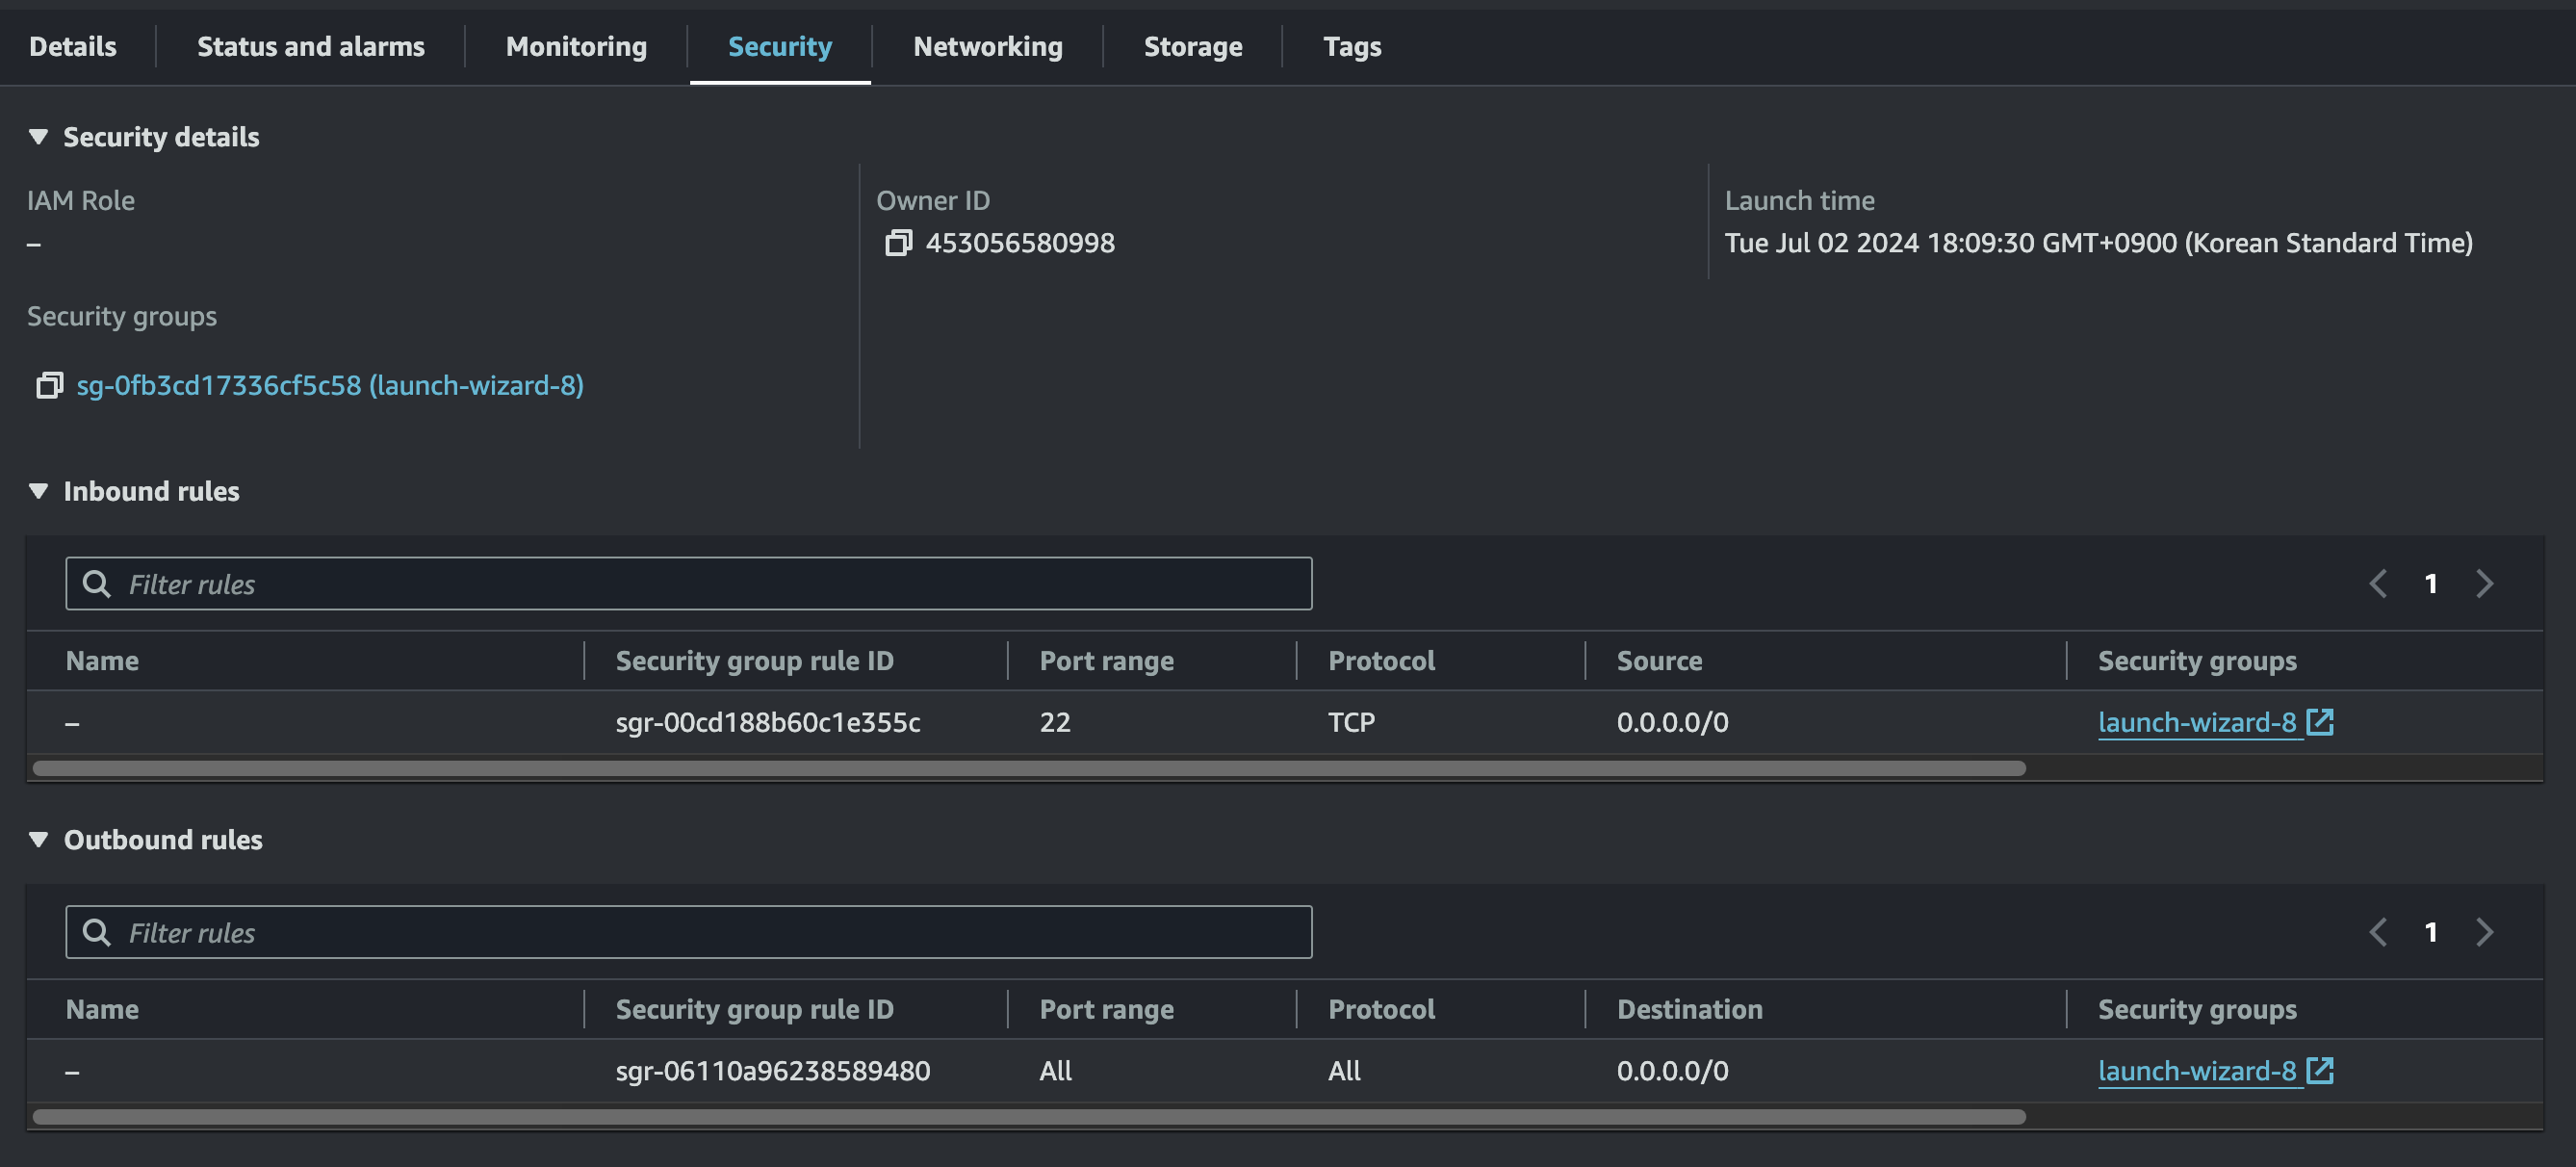
Inbound Rules를 보면 22번 포트에 대해서 0.0.0.0/0인 ip가 허용되어 있다.
여기서 0.0.0.0/0은 어떤 ip던 상관 없다는 와일드 카드를 뜻하며,
ssh 프로토콜이 22번 포트를 사용하는데, 이 포트는 허용한단 소리다.
ping은 L3 Network Layer에서 작동하고, 이것의 protocol은 ICMP라고 했는데, 뭐가 문제인 것일까.
ICMP protocol이 특정 Port에 속하지는 않지만, AWS는 Inbound Rules에서 ICMP protocol 자체를 따로 허용해줘야 한다.
안 그러면 ICMP protocol인 패킷은 전부 거부되고 버려진다.
그래서 아무리 ping을 보내도 응답이 나가지 않았던 것이다.
ICMP protocol 허용하기
우선 방금 본 페이지에서 Security Groups 쪽의 파란 url을 눌러서 이동한다.
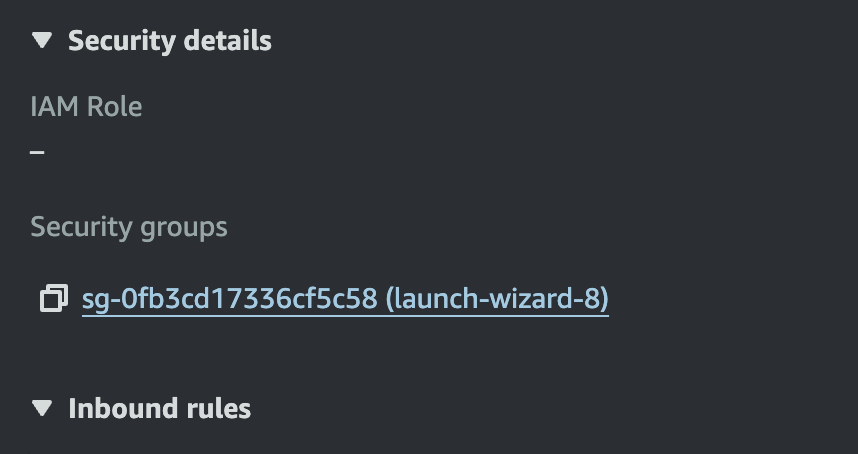
그럼 다음과 같은 화면이 뜨는데, 우측에 Edit inbound rules를 누른다.

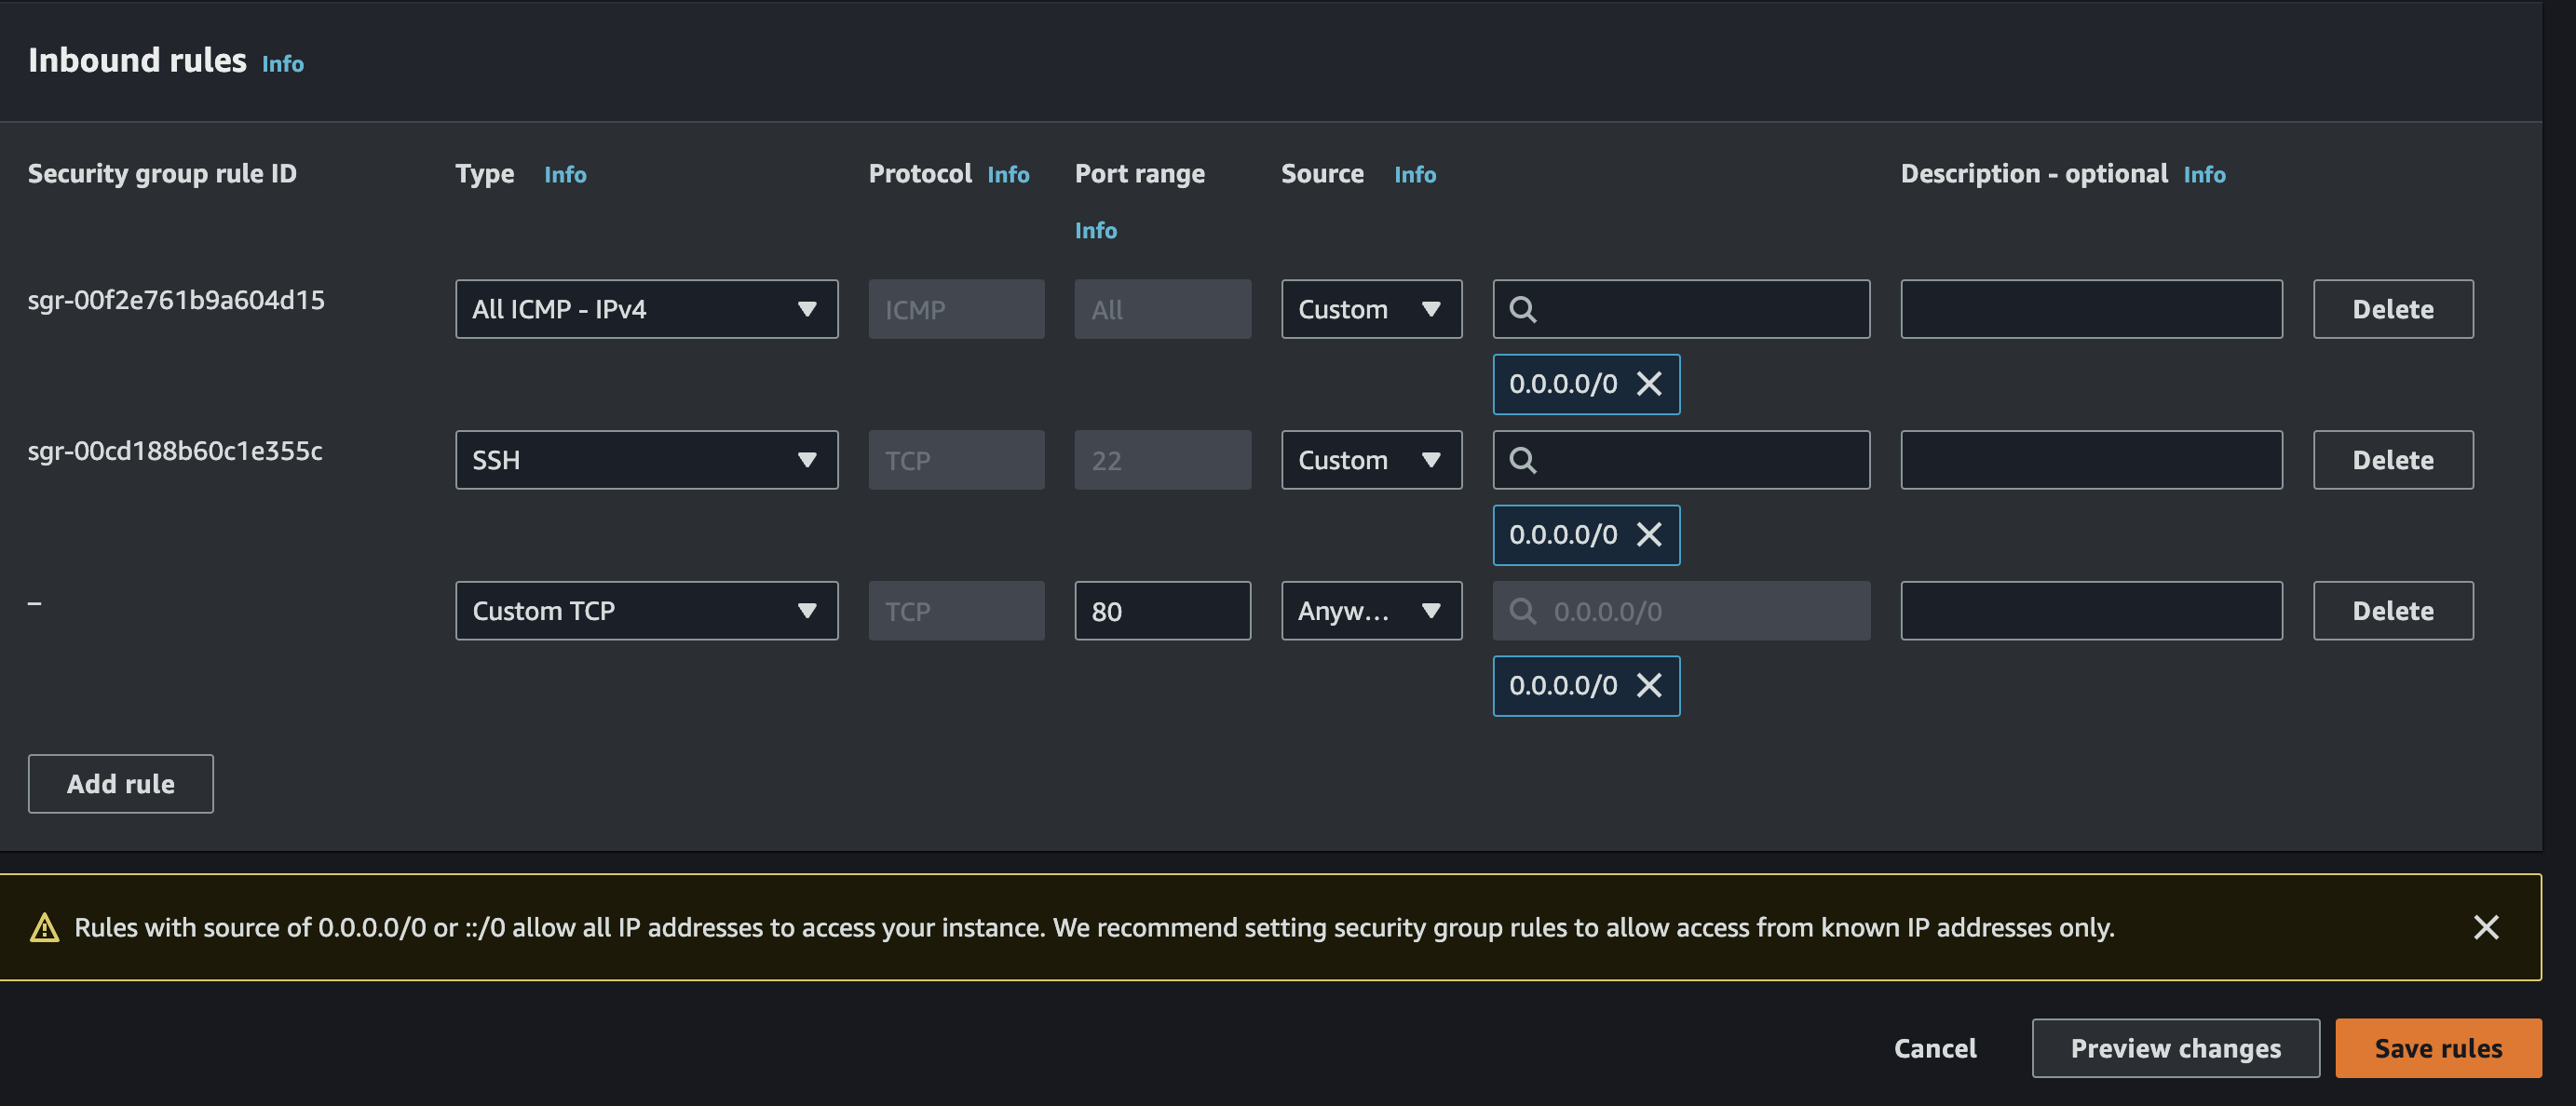
Add Rule 버튼을 누르고 icmp를 검색하여 All ICMP - IPv4를 선택한다.
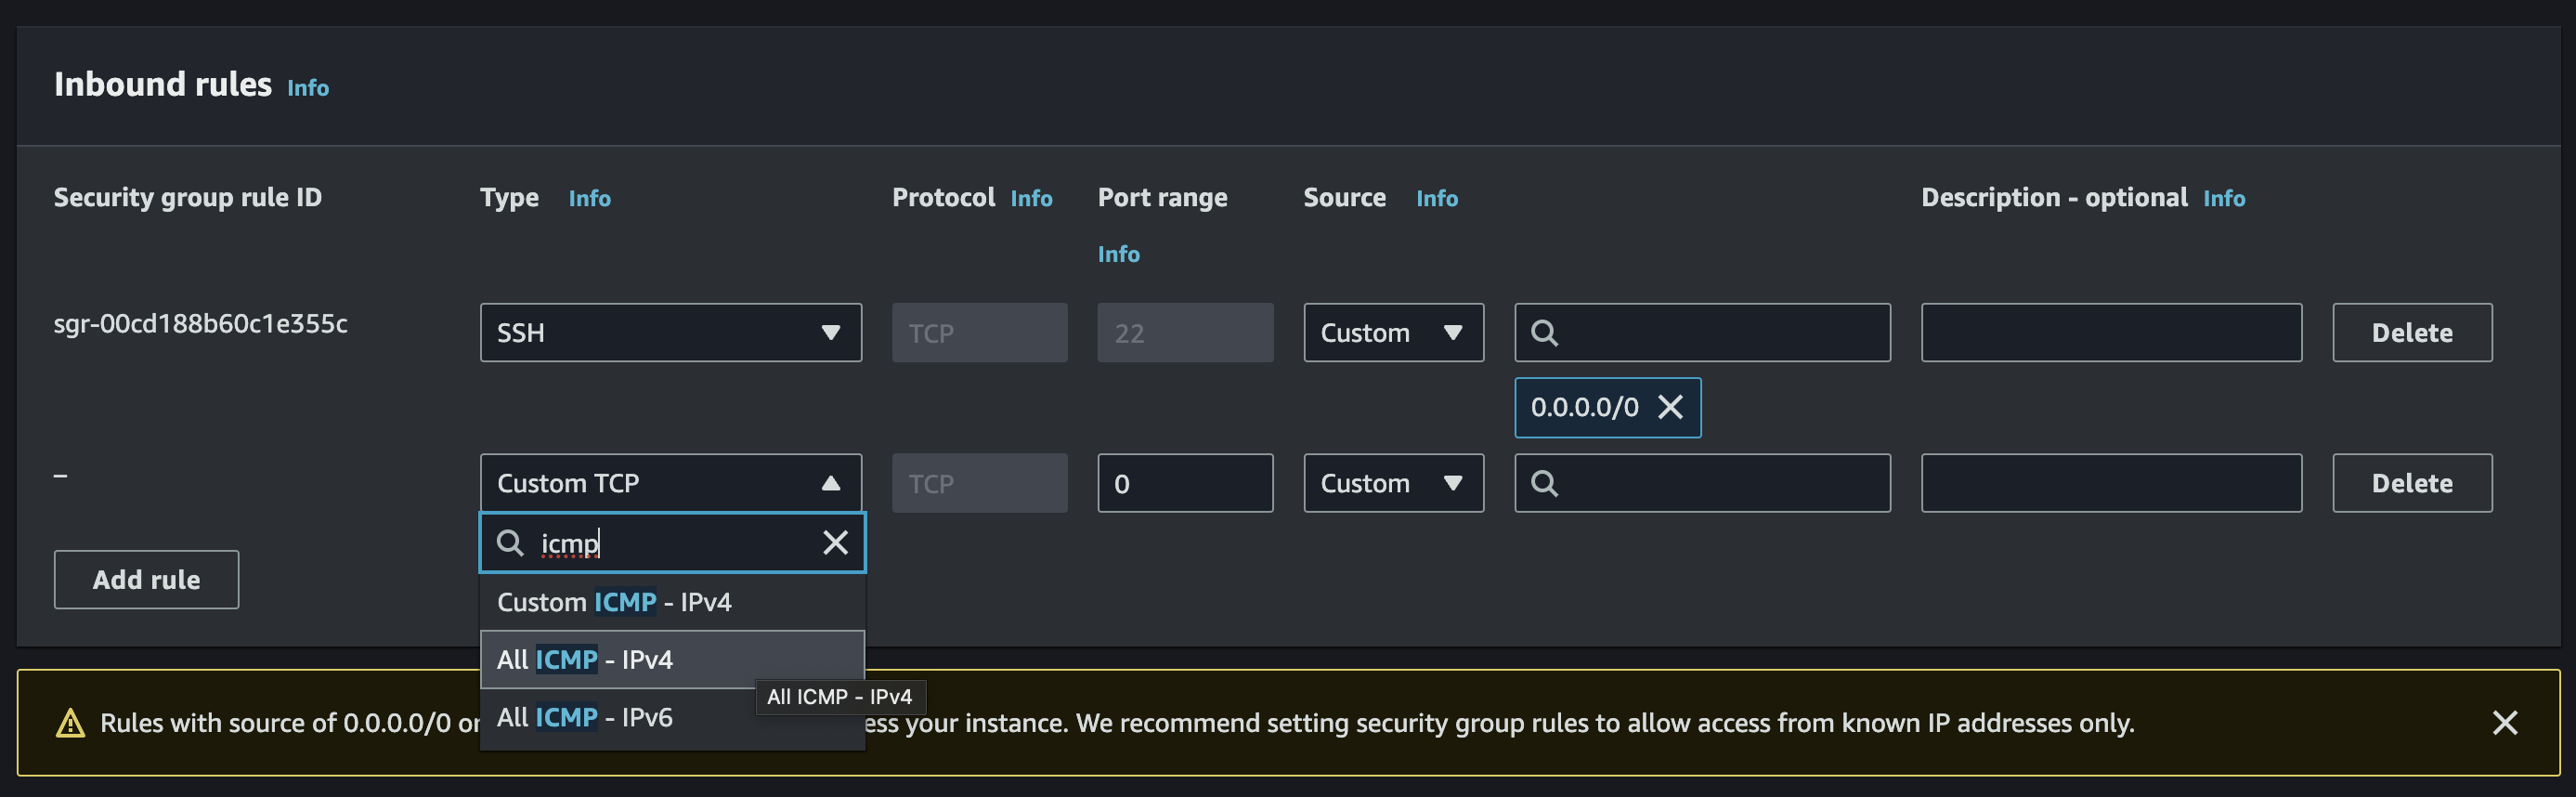
Inbound IP도 0.0.0.0/0으로 설정한 뒤, 우측 하단의 Save rules를 눌러서 저장한다.
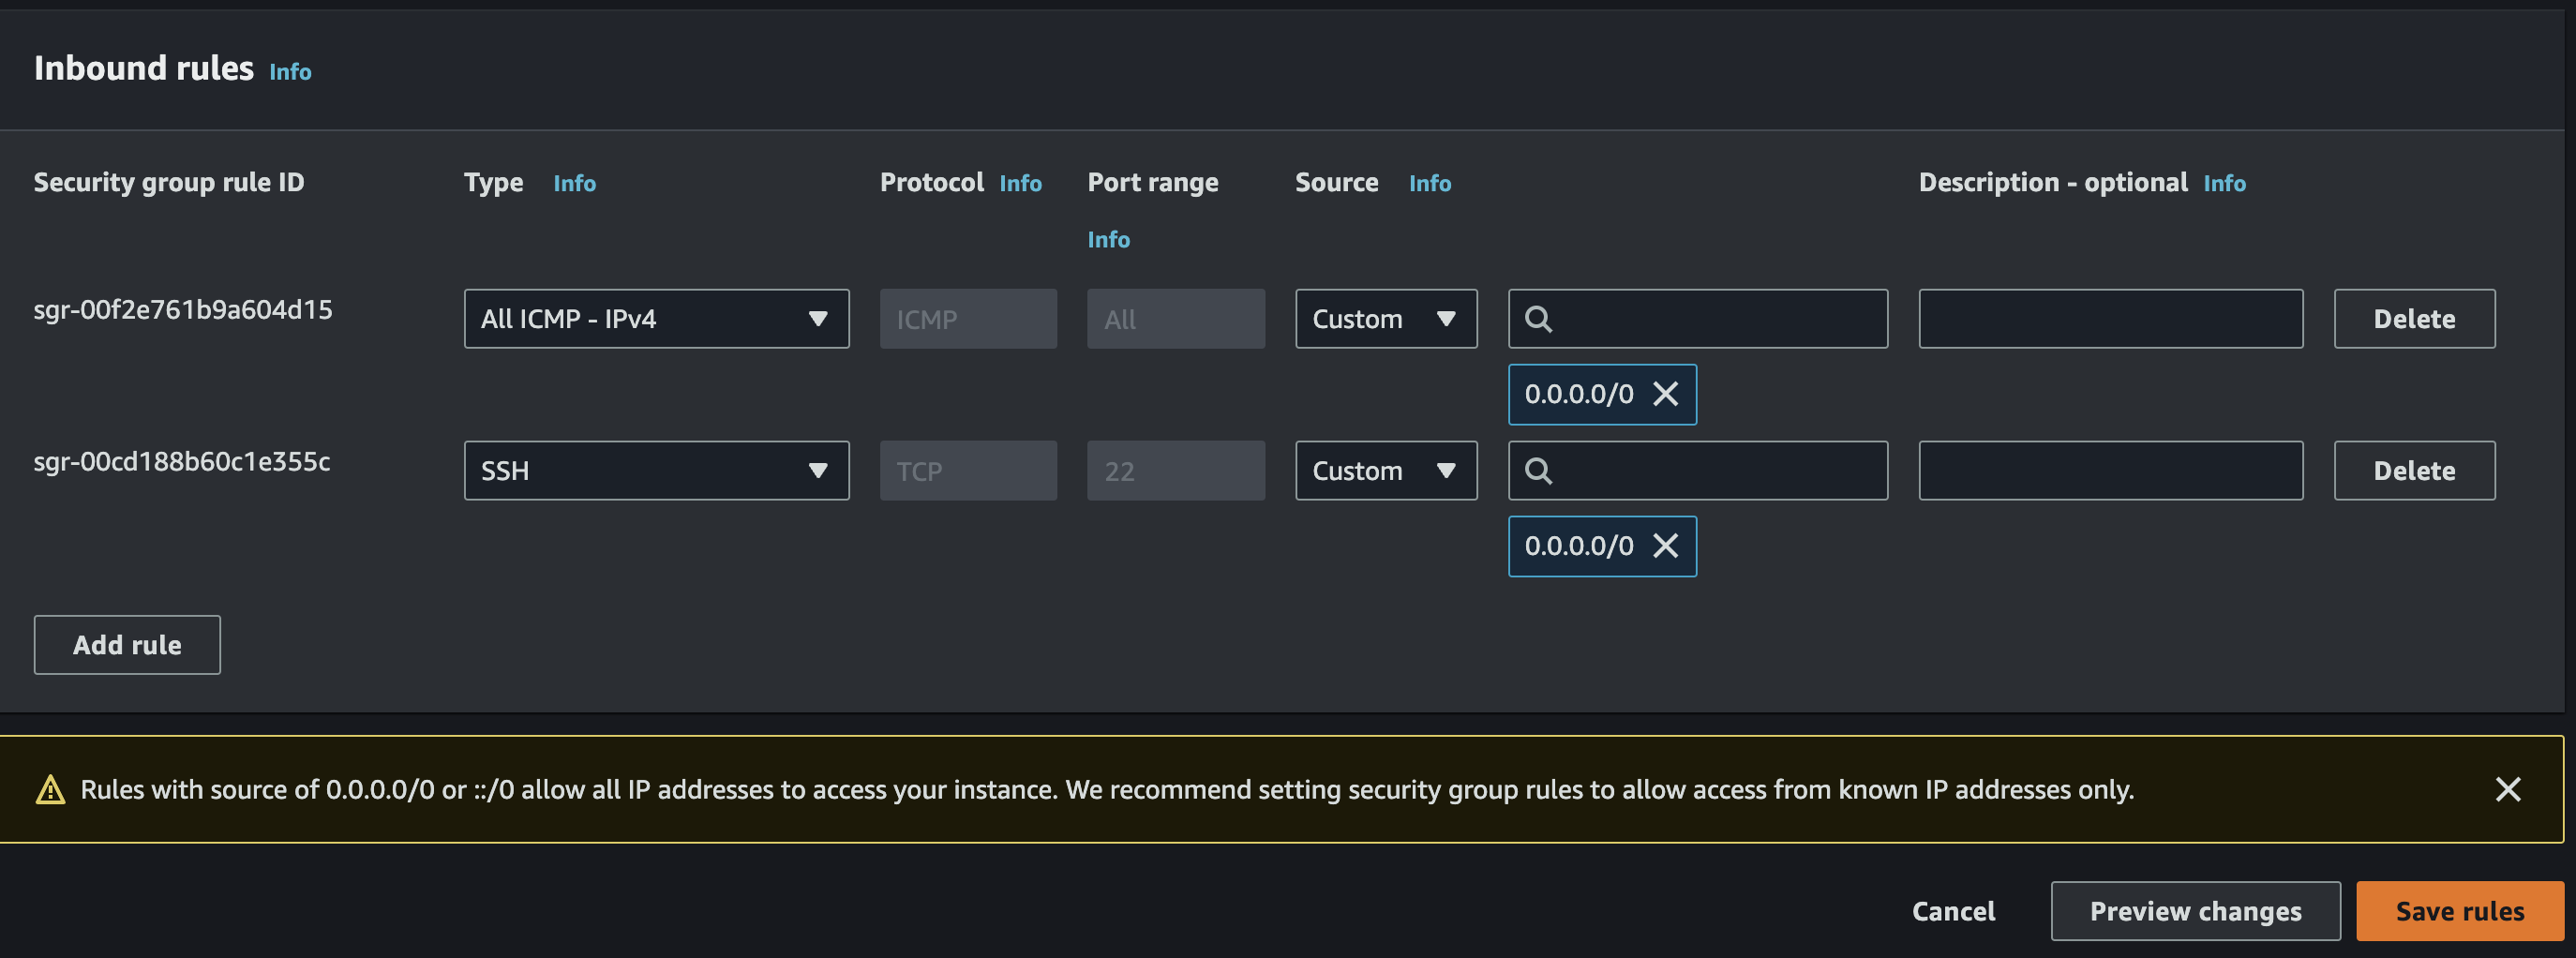
설정이 잘 완료되었나 확인해보자.
다음과 같이 Type이 All ICMP - IPv4고, protocol은 ICMP, Port range가 All, Source가 0.0.0.0/0이면 잘 된 것이다.

모든 Port, 모든 IP를 다 허용하며, ICMP protocol이면 EC2로 들여 보내겠다는 소리다.
반대로 나갈 때는 Outbound Rules라는 것이 있는데 이건 따로 설정할 필요가 있을까.
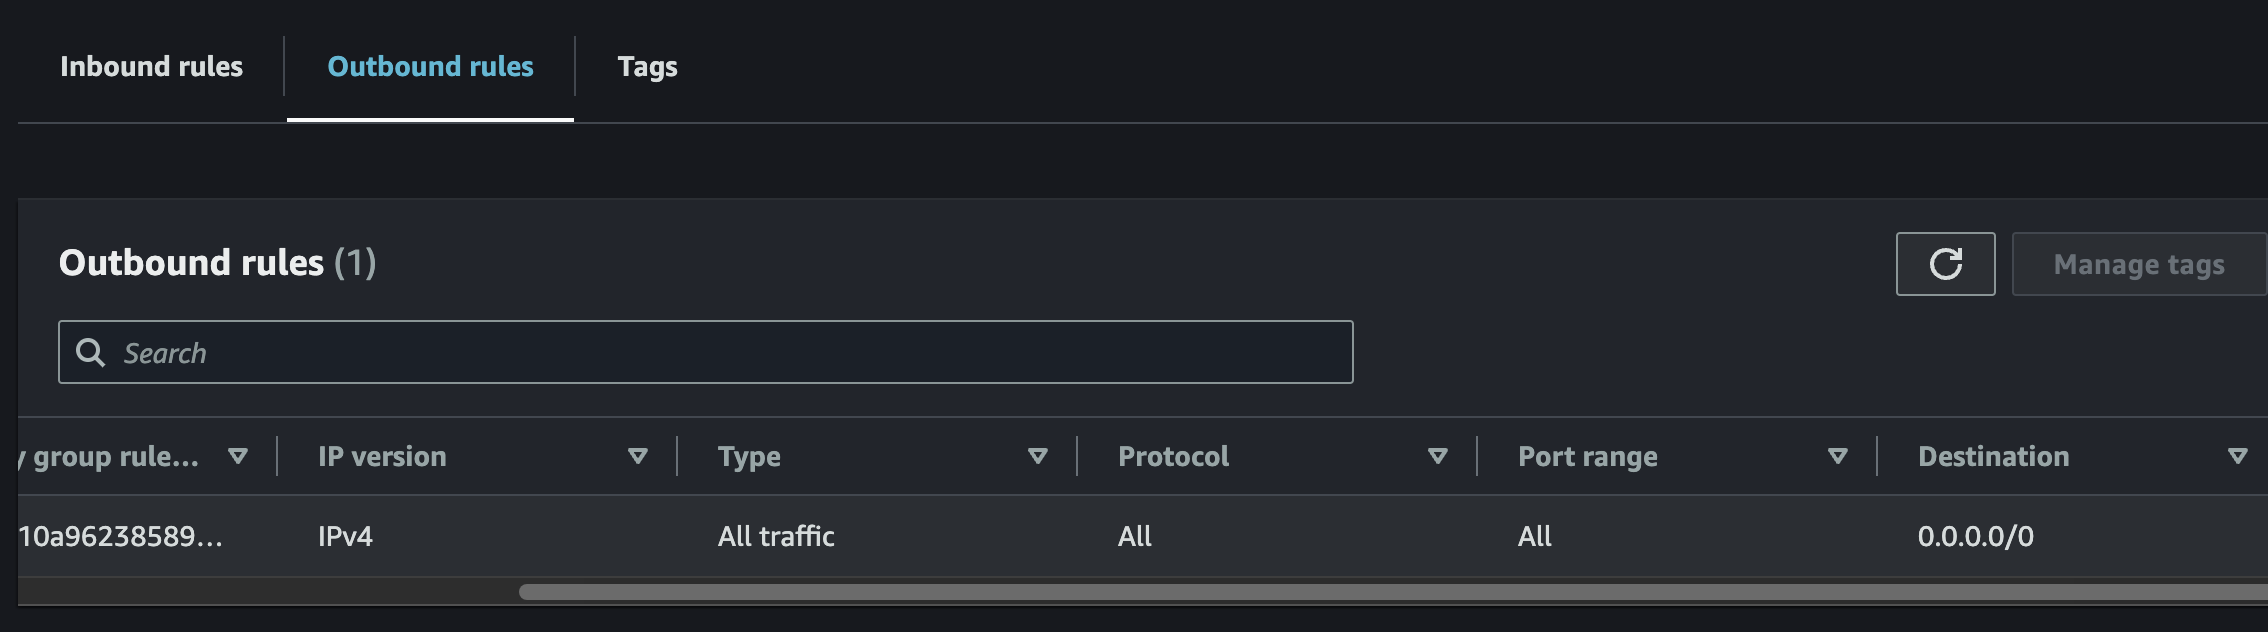
기본적으로 EC2를 만들면 모든 IP, Port, protocol에 대해 오픈되어 있기 때문에 이건 건드릴 필요가 없다.
그럼 다시 ping을 보내보자.
이번엔 5개까지 보내고 Ctrl + C로 Interrupt signal을 보내서 종료했다.
# local
$ ping 13.125.157.31

PING 13.125.157.31 (13.125.157.31): 56 data bytes
64 bytes from 13.125.157.31: icmp_seq=0 ttl=109 time=7.432 ms
64 bytes from 13.125.157.31: icmp_seq=1 ttl=109 time=8.704 ms
64 bytes from 13.125.157.31: icmp_seq=2 ttl=109 time=9.086 ms
64 bytes from 13.125.157.31: icmp_seq=3 ttl=109 time=8.399 ms
64 bytes from 13.125.157.31: icmp_seq=4 ttl=109 time=6.659 ms
^C
--- 13.125.157.31 ping statistics ---
5 packets transmitted, 5 packets received, 0.0% packet loss
round-trip min/avg/max/stddev = 6.659/8.056/9.086/0.888 ms
Packet loss 0.0%로 전부 응답을 받은 것을 확인했다.
그럼 ping으로 nginx가 실행되고 있는지 확인할 수 있을까.
EC2에서 nginx를 정지하고 local에서 다시 ping을 날려보자.
# EC2

# nginx 정지
$ sudo systemctl stop nginx

# nginx inactive인지 상태 확인
$ sudo systemctl status nginx

○ nginx.service - The nginx HTTP and reverse proxy server
     Loaded: loaded (/usr/lib/systemd/system/nginx.service; enabled; preset: disabled)
     Active: inactive (dead) since Tue 2024-07-02 10:11:26 UTC; 3s ago
   Duration: 28min 22.557s
    Process: 2133 ExecStartPre=/usr/bin/rm -f /run/nginx.pid (code=exited, status=0/SUC>
    Process: 2139 ExecStartPre=/usr/sbin/nginx -t (code=exited, status=0/SUCCESS)
    Process: 2157 ExecStart=/usr/sbin/nginx (code=exited, status=0/SUCCESS)
   Main PID: 2163 (code=exited, status=0/SUCCESS)
CPU: 59msnginx가 inactive 상태인 것을 확인했다.
# local
$ ping 13.125.157.31

PING 13.125.157.31 (13.125.157.31): 56 data bytes
64 bytes from 13.125.157.31: icmp_seq=0 ttl=109 time=8.922 ms
64 bytes from 13.125.157.31: icmp_seq=1 ttl=109 time=6.296 ms
64 bytes from 13.125.157.31: icmp_seq=2 ttl=109 time=8.568 ms
^C
--- 13.125.157.31 ping statistics ---
3 packets transmitted, 3 packets received, 0.0% packet loss
round-trip min/avg/max/stddev = 6.296/7.929/8.922/1.163 ms
그러나 이건 ping과는 아무런 관련이 없다.
즉, ping을 통한 L3 Network Layer의 ICMP protocol로는 특정 Node(EC2)가 네트워크 연결이 잘 되어 있는지 까지만 확인할 뿐, 그 안에서 돌아가는 nginx 등의 Application Status는 확인할 수 없다.
telnet(L4 TCP protocol)
ICMP protocol은 특정 IP에 Node가 떠 있는지만 관심 있을 뿐, 아무런 Port도 지정하지 않기 때문에 당연히 특정 port에서 돌아가는 nginx의 상태를 관찰할 수 있을 리 없다.
그럴 때는 한 계층 더 올라가서 Transport Layer를 검사해야 한다.
TCP가 위치한 계층이기 때문에 특정 IP의 특정 Port에서 Application이 listening을 잘 하고 있는지 까지 인지할 수 있다.
이를 확인하기 위해 local에서 telnet을 설치한다.
# local
$ brew install telnet
사용법은 간단하다.
$ telnet <ip> <port>
특정 ip의 특정 port에 tcp 요청을 보낸다.
근데 이것도 Inbound Rules에 등록해야 한다.
지금은 22번 port에 ssh, 모든 port에 ICMP protocol만 허용하고 있기 때문이다
nginx는 기본 port가 80이기 때문에, 80번 port를 tcp로 허용해주자.
그리고 요청을 보낼 것이다.
# local
$ telnet 13.125.157.31 80

Trying 13.125.157.31...
telnet: connect to address 13.125.157.31: Host is down
telnet: Unable to connect to remote host
아까 nginx를 꺼놨기 때문에 EC2의 80번 port에 요청을 보내보면 Host is down이라는 메세지를 주며 연결할 수 없다고 한다.
nginx를 다시 켜주자.
# EC2

# nginx 실행
$ sudo systemctl start nginx

# nginx 상태 확인
$ sudo systemctl status nginx

● nginx.service - The nginx HTTP and reverse proxy server
     Loaded: loaded (/usr/lib/systemd/system/nginx.service; enabled; preset: disabled)
     Active: active (running) since Tue 2024-07-02 10:23:37 UTC; 2s ago
    Process: 3389 ExecStartPre=/usr/bin/rm -f /run/nginx.pid (code=exited, status=0/SUC>
    Process: 3392 ExecStartPre=/usr/sbin/nginx -t (code=exited, status=0/SUCCESS)
    Process: 3403 ExecStart=/usr/sbin/nginx (code=exited, status=0/SUCCESS)
   Main PID: 3422 (nginx)
      Tasks: 2 (limit: 1114)
     Memory: 2.2M
        CPU: 52ms
     CGroup: /system.slice/nginx.service
             ├─3422 "nginx: master process /usr/sbin/nginx"
             └─3423 "nginx: worker process"
켜진 것까지 확인했으니, 다시 요청을 보내보자.
# local
$ telnet 13.125.157.31 80

Trying 13.125.157.31...
Connected to ec2-13-125-157-31.ap-northeast-2.compute.amazonaws.com.
Escape character is '^]'.
이번에는 연결되었다고 나온다.
L3 계층은 그저 특정 IP에 위치한 Node가 네트워크에 연결이 되었나, 까지만 알 수 있었지만 L4 Transport 계층에서 작동하는 telnet을 통해 특정 IP, 특정 Port에서 돌아가는 Application이 켜져 있는지 확인할 수 있었다.
그러나 이것도 문제가 있다.
Application이 켜져는 있지만 정상 동작하지 않는 경우는 잡아낼 수 없다는 것이다.
그 때는 아마 대부분 잘 알고 있을 curl을 사용하면 되는데, nginx를 조금 더 다뤄보고 telnet과 무슨 차이인지 살펴보겠다.
nginx static serving
다시 EC2로 돌아와서 curl localhost:80으로 요청을 보내보자.
# EC2
$ curl localhost:80

<!DOCTYPE html>
<html>
<head>
<title>Welcome to nginx!</title>
<style>
html { color-scheme: light dark; }
body { width: 35em; margin: 0 auto;
font-family: Tahoma, Verdana, Arial, sans-serif; }
</style>
</head>
<body>
<h1>Welcome to nginx!</h1>
<p>If you see this page, the nginx web server is successfully installed and
working. Further configuration is required.</p>

<p>For online documentation and support please refer to
<a href="http://nginx.org/">nginx.org</a>.<br/>
Commercial support is available at
<a href="http://nginx.com/">nginx.com</a>.</p>

<p><em>Thank you for using nginx.</em></p>
</body>
</html>nginx를 기본 설치하면 자동으로 static serving 되고 있는 파일이 그대로 날아온다.
그저 html 파일을 읽어서 그대로 보내준 것 뿐이다.
HTTP protocol을 공부했다면 잘 알고 있을 것이다.
이를 static file serving이라고 하며, Content-Type은 text/html이다.
브라우저에 주소창을 입력하면 대부분 이런 text/html 형식의 데이터가 온다.
그럼 nginx가 static serving하는 html 파일 저장 위치가 존재할텐데,
/usr/share/nginx/html 여기에 위치한다.
# EC2

$ ls /usr/share/nginx/html

404.html  50x.html  icons  index.html  nginx-logo.png  poweredby.png
기본적으로 index.html, 404.html, 50x.html이 존재한다.
cat으로 해당 디렉토리에 위치한 index.html 내용을 보겠다.
# EC2

$ cat /usr/share/nginx/html

<!DOCTYPE html>
<html>
<head>
<title>Welcome to nginx!</title>
<style>
html { color-scheme: light dark; }
body { width: 35em; margin: 0 auto;
font-family: Tahoma, Verdana, Arial, sans-serif; }
</style>
</head>
<body>
<h1>Welcome to nginx!</h1>
<p>If you see this page, the nginx web server is successfully installed and
working. Further configuration is required.</p>

<p>For online documentation and support please refer to
<a href="http://nginx.org/">nginx.org</a>.<br/>
Commercial support is available at
<a href="http://nginx.com/">nginx.com</a>.</p>

<p><em>Thank you for using nginx.</em></p>
</body>
</html>
아까 응답으로 왔던 내용과 일치한다.
즉, 루트 경로로 요청을 보내줬을 때, 이 파일의 내용을 읽어서 보내준 것이다.
vi로 내용을 살짝 바꿔보자(sudo로 실행할 것)
# EC2

$ sudo vi /usr/share/nginx/html/index.html

<h1>hello</h1>
매우 간단하게 <h1>hello</h1>만 남기고 전부 지웠다.
# EC2

$ curl localhost:80

<h1>Hello</h1>
수정을 완료하고 다시 요청을 보내면 우리가 변경한 내용대로 응답이 오는 것을 볼 수 있다.
이번엔 존재하지 않는 a.html을 요청 해보겠다.
응답이 너무 길게 오기 때문에 축약해서 받을 수 있는 -I 옵션을 붙여주자.
# EC2

$ curl localhost:80/a.html -I
HTTP/1.1 404 Not Found
Server: nginx/1.24.0
Date: Tue, 02 Jul 2024 10:42:19 GMT
Content-Type: text/html
Content-Length: 3650
Connection: keep-alive
ETag: "652946be-e42"/usr/share/nginx/html에 없으므로 당연히 404 Not Found가 온다.
이번에는 a.html을 실제로 만들어보겠다.
# EC2

$ sudo vi /usr/share/nginx/html/a.html

<h1>A page</h1>
그리고 다시 요청을 보냈다.
# EC2

$ curl localhost:80/a.html

<h1>A page</h1>
페이지가 만들어졌으므로 응답이 잘 오는 것을 확인할 수 있다.
nginx 설정 변경
이번에는 nginx의 설정을 변경해보겠다.
80번 port가 아니라 8080 port에서 실행되도록 바꾸자.
nginx의 기본 설정 파일은 /etc/nginx/nginx.conf이다.
vi로 열어서 확인해보자.
# EC2

sudo vi /etc/nginx/nginx.conf
100줄 가까운 설정 파일이 나오는데, d + G를 눌러서 전부 지워버리자.
그리고 다음과 같이 설정 파일을 수정한다.
http {
  server {
      listen 8080;
      server_name localhost;

      root /usr/share/nginx/html;

      location / {
          try_files $uri $uri/ =404;
      }
  }
}

events {}
우선 events 블록은 안 써주면 다음과 같은 오류가 나서 넣었다.
nginx: [emerg] no "events" section in configuration
그리고 http.server 블록 안에 nginx를 실행할 host(server_name), port를 지정한다.
localhost:8080에서 listen 한다는 것과 같다.
root는 실제 static serving 할 파일들의 위치인데,
예를 들어 /abc.txt로 들어오면 /usr/share/nginx/html/abc.txt 파일을 찾게 된다.
즉, url 치환이 일어난다.
그리고 location / 블록은 root 경로 /로 요청이 들어왔을 때 행위를 명시한다.
/만 있기 때문에 모든 경로를 포괄하며,
/a 등의 보다 구체적인 location이 존재하는 경우, 구체적인 것이 우선 순위를 갖게 된다.
마지막으로 try_files의 $uri은 요청을 받았을 때,
localhost:8000/abc로 요청이 들어 왔다면, 이 중에서 /abc만 뽑는다.
이게 uri고, 이걸 위에서 root로 지정한 경로로 다시 치환하여
/usr/share/nginx/html/abc를 찾게된다.
$uri/는 조금 특수한데, uri로 입력된 경로가 /a라면, a라는 디렉토리라고 생각하고 /a/index.html을 찾게 된다.
만약 a라는 파일과 /a/index.html이 있으면 우선 순위를 갖는 것은 a라는 파일이다.
마지막으로 =404는 일치하는 파일이 없을 경우 응답으로 404를 주라는 뜻이다.
curl 테스트
설정을 바꿨을 때는 리로드를 해야 한다.
아니면 변경 사항이 반영되지 않는다.
# EC2

# 설정 파일 재로딩
$ sudo nginx -s reload
그리고 홈으로 요청을 보내면
# EC2

$ curl localhost:8080

<h1>Hello</h1>
아까 수정한 /usr/share/nginx/html/index.html의 내용이 그대로 온다.
처음에 try_files의 $uri에 의해 경로가 빈 문자열 ''이 될테니 파일이 없어서 매칭이 되지 않고, $uri/에 의해 디렉토리로 인식되어 /index.html을 찾아서 매칭이 되는 것이다.(정확히는 /usr/share/nginx/html/index.html)
이번에는 존재하지 않는 xxx.html로 경로를 바꿔보겠다.
이번에는 응답이 너무 길기 때문에 -I 옵션을 줘서 응답 헤더만 보도록 하자.
# EC2

$ curl localhost:8080/xxx.html -I

HTTP/1.1 404 Not Found
Server: nginx/1.24.0
Date: Tue, 02 Jul 2024 13:01:24 GMT
Content-Type: text/html
Content-Length: 3650
Connection: keep-alive
ETag: "652946be-e42"
이처럼 없는 파일에 대한 요청은 응답이 404로 반환된다.
telnet vs curl
telnet은 L4 Transport로 TCP protocol이고,
curl은 L7 Http protocol이다.
이 둘을 활용하여 nginx가 제대로 실행되고 있는지 확인할 수 있지만,
telnet으로는 잡지 못하는 문제들이 있다.
상황 재현을 위해 /usr/share/nginx/html/index.html을 삭제해보자.
# EC2

$ sudo rm /usr/share/nginx/html/index.html
요청을 보내면 당연히 제대로 된 응답이 오지 않을 것이다.
# EC2
curl localhost:8080 -I

HTTP/1.1 403 Forbidden
Server: nginx/1.24.0
Date: Tue, 02 Jul 2024 13:05:09 GMT
Content-Type: text/html
Content-Length: 153
Connection: keep-alive
이번에는 local에서 telnet으로 테스트 해보자.
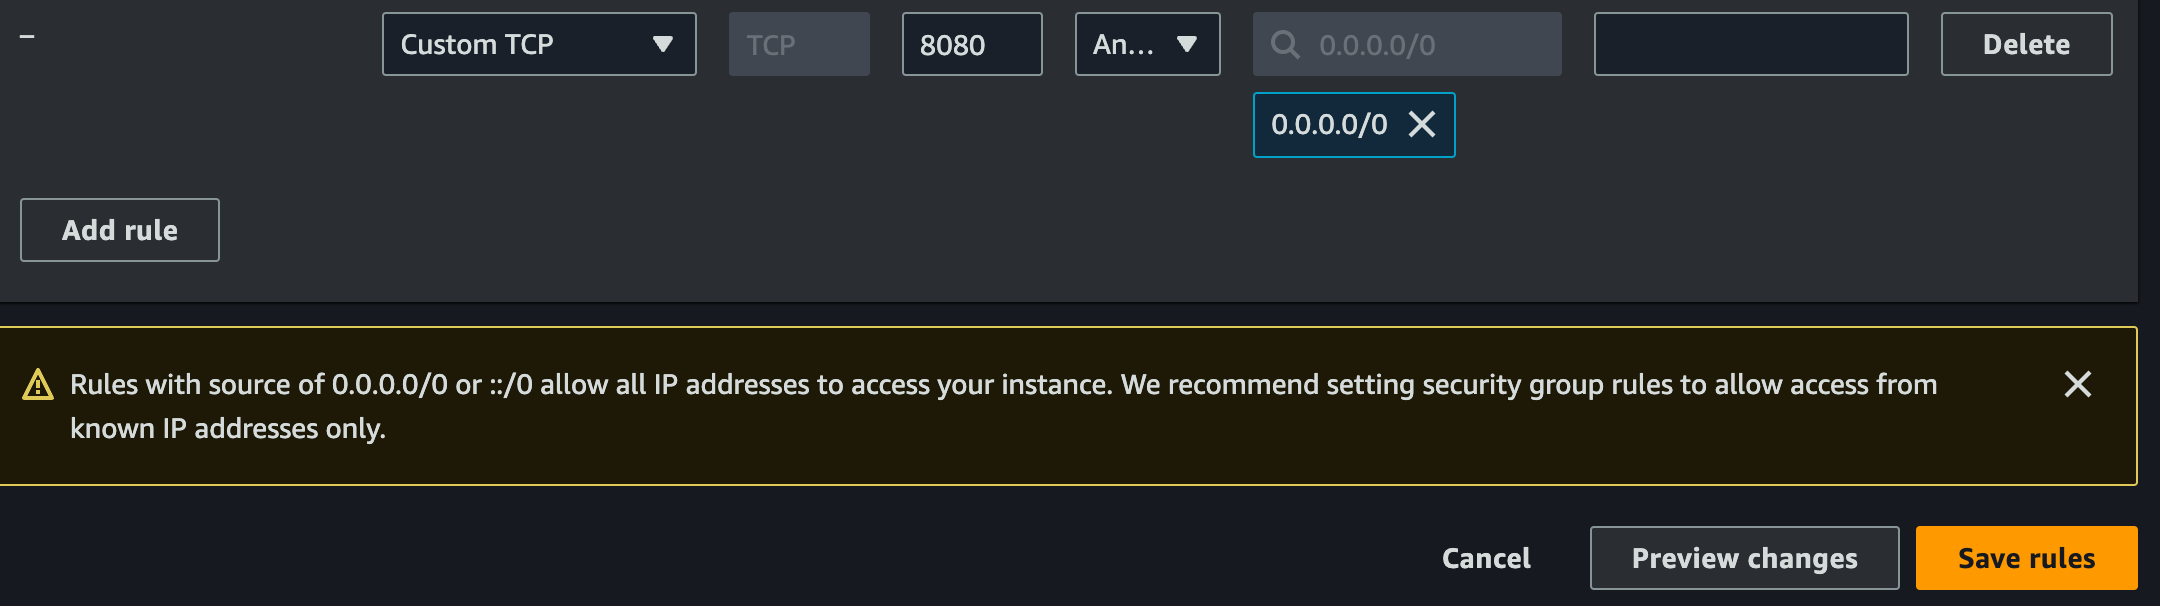
80이 아닌 8080 port로 외부에서 요청을 보내는 것이기 때문에 InBound Rules에 8080 port를 추가로 허용해야 한다.
telnet으로 local에서 요청을 보내면 정상적으로 연결된다.
# local

$ telnet 13.125.157.31 8080

Trying 13.125.157.31...
Connected to ec2-13-125-157-31.ap-northeast-2.compute.amazonaws.com.
Escape character is '^]'.
즉, telnet은 해당 port에서 Application이 listen 하고 있다는 사실까지만 테스트 할 수 있을 뿐, 구체적으로 어떤 path에 어떠한 논리적인 오류가 있는지 까지는 확인할 수 없다.
정리하면 ping은 특정 ip에 바인딩 된 Node의 연결 여부,
telnet은 특정 ip, port에 바인딩 된 Node의 Application 실행 여부,
curl은 더 구체적인 path에 대한 테스트까지 할 수 있었다.
이러한 차이를 인지하는 것이 추후 원하는 Layer 수준의 health check를 할 때 도움이 될 것이다.
Nginx를 간단하게 사용해 봤는데, 이번에는 거의 static serving을 하는 웹 서버로서 사용하기만 했다. 이보다 훨씬 많은 기능들이 내장되어 있고, 최근에는 대체로 LB로 사용되기 때문에 다음 장에서 Nginx 뒷단에 다른 서버들을 추가하여 Load Balancing 설정하여 Nginx를 Reverse Proxy로서 사용하는 방법을 알아보도록 하겠다.
