
이 글의 목적?
DispatcherServlet이 적용되는 과정을 정리해보자.
서블릿 구성
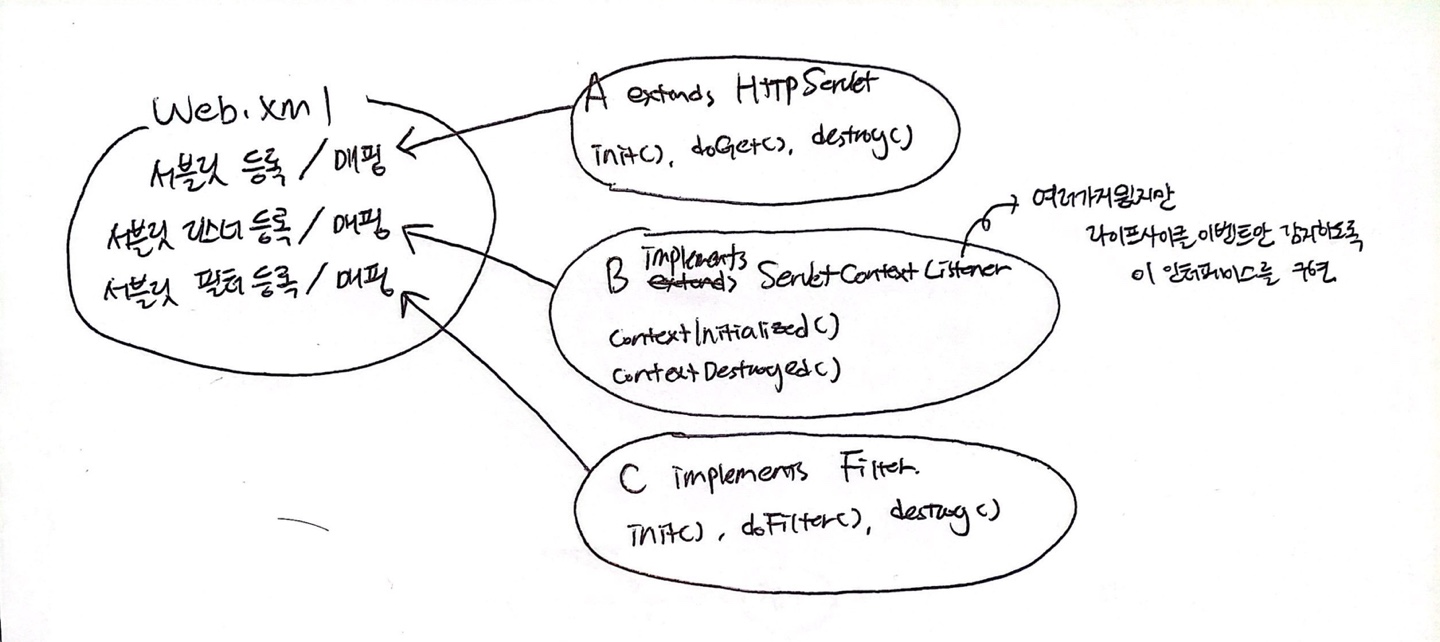
강의에서는 web.xml 파일을 기준으로 진행되었다. web.xml 파일에는 다음과 같은 내용이 들어가 있다.
- 서블릿 등록 및 매핑
- 서블릿 리스너 등록 및 매핑
- 서블릿 필터 등록 및 매핑
💡 web.xml 파일은 뭘까?
이 파일은 웹 애플리케이션의 배포 설명자(Web Application Deployment Descriptor - DD)로, 각 애플리케이션의 환경을 설정하는 역할을 수행한다. 서버가 처음 로딩될 때 읽어들이고, 해당 환경 설정에 대해 톰캣에 적용하여 서버를 시작하는데 필요한 파일이다.
💡 web.xml 없이 자바 코드로?
public class WebApplication implements WebApplicationInitialized {
	@Override
    public void onStartup(ServletContext servletContext) throws ServletException {
    	AnnotationConfigWebApplicationContext context = new AnnotationConfigWebApplicationContext();
        // 설정 파일 등록
        context.register(WebConfig.class);
        context.refresh();
        // DispatcherServlet 등록
        DispatcherServlet dispatcherServlet = new DispatcherServlet(context);
        ServletRegistration.Dynamic app = servletContext.addServlet("app", dispatcherServlet);
        app.addMapping("/app/*");
    }
}
서블릿에서 IoC 컨테이너 연동
가장 이해하기 어려웠던 부분이라고 생각한다. 순서대로 연동하는 방법을 나열해보자.
1. ContextLoaderListener 등록
강의에서는 서블릿에서 IoC 컨테이너를 이용하기 위해 web.xml에 스프링이 제공해주는 ContextLoaderListener를 리스너에 등록을 해줬다.
이 리스너는 서블릿의 생명 주기에 맞춰서 스프링이 제공해주는 ApplicationContext를 연동시켜주는 가장 핵심적인 리스너다. 예를 들어, 서블릿이 종료되는 시점에 ApplicationContext를 제거해준다.
쉽게 본다면, 이 리스너는 ServletContext가 ApplicationContext를 - 즉, 서블릿이 IoC 컨테이너의 빈을 이용하기 위해 서블릿 컨테이너에 등록해주는 역할을 수행한다고 보면 될 것 같다.
<listener>
  <listener-class>org.springframework.web.context.ContextLoaderListener</listener-class>
</listener>
2. ApplicationContext 생성
서블릿 컨테이너의 서블릿들이 스프링의 ApplicationContext를 이용하려면 ServletContext에 등록이 되어있어야 한다고 했다.
하지만 리스너만 web.xml에 등록을 한 시점의 프로젝트에서는 ApplicationContext가 없기 때문에 스프링 설정 파일을 만들어 ApplicationContext를 생성해주어야 한다. 기본적으로는 스프링 설정 파일로는 XML 파일을 사용하지만, 강의에서는 자바 설정 파일을 만들어주었다. 그리고 추가로 빈을 등록해주었다.
@Configuration
@ComponentScan
public class AppConfig {
}
@Service
public class HelloService {
public String getName() {
return "hello world";
}
}- 자바 설정 파일을 만들었다면, 그 다음으로는 리스너에게 연동해야하는 ApplicationContext가 무엇인지 알려줘야한다. 어떤 정보를 기입해야할까?
ContextListener 코드에서 상속받는 ContextLoader 클래스를 살펴보면, contextConfigLocation, contextClass 등 다양한 파라미터가 존재하는 것을 확인할 수 있다.
public class ContextLoader {
    public static final String CONTEXT_ID_PARAM = "contextId";
    public static final String CONFIG_LOCATION_PARAM = "contextConfigLocation";
    public static final String CONTEXT_CLASS_PARAM = "contextClass";
    public static final String CONTEXT_INITIALIZER_CLASSES_PARAM = "contextInitializerClasses";
    public static final String GLOBAL_INITIALIZER_CLASSES_PARAM = "globalInitializerClasses";
    private static final String INIT_PARAM_DELIMITERS = ",; \t\n";
    private static final String DEFAULT_STRATEGIES_PATH = "ContextLoader.properties";

    // (생략...)
강의 기준으로 자바 설정 파일을 만들었으니, 해당 설정 파일의 위치(contextConfigLocation)와 ApplicationContext의 타입(contextClass) 정보를 web.xml에 작성해준다.
<context-param>
  <param-name>contextClass</param-name>
  <param-value>org.springframework.web.context.support.AnnotationConfigWebApplicationContext</param-value>
</context-param>

<context-param>
  <param-name>contextConfigLocation</param-name>
  <param-value>com.example.AppConfig</param-value>
</context-param>
3. ApplicationContext 등록
지금까지의 과정은 ContextLoaderListener가 web.xml에 작성된 정보대로 설정 파일을 가져오고 AnnotationConfigWebApplicationContext 타입으로 ApplicationContext를 만들어 주는 과정이다.
- 그럼 리스너는 어떻게 ServletContext에 ApplicationContext를 등록할까?
ContextLoaderListener의 코드를 보면, ServletContext가 만들어지는 시점(contextInitialized())에 ApplicationContext를 만들어 등록(initWebApplicationContext())이 되는 것을 볼 수 있다.
public class ContextLoaderListener extends ContextLoader implements ServletContextListener {
    public ContextLoaderListener() {
    }

    public ContextLoaderListener(WebApplicationContext context) {
        super(context);
    }

    public void contextInitialized(ServletContextEvent event) {
        this.initWebApplicationContext(event.getServletContext());
    }

    public void contextDestroyed(ServletContextEvent event) {
        this.closeWebApplicationContext(event.getServletContext());
        ContextCleanupListener.cleanupAttributes(event.getServletContext());
    }
ApplicationContext를 만들어 등록되는 메서드를 더 따라가서 확인해보면 ROOT_WEB_APPLICATION_CONTEXT_ATTRIBUTE라는 이름으로 ServletContext에 등록이 되는 것을 확인할 수 있다.
public WebApplicationContext initWebApplicationContext(ServletContext servletContext) {

	// (생략...)
    servletContext.setAttribute(WebApplicationContext.ROOT_WEB_APPLICATION_CONTEXT_ATTRIBUTE, this.context);

	// (생략...)
4. ApplicationContext 빈 사용법
- 그럼 서블릿에서는 어떻게 ApplicationContext 통해서 빈을 가져올 수 있을까?
앞에서 ROOT_WEB_APPLICATION_CONTEXT_ATTRIBUTE라는 이름으로 ApplicationContext를 등록했으니, 이 이름으로 ApplicationContext를 가져와 사용할 수 있다.
public class HelloServlet extends HttpServlet
	@Override
    protected void doGet(HttpServletRequest req, HttpServletResponse res) {
    	// 서블릿에서 ROOT_WEB_APPLICATION_CONTEXT_ATTRIBUTE라는 이름의 ApplicationContext를 꺼내옴
    	ApplicationContext ctx = (ApplicationContext) getServletContext().getAttribute(WebApplicationContext.ROOT_WEB_APPLICATION_CONTEXT_ATTRIBUTE);

        HelloService helloService = ctx.getBean(HelloService.class);
        System.out.println(helloService.getName());
    }
}
DispatcherServlet
Front Controller 패턴
- 매번 각 URL당 서블릿을 만들고 web.xml에 등록해줘야하는 불편함과 공통적으로 처리하는 부분을 해결하기 위해서는 어떻게 해야할까?
공통적으로 처리하는 부분은 서블릿 필터로도 해결할 수 있다. 하지만 더 편리하게 Front Controller 패턴으로 해결할 수 있다. Front Controller는 하나의 Controller가 모든 요청을 처리하도록 구성된 패턴이다. 그리고 이 모든 요청을 처리할 Controller에서 각 요청을 처리할 Handler에게 분해를 하는데, 이를 Dispatch 라고 한다.
스프링에서는 이러한 Controller가 수행하는 서블릿을 이미 구현해놓았는데, 그것이 바로 스프링 MVC의 가장 핵심적인 클래스인 DispatcherServlet이다.
DispatcherServlet 특징
공식 문서에 따르면, 신기하게도 DispatcherServlet은 ServletContext에 등록되어있는 ApplicationContext를 상속받는 새로운 ApplicationContext를 하나 더 만들어준다.
ContextLoaderListener가 만들어주는 ApplicationContext는 ServletContext에 등록되어 다른 서블릿에서 공유하여 사용할 수 있는데, 이 때의 ApplicationContext는 RootWebApplicationContext를 의미한다. 그리고 DispatcherServlet에서 이를 상속받아 새로 생성한 ApplicationContext는 ServletWebApplicationContext를 의미한다.
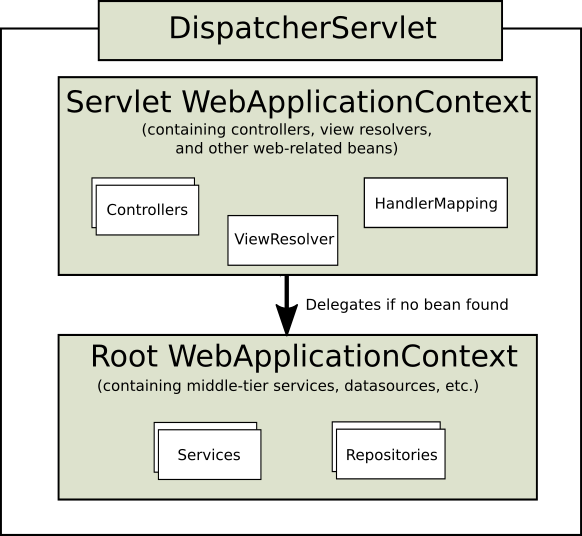
- RootWebApplicationContext와 ServletWebApplicationContext의 차이는 뭘까?
두 ApplicationContext의 차이는 Scope의 차이다. RootWebApplicationContext는 다른 DispatcherServlet에서 공용으로 사용이 가능하고 이미지에서 확인할 수 있듯이 Service와 Repository만 존재한다. 반대로 DispatcherServlet에서 새로 만들어준 ServletWebApplicationContext은 해당 DispatcherServlet 내부에서만 사용이 가능하다.
즉, RootWebApplicationContext는 서로 다른 DispatcherServlet이 공용으로 사용할 수 있다면, ServletWebApplicationContext는 각 DispatcherServlet에서만 사용이 가능하다는 것이다.
DispatcherServlet 설정
가장 먼저 위에서 살펴보았듯이, RootWebApplicationContext와 ServletWebApplicationContext가 각각 가져야하는 것들이 존재하는데, 이것을 분리해주도록 설정해줘야 한다.
먼저 하단의 코드처럼 컨트롤러 클래스를 만들어주고 각 ApplicationContext에 맞게 분리해보자.
@RestController
public class HelloController {
	@Autowired
    HelloService helloService;

    @GetMapping("/hello")
    public String hello() {
    	return helloService.getName();
    }
}
Controller는 DispatcherServlet이 만들어주는 ServletWebApplicationContext에 등록되어야하고, Service는 RootWebApplicationContext에 등록이 되어있어야한다. 하지만 리스너가 ApplicationContext를 만들어줄때, Controller와 Service를 같이 RootWebApplicationContext에 등록해주기 때문에 자바 설정 파일에서 Controller를 스캔 대상에서 제외시켜야 한다.
@Configuration
@ComponentScan(excludeFilters = @ComponentScan.Filter(Controller.class))
public class AppConfig {
}
그 다음으로는 ServletWebApplicationContext에 RootWebApplicationContext가 제외시킨 Controller를 등록시켜주도록 새로운 자바 설정 파일을 만들어준다.
@Configuration
@ComponentScan(useDefaultFilters = false, includeFilters = @ComponentScan.Filter(Controller.class))
public class WebConfig {
}
DispatcherServlet을 web.xml에 등록해주고, 파라미터로는 DispatcherServlet이 ServletWebApplicationContext를 만들어주도록 설정해준다. 그리고 모든 요청을 등록한DispatcherServlet으로 처리하도록 설정해준다.
<servlet>
  <servlet-name>app</servlet-name>
  <servlet-class>org.springframework.web.servlet.DispatcherServlet</servlet-class>
  <init-param>
    <param-name>contextClass</param-name>
    <param-value>org.springframework.web.context.support.AnnotationConfigWebApplicationContext</param-value>
  </init-param>
  <init-param>
    <param-name>contextConfigLocation</param-name>
    <param-value>com.example.WebConfig</param-value>
  </init-param>
</servlet>

<servlet-mapping>
  <servlet-name>app</servlet-name>
  <url-pattern>/app/*</url-pattern>
</servlet-mapping>- 굳이 RootWebApplicationContext와 ServletWebApplicationContext의 상속 구조처럼 나눌 필요가 있을까?
DispatcherServlet과 다른 서블릿이 정의되어있고, 그 다른 서블릿이 ApplicationContext를 써야한다면 상속 구조를 만드는 것이 맞지만, 반드시 분리해할 필요는 없다.
또한 DispatcherServlet 하나만 서블릿으로 등록해주고 ServletWebApplicationContext가 모든 Controller, Service, Repository 등을 가지도록 설정해도 상관없다. 단, 하나의 자바 설정 파일만이 사용되므로 해당 설정 파일이 모든 클래스에서 Component Scanning이 되도록 구성해야 한다.
@Configuration
@ComponentScan
public class WebConfig {
}
대부분의 경우에는 여러개의 서블릿을 사용하는것이 아닌, 하나의 DispatcherServlet에 DispatcherServlet이 만든 ApplicationContext에 모든 빈을 등록하여 사용한다고 하니, 크게 신경을 쓸 필요는 없을 것 같다.
DispatcherServlet 동작 과정
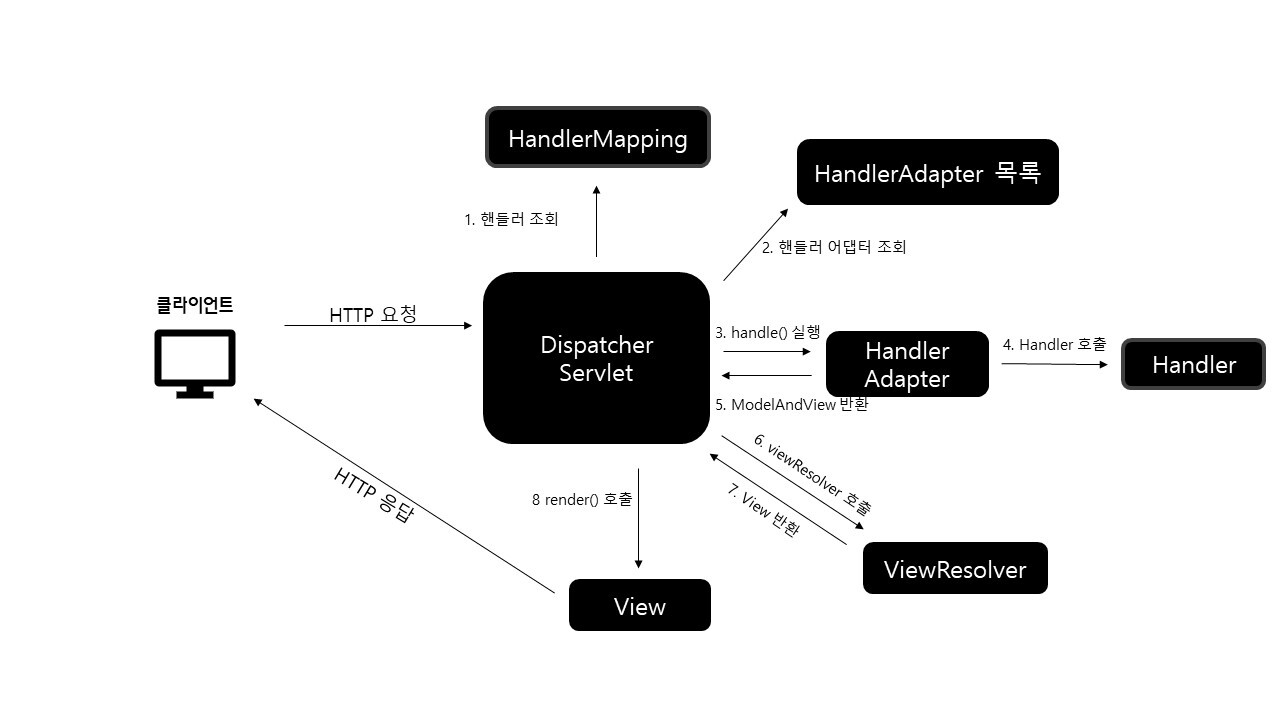
강의에서는 특정 URL로 접속했을 때의 동작 과정을 디버거를 통해 확인했다. 코드 중에서 DispatcherServlet의 코드만 확인해보자.
doService()에 요청이 들어옴doDispatch()로 요청을 처리getHandler()로 RequestMappingHandlerMapping를 찾아옴getHandlerAdapter()로 Handler를 실행할 RequestMappingHandlerAdapter를 찾아옴handle()로 요청을 처리
public class DispatcherServlet extends FrameworkServlet {

	// (생략...)

    protected void doService(HttpServletRequest request, HttpServletResponse response) throws Exception {
        this.logRequest(request);

		// (생략...)

        try {
            this.doDispatch(request, response);
			// (생략...)
	}

    protected void doDispatch(HttpServletRequest request, HttpServletResponse response) throws Exception {
        HttpServletRequest processedRequest = request;
        HandlerExecutionChain mappedHandler = null;
        boolean multipartRequestParsed = false;
        WebAsyncManager asyncManager = WebAsyncUtils.getAsyncManager(request);

        try {
            try {
                ModelAndView mv = null;
                Object dispatchException = null;

                try {
                	// 요청을 분석하여 Multipart, Locale 등의 정보를 확인
                    processedRequest = this.checkMultipart(request);
                    multipartRequestParsed = processedRequest != request;

                    // 요청을 처리할 수 있는 Handler를 찾아옴
                    mappedHandler = this.getHandler(processedRequest);
                    if (mappedHandler == null) {
                        this.noHandlerFound(processedRequest, response);
                        return;
                    }

                    // 위에서 찾은 Handler를 실행할 수 있는 HandlerAdapter를 찾아옴
					HandlerAdapter ha = this.getHandlerAdapter(mappedHandler.getHandler());
                    String method = request.getMethod();
                    boolean isGet = HttpMethod.GET.matches(method);
                    if (isGet || HttpMethod.HEAD.matches(method)) {
                        long lastModified = ha.getLastModified(request, mappedHandler.getHandler());
                        if ((new ServletWebRequest(request, response)).checkNotModified(lastModified) && isGet) {
                            return;
                        }
                    }

                    if (!mappedHandler.applyPreHandle(processedRequest, response)) {
                        return;
                    }

					// HandlerAdapter로 요청을 처리
                    mv = ha.handle(processedRequest, response, mappedHandler.getHandler());
                    if (asyncManager.isConcurrentHandlingStarted()) {
                        return;
                    }

                    this.applyDefaultViewName(processedRequest, mv);
                    mappedHandler.applyPostHandle(processedRequest, response, mv);
                } catch (Exception var20) {
                    dispatchException = var20;
                } catch (Throwable var21) {
                    dispatchException = new NestedServletException("Handler dispatch failed", var21);
                }

                this.processDispatchResult(processedRequest, response, mappedHandler, mv, (Exception)dispatchException);
            } catch (Exception var22) {
                this.triggerAfterCompletion(processedRequest, response, mappedHandler, var22);
            } catch (Throwable var23) {
                this.triggerAfterCompletion(processedRequest, response, mappedHandler, new NestedServletException("Handler processing failed", var23));
            }

        } finally {
            if (asyncManager.isConcurrentHandlingStarted()) {
                if (mappedHandler != null) {
                    mappedHandler.applyAfterConcurrentHandlingStarted(processedRequest, response);
                }
            } else if (multipartRequestParsed) {
                this.cleanupMultipart(processedRequest);
            }

        }
    }
	}

    @Nullable
    protected HandlerExecutionChain getHandler(HttpServletRequest request) throws Exception {
    	// DispatcherServlet에서 제공하는 HandlerMapping
        // - BeanNameUrlHandlerMapping
        // - RequestMappingHandlerMapping : @GetMapping, @PostMapping 등을 찾아주는 핸들러 매핑
        if (this.handlerMappings != null) {
            Iterator var2 = this.handlerMappings.iterator();

            // 두 개의 HandlerMapping 중, 요청을 처리할 수 있는 HandlerMapping을 찾고 반환
			// 강의 기준으로는 @GetMapping, @PostMapping을 처리할 수 있는 RequestMappingHandlerMapping을 찾음
            while(var2.hasNext()) {
                HandlerMapping mapping = (HandlerMapping)var2.next();
                HandlerExecutionChain handler = mapping.getHandler(request);
                if (handler != null) {
                    return handler;
                }
            }
        }

	protected HandlerAdapter getHandlerAdapter(Object handler) throws ServletException {
		// DispatcherServlet에서 제공하는 HandlerAdapter
        // - HttpRequestHandlerAdapter
        // - SimpleControllerHandlerAdapter
        // - RequestMappingHandlerAdapter
        if (this.handlerAdapters != null) {
            Iterator var2 = this.handlerAdapters.iterator();

            while(var2.hasNext()) {
                HandlerAdapter adapter = (HandlerAdapter)var2.next();
                if (adapter.supports(handler)) {
                    return adapter;
                }
            }
        }

        throw new ServletException("No adapter for handler [" + handler + "]: The DispatcherServlet configuration needs to include a HandlerAdapter that supports this handler");
    }

    // (생략...)
}
DispatcherServlet 커스텀화
위에서 사용한 Handler, Adapter들은 직접 설정하지 않으면 기본 전략을 사용한다. 만약에 커스텀화한다면 직접 빈을 등록해주면 된다.
@Configuration
@ComponentScan
public class WebConfig {
	@Bean
	public InternalResourceViewResolver viewResolver() {
		InternalResourceViewResolver viewResolver = new InternalResourceViewResolver();
        viewResolver.setPrefix("/WEB-INF/");
        viewResolver.setSuffix(".jsp");
		return viewResolver;
    }
}- 등록한 빈은 어떻게 사용될까?
빈으로 등록한 설정은 DispatcherServlet의 전략을 초기화하는 과정에서 등록된 빈을 적용한다. 하단의 DispatcherServlet 코드를 살펴보자.
public class DispatcherServlet extends FrameworkServlet {

    // (생략...)

	protected void initStrategies(ApplicationContext context) {
        this.initMultipartResolver(context);
        this.initLocaleResolver(context);
        this.initThemeResolver(context);
        this.initHandlerMappings(context);
        this.initHandlerAdapters(context);
        this.initHandlerExceptionResolvers(context);
        this.initRequestToViewNameTranslator(context);
        this.initViewResolvers(context); // ViewResolver
        this.initFlashMapManager(context);
    }

    // (생략...)

    private void initViewResolvers(ApplicationContext context) {
        this.viewResolvers = null;
        if (this.detectAllViewResolvers) {
            Map<String, ViewResolver> matchingBeans = BeanFactoryUtils.beansOfTypeIncludingAncestors(context, ViewResolver.class, true, false);
            if (!matchingBeans.isEmpty()) {
                this.viewResolvers = new ArrayList(matchingBeans.values());
                AnnotationAwareOrderComparator.sort(this.viewResolvers);
            }
        } else {
            try {
                ViewResolver vr = (ViewResolver)context.getBean("viewResolver", ViewResolver.class);
                this.viewResolvers = Collections.singletonList(vr);
            } catch (NoSuchBeanDefinitionException var3) {
            }
        }

		// 등록된 ViewResolvoer가 없을 경우 기본 ViewResolver를 사용
        if (this.viewResolvers == null) {
            this.viewResolvers = this.getDefaultStrategies(context, ViewResolver.class);
            if (this.logger.isTraceEnabled()) {
                this.logger.trace("No ViewResolvers declared for servlet '" + this.getServletName() + "': using default strategies from DispatcherServlet.properties");
            }
        }

    }

    // (생략...)

}
DispatcherServlet 설정 파일
DispatcherServlet에서 기본적으로 사용하는 인터페이스들에 대한 정보는 DispatcherServlet.properties 파일에 작성되어있다.
# Default implementation classes for DispatcherServlet's strategy interfaces.
# Used as fallback when no matching beans are found in the DispatcherServlet context.
# Not meant to be customized by application developers.

org.springframework.web.servlet.LocaleResolver=org.springframework.web.servlet.i18n.AcceptHeaderLocaleResolver

org.springframework.web.servlet.ThemeResolver=org.springframework.web.servlet.theme.FixedThemeResolver

org.springframework.web.servlet.HandlerMapping=org.springframework.web.servlet.handler.BeanNameUrlHandlerMapping,\
	org.springframework.web.servlet.mvc.method.annotation.RequestMappingHandlerMapping,\
	org.springframework.web.servlet.function.support.RouterFunctionMapping

org.springframework.web.servlet.HandlerAdapter=org.springframework.web.servlet.mvc.HttpRequestHandlerAdapter,\
	org.springframework.web.servlet.mvc.SimpleControllerHandlerAdapter,\
	org.springframework.web.servlet.mvc.method.annotation.RequestMappingHandlerAdapter,\
	org.springframework.web.servlet.function.support.HandlerFunctionAdapter


org.springframework.web.servlet.HandlerExceptionResolver=org.springframework.web.servlet.mvc.method.annotation.ExceptionHandlerExceptionResolver,\
	org.springframework.web.servlet.mvc.annotation.ResponseStatusExceptionResolver,\
	org.springframework.web.servlet.mvc.support.DefaultHandlerExceptionResolver

org.springframework.web.servlet.RequestToViewNameTranslator=org.springframework.web.servlet.view.DefaultRequestToViewNameTranslator

org.springframework.web.servlet.ViewResolver=org.springframework.web.servlet.view.InternalResourceViewResolver

org.springframework.web.servlet.FlashMapManager=org.springframework.web.servlet.support.SessionFlashMapManager
참고로 Spring Boot에서는 더 많은 내용이 기본적으로 등록이 되어있다. WebMvcAutoConfiguration 클래스를 보면 위에서 DispatcherServlet이 기본적으로 제공하는 것들 외에도 많은 것들을 제공해주고 있는 것을 확인할 수 있다.
이 글의 레퍼런스
- 백기선님의 스프링 웹 MVC
- https://yejun-the-developer.tistory.com/m/4

여기서 servletcontext가 서블릿 컨테이너 인가용?