1. 사전 지식
Activity와 Fragment에 대한 이해를 바탕으로 BottomNavigationView를 사용한다.
2. BottomNavigationView 사용
2-0. Workflow
BottomNavigationView를 사용하기 위해 아래의 과정을 거쳐야 한다.
1. Fragment 생성
2. BottomNavigationView 구성
3. MainActivity xml 구성
4. BottomNavigationView Click 기능 구현
2-1. Fragment 생성
Fragment를 생성하기 위해선, 새로운 Java Class를 만들어야 한다. 필자의 경우 Fragment1, Fragment2, Fragment3 3개를 생성했다. Fragment Java 파일을 만들면서, 동시에 Fragment에 띄울 xml도 구성해줘야 한다.
각 Fragment 파일은 비어있는 Fragment 객체 하나와 onCreateView() 함수로 구성되어야 한다. 구체적인 코드는 아래와 같다.
- Fragment1.java
public class Fragment1 extends Fragment {
    public Fragment1() { }

    @Override
    public View onCreateView(LayoutInflater inflater, ViewGroup container, Bundle savedInstanceState) {
        return inflater.inflate(R.layout.fragment1, container, false);
    }
}
각 Fragment에서 띄울 화면은 아래와 같이 구성하였다.
- fragment1.xml
<?xml version="1.0" encoding="utf-8"?>
<androidx.constraintlayout.widget.ConstraintLayout xmlns:android="http://schemas.android.com/apk/res/android"
    xmlns:app="http://schemas.android.com/apk/res-auto"
    xmlns:tools="http://schemas.android.com/tools"
    android:layout_width="match_parent"
    android:layout_height="match_parent"
    android:background="#CDDC39">

    <TextView
        android:id="@+id/textView"
        android:layout_width="wrap_content"
        android:layout_height="wrap_content"
        android:text="첫번째"
        android:textSize="30sp"
        app:layout_constraintBottom_toBottomOf="parent"
        app:layout_constraintEnd_toEndOf="parent"
        app:layout_constraintStart_toStartOf="parent"
        app:layout_constraintTop_toTopOf="parent" />

</androidx.constraintlayout.widget.ConstraintLayout>
2-2. BottomNavigationView 구성
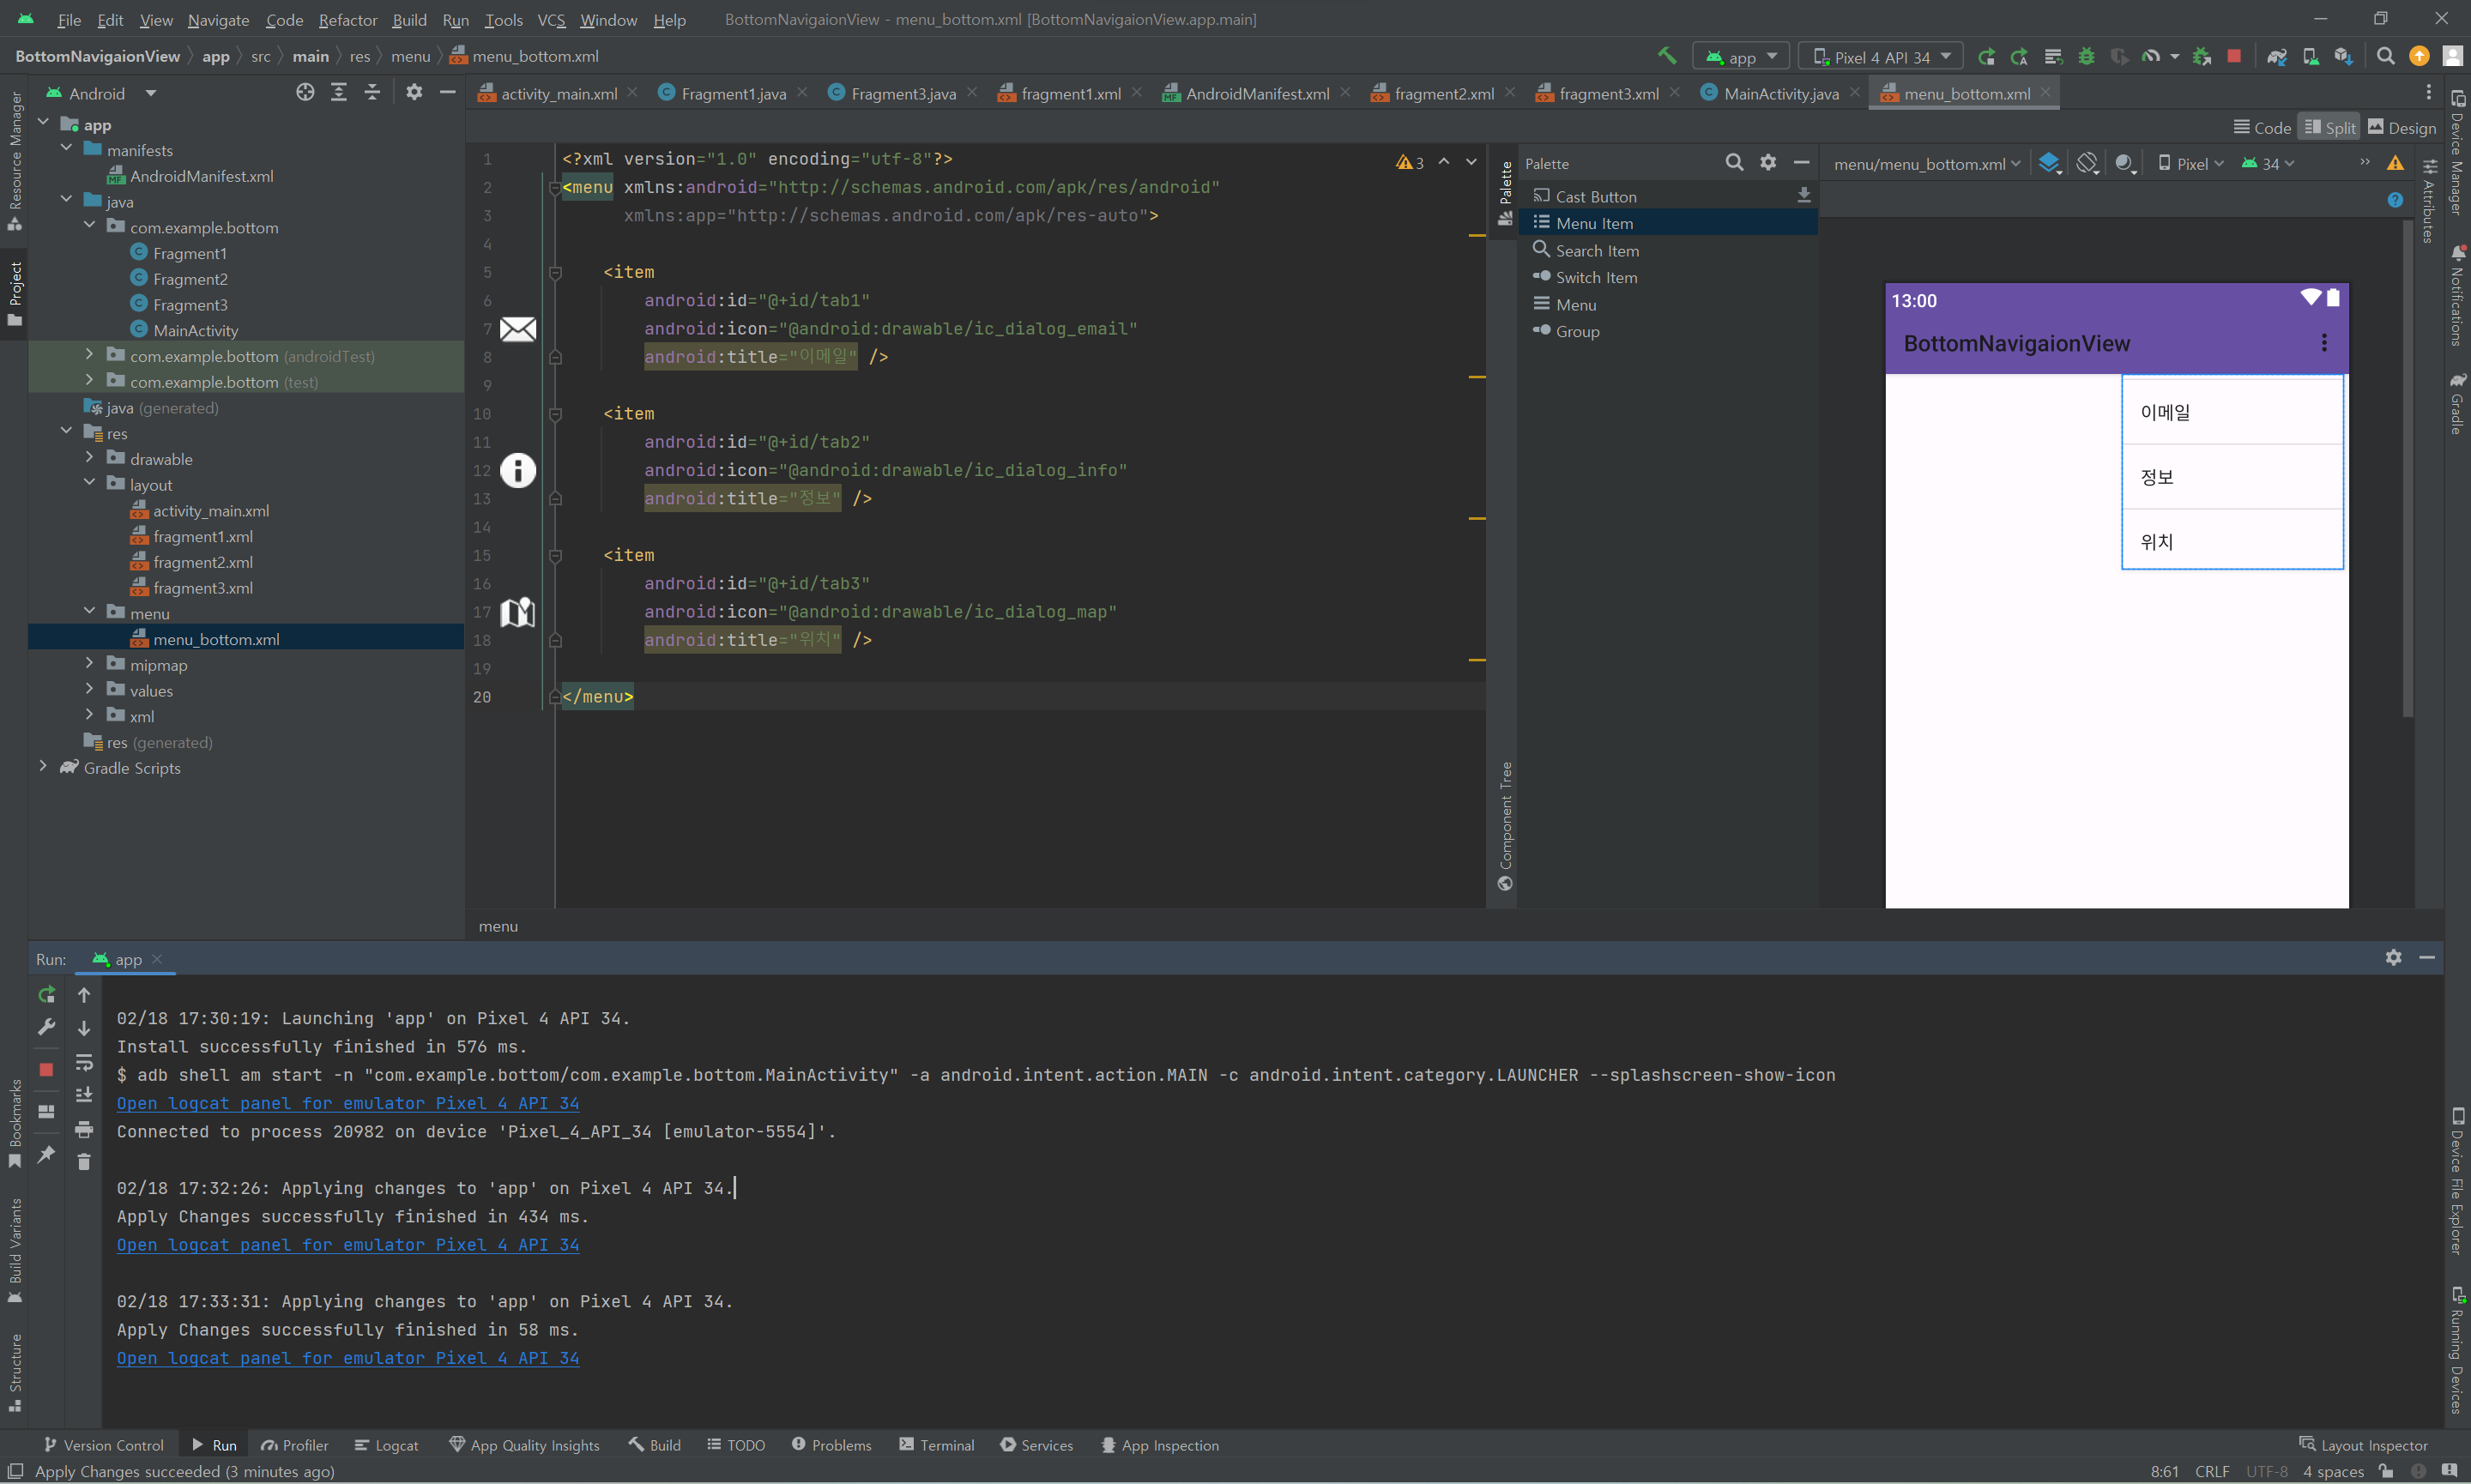
BottomNavigationView를 띄우기 위해서 먼저 어떤 항목을 포함할지 정해야 한다. 그러기 위해, res 폴더에 menu 폴더를 새로 만들고, menu 폴더 안에 menu_bottom.xml 파일을 만든다.
menu_bottom.xml 파일의 큰 틀은 아래와 같다.
<menu xmlns:android="http://schemas.android.com/apk/res/android"
      xmlns:app="http://schemas.android.com/apk/res-auto">

</menu>
이제 필요한 만큼 Item을 추가해주면 되는데, Palette > Menu Item을 드래그 앤 드롭하면 된다. 모든 Item을 드래그 앤 드롭하면 각 Item의 id, icon, title을 설정해줘야 한다.
- id : BottomNavigationView의 Item 클릭을 구분하기 위해 필요
- icon : Item에 띄울 아이콘 설정
- title : Item 아이콘 밑에 설명을 띄울 때 필요
필자의 경우 아래와 같이 3개의 Item을 설정했다.
- menu_bottom.xml
<?xml version="1.0" encoding="utf-8"?>
<menu xmlns:android="http://schemas.android.com/apk/res/android"
      xmlns:app="http://schemas.android.com/apk/res-auto">

    <item
        android:id="@+id/tab1"
        android:icon="@android:drawable/ic_dialog_email"
        android:title="이메일" />

    <item
        android:id="@+id/tab2"
        android:icon="@android:drawable/ic_dialog_info"
        android:title="정보" />

    <item
        android:id="@+id/tab3"
        android:icon="@android:drawable/ic_dialog_map"
        android:title="위치" />

</menu>
xml preview 화면을 보면 아래와 같다. 여기서 설정한 icon이 뜨지 않더라도 문제가 되지 않는다.
2-3. MainActivity xml 구성
하단바를 사용하기 위해선, BottomNavigationView를 하단바를 띄울 xml에 추가해야 한다. Palette > Containers > BottomNavigationView를 찾아 드래그 앤 드롭한다. 이 때 BottomNavigationView는 너비는 match parent로, 높이는 wrap content로 설정한다. 다음으로 BottomNavigationView 속성에 app:menu="@menu/menu_bottom"를 추가해주어야 한다. 해당 속성은 우리가 앞서 만들었던 menu_bottom.xml과 BottomNavigationView를 연동시키는 역할을 한다.
추가적으로, 하단바의 item들의 라벨을 모두 보이게 하고 싶으면 app:labelVisibilityMode="labeled" 속성을 추가하면 된다.
이어서, 하단바 위의 부분을 Fragment로 구성해야 하므로, Palette > Layouts > FrameLayout을 찾아 드래그 앤 드롭한다. 이 때 FrameLayout은 너비와 높이 모두 match parent로 설정한다. 위의 과정을 모두 진행하면 xml 파일은 아래와 같이 구성된다.
약간의 팁이 있는데, FrameLayout이 전체 화면에 해당하므로, Fragment 화면의 아래 부분은 하단바에 의해 가려지게 된다. 따라서 앱의 디자인을 편하게 하기 위해서, 하단바를 띄울 Fragment의 xml에 전부 하단바를 추가하는게 좋다.
- activity_main.xml
<?xml version="1.0" encoding="utf-8"?>
<androidx.constraintlayout.widget.ConstraintLayout xmlns:android="http://schemas.android.com/apk/res/android"
    xmlns:app="http://schemas.android.com/apk/res-auto"
    xmlns:tools="http://schemas.android.com/tools"
    android:layout_width="match_parent"
    android:layout_height="match_parent">


    <FrameLayout
        android:id="@+id/container"
        android:layout_width="match_parent"
        android:layout_height="match_parent"
        app:layout_behavior="@string/appbar_scrolling_view_behavior" >

    </FrameLayout>

    <com.google.android.material.bottomnavigation.BottomNavigationView
        android:id="@+id/bottom_navigation"
        android:layout_width="match_parent"
        android:layout_height="wrap_content"
        android:layout_marginEnd="0dp"
        android:layout_marginStart="0dp"
        app:labelVisibilityMode="labeled"
        app:layout_constraintBottom_toBottomOf="parent"
        app:layout_constraintLeft_toLeftOf="parent"
        app:layout_constraintRight_toRightOf="parent"
        app:itemBackground="?colorPrimary"
        app:itemIconTint="#45366E"
        app:itemTextColor="#45366E"
        app:menu="@menu/menu_bottom"/>

</androidx.constraintlayout.widget.ConstraintLayout>
2-4. BottomNavigationView Click 기능 구현
이제 MainActivity.java 파일에서 BottomNavigationView의 item을 클릭했을 때 어떤 동작을 할지 코딩해주면 된다. 기본적인 버튼 연결과 유사하게 진행되지만, BottomNavigationView의 클릭된 item에 따라 다른 동작을 수행하도록 해야한다.
클릭된 item을 앞서 설정했던 id를 바탕으로 구분지어 id에 따라 다른 Fragment 화면을 띄워주면 된다. 예시 코드는 아래와 같다. tab1 버튼을 클릭하면 FrameLayout을 Fragment1 화면으로 바꾸는 코드이다.
@NonNull부분에서 import가 되지 않아 에러가 발생할 수 있다.
import androidx.annotation.NonNull;를 MainActivity Class 윗줄에 추가하면 된다.
Fragment1 fragment1;

protected void onCreate(Bundle savedInstanceState) {
    fragment1 = new Fragment1();
    getSupportFragmentManager().beginTransaction().replace(R.id.container, fragment1).commit();

    BottomNavigationView bottomNavigation = findViewById(R.id.bottom_navigation);
    bottomNavigation.setOnNavigationItemSelectedListener(
            new BottomNavigationView.OnNavigationItemSelectedListener() {
                @Override
                public boolean onNavigationItemSelected(@NonNull MenuItem item) {
                    int itemId = item.getItemId();
                    if (itemId == R.id.tab1) {
                        getSupportFragmentManager().beginTransaction().replace(R.id.container, fragment1).commit();

                        return true;
                    }

                    return false;
                }
            }
    );
}
이제 나머지 Fragment에 대해서도 모두 연결해주면 된다. 전체 코드는 아래와 같다.
- MainActivity.java
public class MainActivity extends AppCompatActivity {
Fragment1 fragment1;
Fragment2 fragment2;
Fragment3 fragment3;
@Override
protected void onCreate(Bundle savedInstanceState) {
super.onCreate(savedInstanceState);
setContentView(R.layout.activity_main);
fragment1 = new Fragment1();
fragment2 = new Fragment2();
fragment3 = new Fragment3();
getSupportFragmentManager().beginTransaction().replace(R.id.container, fragment1).commit();
BottomNavigationView bottomNavigation = findViewById(R.id.bottom_navigation);
bottomNavigation.setOnNavigationItemSelectedListener(
new BottomNavigationView.OnNavigationItemSelectedListener() {
@Override
public boolean onNavigationItemSelected(@NonNull MenuItem item) {
int itemId = item.getItemId();
if (itemId == R.id.tab1) {
getSupportFragmentManager().beginTransaction().replace(R.id.container, fragment1).commit();
return true;
}
else if (itemId == R.id.tab2) {
getSupportFragmentManager().beginTransaction().replace(R.id.container, fragment2).commit();
return true;
}
else if (itemId == R.id.tab3) {
getSupportFragmentManager().beginTransaction().replace(R.id.container, fragment3).commit();
return true;
}
return false;
}
}
);
}
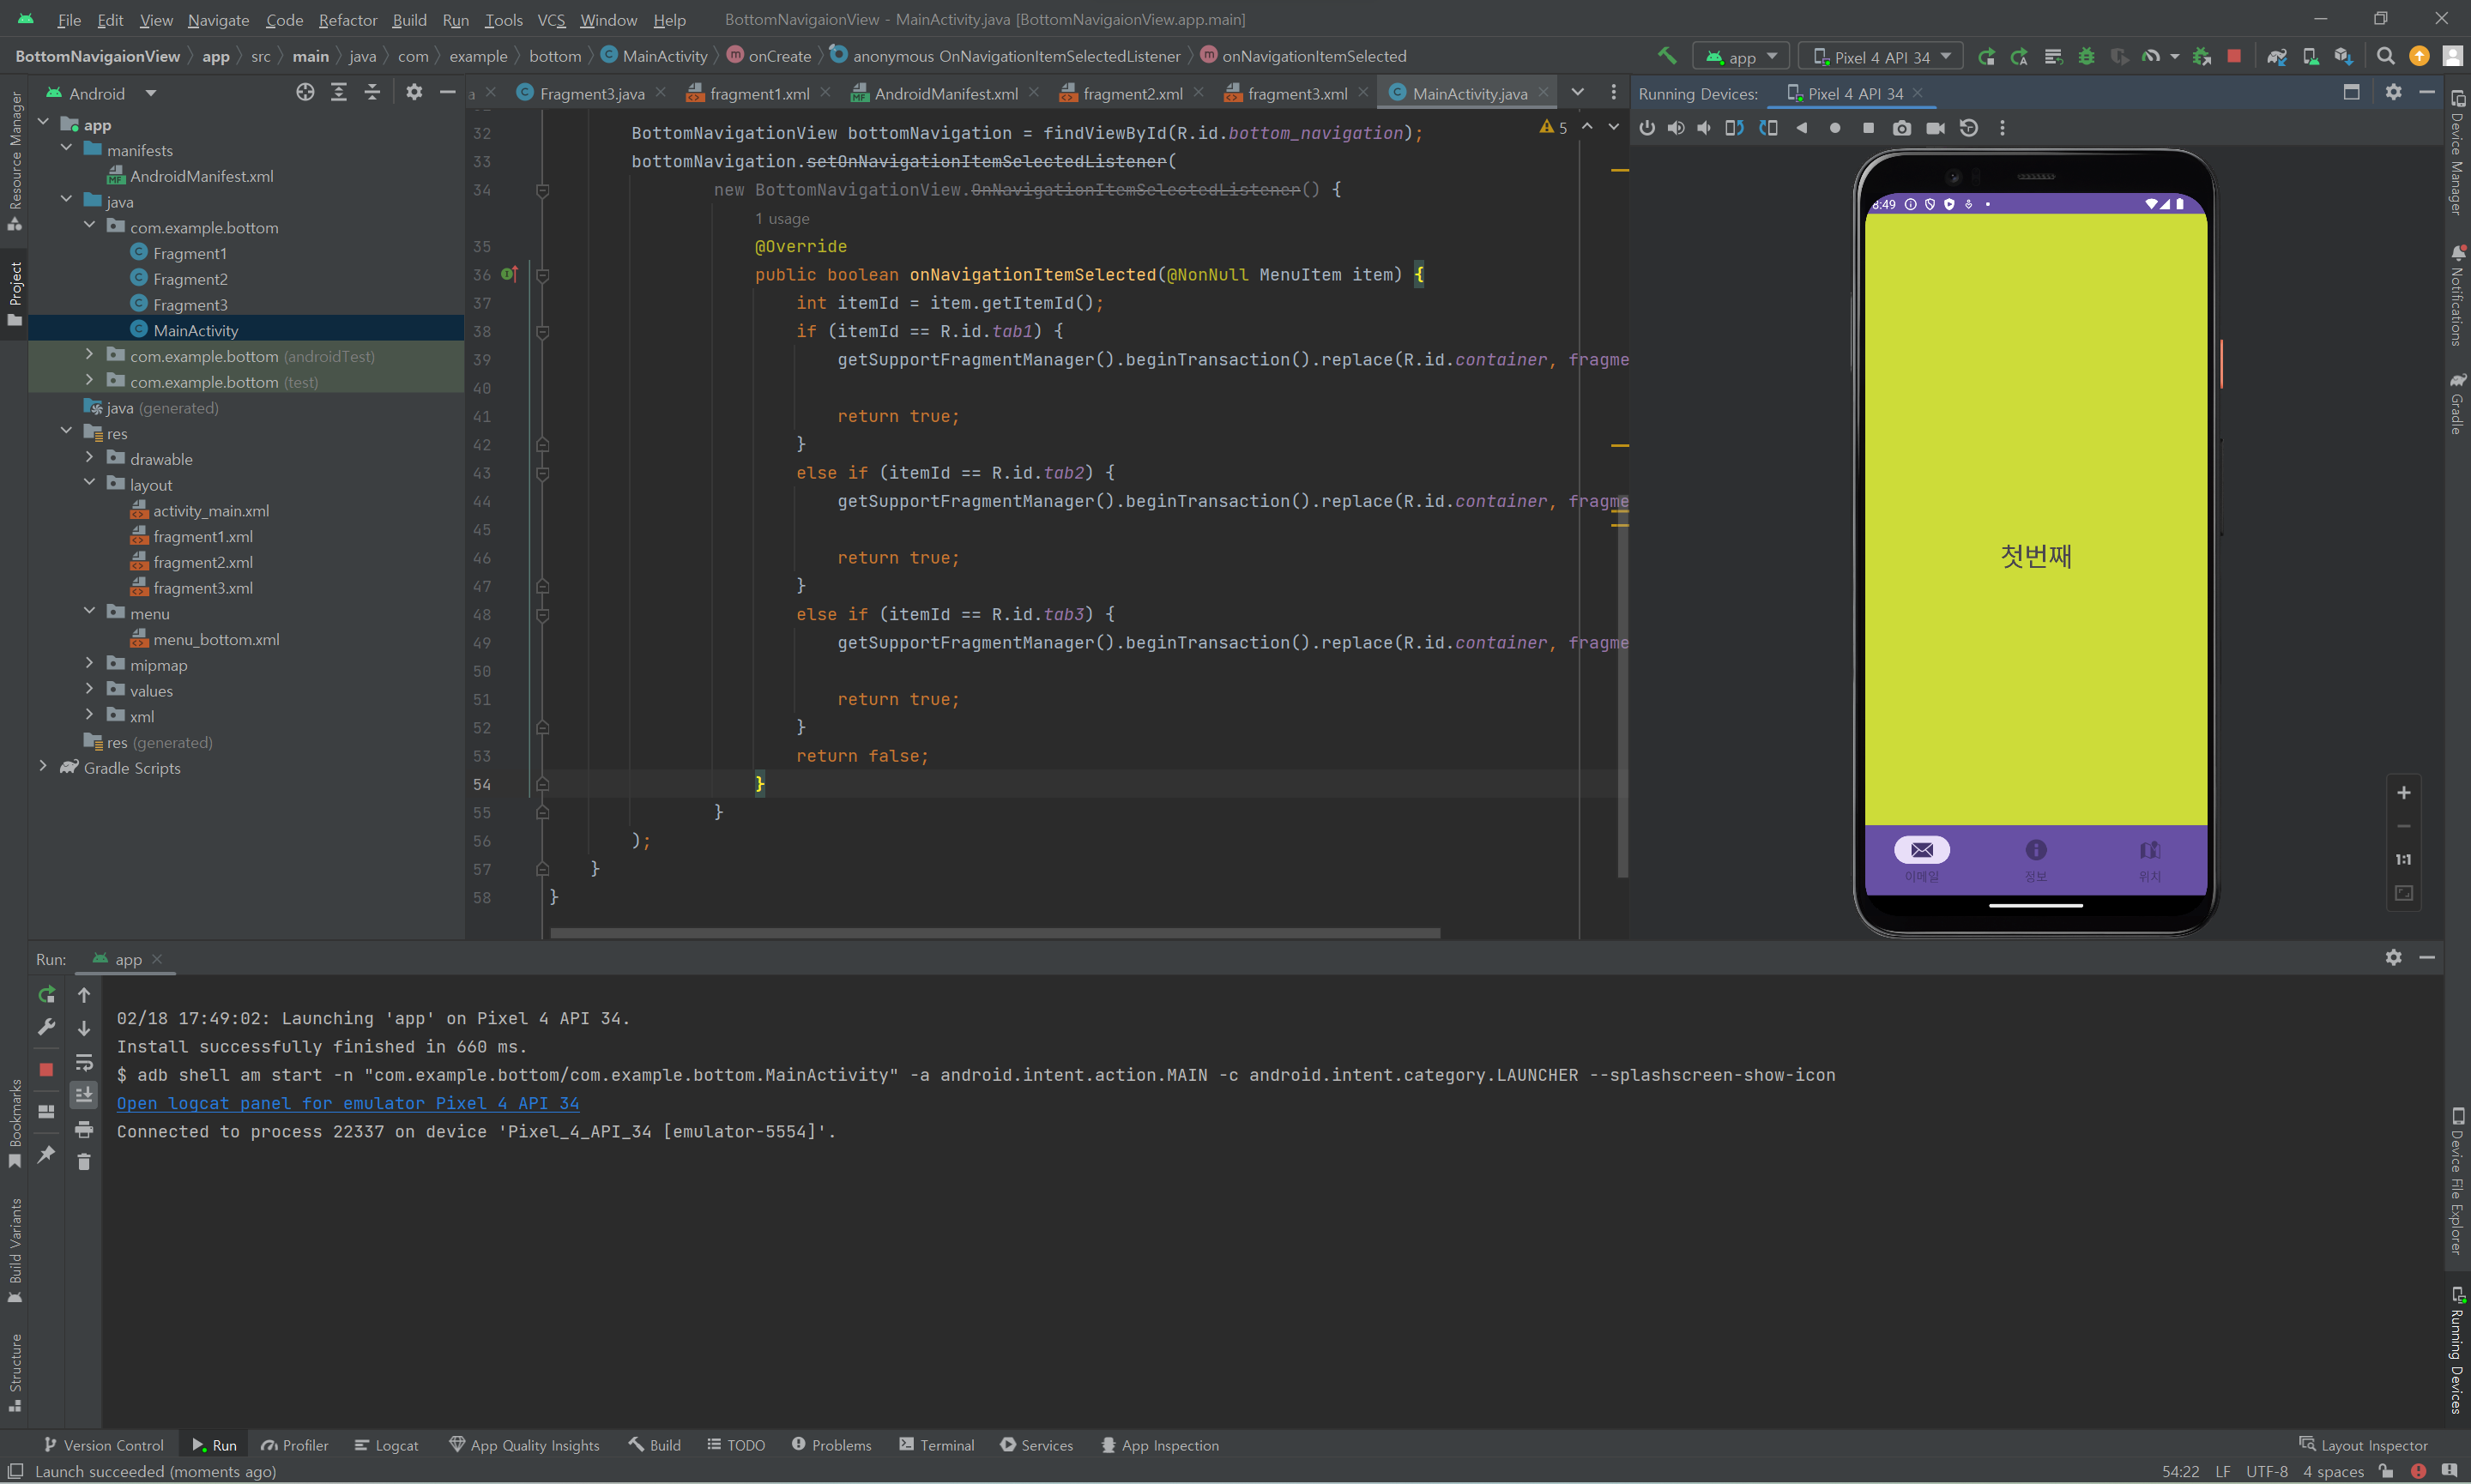
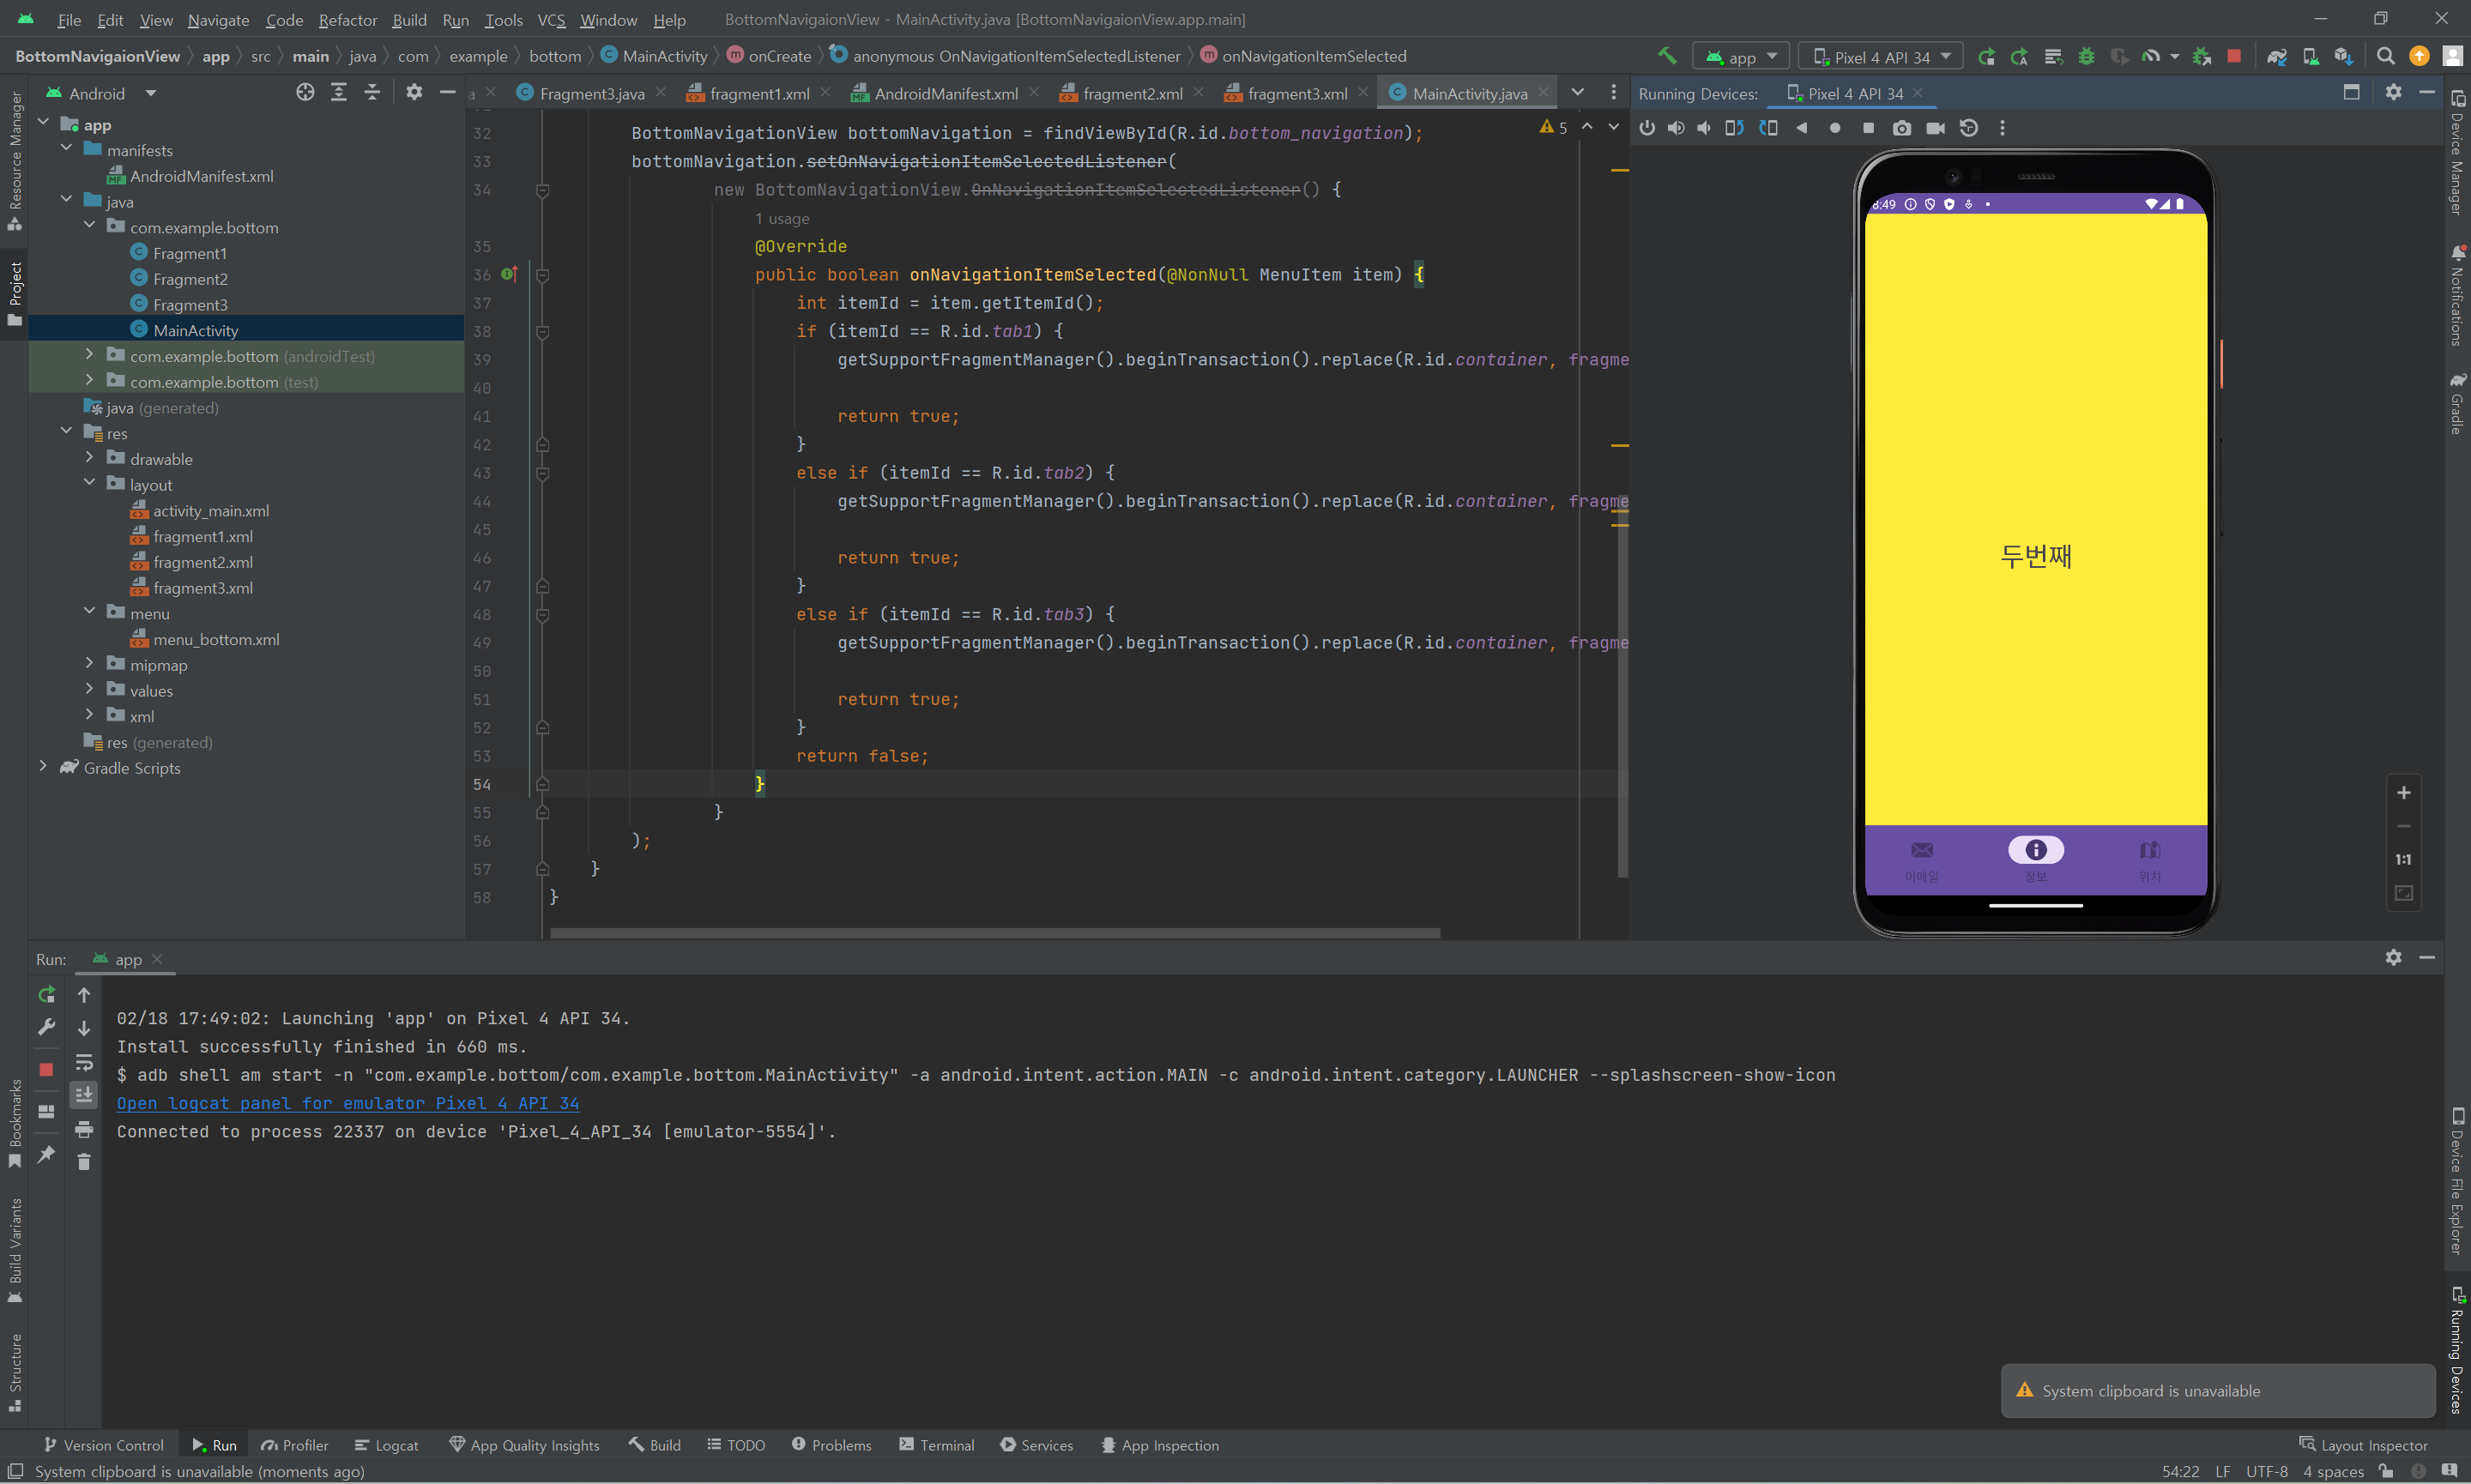
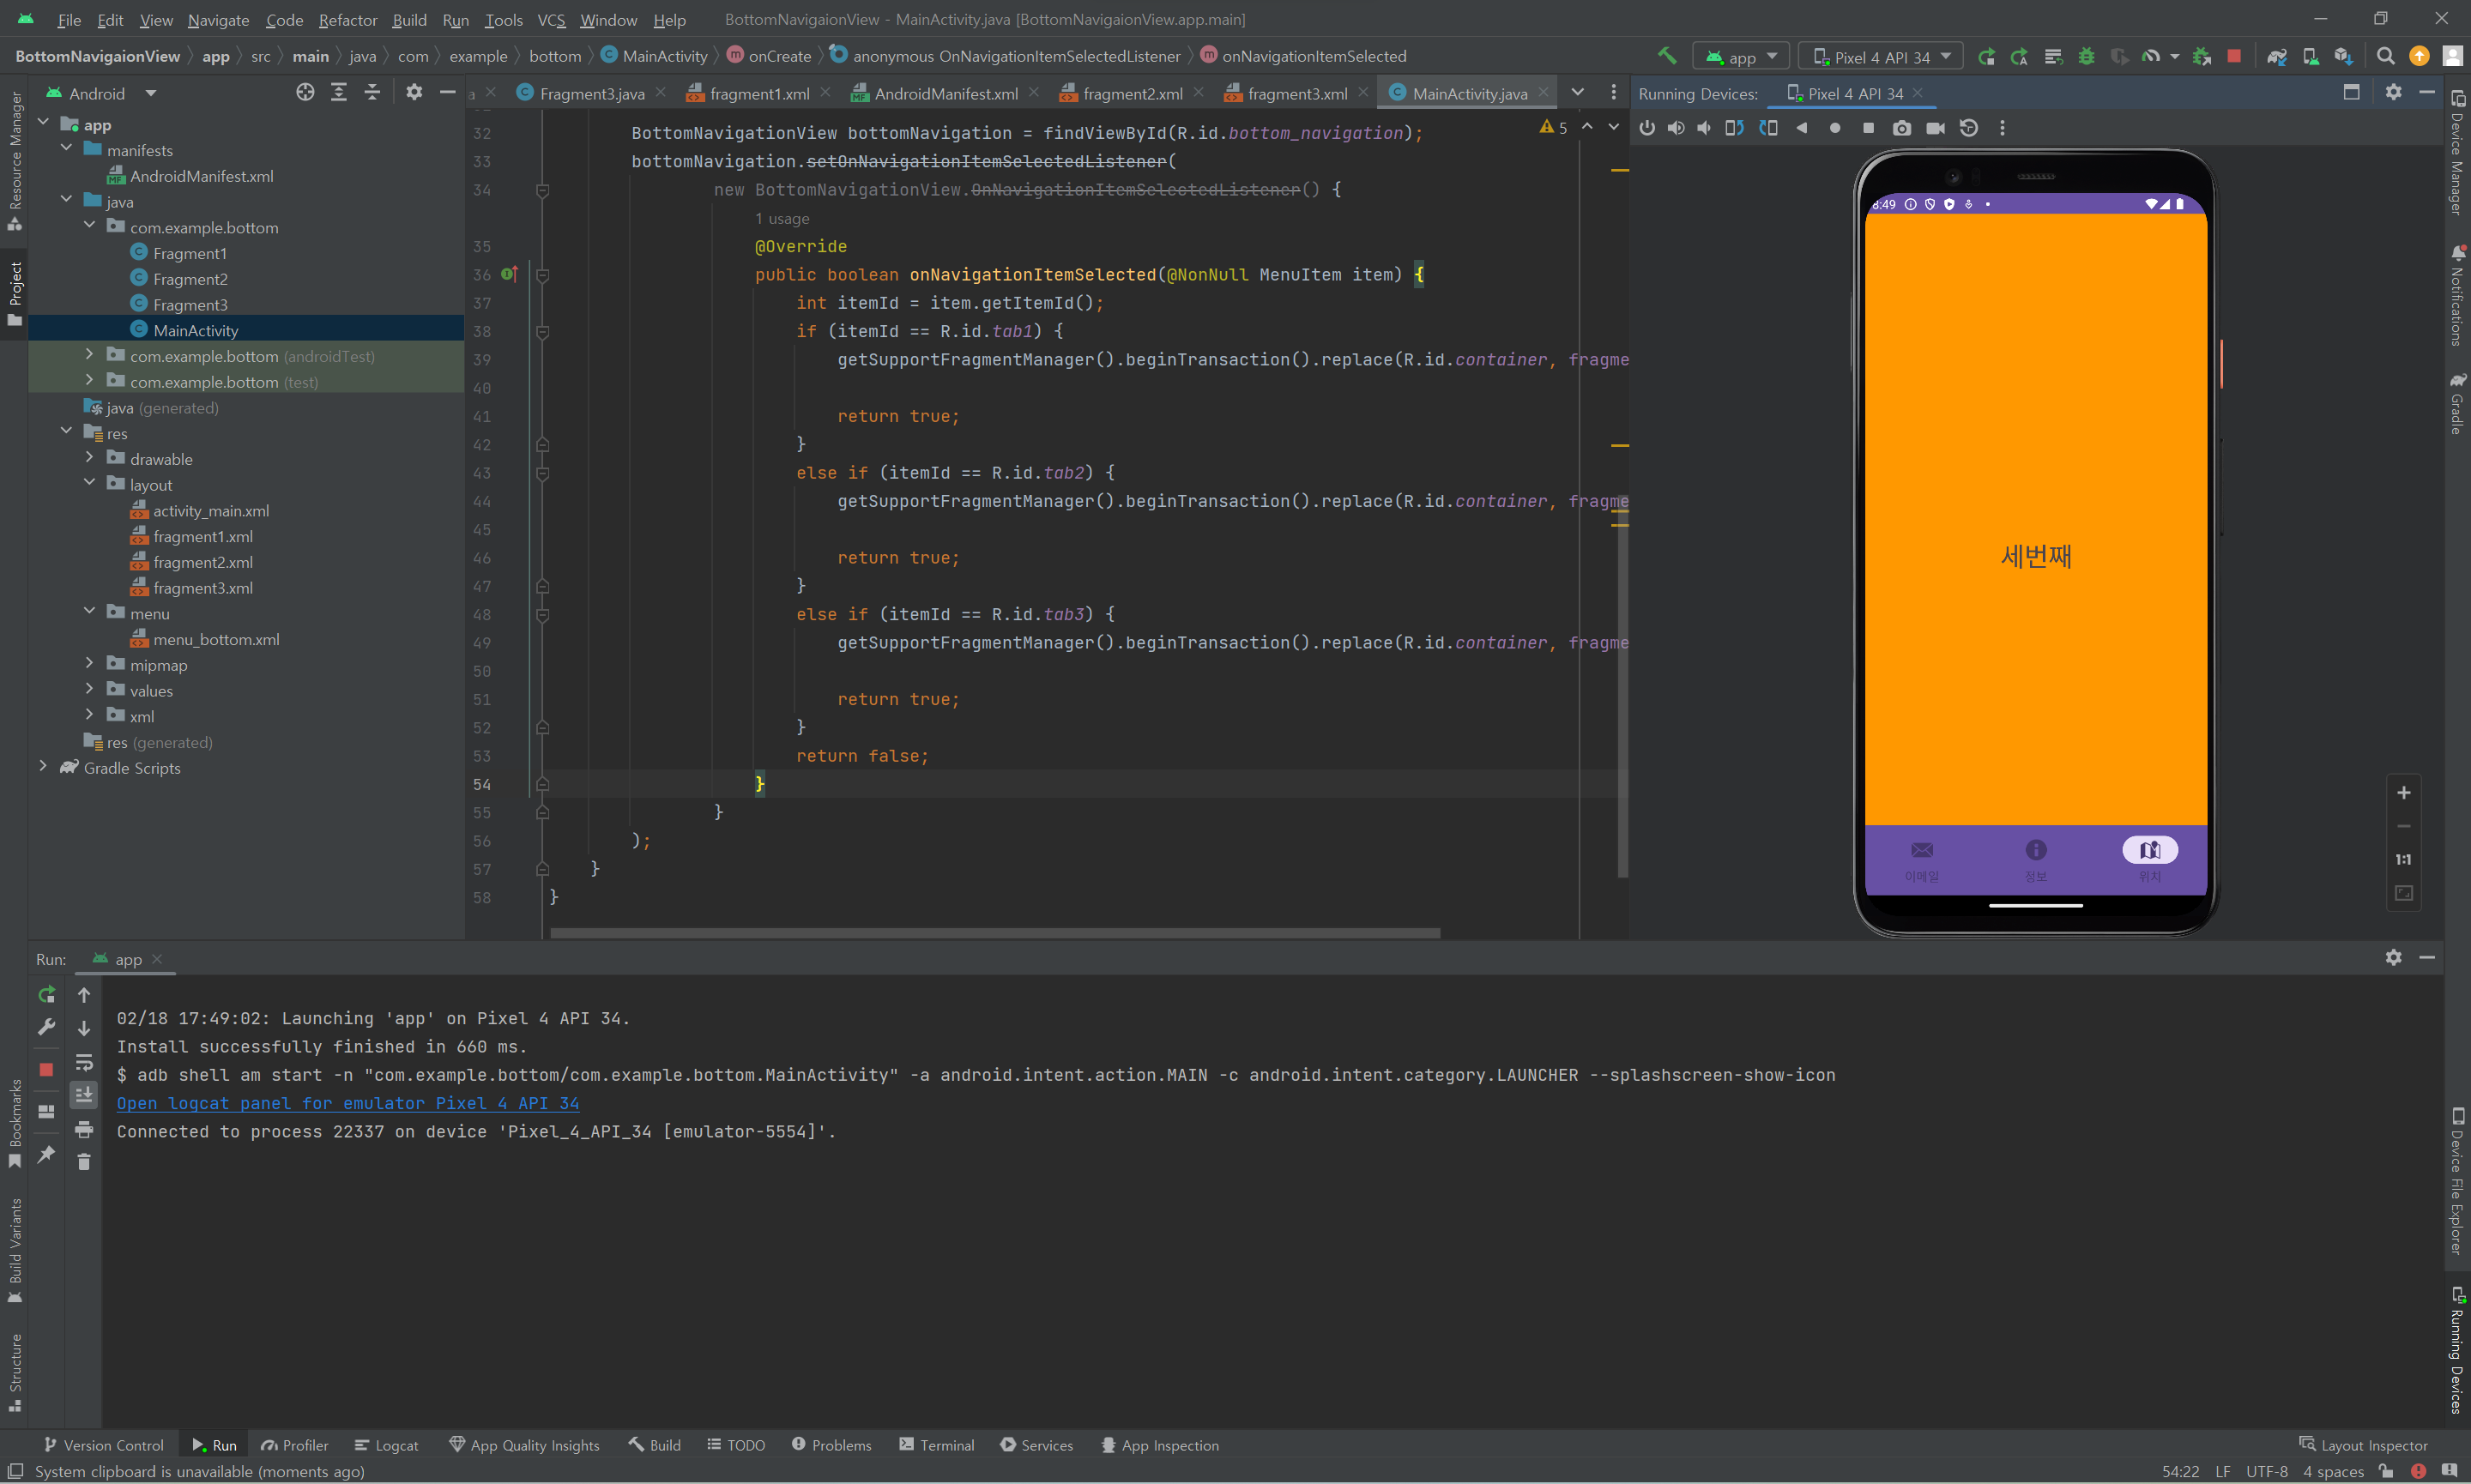
}3. 결과
위의 코드들을 모두 작성하면 하단바가 잘 동작한다는 것을 알 수 있다.