0. workflow
필자는 AudioRecord & MediaPlayer에서 저장한 양식을 바탕으로 Firebase 서버에 mp3 파일을 저장하고자 한다.

0-1. 사전 작업
0-2. 외부 모듈 implementation
0-3. 파일 Upload
1. 사전 작업
데이터들을 사용자별로 구분지어 저정해야 하기 때문에, 로그인 기능을 구현해야 한다. 따라서 Firebase Login & Register의 작업을 먼저 진행한 후 데이터베이스 작업을 진행해야 한다.
Storage를 사용하기 위해선 데이터베이스를 만들어야 한다. Firebase 콘솔 창에서 Storage를 찾아 시작하기 버튼을 클릭한다.
보안 규칙은 테스트 모드로 설정한 후, 위치는 asia-northeast3(firebase에서 이전에 설정했다면 따로 설정할 필요 X)로 설정한다.
또한, AudioRecord & MediaPlayer에서 저장한 양식을 바탕으로 진행하기에, 위 작업도 먼저 진행되어야 한다.
2. 외부 모듈 implementation
Storage 공식 문서를 살펴보면, Storage 사용에 대한 설명이 나와있다. Android Studio에서 사용하기 위해선, 앱 수준의 build.gradle 파일의 아래의 코드를 추가해야 한다.
firebase-auth의 경우, 사용자별로 업로드할 파일을 관리하기 위해서 implementation이 필요하다.
dependencies {
	...

    implementation platform('com.google.firebase:firebase-bom:32.7.3')
    implementation 'com.google.firebase:firebase-analytics'
    implementation 'com.google.firebase:firebase-auth'
    implementation 'com.google.firebase:firebase-storage'
}
3. 파일 Upload
저장된 파일을 RecyclerView로 띄우며, upload 버튼을 눌렀을 때 서버로 업로드하기 위해서 화면을 구성한다. 이때 얼마나 업로드되었는지 확인할 수 있도록 TextView와 ProgressBar를 추가해주었다.
- activity_upload.xml
<?xml version="1.0" encoding="utf-8"?>
<androidx.constraintlayout.widget.ConstraintLayout xmlns:android="http://schemas.android.com/apk/res/android"
    xmlns:app="http://schemas.android.com/apk/res-auto"
    xmlns:tools="http://schemas.android.com/tools"
    android:id="@+id/main"
    android:layout_width="match_parent"
    android:layout_height="match_parent"
    tools:context=".UploadActivity">

    <androidx.recyclerview.widget.RecyclerView
        android:id="@+id/recyclerView"
        android:layout_width="match_parent"
        android:layout_height="600dp"
        app:layout_constraintBottom_toBottomOf="parent"
        tools:layout_editor_absoluteX="1dp" />

    <Button
        android:id="@+id/uploadbtn"
        android:layout_width="wrap_content"
        android:layout_height="wrap_content"
        android:layout_marginBottom="30dp"
        android:text="upload"
        app:layout_constraintBottom_toTopOf="@+id/recyclerView"
        app:layout_constraintEnd_toEndOf="parent"
        app:layout_constraintStart_toStartOf="parent" />

    <ProgressBar
        android:id="@+id/progressBar"
        style="?android:attr/progressBarStyleHorizontal"
        android:layout_width="0dp"
        android:layout_height="wrap_content"
        android:layout_marginStart="30dp"
        android:layout_marginEnd="30dp"
        android:layout_marginBottom="150dp"
        android:progress="50"
        app:layout_constraintBottom_toTopOf="@+id/recyclerView"
        app:layout_constraintEnd_toEndOf="parent"
        app:layout_constraintStart_toStartOf="parent" />

    <TextView
        android:id="@+id/progressText"
        android:layout_width="wrap_content"
        android:layout_height="wrap_content"
        android:text="TextView"
        android:textSize="24sp"
        app:layout_constraintBottom_toTopOf="@+id/progressBar"
        app:layout_constraintEnd_toEndOf="parent"
        app:layout_constraintStart_toStartOf="parent"
        app:layout_constraintTop_toTopOf="parent" />
</androidx.constraintlayout.widget.ConstraintLayout>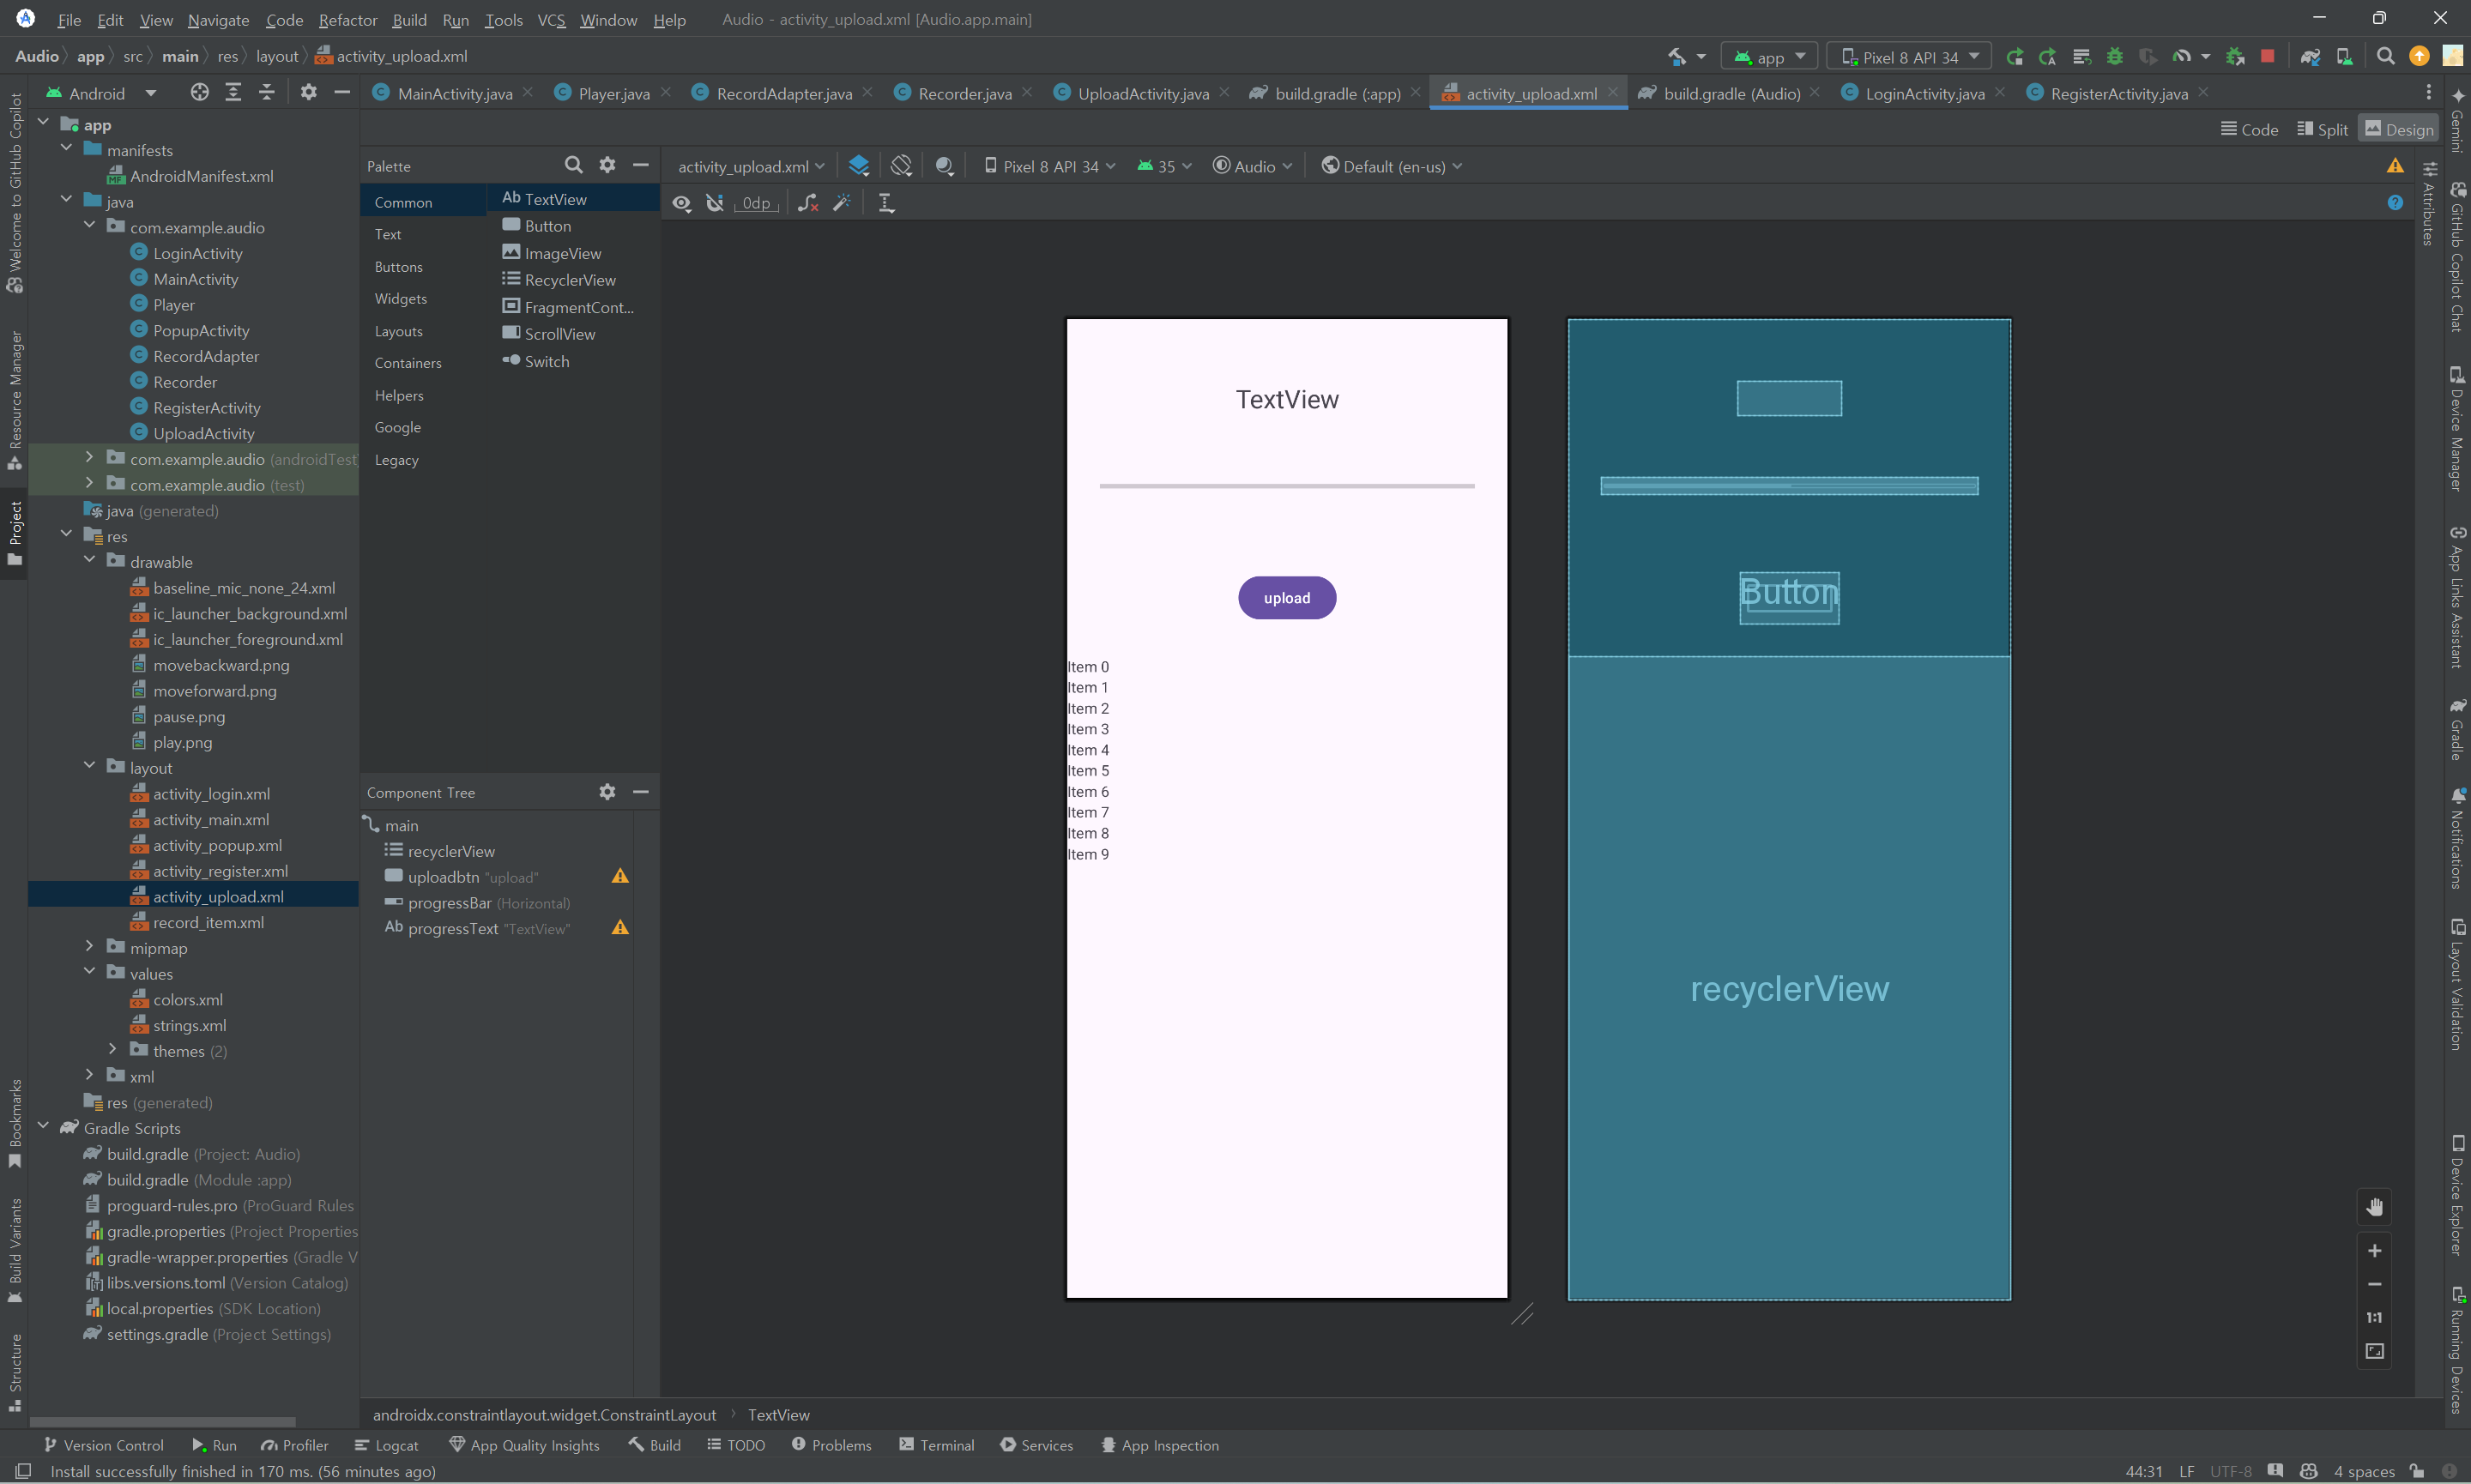
다음으로 파일을 업로드할 수 있도록 File Class를 인자로 받아 업로드해주는 함수인 uploadFile 함수를 구현한다. 파일을 업로드 할 때는 UploadTask 객체에서 제공하는 함수를 이용해 그 과정을 파악할 수 있는데, 대표적으로 실패했을 경우(addOnFailureListener), 업로드 중일 경우(addOnProgressListener), 업로드가 완료될 경우(addOnSuccessListener) 함수들을 사용한다.
특히 업로드 중일 경우 어느 정도 전송 되었는지 getBytesTransferred 함수를 이용하면 알 수 있는데, 전체 파일의 길이(getTotalByteCount)를 이용하여 몇 퍼센트 정도 업로드되었는지 확인할 수 있다.
함수의 구현 결과는 아래와 같다.
void uploadFile(File localFile) {
    Uri file = Uri.fromFile(localFile);
    StorageReference riversRef = storageRef.child(uid+"/"+file.getLastPathSegment());
    UploadTask uploadTask = riversRef.putFile(file);

    uploadTask.addOnFailureListener(new OnFailureListener() {
        @Override
        public void onFailure(@NonNull Exception exception) {
            textView.setText("업로드 실패");
        }
    }).addOnProgressListener(new OnProgressListener<UploadTask.TaskSnapshot>() {
        @Override
        public void onProgress(@NonNull UploadTask.TaskSnapshot snapshot) {
            int progress = (int) ((100.0 * snapshot.getBytesTransferred()) / snapshot.getTotalByteCount());
            textView.setText(progress + "% 업로드");
            progressBar.setProgress(progress);
        }
    }).addOnSuccessListener(new OnSuccessListener<UploadTask.TaskSnapshot>() {
        @Override
        public void onSuccess(UploadTask.TaskSnapshot taskSnapshot) {
            textView.setText("업로드 완료");
            uploadFile = null;
        }
    });
}
이제 이 함수를 이용하여 어댑터를 클릭했을 때 item의 정보 중 파일의 경로를 이용하여 실제로 업로드해보도록 한다.
- RecordAdapter.java
public class RecordAdapter extends RecyclerView.Adapter<RecordAdapter.ViewHolder>{
    public static ArrayList<RecordItem> items = new ArrayList<>();
    public interface OnItemClickListener {
        void onItemClicked(RecordItem item);
    }
    public static OnItemClickListener itemClickListener;
    public void setOnItemClickListener (OnItemClickListener listener) {
        itemClickListener = listener;
    }

    public static class ViewHolder extends RecyclerView.ViewHolder {
        public TextView recordTitle, recordTime, recordDate;
        public View parentView;

        public ViewHolder(View view) {
            super(view);
            recordTitle = view.findViewById(R.id.recordTitle);
            recordTime = view.findViewById(R.id.recordTime);
            recordDate = view.findViewById(R.id.recordDate);
            parentView = view;
        }

        public void setItem(RecordItem item) {
            recordTitle.setText(item.name);
            recordTime.setText(item.time);
            recordDate.setText(item.date);

            parentView.setOnClickListener(new View.OnClickListener() {
                @Override
                public void onClick(View view) { itemClickListener.onItemClicked(item); }
            });
        }
    }

    @Override
    public ViewHolder onCreateViewHolder(ViewGroup viewGroup, int viewType) {
        View view = LayoutInflater.from(viewGroup.getContext())
                .inflate(R.layout.record_item, viewGroup, false);

        return new ViewHolder(view);
    }

    @Override
    public void onBindViewHolder(ViewHolder viewHolder, int position) {
        RecordItem item = items.get(position);
        viewHolder.setItem(item);
    }

    @Override
    public int getItemCount() {
        return items.size();
    }

    public void addItem(RecordItem item) {
        items.add(item);
    }

    public static class RecordItem {
        String name, time, date, filename;

        public RecordItem(RecordItem item){
            this(item.name, item.time, item.date, item.filename);
        }

        public RecordItem(String name, String time, String date, String filename) {
            this.name = name;
            this.time = time;
            this.date = date;
            this.filename = filename;
        }
    }

    void parseNameAndAddItem(String filename) {
        if (!filename.contains(".mp3") || !filename.contains("(") || !filename.contains(")")) {
            return;
        }
        String[] split = filename.split("/");
        String name = split[split.length - 1];

        String[] split2 = name.split("\\(");
        String datetime = split2[0];

        String[] split3 = split2[1].split("\\)");
        String title = split3[0];

        String[] split4 = datetime.split(" ");
        String date = split4[0];

        SimpleDateFormat sTime = new SimpleDateFormat("mm:ss", Locale.KOREA);

        String length = sTime.format(new Date(getMP3FileLength(new File(filename))));

        addItem(new RecordAdapter.RecordItem(title, length, date, filename));
        notifyDataSetChanged();
    }

    public int getMP3FileLength(File file) {
        int duration = 0;
        try {
            MediaPlayer tmpmediaPlayer = new MediaPlayer();
            FileInputStream stream = new FileInputStream(file.getAbsolutePath());
            tmpmediaPlayer.setDataSource(stream.getFD());
            stream.close();

            tmpmediaPlayer.prepare();
            duration = tmpmediaPlayer.getDuration();
            tmpmediaPlayer.release();
        } catch (IOException e) {
            e.printStackTrace();
        }

        return duration;
    }
}- MainActivity.java
public class UploadActivity extends AppCompatActivity {
RecyclerView recyclerView;
Button uploadBtn;
RecordAdapter adapter = new RecordAdapter();
FirebaseStorage storage = FirebaseStorage.getInstance();
StorageReference storageRef = storage.getReference();
String uploadFile;
FirebaseAuth firebaseAuth = FirebaseAuth.getInstance();
FirebaseUser user = firebaseAuth.getCurrentUser();
String uid = user.getUid().toString();
ProgressBar progressBar;
TextView textView;
@Override
protected void onCreate(Bundle savedInstanceState) {
super.onCreate(savedInstanceState);
setContentView(R.layout.activity_upload);
recyclerView = findViewById(R.id.recyclerView);
uploadBtn = findViewById(R.id.uploadbtn);
progressBar = findViewById(R.id.progressBar);
textView = findViewById(R.id.progressText);
LinearLayoutManager layoutManager = new LinearLayoutManager(getApplicationContext(), LinearLayoutManager.VERTICAL, false);
recyclerView.setLayoutManager(layoutManager);
recyclerView.setAdapter(adapter);
File dir = new File(getExternalCacheDir().getAbsolutePath());
File[] files = dir.listFiles();
for (File file : files) {
adapter.parseNameAndAddItem(file.getAbsolutePath());
}
adapter.setOnItemClickListener(new RecordAdapter.OnItemClickListener() {
@Override
public void onItemClicked(RecordAdapter.RecordItem item) {
uploadFile = item.filename;
}
});
uploadBtn.setOnClickListener(new View.OnClickListener() {
@Override
public void onClick(View view) {
if (uploadFile != null) {
uploadFile(new File(uploadFile));
}
}
});
}
void uploadFile(File localFile) {
Uri file = Uri.fromFile(localFile);
StorageReference riversRef = storageRef.child(uid+"/"+file.getLastPathSegment());
UploadTask uploadTask = riversRef.putFile(file);
uploadTask.addOnFailureListener(new OnFailureListener() {
@Override
public void onFailure(@NonNull Exception exception) {
textView.setText("업로드 실패");
}
}).addOnProgressListener(new OnProgressListener<UploadTask.TaskSnapshot>() {
@Override
public void onProgress(@NonNull UploadTask.TaskSnapshot snapshot) {
int progress = (int) ((100.0 * snapshot.getBytesTransferred()) / snapshot.getTotalByteCount());
textView.setText(progress + "% 업로드");
progressBar.setProgress(progress);
}
}).addOnSuccessListener(new OnSuccessListener<UploadTask.TaskSnapshot>() {
@Override
public void onSuccess(UploadTask.TaskSnapshot taskSnapshot) {
textView.setText("업로드 완료");
uploadFile = null;
}
});
}
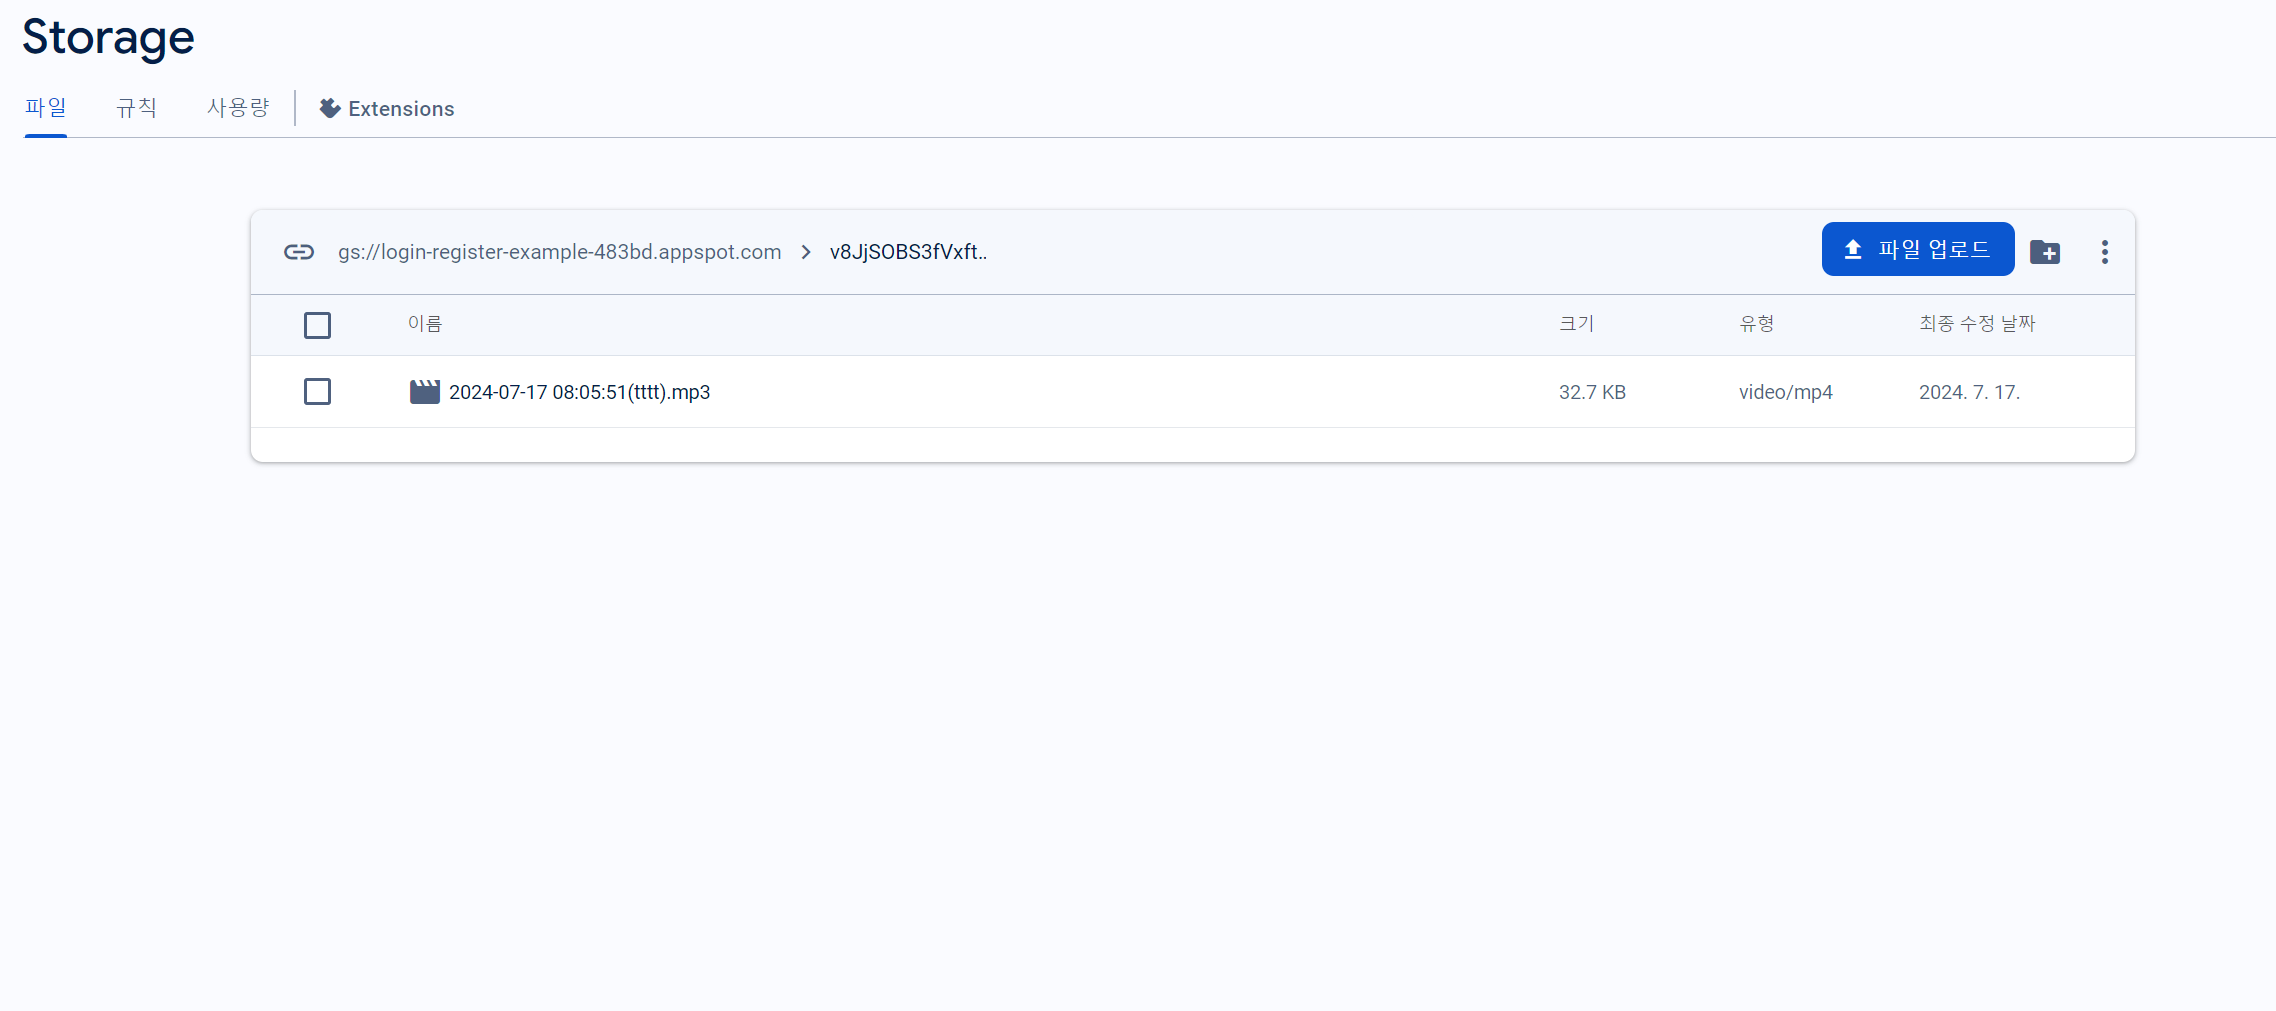
}4. 결과
아래 사진과 같이 파일이 정상적으로 업로드된 것을 확인할 수 있다.