📝 updateForm에 접속하기
1. UPDATE할 내용을 담을 Form 만들기(updateForm.jsp)
원래는 PUT으로 요청해야 하므로 Form으로 요청을 못함을 유의하고 만들자.
<%@ page language="java" contentType="text/html; charset=UTF-8"
	pageEncoding="UTF-8"%>

<%@ include file="../layout/header.jsp"%>

<div class="container">
	<form action="/boards/${boards.id}/update" method="post">
		<div class="mb-3 mt-3">
			<input
				type="text" class="form-control"
				placeholder="Enter title" name="title" value="제목입니다">
		</div>
		<div class="mb-3">
			<textarea class="form-control" rows="8" name="content">내용입니다</textarea>
		</div>
		<button type="submit" class="btn btn-primary">수정완료</button>
	</form>
</div>

<%@ include file="../layout/footer.jsp"%>
💡 VC패턴인 login과 다르게 update는 MVC패턴이다.
DB에서 받은 데이터를 Model에 담아 jsp에 불러오기 때문이다.
2. Controller - updateForm GET요청
	@GetMapping("/boards/{id}/updateForm") //무엇을 업데이트 할 것인지 정해줘야 함 ("boards/updateForm"은 말이 안 됨)
	//boards테이블의 특정게시글(id)을 update할 수 있는 Form을 주세요
	public String updateForm(@PathVariable Integer id) {
		return	"boards/updateForm";
		//데이터를 가지고 갈 순 없지만 일단 updateForm으로 잘 가지는지 테스트
	}
📌 restful api : 자원에 접근하는 주소를 설계하는 방식. 이를 참고하여 주소를 지어야 한다.
지금은 연습 중이므로 주소가 잘 읽히도록 작성했다. 프로젝트시 반드시 restful api를 읽고 주소를 정하자.
3. 수정하러가기 버튼을 누르면 updateForm으로 가게 하기
[detail.jsp 코드]
	<c:if test="${principal.id == boards.usersId}">
		<div class="d-flex">

			<a href="/boards/${boards.id}/updateForm" class="btn btn-warning">수정하러가기</a>

			<form action="/boards/${boards.id}/delete" method="post">
				<button class="btn btn-danger">삭제</button>
			</form>
		</div>
</c:if>- updateForm으로 가는 것은 GET 요청이므로 굳이 form으로 받을 필요가 없다. →
<a href=>로 코드 수정해줌
4. Controller 완성하기
1) 비정상 요청, 인증, 권한 체크
	@GetMapping("/boards/{id}/updateForm") //무엇을 업데이트 할 것인지 정해줘야 함("boards/updateForm"은 말이 안 됨)
	//boards테이블의 특정게시글(id)을 update할 수 있는 Form을 주세요
	public String updateForm(@PathVariable Integer id) {
		Boards boardsPS = boardsDao.findById(id);
		Users principal = (Users) session.getAttribute("principal");

		//1.id가 있는지 체크
		//비정상 요청 체크
		if (boardsPS == null) {
			return "errors/badPage";
		}

		// 인증 체크
		if (principal == null) {
			return "redirect:/loginForm";
		}

		// 권한 체크
		if (principal.getId() != boardsPS.getUsersId()) {
			return "errors/badPage";
		}

		return	"boards/updateForm";
		//데이터를 가지고 갈 순 없지만 일단 updateForm으로 잘 가지는지 테스트
	}
정상적이지 않은 요청일 경우
return "redirect:/boards/"+id;는 비정상 요청 체크시 오류가 나므로 아예 에러페이지를 만들어 확인이 편하도록 코드를 수정하자.
return "redirect:/boards/"+id;→return "boards/updateForm";
2) View(updateForm.jsp)에 전달할 오브젝트 Model에 담기
	@GetMapping("/boards/{id}/updateForm") //무엇을 업데이트 할 것인지 정해줘야 함 ("boards/updateForm"은 말이 안 됨)
	//boards테이블의 특정게시글(id)을 update할 수 있는 Form을 주세요
	public String updateForm(@PathVariable Integer id, Model model) {
		Boards boardsPS = boardsDao.findById(id);
		Users principal = (Users) session.getAttribute("principal");

		//1.id가 있는지 체크
		//비정상 요청 체크
		if (boardsPS == null) {
			return "errors/badPage";
		}

		// 인증 체크
		if (principal == null) {
			return "redirect:/loginForm";
		}

		// 권한 체크
		if (principal.getId() != boardsPS.getUsersId()) {
			return "errors/badPage";
		}

		model.addAttribute("boards", boardsPS);
		return	"boards/updateForm";
	}
5. updateForm.jsp 코드 수정
수정할 내용이 Form에 보여야 하므로 el표현식으로 model에 담은 데이터 받기.
<%@ page language="java" contentType="text/html; charset=UTF-8"
	pageEncoding="UTF-8"%>

<%@ include file="../layout/header.jsp"%>

<div class="container">
	<form action="/boards/${boards.id}/update" method="post">
		<div class="mb-3 mt-3">
			<input
				type="text" class="form-control"
				placeholder="Enter title" name="title" value="${boards.title}">
		</div>
		<div class="mb-3">
			<textarea class="form-control" rows="8" name="content">${boards.content}</textarea>
		</div>
		<button type="submit" class="btn btn-primary">수정완료</button>
	</form>
</div>

<%@ include file="../layout/footer.jsp"%>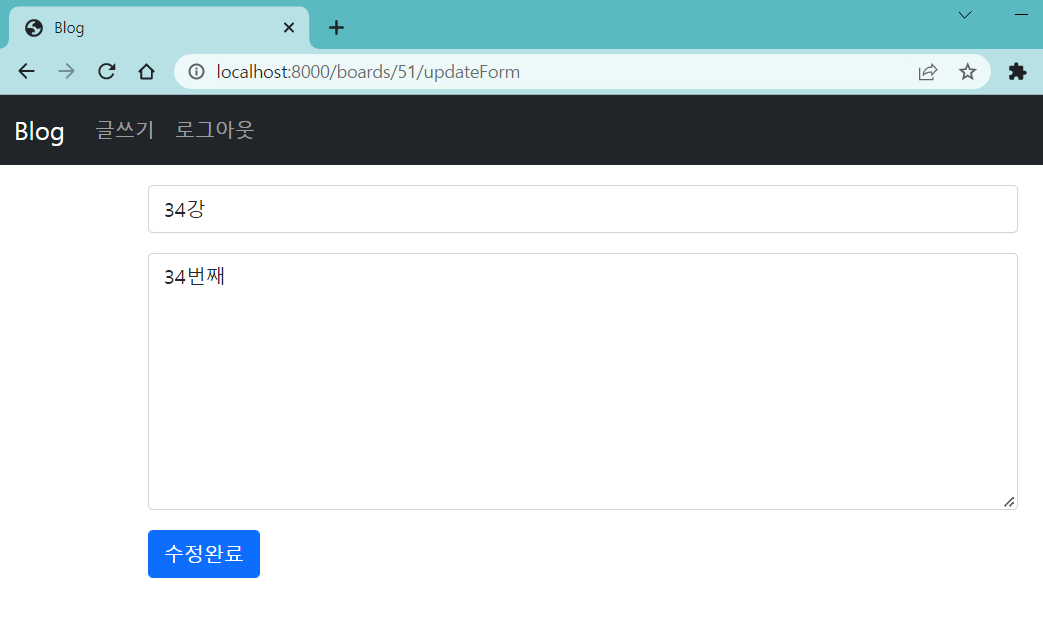
💎 post시 전송되는 값
보이는 값 : value="${boards.title}", ${boards.content}
post시 전송되는 값 : name="title", name="content", 즉 우리가 수정한 값은 title과 content로 name되어 post되는 것이다.
📝 update 기능 구현하기
1. Mapper
	<update id="update">
		UPDATE boards SET title = #{title}, content = #{content} WHERE id = #{id}
	</update>
2. Controller
1) UpdateDto로 받는 방법
Controller 코드
	@PostMapping("boards/{id}/update")
	public String update(@PathVariable Integer id, UpdateDto updateDto) {
		//영속화
		Boards boardsPS = boardsDao.findById(id);
		Users principal = (Users) session.getAttribute("principal");

		//비정상 요청 체크
		if (boardsPS == null) {
			return "errors/badPage";
		}

		// 인증 체크
		if (principal == null) {
			return "redirect:/loginForm";
		}

		// 권한 체크
		if (principal.getId() != boardsPS.getUsersId()) {
			return "errors/badPage";
		}

		boardsDao.insert(updateDto.toEntity(id));
		return "redirect:/boards/"+id;
	}
UpdateDto 코드
package site.metacoding.red.web.dto.request.boards;

import lombok.Getter;
import lombok.Setter;
import site.metacoding.red.domain.boards.Boards;

@Setter
@Getter
public class UpdateDto {
	private String title;
	private String content;

	//DTO가 Entity로 변하는 메서드
	public Boards toEntity(Integer id) {
		Boards boards = new Boards(this.title, this.content, id);
		return boards;
	}
}
2) boardsPS에 updateDto를 담아주어 변경
Boards 코드
	public void 글수정(UpdateDto updateDto) {
		this.title = updateDto.getTitle();
		this.content = updateDto.getContent();
	}
Controller 코드
	@PostMapping("boards/{id}/update")
	public String update(@PathVariable Integer id, UpdateDto updateDto) {
		//영속화
		Boards boardsPS = boardsDao.findById(id);
		Users principal = (Users) session.getAttribute("principal");

		//비정상 요청 체크
		if (boardsPS == null) {
			return "errors/badPage";
		}

		// 인증 체크
		if (principal == null) {
			return "redirect:/loginForm";
		}

		// 권한 체크
		if (principal.getId() != boardsPS.getUsersId()) {
			return "errors/badPage";
		}

		//2. 변경(boardsPS만 title, content가 변경됨)
		boardsPS.글수정(updateDto);

		//3. 수행
		boardsDao.update(boardsPS);

		return "redirect:/boards/"+id;
	}
UpdateDto에 Boards Entity 메서드 만들어 수정(1번 방식)보다 영속화-(Boards에 바로 updateDto를 받아)변경-수정(2번 방식)이 더 편리하다.
왜냐하면 title만 변경하고 싶을 경우 영속화된 boardsPS에 title값만 바꿔서 update를 수행하면 되기 때문이다. Entity를 만드는 경우는 update 쿼리문을 각각 설정해줘야 한다.
@Setter
@Getter
public class UpdateDto {
	private String title;
	private String content;
    }
에서 content값을 받지 않으면 content는 초깃값이 없어(값이 할당되지 않아) 후에
	public void 글수정(UpdateDto updateDto) {
		this.title = updateDto.getTitle();
		this.content = updateDto.getContent();
	}
getter할 값이 없어
this.content = updateDto.getContent();라인이 실행되지 않는듯
- 영속화-변경-수정을 사용하려면
public Boards toEntity는 없어도 @getter @setter는 있어야 한다.
📝 validation (유효성 검사)
유효성 검사 : 데이터가 서버 혹은 DB로 옮겨지기 전, 개발자가 만든 조건에 부합하는지 확인, 검증하는 작업
오류가 터지지 않기 위해서는 프론트(html, JS)와 백엔드 양방향에서 막아야 한다.
백엔드는 비정상 요청 체크, 인증 체크, 권한 체크로 막았으므로 html에서 막아보자. (JS는 아직 할 줄 모르므로 생략)
📝 [ html에서 막아야 할 것 ]
1. 공백입력 막기 : required 설정
2. 담을 수 있는 데이터의 양을 초과하여 오류가 나지 않도록 설정
- textarea는 clob(4GB)를 저장할 수 있으므로 title만 입력될 값을 제한시켜주면 된다. →
maxlength설정 - title은 150byte를 담을 수 있도록 설정해 놓았는데, 🔥 한글은 1글자당 3byte이므로 50글자까지만 입력되도록 해야 한다.
<div class="container">
	<form action="/boards/${boards.id}/update" method="post">
		<div class="mb-3 mt-3">
			<input
				type="text" class="form-control"
				placeholder="Enter title" name="title" value="${boards.title}" required="required" maxlength="50">
		</div>
		<div class="mb-3">
			<textarea class="form-control" rows="8" name="content" required="required">${boards.content}</textarea>
		</div>
		<button type="submit" class="btn btn-primary">수정완료</button>
	</form>
</div>
POST로 title의 value값을 설정해 오류를 나게 할 수는 있지만 일단 html에서는 공백입력이나 입력가능한 byte 수 초과로 오류가 나는 것은 막을 수 있다.
여담 :
오류를 나게 하는 사용자가 있는데 이런 경우 접속을 하지 못하도록 web.xml로 필터링을 걸어놓거나 영구정지를 시킨다고 한다. 영구정지 당할 정도면 악질적이니까... 보통 delete시킨다.
