Servlet
Reading Username/Password - Form
html form 기반의 인증 과정이 어떻게 동작하는지 알아보자.
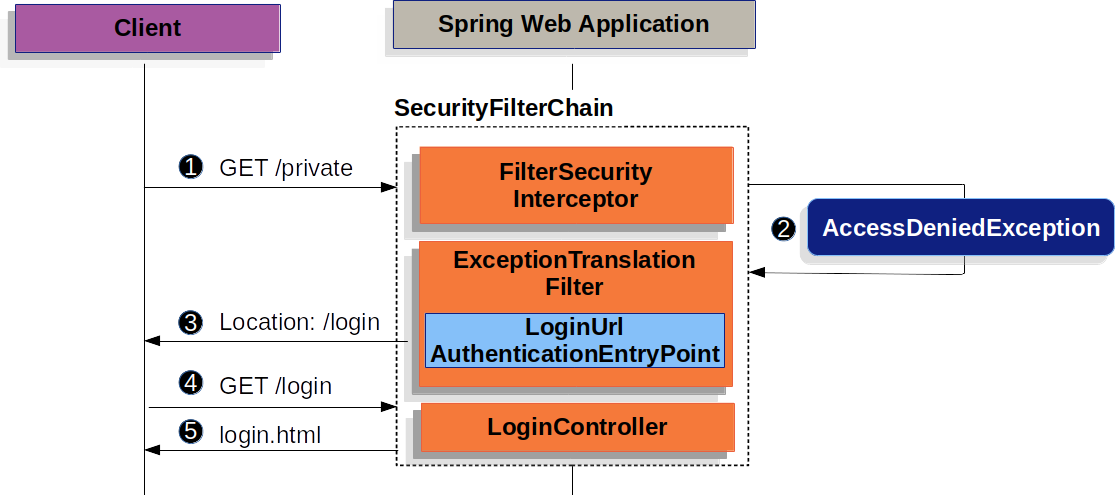
로그인 페이지로 리다이렉트 하는 과정
- 한 유저가 인증되지 않은(not authorized) 리소스
/private에 인증되지 않은(unauthenticated) 요청을 보낸다. - 스프링 시큐리티의
FilterSecurityInterceptor는 인증되지 않은 요청을AccessDeniedException예외를 던짐으로써 거부되었음을 나타낸다. - 유저가 인증받지 않았으므로
ExceptionTranslationFilter는 인증을 시작하도록 만들고AuthenticationEtryPoint가 구성된 로그인 페이지로 리다이렉트를 보낸다. 대부분AuthenticationEntryPoint는LoginUrlAuthenticationEntryPoint의 인스턴스이다. - 브라우저는 리다이렉트된 로그인 페이지를 요청한다.
- 어플리케이션에 무언가가 로그인 페이지를 렌더링 해야 한다.
username, password가 넘겨지고 UsernamePasswordAuthenticationFilter가 username과 password를 인증한다.

username과 password 인증
- 유저가 username, password를 넘기면
UsernamePasswordAuthenticationFilter는HttpServletRequest에서 가져온 username과 password 인증의 하나인UsernamepasswordAuthenticationToken을 만든다. UsernamePasswordAuthenticationToken은 인증하도록AuthenticationManger에게 전달된다.AuthenticationManger의 세부 정보는 사용자 정보가 저장되는 방식에 따라 달라진다.- 인증에 실패할 경우,
- SecurityContextHolder가 지워진다.
- RememberMeServices.loginFail가 호출되고 만약 remember me가 구성되지 않았다면 수행하지 않는다.
- AuthenticationFailureHandler가 호출된다.
- 인증에 성공할 경우,
- SessionAuthenticationStrategy에 새로운 로그인을 알린다.
- 인증은 SecurityContextHolder에 설정된다.
- RememberMeServices.loginSuccess가 호출되고 remember me가 구성되지 않았을 경우 마찬가지로 수행하지 않는다.
- ApplicationEventPublisher는 InteractiveAuthenticationSuccessEvent를 퍼블리시한다.
- AuthenticationSuccessHandler가 호출된다. 일반적으로 로그인 페이지로 리다이렉트됐을 때 ExceptionTranslationFilter에서 저장된 요청을 리다이렉트 시킬SimpleUrlAuthenticationSuccessHandler 이다.
스프링 시큐리티 폼 로그인은 기본적으로 활성화되어 있다. 그러나 config 기반의 서블릿이 제고외는 즉시 폼 기반의 로그인은 명시적으로 제공해야 한다. 아래는 명시적으로 작성해야할 간단한 자바 config 예이다.
public SecurityFilterChain filterChain(HttpSecurity http) {
	http
		.formLogin(withDefaults());
	// ...
}
이 config에서 스프링 시큐리티는 기본 로그인 페이지를 렌더링한다. 커스텀 로그인 페이지도 사용할 수 있다.
아래는 커스텀 로그인 폼을 제공하는 예이다.
public SecurityFilterChain filterChain(HttpSecurity http) {
	http
		.formLogin(form -> form
			.loginPage("/login")
			.permitAll()
		);
	// ...
}
로그인 페이지를 스프링 시큐리티 config에서 지정했다면 페이지를 렌더링해야 한다. 아래는 /login의 html 로그인 폼을 Thymeleaf 템플릿 엔진으로 구현한 예이다.
<!DOCTYPE html>
<html xmlns="http://www.w3.org/1999/xhtml" xmlns:th="https://www.thymeleaf.org">
	<head>
		<title>Please Log In</title>
	</head>
	<body>
		<h1>Please Log In</h1>
		<div th:if="${param.error}">
			Invalid username and password.</div>
		<div th:if="${param.logout}">
			You have been logged out.</div>
		<form th:action="@{/login}" method="post">
			<div>
			<input type="text" name="username" placeholder="Username"/>
			</div>
			<div>
			<input type="password" name="password" placeholder="Password"/>
			</div>
			<input type="submit" value="Log in" />
		</form>
	</body>
</html>
기본 HTML form의 몇가지 핵심 사항
- 폼은
/login으로 POST 해야한다. - 폼은 타임리프로 자동적으로 포함되는 CSRF 토큰을 포함해야 한다.
- 폼에서 username은 name="username"으로 지정해야 한다.
- 폼에서 password는 name="password"로 지정해야 한다.
- HTTP 매개 변수 오류가 발견되면 유저가 적절한 username / password를 입력하지 않았음을 나타낸다.
- HTTP 매개 변수 로그아웃이 발견되면 유저가 성공적으로 로그아웃했음을 알 수 있다.
만약 Spring MVC를 사용한다면 controller에 GET /login와 템플릿을 매핑할 수 있도록 생성해야 한다.
@Controller
class LoginController {
	@GetMapping("/login")
	String login() {
		return "login"; // page
	}
}