지금 현 상태는 포크해와 가져온 리포지토리를 깃허브 페이지 호스팅으로 해당 주소를 들어가면 내가 고른 minimal mistakes의 스타트 가이드가 뜬다.
이걸 토대로 또 도전해보자 한다.
ProTip: Be sure to remove /docs and /test if you forked Minimal Mistakes. These folders contain documentation and test pages for the theme and you probably don’t want them littering up your repo.
리포지토리에 있는 test와 docs 폴더는 제거해도 좋다 한다.
Note: The theme uses the jekyll-include-cache plugin which will need to be installed in your Gemfile and added to the plugins array of _config.yml. Otherwise you’ll throw Unknown tag 'include_cached' errors at build.
_config.yml로 설정하고 그 플러그인 캐시는 gemfile 파일에 저장된다 하는데 주의 주는것 같다..
- Add the following to your Gemfile:
gem "minimal-mistakes-jekyll"
- Fetch and update bundled gems by running the following Bundler command:
bundle
- Set the theme in your project’s Jekyll _config.yml file:
theme: minimal-mistakes-jekyllTo update the theme run bundle update.
이것 또한 여러 글들에서 따라했던 내용이지만 다시 한번 해 줬다.
Remove the UnnecessaryPermalink
If you forked or downloaded the minimal-mistakes-jekyll repo you can safely remove the following folders and files:
.editorconfig
.gitattributes
.github
/docs
/test
CHANGELOG.md
minimal-mistakes-jekyll.gemspec
README.md
screenshot-layouts.png
screenshot.png
나처럼 포크, 다운로드 하여 가져온 경우 위의 파일, 폴더들은 삭제해도 좋다한다. 삭제하자
Scaffolding out a site with the jekyll new command requires you to modify a few files that it creates.
Edit _config.yml. Then:
Replace /index.md with a modified Minimal Mistakes index.html. Be sure to enable pagination if using the home layout by adding the necessary lines to _config.yml.
Change layout: post in _posts/0000-00-00-welcome-to-jekyll.markdown to layout: single.
Remove about.md, or at the very least change layout: page to layout: single and remove references to icon-github.html (or copy to your _includes if using it).
으헥.. 하란대로 하고 싶어도 난 저들이 말하는 _posts란 폴더 자체가 없었으며, 리포에 다시 가보면 삭제하라 했던 폴더인 docs 나 test 안에 있었다. _config.yml에 layout 항목이 있어서 single로 바꿔주었다. (기본값이 single 이였음 본인은)
about.md 지우고 난 icon-github.html도 없었다.
자! 이제 끝났다 한다!!?
That’s it! If all goes well running bundle exec jekyll serve should spin-up your site.
드가자~ 드가자~
?????
?????
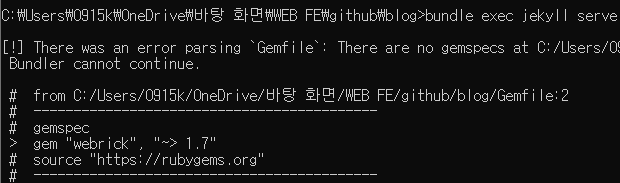
Gemfile에 문제.. 그리고 gemspecs이 없다고..
저 소스 링크로 들어가 보겠다.
루비젬 내가 깔았던걸 또 깔으란 소린지 루비 다운로드 사이트가 링크됐고
최신 버전을 이미 설치한 나는, 오류를 검색해본다.
나와 같은 문제를 겪는 분들이 많았고 쉽게 해결할 수 있었다.
Gemfile 문제는 내가 듀토리얼에서 건너뛰었던 녀석으로 간주된다.
source "https://rubygems.org"
gem "jekyll", "~> 3.7"
gem "minimal-mistakes-jekyll"
이것을 gemfile에 복붙해주고 저장후 끈다. 해결!
2번째 gem "webrick" 오류는 루비버전이 3.0.0 이후로 제킬이 실행되지 않는 문제로 수동으로 webrick을 설치해주면 된다.
bundle add webrick
잘 설치가 된다!
그럼 다시 bundle exec jekyll serve로 혼내주자!
.
.
.
.
.
캬~~ 컄ㅋㅋㅋㅋ
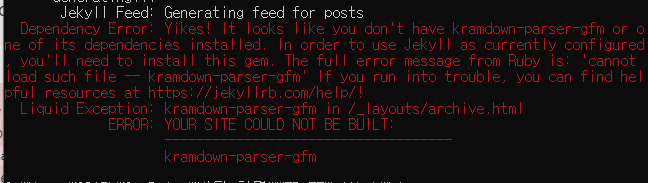
Liquid Exception: kramdown-parser-gfm in /_layouts/archive.html
이게 문제군.. 한번에 되면 오히려 맥 빠질뻔 했다.. ㅇㅇ
스택플로우에 재미있는 해결책이 있다.
I added gem "kramdown-parser-gfm" to the Gemfile and then ran bundle install.
Now the serve command completes successfully.
시도를 안 할 이유가 없다!
아까 복붙한 젬파일 안에 gem "kramdown-parser-gfm" 추가!
그리고 bundle install로 설치 해준다.
와ㅏㅏㅏㅏㅏㅏㅏㅏㅏㅏㅏㅏㅏㅏ
첫 고비를 넘겼다!!
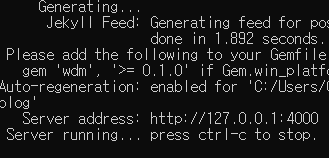
이렇게 Server running... 이 마지막줄에 나오면 성공!!
하지만 방심마라, 이건 최소한의 준비를 했을 뿐이다..
우린 깃에 올려 빌드하고 페이징 그리고 호스팅까지 갈 길이 멀다.
서버연 김에 저기 적힌 주소로 함 가보자 http://127.0.0.1:4000
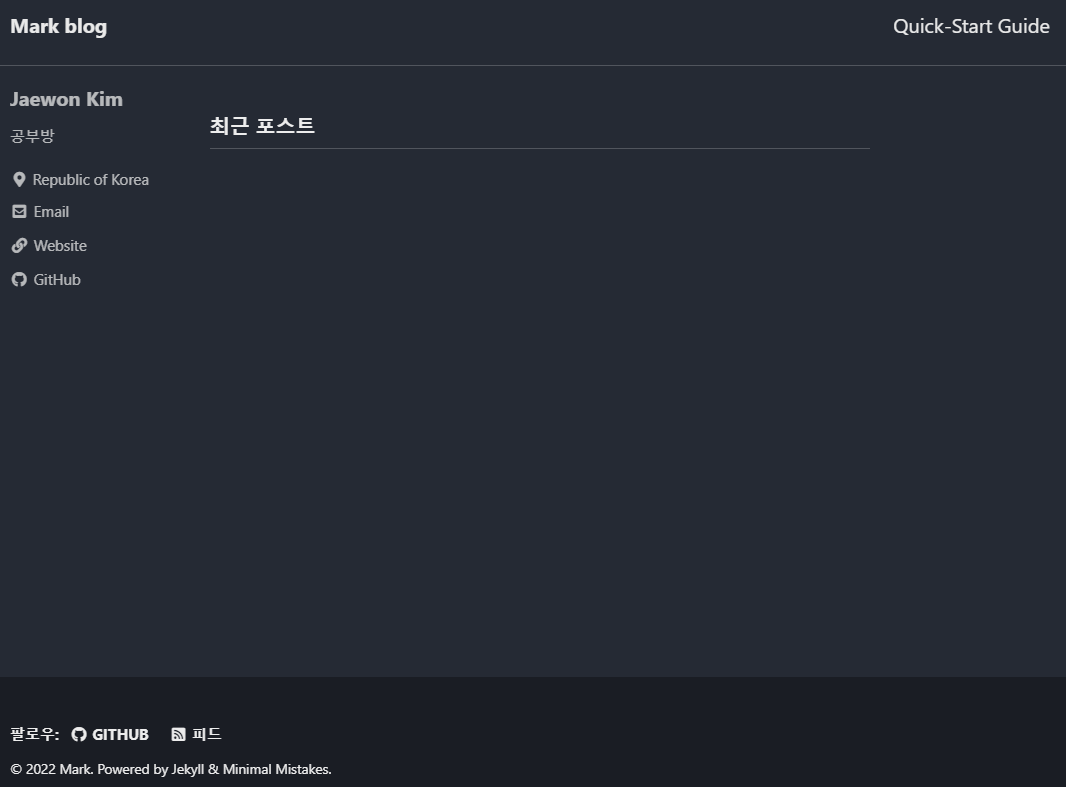
감격 기가 막히지 않을 수가 없다 ㄹㅇ...
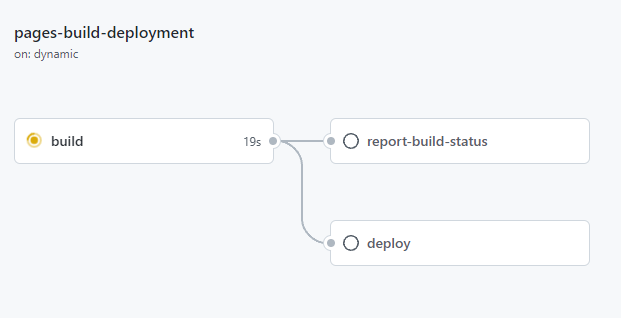
제발 깃허브에 빌드 과정에 꼬이지 않게 해주세요
제발 깃허브에 빌드 과정에 꼬이지 않게 해주세요
제발 깃허브에 빌드 과정에 꼬이지 않게 해주세요
.
.
.
.
.
.

빌드는 커녕 git add push 도 못하게 생겼네 ㅋㅋ
전편에서 그렇게 날 괴롭히던 submodule 이다.. 이길 자신이 없지만 오늘도 최대한 싸워보겠다.
30분 정도가 흘렀다... 그리고 또 스택 플로우에게 도움 받았다..
문제점은 클론해온 저 리포지토리에 .git 때문이라고.. 서브 모듈로써 내 리포지토리에 상속? 시키기위해 전 주인을 내보냈다.
.git 파일을 삭제하거나,
git rm --cached . -rf로 혼내줄 수 있다.
무사히 깃 푸쉬 완료!
다시 기도 시간이다.
제발.. 이제 보내줄때가 됬ㅈ...
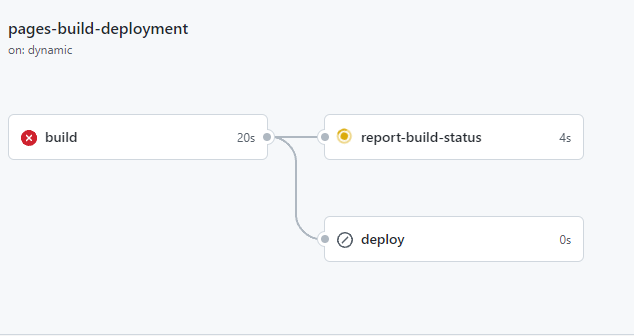
ㅋㅋㅋㅋㅋㅋ 저번 회차랑 같은 오류다

난 이룬게 없다
내일 두고보자...