- Dockerfile 로 image를 빠르게 만들어 낼 수 있다.
- docker pull 받아서 들어가서 또 하나하나 패키지를 설치할 시간이 없잖어?
Dockerfile 변수
| Variable | Description | example |
|---|---|---|
| FROM | 기본 이미지 | FROM ubuntu:focal Ubuntu:focal 버전 이미지 사용 |
| RUN | 쉘 명령어 실행 | RUN apt updateRUN apt upgrade -yRUN RUNLEVEL=1 dpkg-reconfigure openssh-server |
| CMD | 컨테이너 기본 실행 명령어 (Entrypoint 인자로 사용) | CMD /bin/bash |
| EXPOSE | 오픈되는 포트 정보 | |
| ENV | 환경 변수 설정 | ENV LANG en_US.UTF-8ENV DEBIAN_FRONTED=nointeractive |
| ADD | 파일 또는 디렉토리 추가. URL/ZIP 사용가능 | |
| COPY | 파일 또는 디렉토리 추가 | |
| ENTRYPOINT | 컨테이너 기본 실행 명령어 | |
| VOLUME | 외부 마운트 포인트 생성 | VOLUME /datapath/youwant |
| USER | RUN, CMD, ENTRYPOINT를 실행하는 사용자 | |
| WORKDIR | 작업 디렉토리 설정 | |
| ARGS | 빌드타임 환경변수 설정 | |
| LABEL | key-value 데이터 | |
| ONBUILD | 다른 빌드의 베이스로 사용될 때 사용하는 명령어 | |
ARG VAR=argument | 이 도커 빌드 파일에서 사용할 변수 만듦 VAR: 변수, argument: 값 | ARG user=bitbakeRUN useradd ${user}ARG user=jenkinsARG id_u=1001ARG id_g=1001RUN groupadd -g $id_g $user && useradd -m -p $user -u $id_u -g $id_g -o -s /bin/bash $user |
Dockerbuild 명령 예
| Variable | example | Description |
|---|---|---|
| FROM | FROM ubuntu:focal | 도커 구성시 기본 이미지를 ubuntu:focal 로 사용한다. |
| ARG | ARG user=bitbakeARG group=bitbakeARG uid=1001ARG gid=1001 | 도커빌드파일 내, 변수 user=bitbkae 로 설정한다. 추후, 사용 시, RUN useradd ${user}와 같이 사용한다. |
| ARG | ARG DEBIAN_FRONTED=noninteractive |
1. Ubuntu 22.04 + build 환경
Dockerfile생성
# ====== Dockerfile ====== #
FROM ubuntu:18.04

ENV DEBIAN_FRONTEND=noninteractive
RUN apt update
RUN apt install -y apt-utils

RUN apt dist-upgrade -y
RUN apt install -y software-properties-common lsb-release

RUN add-apt-repository ppa:openjdk-r/ppa --yes
RUN apt update -y

RUN apt install -y locales
RUN locale-gen en_US.UTF-8

ENV LANG en_US.UTF-8
ENV LANGUAGE en_US:en
ENV LC_ALL en_US.UTF-8

RUN apt install -y adduser sudo vim tree mc htop inxi cron anacron \
file time gawk git tig diffstat rsync wget curl coreutils tmux pseudo \
python2.7 python3 python3-pip python3-dev python3-venv python3-distutils bash-completion bison \
libpq-dev libgraphviz-dev graphviz sysstat build-essential chrpath cpio libxml2 libxml-simple-perl \
gcc-multilib g++-multilib clang \
iputils-ping liblz4-tool texinfo zstd libglib2.0-0 \
openjdk-11-jdk ant bzip2 gzip tar zip

RUN echo '*               soft    nofile          1048576'>>/etc/security/limits.conf
RUN echo '*               hard    nofile          1048576'>>/etc/security/limits.conf

CMD /bin/bash- 나와서! 쉘에
$ docker build --tag <image_name>:<tag> .
# docker build의 마지막에 . 은 현재 Dockerfile이 현재 디렉토리에 있기 때문이다.
# 이 단계는 Dockerfile로 '이미지 빌드' 하는 과정이다.


$ docker tag <image_hash> <repo>/<image_name>:<tag>
# 따로 위에 만든 이미지를 repo를 붙여서 태그를 붙인다.
1-2. 위 이미지기반 추가 및 uid,gid, user, ssh 설정
# ============= Dockerfile ============== #
FROM <위의 이미지>:<tag>

RUN apt update
RUN apt full-upgrade -y

RUN apt install -y software-properties-common
RUN add-apt-repository ppa:ubuntu-toolchain-r/test
RUN apt update -y
RUN apt install -y build-essential
RUN apt -y install gcc-9 g++-9

RUN update-alternatives    --install /usr/bin/gcc         gcc         /usr/bin/gcc-7       75 \
                           --slave   /usr/bin/g++         g++         /usr/bin/g++-7          \
                           --slave   /usr/bin/gcc-ar      gcc-ar      /usr/bin/gcc-ar-7       \
                           --slave   /usr/bin/gcc-nm      gcc-nm      /usr/bin/gcc-nm-7       \
                           --slave   /usr/bin/gcc-ranlib  gcc-ranlib  /usr/bin/gcc-ranlib-7   \
                           --slave   /usr/bin/gcov        gcov        /usr/bin/gcov-7         \
                           --slave   /usr/bin/gcov-dump   gcov-dump   /usr/bin/gcov-dump-7    \
                           --slave   /usr/bin/gcov-tool   gcov-tool   /usr/bin/gcov-tool-7

RUN update-alternatives    --install /usr/bin/gcc         gcc         /usr/bin/gcc-9       94 \
                           --slave   /usr/bin/g++         g++         /usr/bin/g++-9          \
                           --slave   /usr/bin/gcc-ar      gcc-ar      /usr/bin/gcc-ar-9       \
                           --slave   /usr/bin/gcc-nm      gcc-nm      /usr/bin/gcc-nm-9       \
                           --slave   /usr/bin/gcc-ranlib  gcc-ranlib  /usr/bin/gcc-ranlib-9   \
                           --slave   /usr/bin/gcov        gcov        /usr/bin/gcov-9         \
                           --slave   /usr/bin/gcov-dump   gcov-dump   /usr/bin/gcov-dump-9    \
                           --slave   /usr/bin/gcov-tool   gcov-tool   /usr/bin/gcov-tool-9

RUN update-alternatives --set gcc /usr/bin/gcc-9

RUN apt install -y openssh-server
RUN apt install -y lib32stdc++-9-dev lib32gcc-9-dev g++-9-multilib
RUN sed -i 's#exit 101#exit 0#g' /usr/sbin/policy-rc.d
RUN RUNLEVEL=1 dpkg-reconfigure openssh-server
RUN update-rc.d ssh defaults

RUN echo "root:root" | chpasswd # 초기 root의 비밀번호는 root임(컨테이너에서 바꾸기)

ARG user=jenkins
ARG id_u=1001
ARG id_g=1001
RUN groupadd -g $id_g -o $user && useradd -m -p $user -u $id_u -g $id_g -o -s /bin/bash $user

# user에 sudo 권한 부여하기
RUN usermod -aG sudo $user
RUN echo "${user}:${user}" | chpasswd # user의 초기 비밀번호는 user. 컨테이너에서 바꿀 것!

WORKDIR /home/$user
CMD service ssh restart && /bin/bash
gcc v9
$ docker build --build-arg user=jenkins --build-arg id_u=$(id -u) --build-arg id_g=$(id -g) --tag <image_name>:<tag> .
# 역시나 제일 마지막 . 은 현재 Dockerfile이 현재 디렉토리에 있기 때문이다.
# --build-arg id_u=$(id -u) 를 사용하지 않으면, Dockerfile에 있는 id_u=1001이 그대로 사용된다.


$ docker tag <image_hash> <repo>/<image_name>:<tag>
# 따로 위에 만든 이미지를 repo를 붙여서 태그를 붙인다.
- 결과

- 일단
-d로container실행
-it옵션을 주고,container실행
root로interactive shell실행
2. ubuntu 20.04 + systemd 기반
# ====== Dockerfile ====== #
FROM ubuntu:20.04

ENV DEBIAN_FRONTEND=noninteractive

ENV TZ=Asia/Seoul
RUN sed -i 's/kr.archive.ubuntu.com/mirror.kakao.com/g' /etc/apt/sources.list


RUN apt update
RUN apt install -y apt-utils

RUN apt dist-upgrade -y
RUN apt install -y software-properties-common lsb-release

RUN add-apt-repository ppa:openjdk-r/ppa --yes
RUN apt update -y

RUN apt install -y locales
RUN locale-gen en_US.UTF-8

ENV LANG en_US.UTF-8
ENV LANGUAGE en_US:en
ENV LC_ALL en_US.UTF-8

RUN apt install -y adduser sudo vim tree mc htop inxi cron anacron \
file time gawk git tig diffstat rsync wget curl coreutils tmux pseudo \
python2.7 python3 python3-pip python3-dev python3-venv python3-distutils bash-completion bison \
libpq-dev libgraphviz-dev graphviz sysstat build-essential chrpath cpio libxml2 libxml-simple-perl \
gcc-multilib g++-multilib clang \
iputils-ping liblz4-tool texinfo zstd libglib2.0-0 \
openjdk-11-jdk ant bzip2 gzip tar zip

RUN echo '*               soft    nofile          1048576'>>/etc/security/limits.conf
RUN echo '*               hard    nofile          1048576'>>/etc/security/limits.conf

RUN apt update \
  && apt install -qq -y init systemd \
  && apt install -qq -y build-essential \
  && apt install -qq -y tzdata \
  && apt install -qq -y vim curl \
  && apt-get clean autoclean \
  && apt-get autoremove -y \
  && rm -rf /var/lib/{apt,dpkg,cache,log}


CMD /bin/bash- 나와서! 쉘에
$ docker build --tag <image_name>:<tag> .
# docker build의 마지막에 . 은 현재 Dockerfile이 현재 디렉토리에 있기 때문이다.
# 이 단계는 Dockerfile로 '이미지 빌드' 하는 과정이다.


$ docker tag <image_hash> <repo>/<image_name>:<tag>
# 따로 위에 만든 이미지를 repo를 붙여서 태그를 붙인다.
2-1. 위 이미지기반 추가 및 uid,gid, user, ssh 설정
# ============= Dockerfile ============== #
FROM <위의 이미지>:<tag>

RUN apt update
RUN apt full-upgrade -y

RUN apt install -y software-properties-common
RUN add-apt-repository ppa:ubuntu-toolchain-r/test
RUN apt update -y
RUN apt install -y build-essential

RUN apt install -y openssh-server
RUN apt install -y lib32stdc++-9-dev lib32gcc-9-dev g++-9-multilib
RUN sed -i 's#exit 101#exit 0#g' /usr/sbin/policy-rc.d
RUN RUNLEVEL=1 dpkg-reconfigure openssh-server
RUN update-rc.d ssh defaults

RUN echo "root:root" | chpasswd # 초기 root의 비밀번호는 root임(컨테이너에서 바꾸기)

ARG user=jenkins
ARG id_u=1001
ARG id_g=1001
RUN groupadd -g $id_g -o $user && useradd -m -p $user -u $id_u -g $id_g -o -s /bin/bash $user

# user에 sudo 권한 부여하기
RUN usermod -aG sudo $user
RUN echo "${user}:${user}" | chpasswd # user의 초기 비밀번호는 user. 컨테이너에서 바꿀 것!

WORKDIR /home/$user
CMD service ssh restart && /bin/bash
gcc v9
$ docker build --build-arg user=jenkins --build-arg id_u=$(id -u) --build-arg id_g=$(id -g) --tag <image_name>:<tag> .
# 역시나 제일 마지막 . 은 현재 Dockerfile이 현재 디렉토리에 있기 때문이다.
# --build-arg id_u=$(id -u) 를 사용하지 않으면, Dockerfile에 있는 id_u=1001이 그대로 사용된다.


$ docker tag <image_hash> <repo>/<image_name>:<tag>
# 따로 위에 만든 이미지를 repo를 붙여서 태그를 붙인다.
pyenv 스크립트 설치
RUN apt update
RUN apt upgrade -y
RUN apt-get install make build-essential libssl-dev zlib1g-dev libbz2-dev libreadline-dev libsqlite3-dev wget curl llvm libncursesw5-dev xz-utils tk-dev libxml2-dev libxmlsec1-dev libffi-dev liblzma-dev libssl-dev

USER jenkins
RUN curl https://pyenv.run | bash
RUN echo "export PYENV_ROOT=\"$HOME/.pyenv\"" >> /home/jenkins/.bashrc
RUN echo "export PATH=\"\$PYENV_ROOT/bin:\$PATH\"" >> /home/jenkins/.bashrc
RUN echo "eval \"\$(pyenv init --path)\"" >> /home/jenkins/.bashrc

USER root

WORKDIR /home/$user
CMD service ssh restart && /bin/bash
Container가 볼륨 공유 시, 기반으로 commit은 위험

- container도 어짜피, IMAGE를 기반으로 한 건데, 깔끔하게!
Dockerfile에 FROM IMAGE로 깔끔하게 빌드 해, 새 이미지를 만들어 내자.
build
Dockerfile
위치:~/workspace/Dockerfile이 있다고 가정한다.
- docker build
$ docker build -t USER_ID혹은REPO/IMAGE:TAG -f Dockerfile_위치-t USER_ID/IMAGE:TAG: 설정한USER_ID/IMAGE:TAG로 이미지 생성-f Dockerfile_위치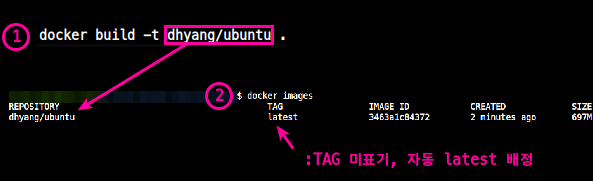
git source
pllpokko@alumni.kaist.ac.kr