Install
- 환경: Ubuntu 20.04 LTS, x86-64아래 커맨드 설치
$ curl https://pyenv.run | bashpyenv.run이 repository의 설치용 스크립트를 bash로 리다이렉트
- 출력
# (The below instructions are intended for common
# shell setups. See the README for more guidance
# if they don't apply and/or don't work for you.)
# 아래의 명령어들은 일반-쉘-설정에 설치된다.

# Add pyenv executable to PATH and
# enable shims by adding the following
# to ~/.profile:
# pyenv 실행가능한 PATH로 추가도록 아래의 환경 변수를 ~/.profile에 추가하라.

export PYENV_ROOT="$HOME/.pyenv"
export PATH="$PYENV_ROOT/bin:$PATH"
eval "$(pyenv init --path)"

# If your ~/.profile sources ~/.bashrc,
# the lines need to be inserted before the part
# that does that. See the README for another option.
# ~/.profile이 sources ~/.bashrc라면, 위 라인이 그 이전에 삽입할 것

# If you have ~/.bash_profile, make sure that it
# also executes the above lines -- e.g. by
# copying them there or by sourcing ~/.profile
# ~/.bash_profile을 가지고 있다면, 위 라인이 실행됨을 보장한다.

# Load pyenv into the shell by adding
# the following to ~/.bashrc:

# ~/.bashrc에 다음의 명령어를 추가여 pyenv를 로드할 수 있다.

eval "$(pyenv init -)"

# Make sure to restart your entire logon session
# for changes to profile files to take effect.

# 전체 로그인 세션을 restart해서 변경이 profile file에 effect를 주게 해라.

# Load pyenv-virtualenv automatically by adding
# the following to ~/.bashrc:

# ~/.bashrc에 다음의 명령어를 추가하여 자동적으로 pyenv-virtualenv를 로드한다.

eval "$(pyenv virtualenv-init -)"
- shell별 startupfile은 링크 글 참고
- 그러나! 다 귀찮아서!! 아래 같이 3줄만 자신이 사용하는 쉘설정 파일에 넣는다.
ZSH를 사용하는 경우
- 본 저자는 ZSH를 사용하므로
~/.zshrc에
아래의 내용을 append함
export PYENV_ROOT="$HOME/.pyenv"
export PATH="$PYENV_ROOT/bin:$PATH"
eval "$(pyenv init --path)"- 바로 적용
$ source ~/.zshrc- 확인
$ pyenv versions설치시 Error
build 환경 에러
$ sudo apt-get install make build-essential libssl-dev zlib1g-dev \
libbz2-dev libreadline-dev libsqlite3-dev wget curl llvm \
libncursesw5-dev xz-utils tk-dev libxml2-dev libxmlsec1-dev libffi-dev liblzma-dev
OpenSSL lib 못 찾는 에러
1) ERROR: The Python ssl extension was not compiled. Missing the OpenSSL lib?
libssl-dev를 찾지 못해서 발생하는 에러$ sudo apt-get install libssl-dev로 해결
pyenv 활용
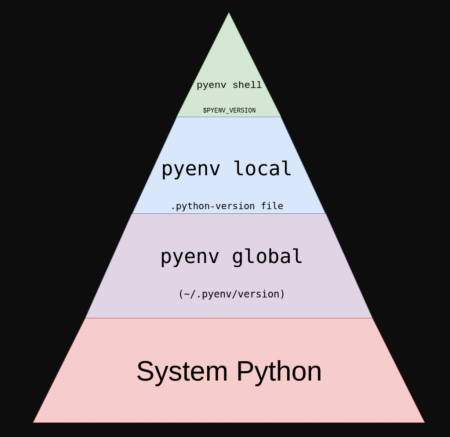
pyenv 단계별 특징

pyenv shellpyenv local: 특정 디렉토리에서 사용되는 python- dir/.python-version 파일에 명시된 것 사용
pyenv global: pyenv에 의해 $USER가 전반적으로 사용하는 python- ~/.pyenv/version 에서 관리
System Python: 내 system에서 쓰는 Python/usr/bin/python -> /usr/bin/python3 -> /usr/bin/python3.8...- 버전 잘못 건드리면, apt 저장소 명령도 꼬이는 등 매우 빡침
특정 버전 python 설치
$ pyenv install <INSTALL_PYTHON>
<INSTALL_PYTHON>에 뭐가 들어갈지 모르겠으면,tab키를 누르면 자동 완성
- 3.6.8 버전을 설치한다면,
$ pyenv install 3.6.8pyenv python 확인
$ pyenv versions
python 고르기
$ pyenv global <version>
$ pyenv global <PYTHON VERSION>

e.g.,
$ pyenv global 3.9.0- $USER 용으로 사용하는 시스템 전반으로 사용됨
$HOME/.pyenv/versions에 디렉토리로 지정됨
- 설정 시, 해당 유저의 쉘에서
$ python -V해보면 pyenv global로 지정된 파이썬이 사용됨을 확인
$ python -V
Python 3.9.0
# 시스템용 python(/usr/bin/python)은 3.8.6 임
$ pyenv local <version>
- 특정 디렉토리에서만 사용할 버전
$ pyenv local <PYTHON VERSION>

e.g.,
$ pyenv local 3.9.0- 해당 디렉토리에
.python-version파일이 생성 되고, 명시된 버전 사용됨
# === dir/.python-version === #
3.9.0
사용하는 python bin 위치
$ pyenv which python
$ pyenv which python
$ pyenv which python
/home/$USER/.pyenv/versions/3.9.6/bin/python
package, pip
global
- 사용중인 pyenv의 python version: 3.9.6 (global)

global 관리 위치
$HOME/.pyenv/versions/3.9.6

global site-packages
- site-packages:
$HOME/.pyenv/versions/3.9.6/lib/python3.9/site-packages

local directory用
dir python 적용
$ pyenv local <version>
$ pyenv local <python version>으로 명시
$ pyenv local <Python Version>

e.g.,
$ pyenv local 3.9.0- 환경변수
PYENV_VERSION에 명시
- 제일 확실한 방법
$ export PYENV_VERSION="3.9.0"
.python-version파일을 디렉토리에 생성
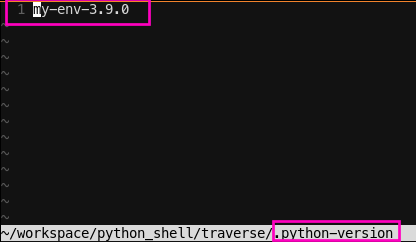
.python-version파일을 생성하고 버전 명시


pyenv-virtualenv
- pyenv로 local로 python version을 설치/사용
- python-version + python packages 관리까지 하고 싶다면! pyenv-virtualenv 사용!
install
$ git clone https://github.com/pyenv/pyenv-virtualenv.git $(pyenv root)/plugins/pyenv-virtualenv- 이미
$HOME/.pyenv/plugins/pyenv-virtualenv디렉토리가 있다면
(~/.pyenv/plugins/pyenv-virtualenv) $ git fetch origin && git pull origin master && git checkout FETCH_HEAD
(~/.pyenv/plugins/pyenv-virtualenv) $ sudo ./install.sh
pyenv-virtualenv 목록 list
$ pyenv versions
- 원래는
$ pyenv virtualenvs인데, 그냥$ pyenv versions해도됨

my virtualenv 생성
$ pyenv virtualenv <name>
pyenv-virtualenv <내 환경>이 관리하는 패키지
- pyenv local python version:
3.6.8
pyenv-virtualenv 환경 이름:my-env-3.9.0
| 항목 | path |
|---|---|
| site-packages | $HOME/.pyenv/versions/3.9.0/envs/my-env-3.9.0/lib/python3.9/site-packages |
| pip | $HOME/.pyenv/versions/3.9.0/envs/my-env-3.9.0/lib/python3.9/site-packages |
- pyenv local python version:
3.6.8
pyenv-virtualenv 환경 이름:webosimg.lge.com
| 항목 | path |
|---|---|
| site-packages | $HOME/.pyenv/versions/3.6.8/envs/webosimg.lge.com/lib/python3.6/site-packages |
| pip | $HOME/.pyenv/versions/3.6.8/envs/webosimg.lge.com/lib/python3.6/site-packages |
pyenv-virtualenv 만들기
- pyenv local python version 기준으로 하위 specific env가 만들어짐
- 예를 들어, 내 디렉토리에서 pyenv로 python 3.9.0을 사용한다고 가정
# pyenv 적용 디렉토리
$ pyenv virtualenv <Env Name to be created>
으로 pyenv-virtualenv 환경을 생성할 수 있다.
- pyenv python version:
3.9.0 - Env name:
my-env-3.9.0로 생성 예제
# pyenv local 3.9.0
$ pyenv virtualenv my-env-3.9.0- Path :
$HOME/.pyenv/version/3.9.0/my-env-3.9.0생성
pyenv-virtualenv Activate
$ pyenv activate <virtualenv>

e.g.,
$ pyenv activate my-env-3.9.0- 디렉토리 들어갈 때 마다 커맨드 치면 굉장히 귀찮기 때문에,
.python-version파일에 명시해도 됨

pyenv-virtualenv Deactivate
$ pyenv deactivateDelete virtualenv
$ pyenv uninstall my-virtual-env
혹은
$ pyenv virtualenv-delete my-virtual-env
다른 virtualenv 때문에, 새 virtualenv 적용 안될 때
- 현재 상황

-
echo $PYENV_VERSION으로 보자

-
$PYENV_VERSION에 명시적으로 사용 버전을 Insert
$ export PYENV_VERSION=3.6.8


