
📅 2025-10-22
➡️ React Redux에 대해 새롭게 알게 된 것 또는 헷갈리는 부분 정리
🔎 학습 리마인드
📌 Redux
- 전역 상태를 하나의 저장소(Store)에서 관리하도록 도와주는 라이브러리
설치
npm i redux react-redux폴더 구조
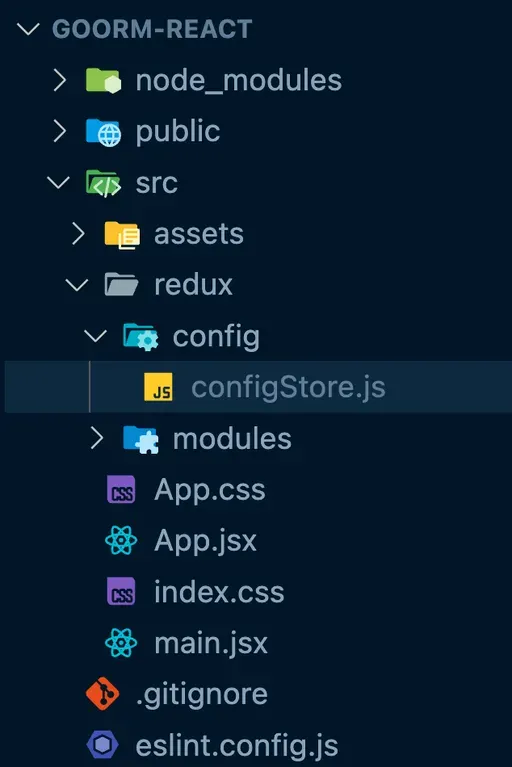
src폴더 안에redux폴더 생성redux폴더 안에config,modules폴더 생성config폴더 안에configStore.js파일 생성
redux폴더 - 리덕스의 관련된 코드를 모아두는 폴더config폴더 - 리덕스 설정과 관련된 파일들configStore.js- state store를 만드는 설정 코드
modules폴더 - 주제별 상태/리듀서를 묶은 파일들
💡 configStore.js
// src/redux/config/configStore.js
import { createStore, combineReducers } from "redux";

const rootReducer = combineReducers({});

const store = createStore(rootReducer);

export default store;combineReducers()- 여러 리듀서를 하나로 합쳐 큰 상태 객체 생성
createStore()- Redux Store 생성 (앱당 하나만 존재)
💡 main.jsx
import { StrictMode } from "react";
import { createRoot } from "react-dom/client";
import "./index.css";
import App from "./App.jsx";

//추가할 코드
import { Provider } from "react-redux";
import store from "./redux/config/configStore";

createRoot(document.getElementById("root")).render(
  <StrictMode>
    {/* App을 Provider로 감싸고, configStore에서 export default한 store를 넣어줌 */}
    <Provider store={store}>
      <App />
    </Provider>
  </StrictMode>
);Provider로 App을 감싸고 store를 전달하면 하위 컴포넌트에서 Redux 사용 가능
📌 Counter 모듈 만들기
💡 counter.js
// src/redux/modules/counter.js

// 1) 초기 상태
const initialState = { number: 0 };

// 2) 리듀서(상태 변경 규칙)
function counter(state = initialState, action) {
  switch (action.type) {
    default:
      return state;
  }
}

// 3) 이 모듈의 리듀서를 기본 내보내기
export default counter;initialState: 이 모듈이 다룰 상태의 초기값 (객체/배열/원시 값 무엇이든 가능)리듀서: 어떤 액션이 오면 상태를 어떻게 바꿀 것인지 정의하는 함수
💡 스토어에 모듈 연결
// src/redux/config/configStore.js
import { createStore, combineReducers } from "redux";
import counter from "../modules/counter";

const rootReducer = combineReducers({
  counter, // counter: counter 와 동일
});

const store = createStore(rootReducer);
export default store;
💡 스토어 값 읽기 (useSelector)
useSeletorimport './App.css'; import { useSelector } from 'react-redux'; function App() { const number = useSelector((state) => { return state; }); console.log(number); // { counter: { number: 0 } } console.log(number.counter); // { number: 0 } return <div></div>; } export default App;
📌 Redux의 흐름
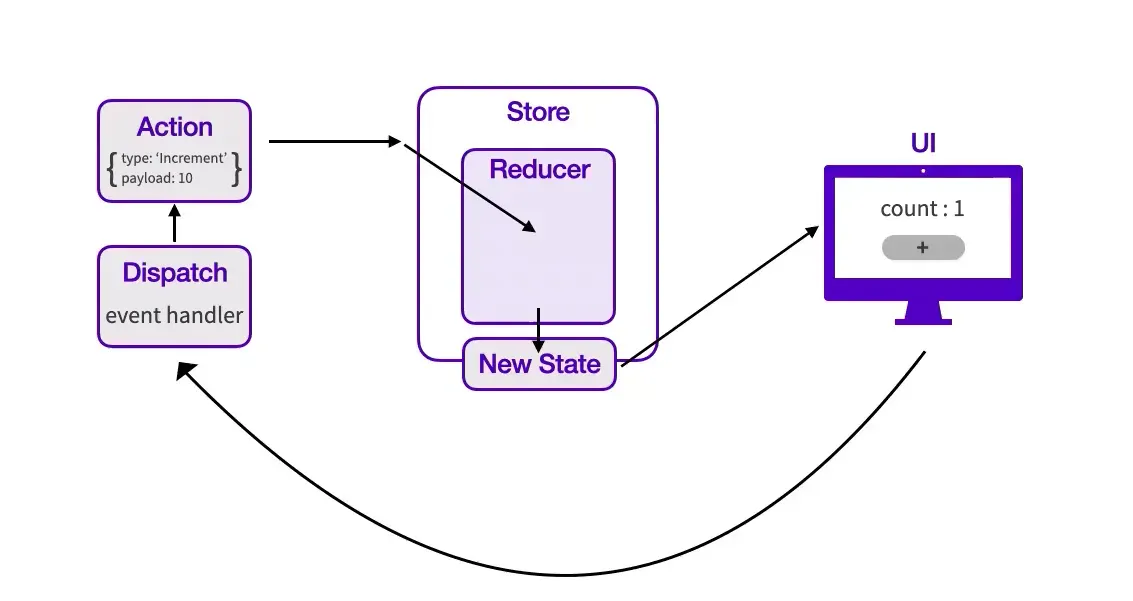
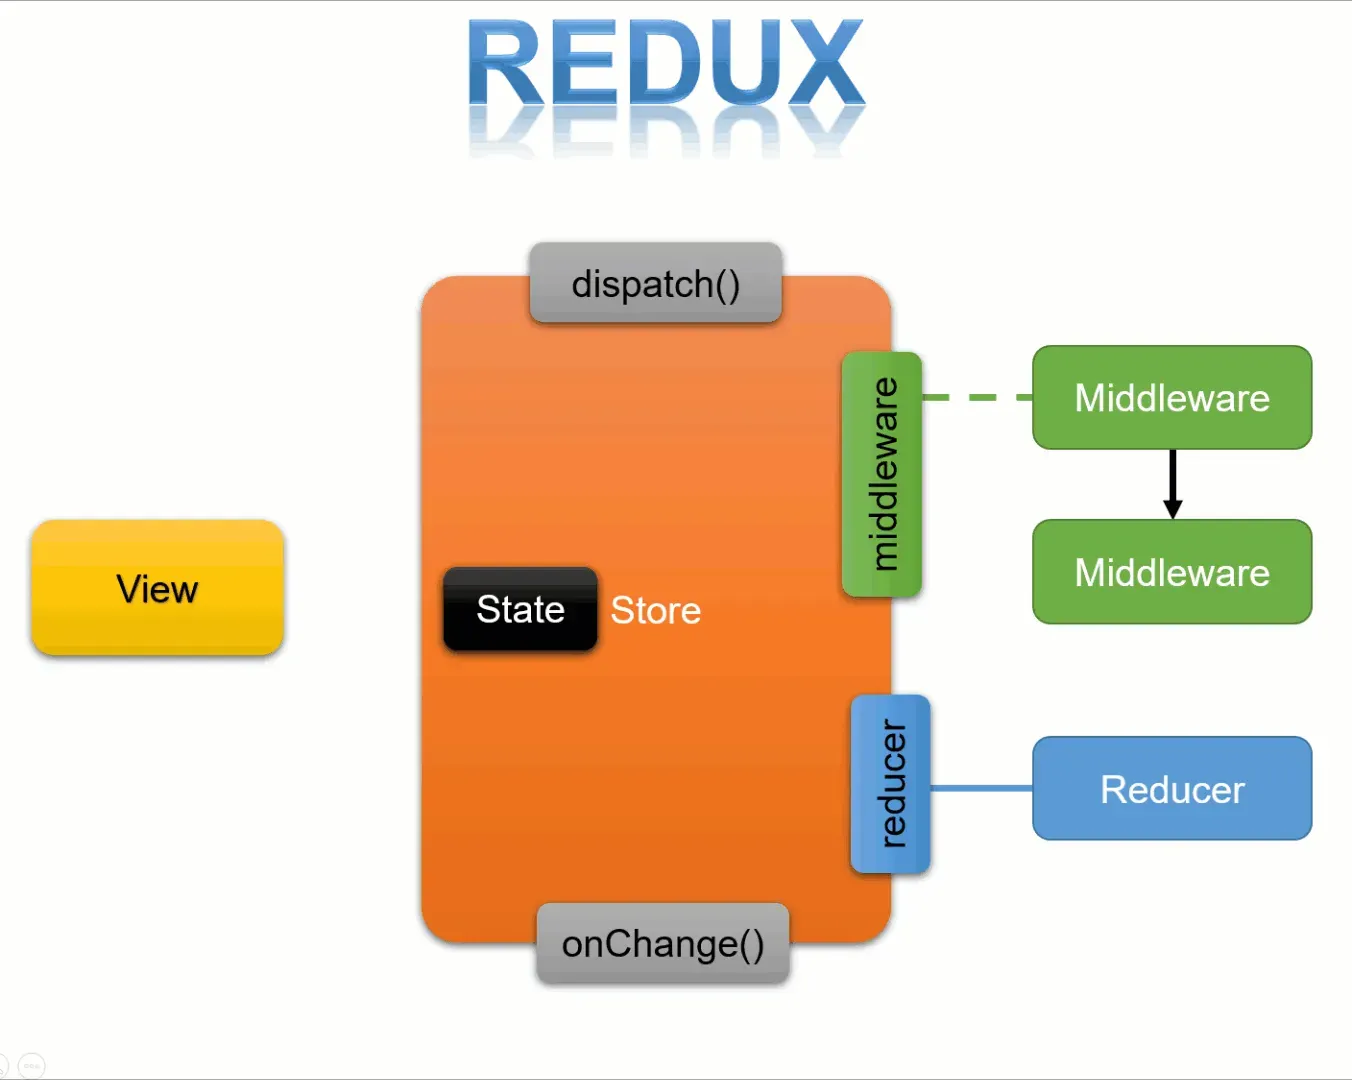
- 화면(UI)에서 어떤 액션이 발생
- 그 액션을
dispatch가 받아 스토어로 전달 - 리듀서가 실행되기 전에 middleware가 끼어들어 가공 처리
- 미들웨어 처리가 끝나면 reducer가 호출
- 리듀서 결과로 만들어진 새 상태가 store에 저장
- store를 구독하고 있던 컴포넌트들이 변경된 상태로 다시 렌더링
💡 Action과 Dispatch
- Action: 상태 변경 요청 객체 (
{ type: "PLUS_ONE" }) - Dispatch: Action을 리듀서에 보내 상태 변경
import { useDispatch } from "react-redux";

const dispatch = useDispatch();

<button onClick={() => dispatch({ type: "PLUS_ONE" })}>+1</button>
💡 리듀서에서 상태 변경
const initialState = { number: 0 };

const counter = (state = initialState, action) => {
  switch (action.type) {
    case "PLUS_ONE":
      return { number: state.number + 1 };
    default:
      return state;
  }
};- Action이 도착하면 상태 변경 후 새 객체 반환
- 기존 상태는 직접 수정하지 않고 새 상태를 반환해야 함
💡 리덕스의 핵심 요소
| 요소 | 설명 |
|---|---|
| Action | 상태(State)가 변하는 것. “무엇이 일어날지”를 정의하는 명령 객체 |
| Reducer | 액션을 받아 상태를 수정하는 함수. 액션에 따라 새 상태를 계산하고 반환 |
| Store | 리듀서와 상태를 저장하는 단일 객체. 상태 변화를 구독하는 컴포넌트에 알림 역할 |
| Dispatch | 스토어의 내장 함수. 액션을 리듀서로 보내 상태 변경을 트리거 |