
이번에는 [OAuth + Spring Boot + JWT] 1. OAuth란? 프론트엔드와 백엔드의 역할 마지막에 설명한 구조를 스프링 시큐리티 없이 구현하기 앞서 스프링 시큐리티를 사용해서 oauth를 구현해보려고 한다.
👀 구현한 코드: https://github.com/KJunseo/oauth-with-spring-security
🌱 스프링 시큐리티를 사용하여 OAuth 로그인 구현해보기
사전 작업
1) 스프링 프로젝트 생성
2) 의존성 추가
dependencies {
    implementation 'org.springframework.boot:spring-boot-starter-web'
    implementation 'org.springframework.boot:spring-boot-starter-data-jpa'
    implementation 'org.springframework.boot:spring-boot-starter-oauth2-client' // 스프링 시큐리티
    implementation 'com.h2database:h2'
    testImplementation 'org.springframework.boot:spring-boot-starter-test'
}
3) 도메인 생성
OAuth 로그인을 통해 얻어온 유저 정보를 매핑하기 위한 도메인. OAuth 로그인을 통해 OAuth 자체 ID, name, email, image url을 얻어오려고 한다.
@Entity
public class Member {
    @Id
    @GeneratedValue(strategy = GenerationType.IDENTITY)
    private Long id;

    private String oauthId;

    private String name;

    private String email;

    private String imageUrl;

    @Enumerated(EnumType.STRING)
    private Role role;

    protected Member() {
    }

    public Member(String oauthId, String name, String email, String imageUrl, Role role) {
        this(null, oauthId, name, email, imageUrl, role);
    }

    public Member(Long id, String oauthId, String name, String email, String imageUrl, Role role) {
        this.id = id;
        this.oauthId = oauthId;
        this.name = name;
        this.email = email;
        this.imageUrl = imageUrl;
        this.role = role;
    }

    public Member update(String name, String email, String imageUrl) {
        this.name = name;
        this.email = email;
        this.imageUrl = imageUrl;
        return this;
    }

    public String getRoleKey() {
        return this.role.getKey();
    }

    public Long getId() {
        return id;
    }

    public String getOauthId() {
        return oauthId;
    }

    public String getName() {
        return name;
    }

    public String getEmail() {
        return email;
    }

    public String getImageUrl() {
        return imageUrl;
    }

    public Role getRole() {
        return role;
    }
}
public enum Role {
    GUEST("ROLE_GUEST"),
    USER("ROLE_USER");

    private final String key;

    Role(String key) {
        this.key = key;
    }

    public String getKey() {
        return key;
    }
}
4) OAuth 서비스 등록(github, google, naver)
이번 예시에서는 github, google, naver OAuth 서비스를 이용해서 로그인을 진행해 볼 예정이다. 서비스 등록 UI는 언제나 바뀔 수 있다.(2021.07.23 기준 UI이다.)
github
github 설정은 간단하다.
https://github.com/settings/developers 이 url로 접속한다.
그 후, 우측에 New OAuth App 버튼을 클릭한다.
내용을 채워넣어주면 된다. 여기서 callback URL은 /login/oauth2/code/github을 맞춰 적어준다.
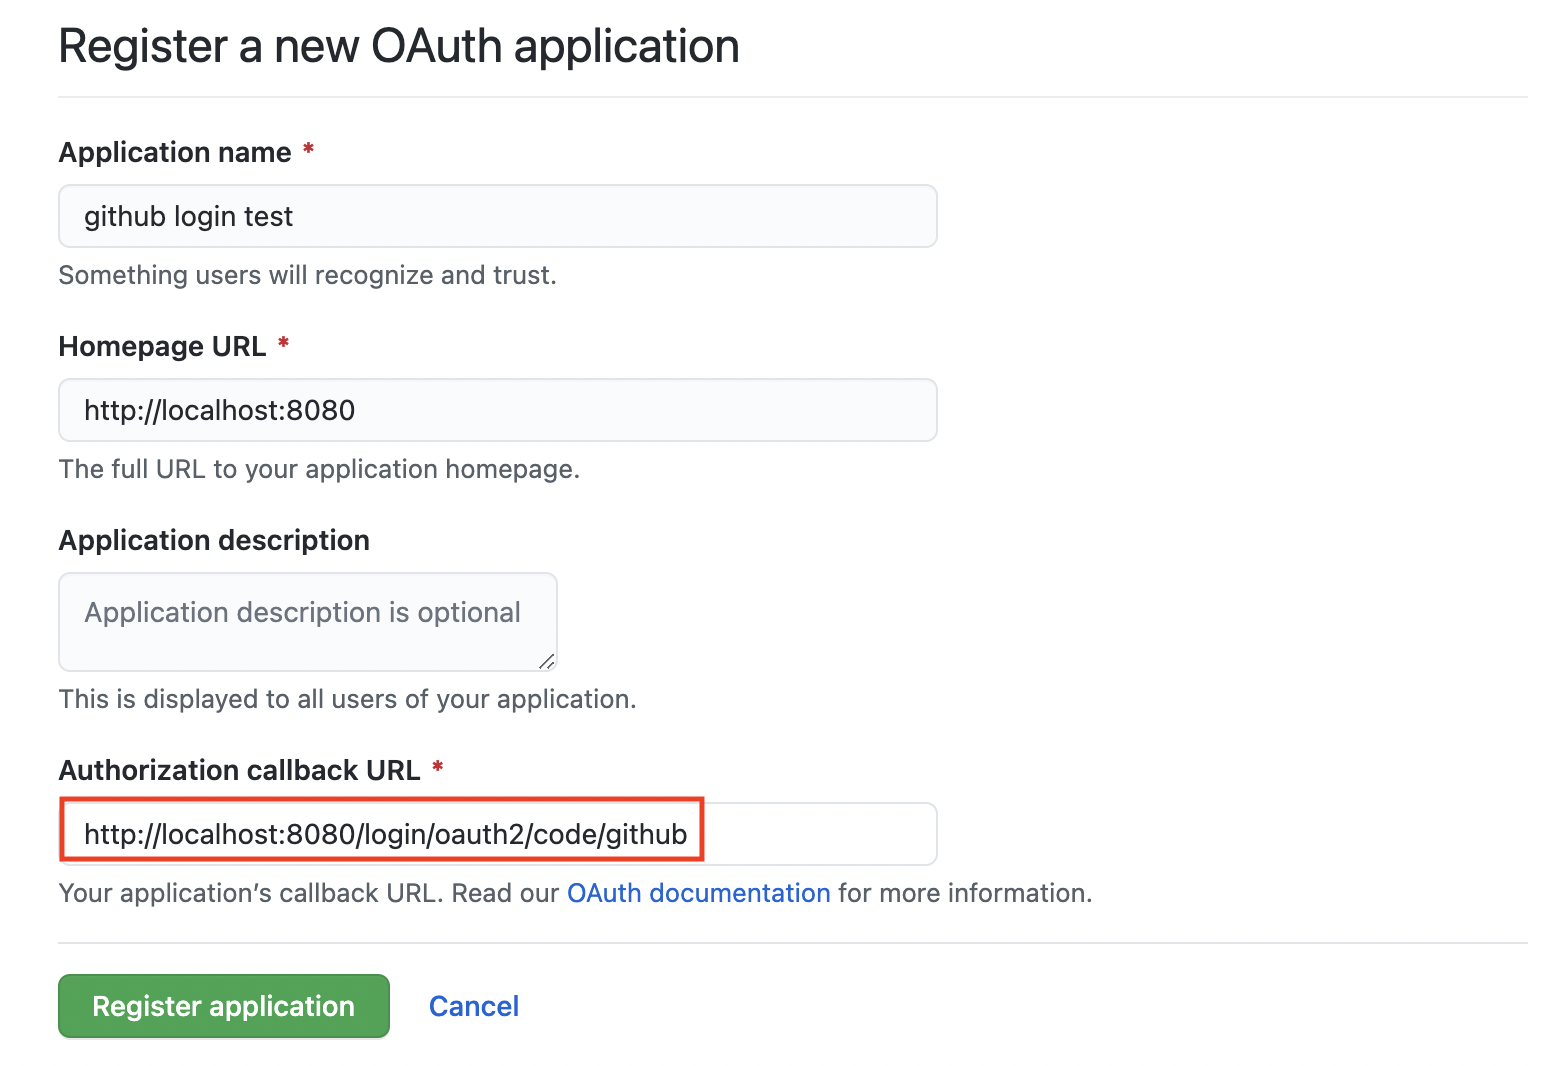
그리고 Register application을 눌러주면 Client ID가 보이고, Client secrets를 만들 수 있는 버튼이 보인다.

Client secrets를 생성해주고, Client ID, Client secrets를 잠깐 어디 적어두기!(github의 경우 Client secrets를 다시 볼 수 없다.)
https://console.cloud.google.com/home/dashboard 로 접속하여 새 프로젝트를 만든다.
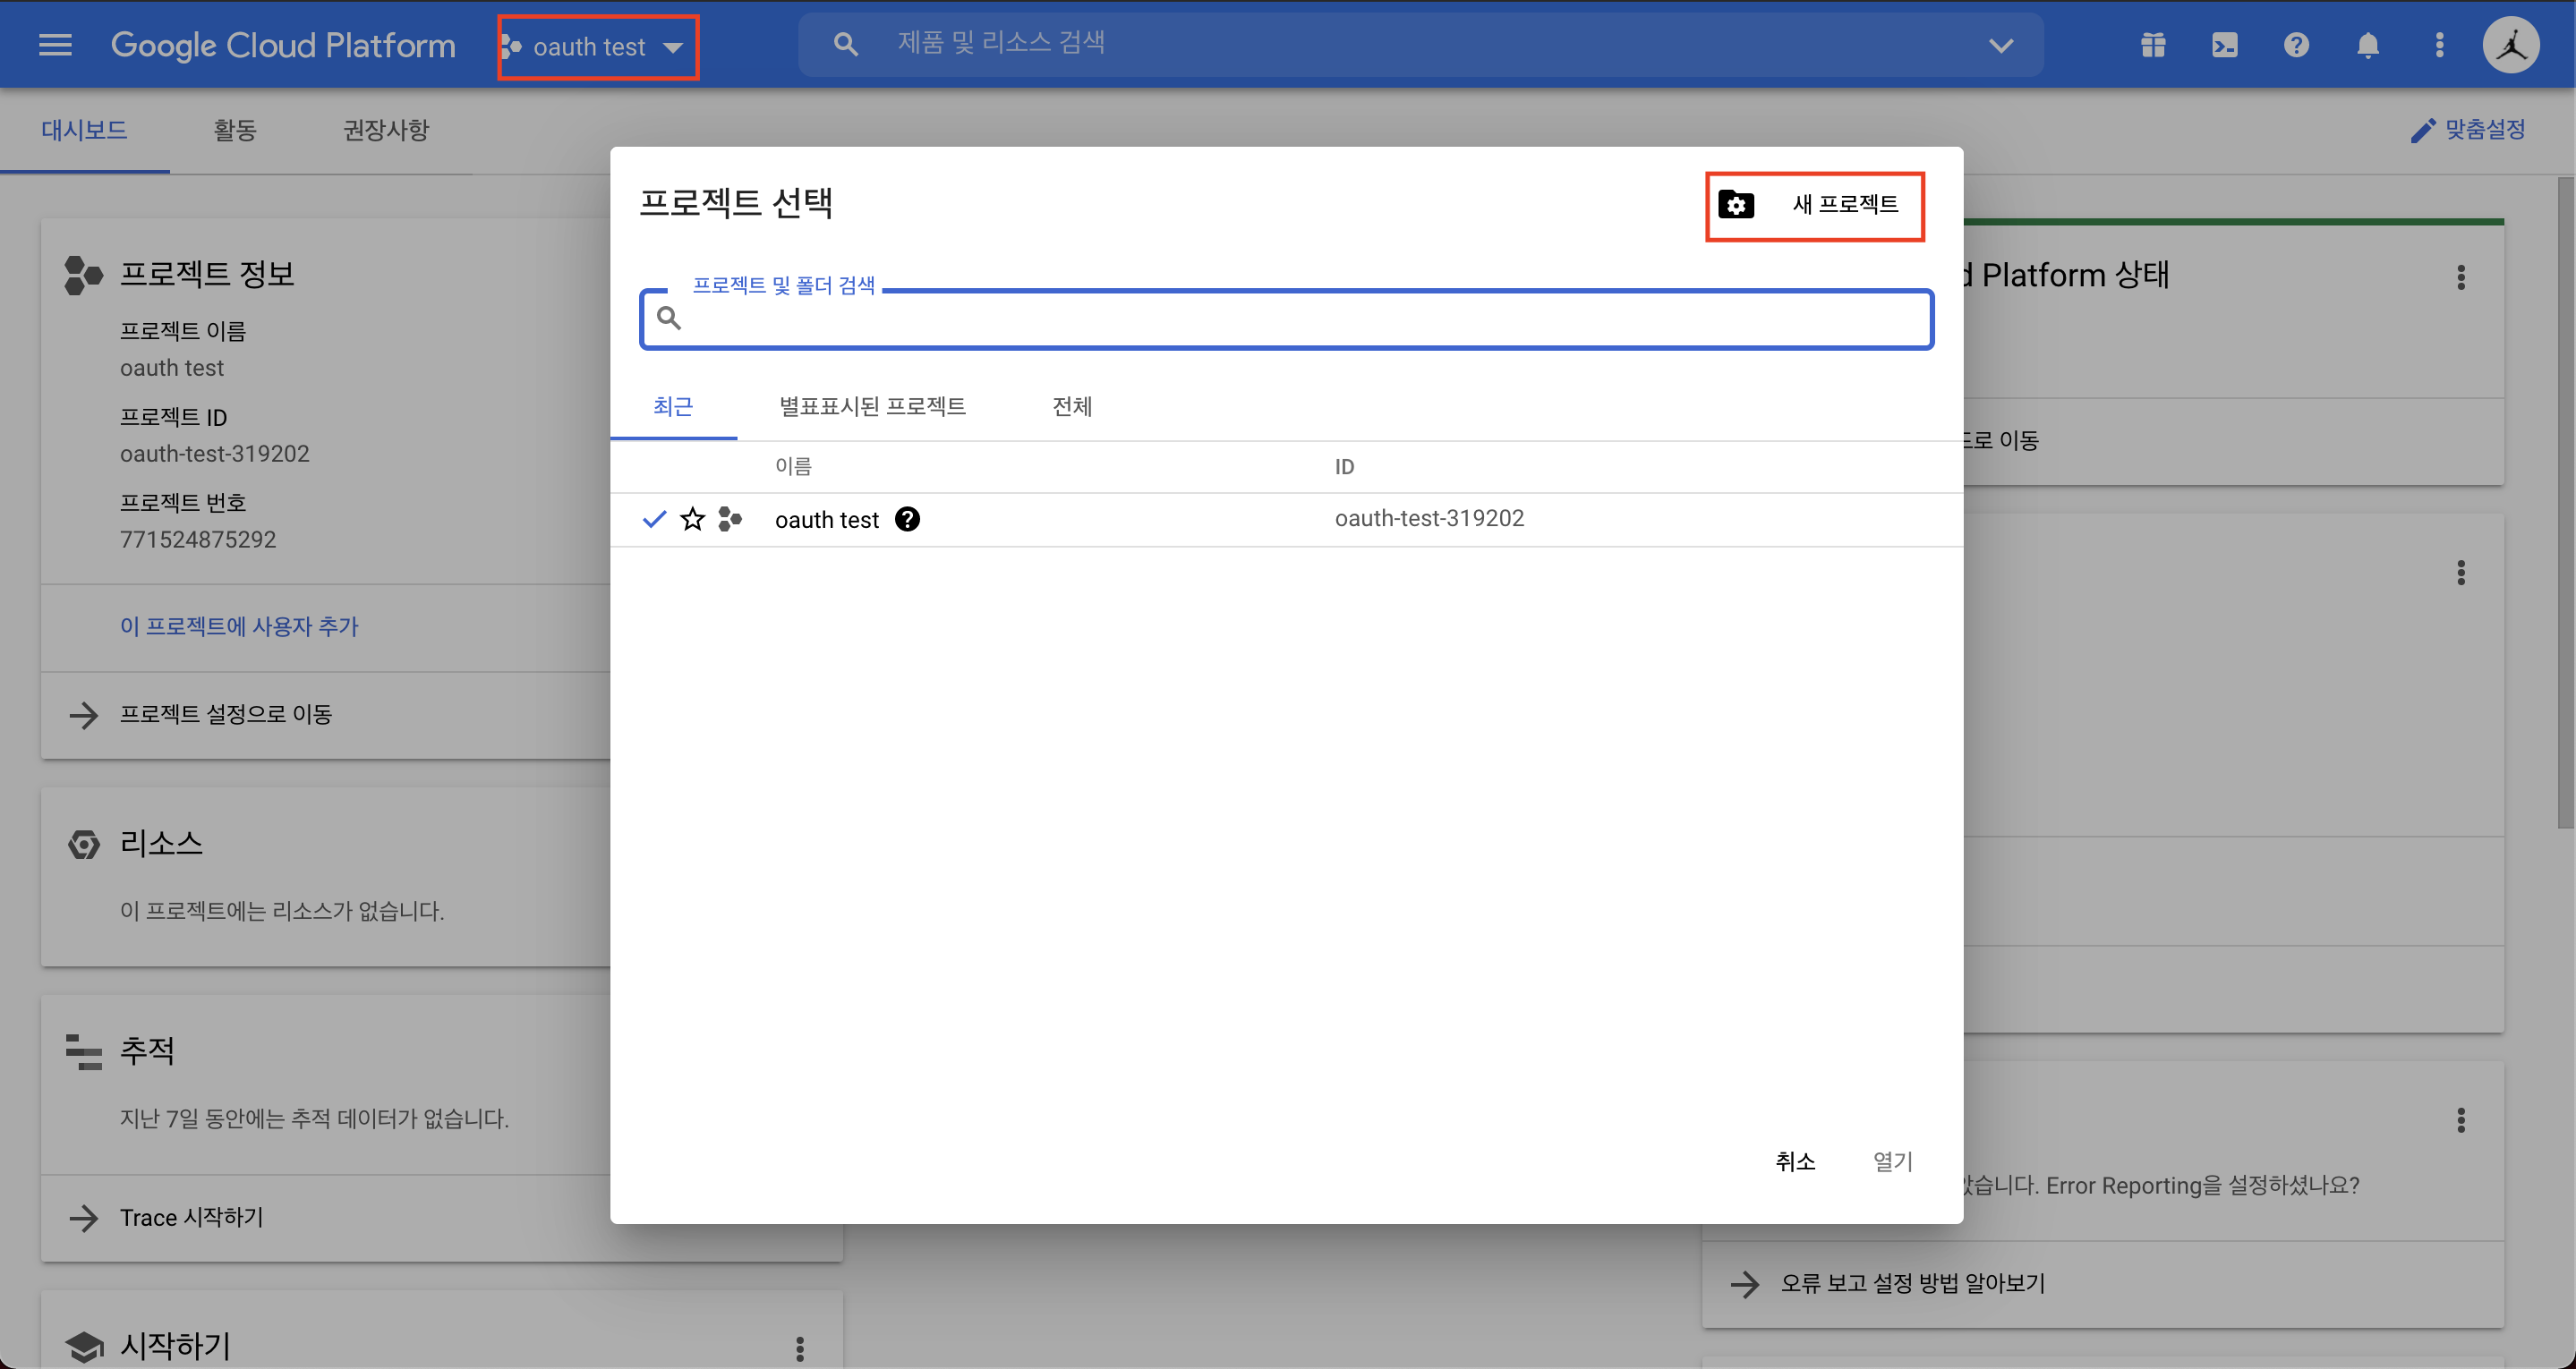
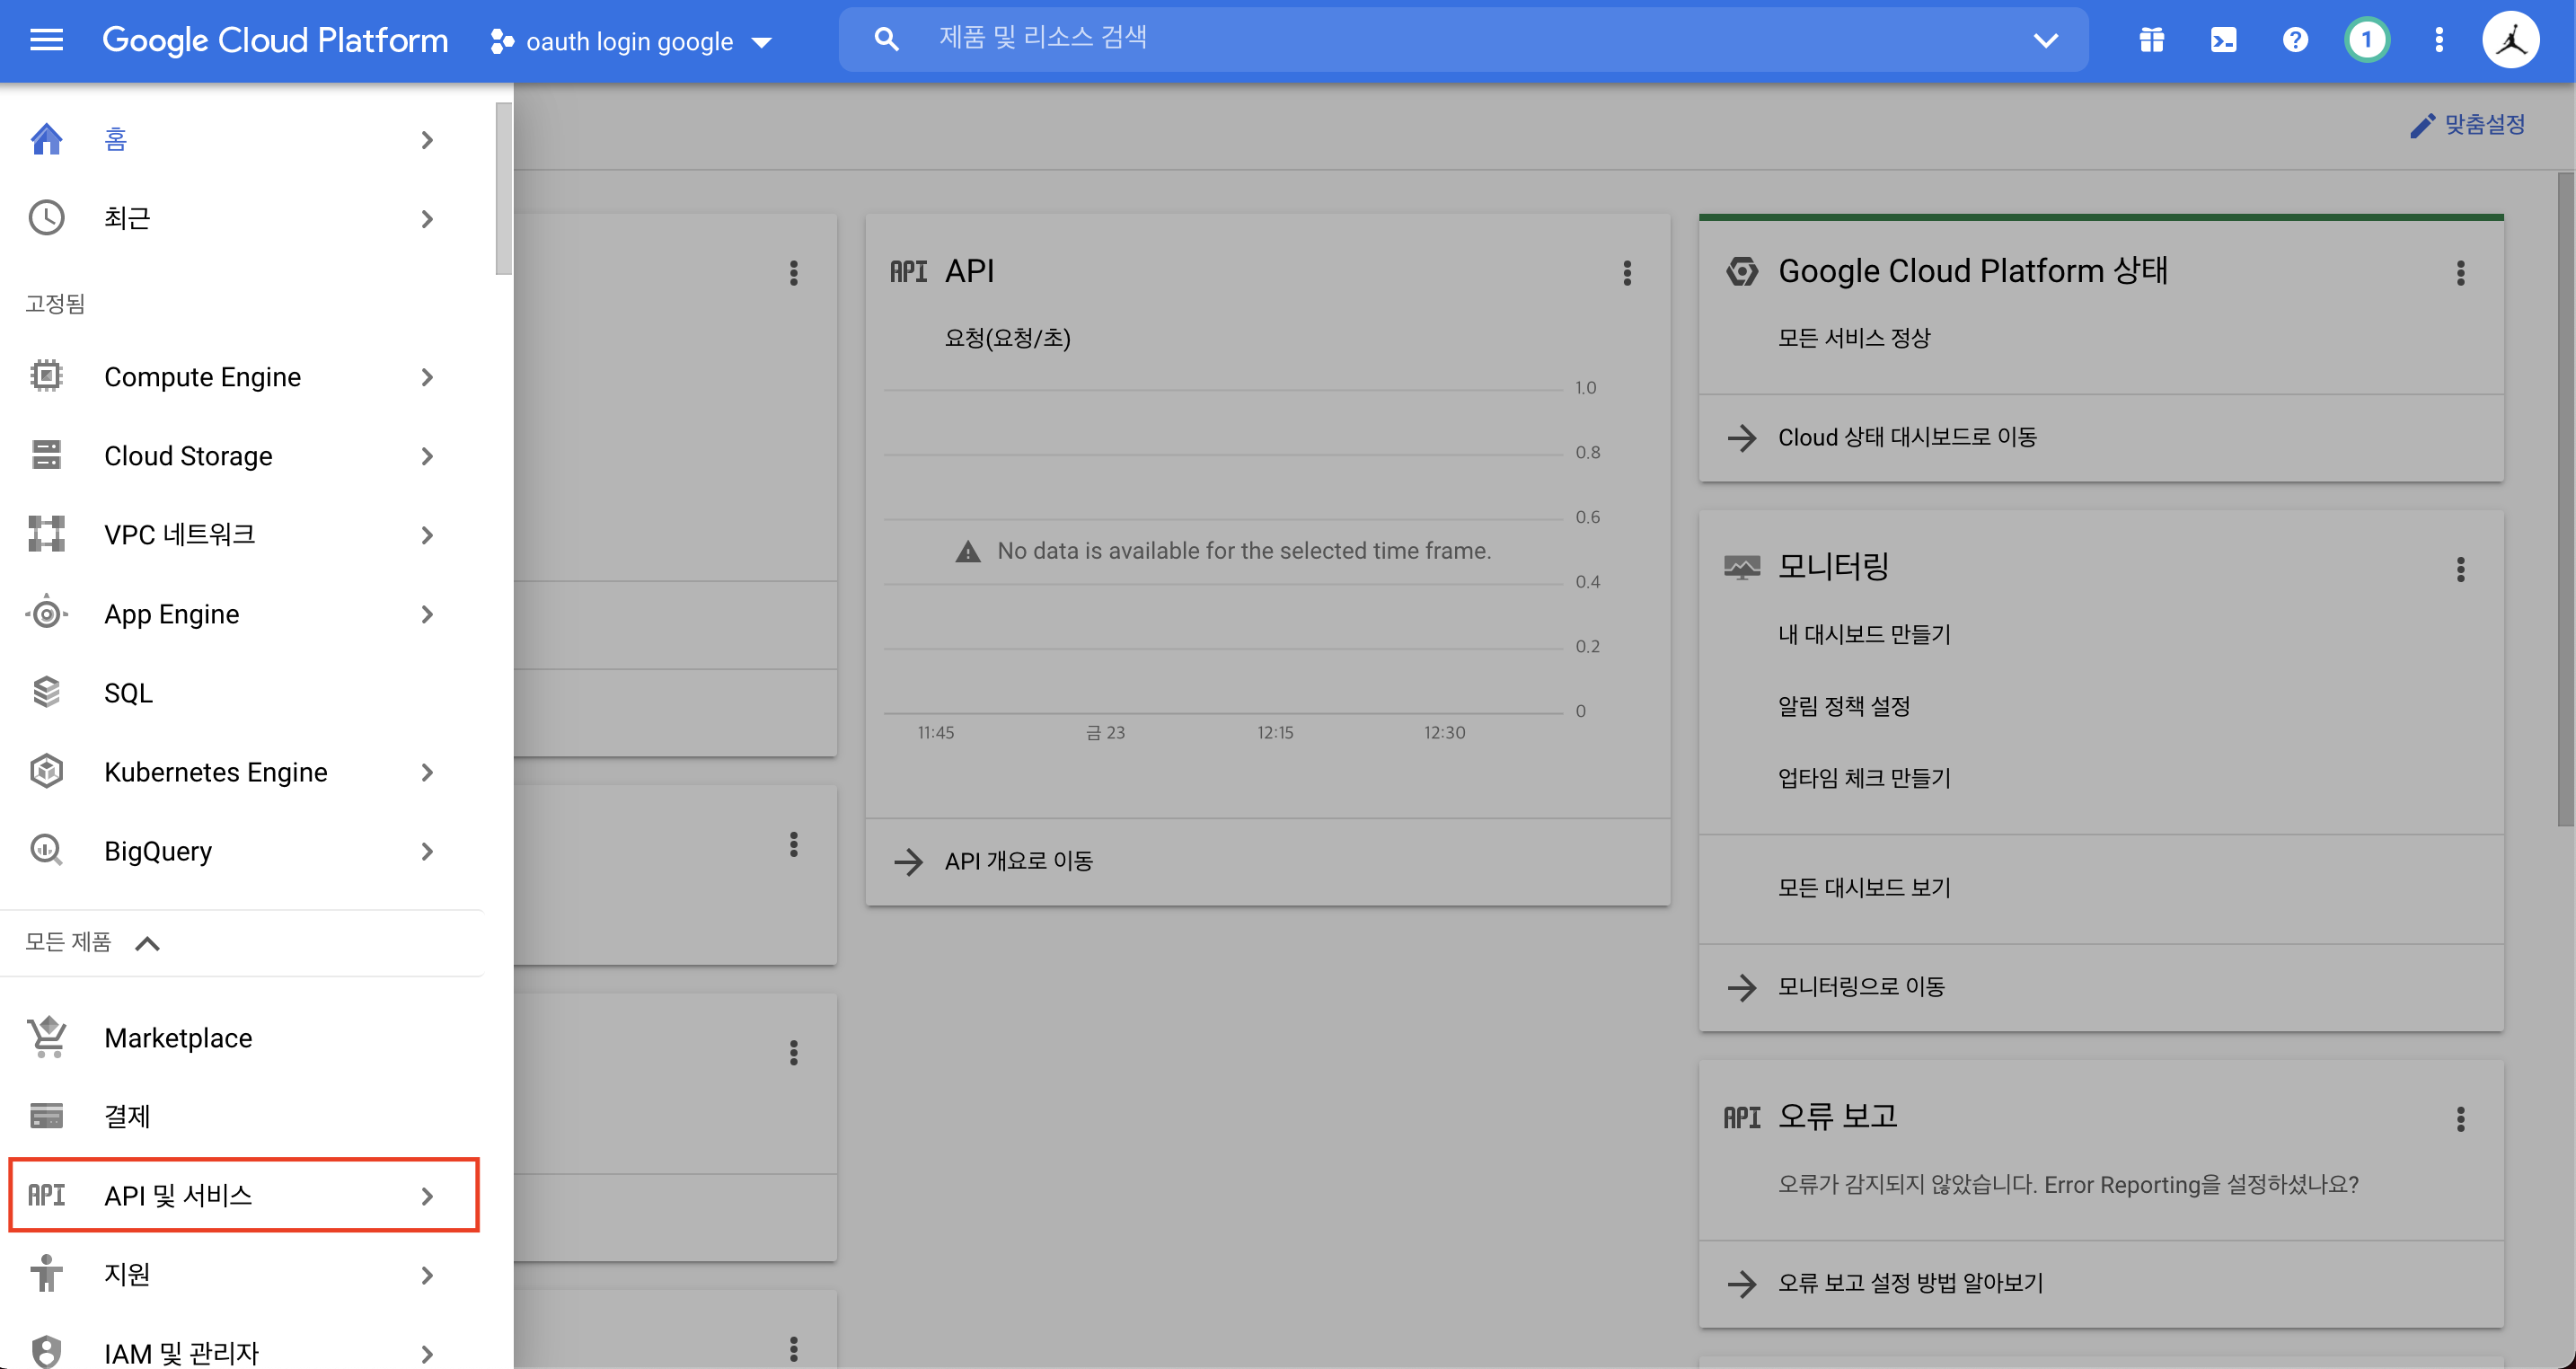
프로젝트 이름을 입력하고 조금 기다리면 프로젝트가 생성된다. 생성된 프로젝트에서 API 및 서비스를 클릭한다.
사용자 인증 정보 -> 사용자 인증 정보 만들기 -> OAuth 클라이언트 ID를 클릭한다.
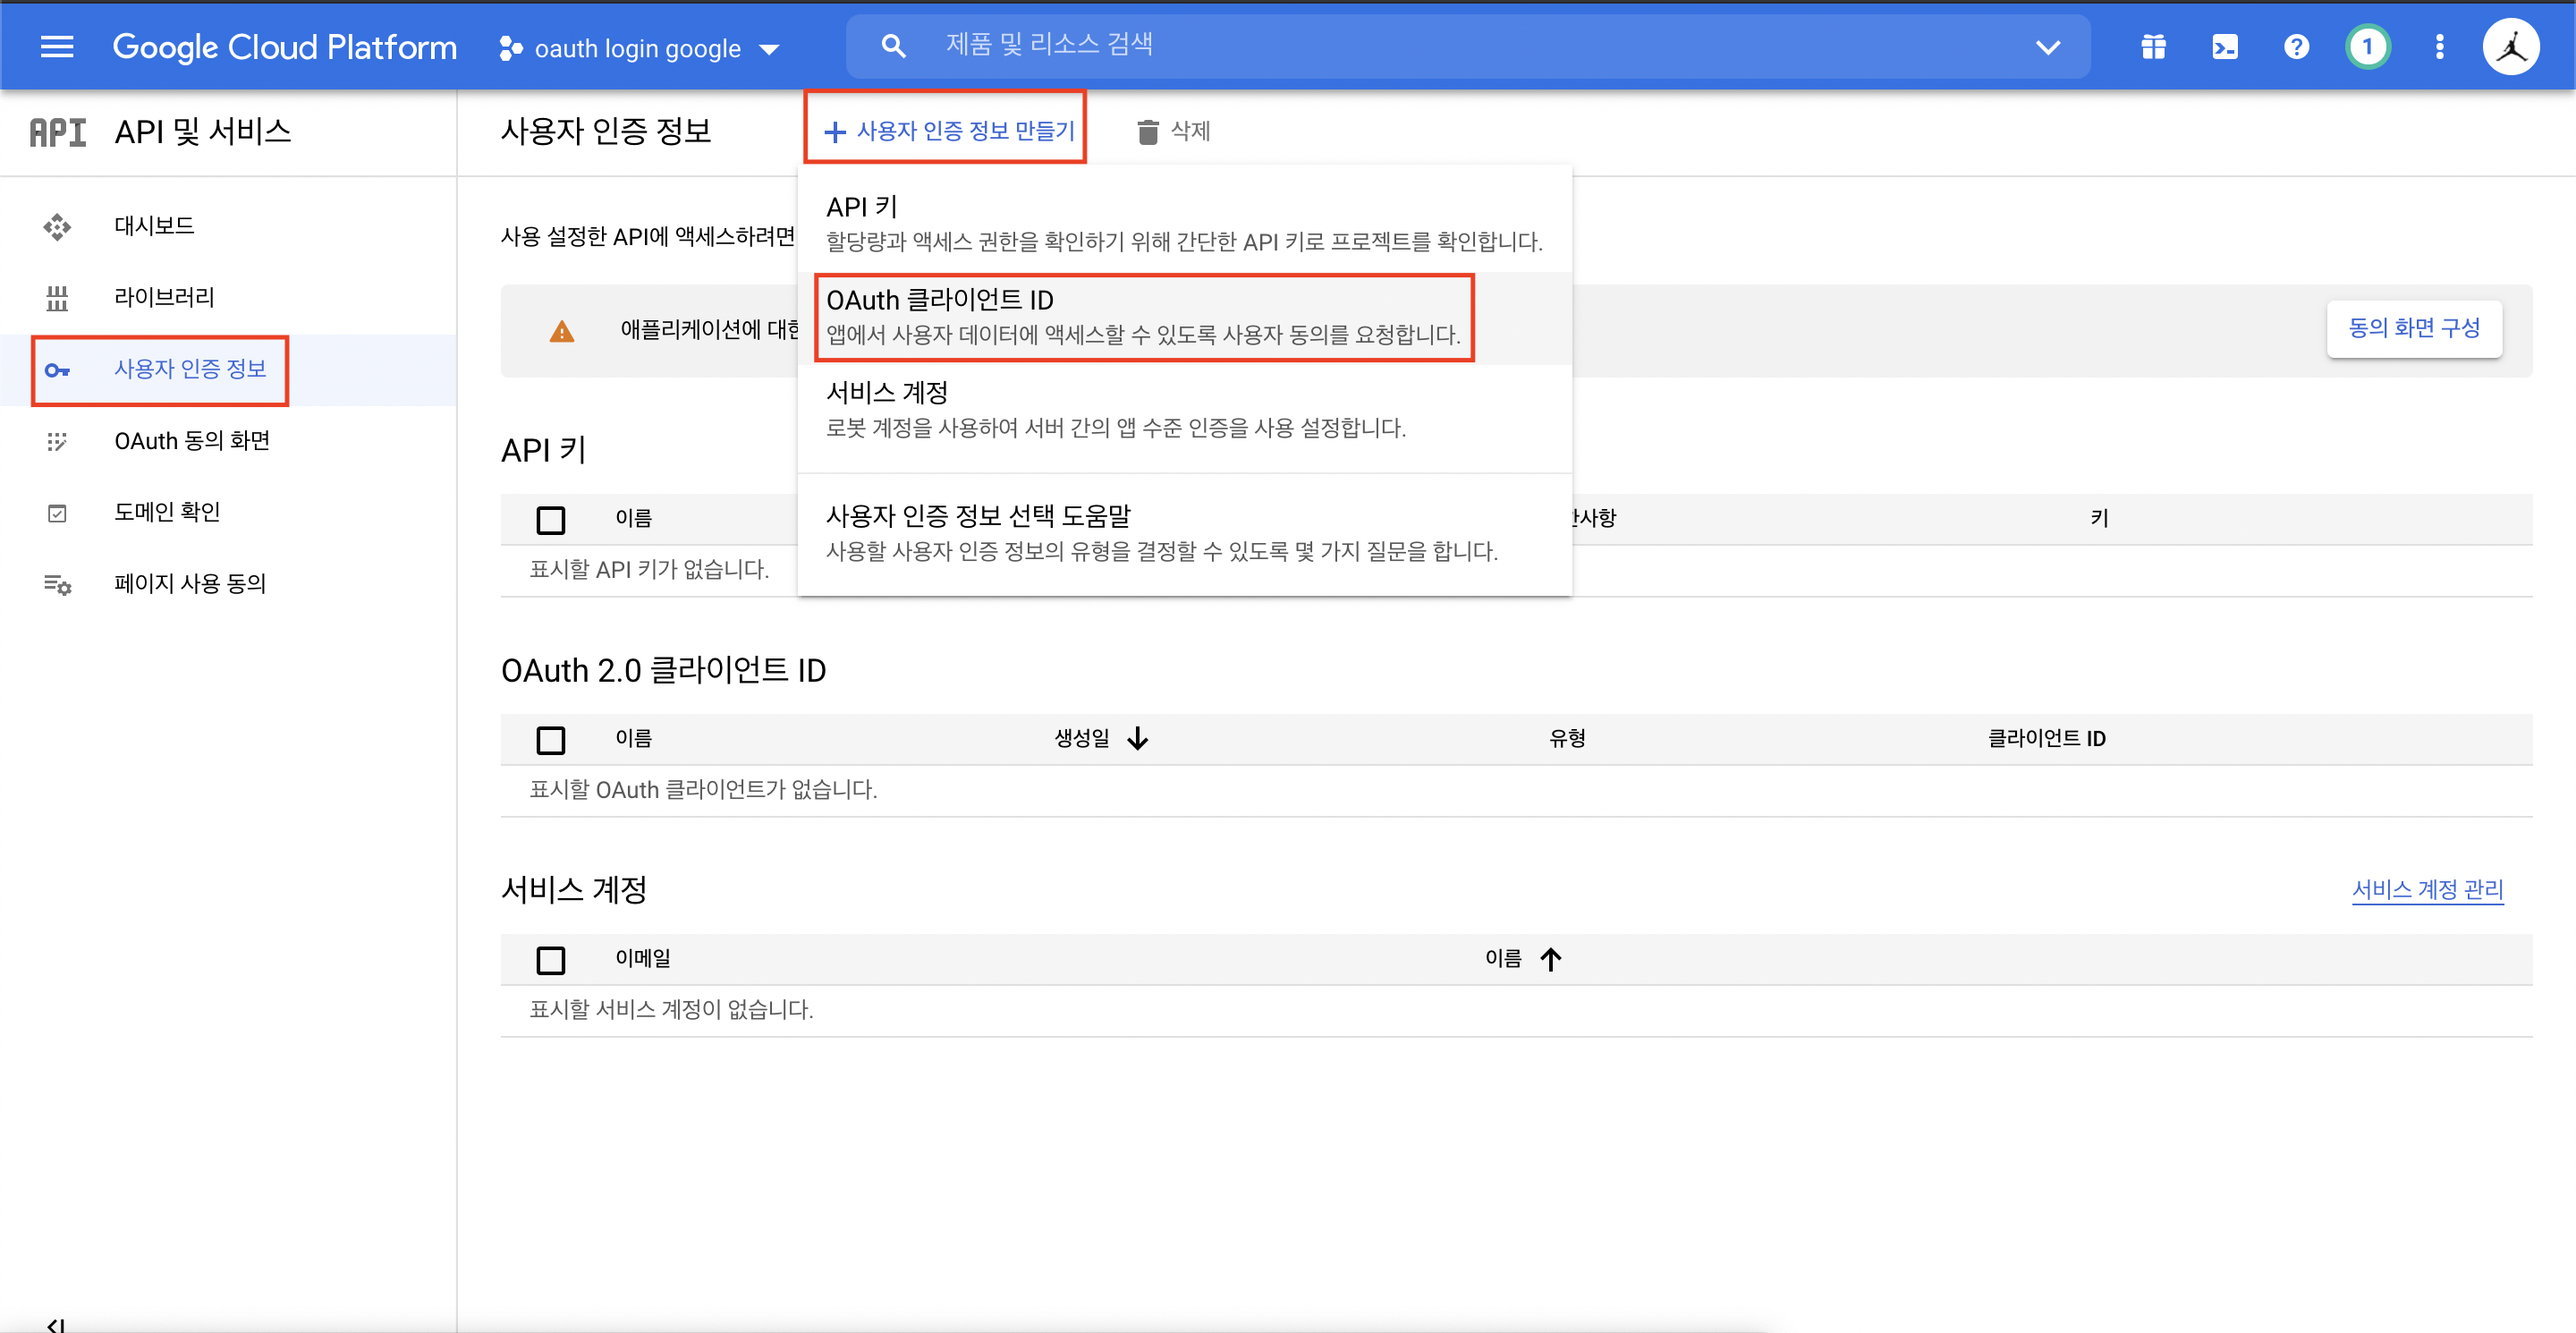
아직 OAuth 동의 화면이 없기 때문에 동의 화면을 먼저 만들라고 한다. 동의 화면 구성을 클릭하고, User Type을 선택하면 App 정보를 입력할 수 있다.
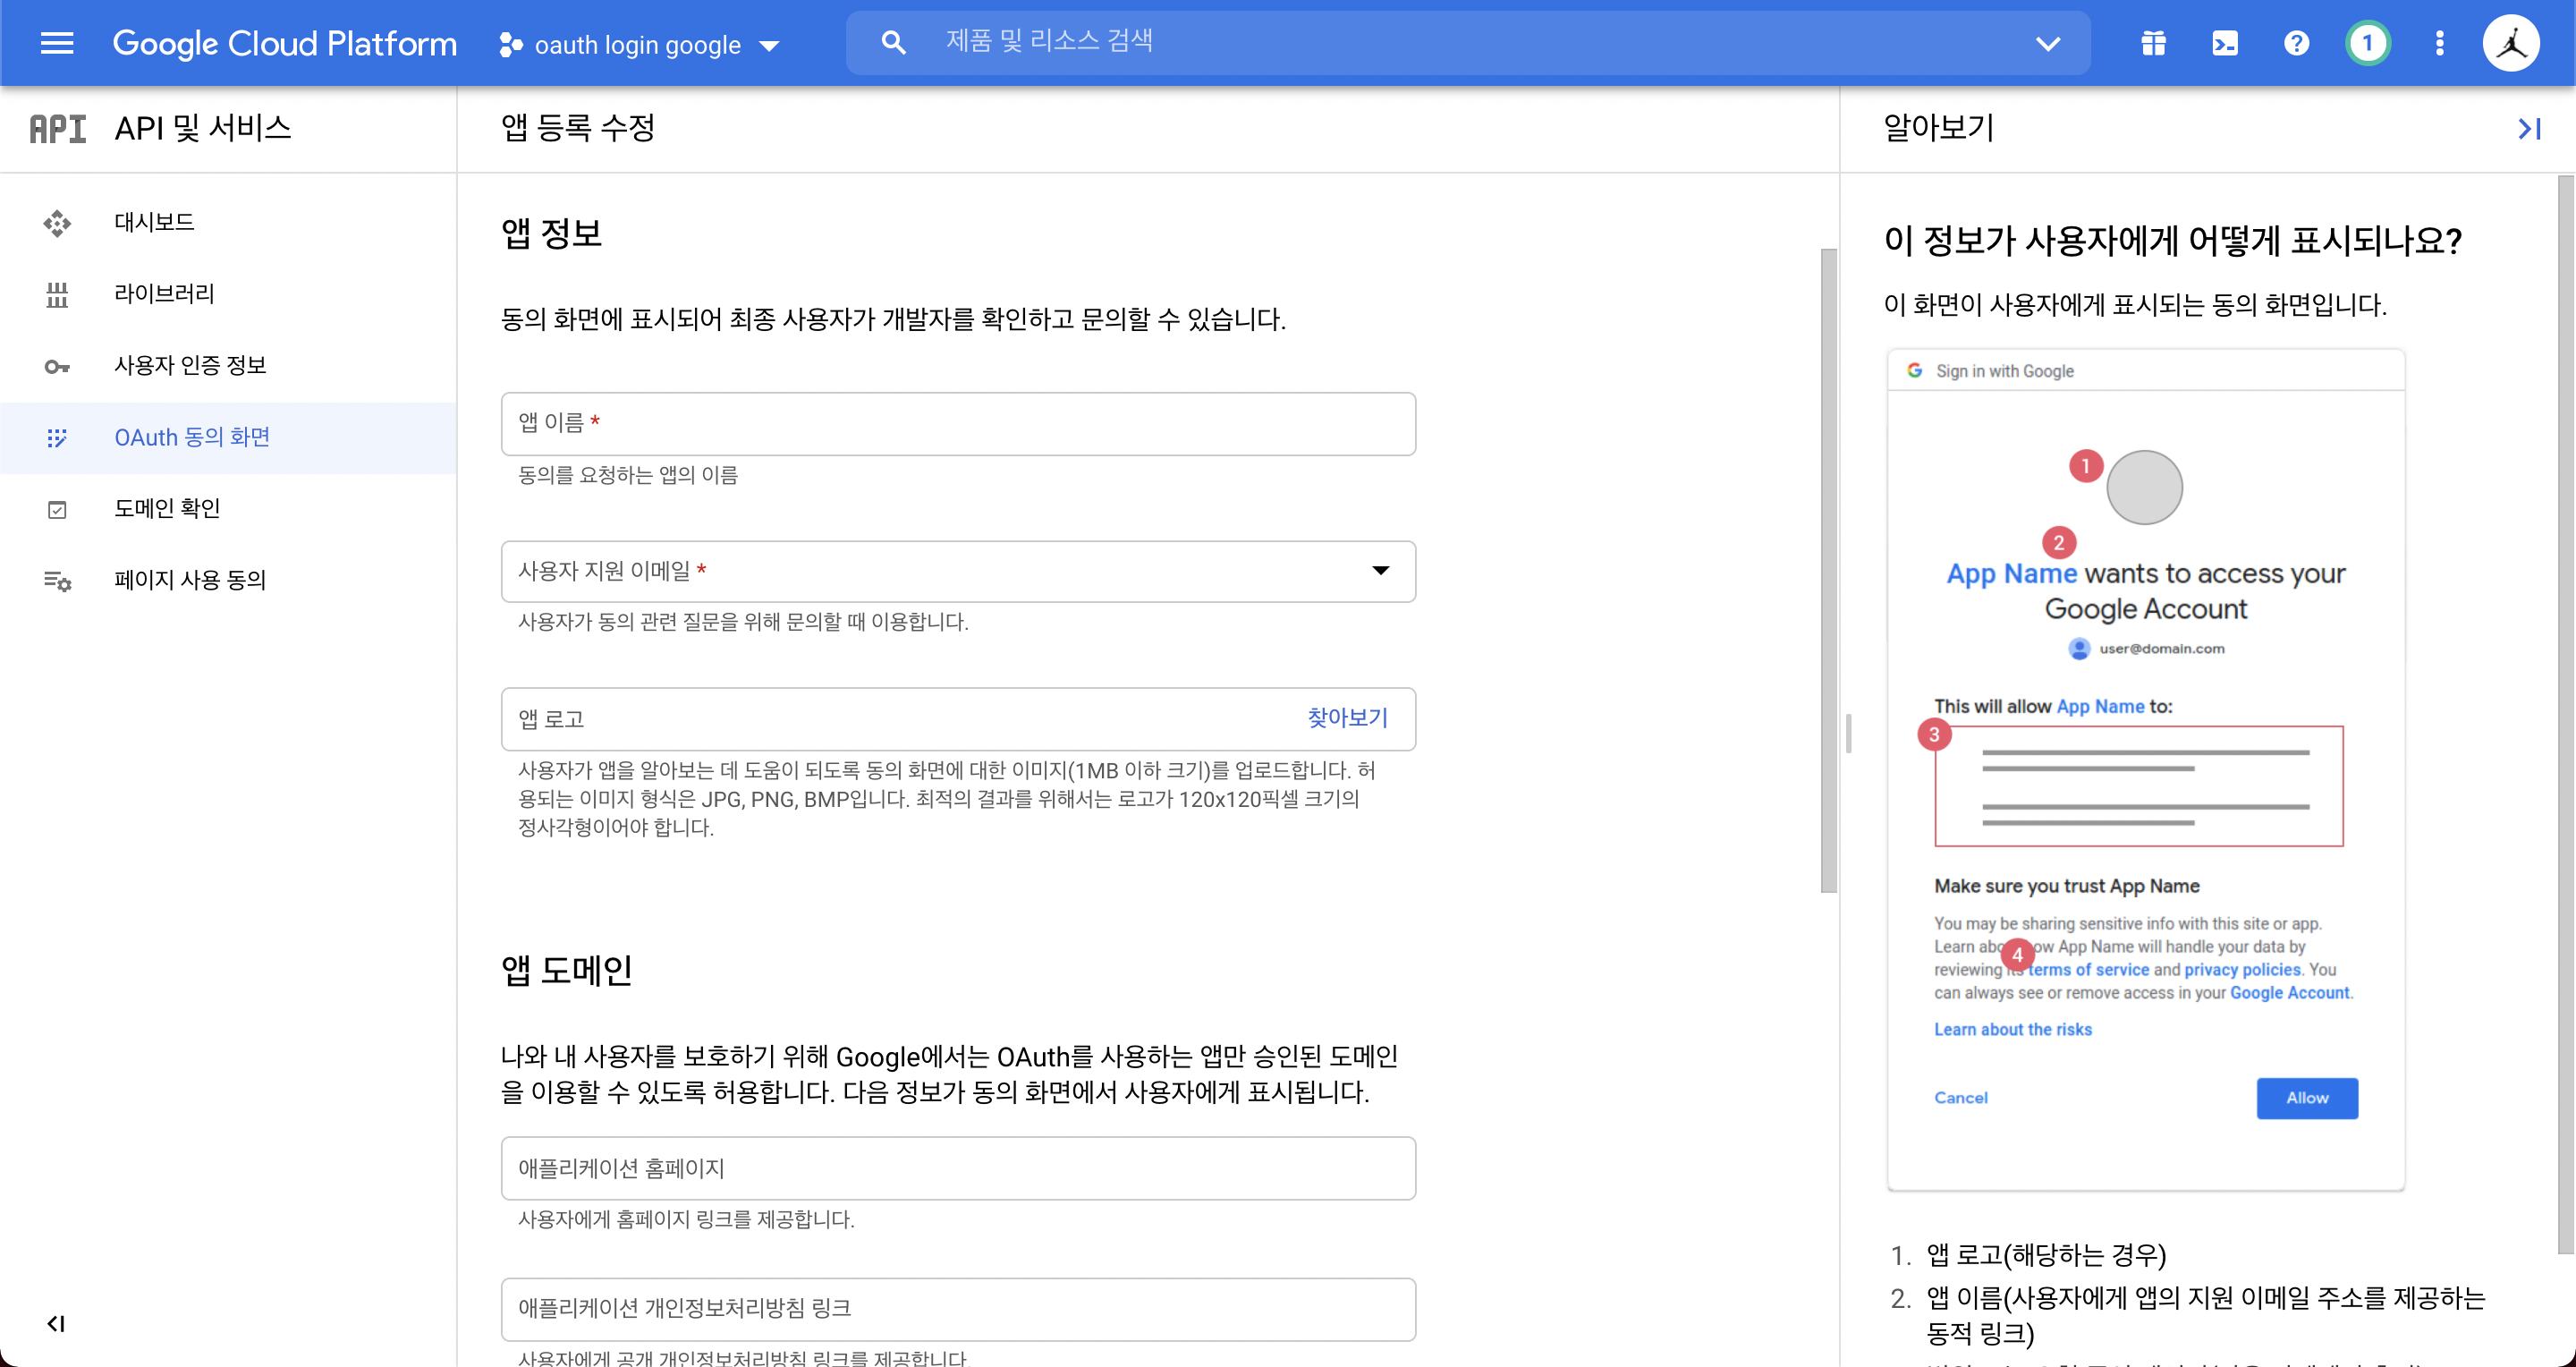
필수 정보만 입력하고 넘어가면 범위도 선택할 수 있다.
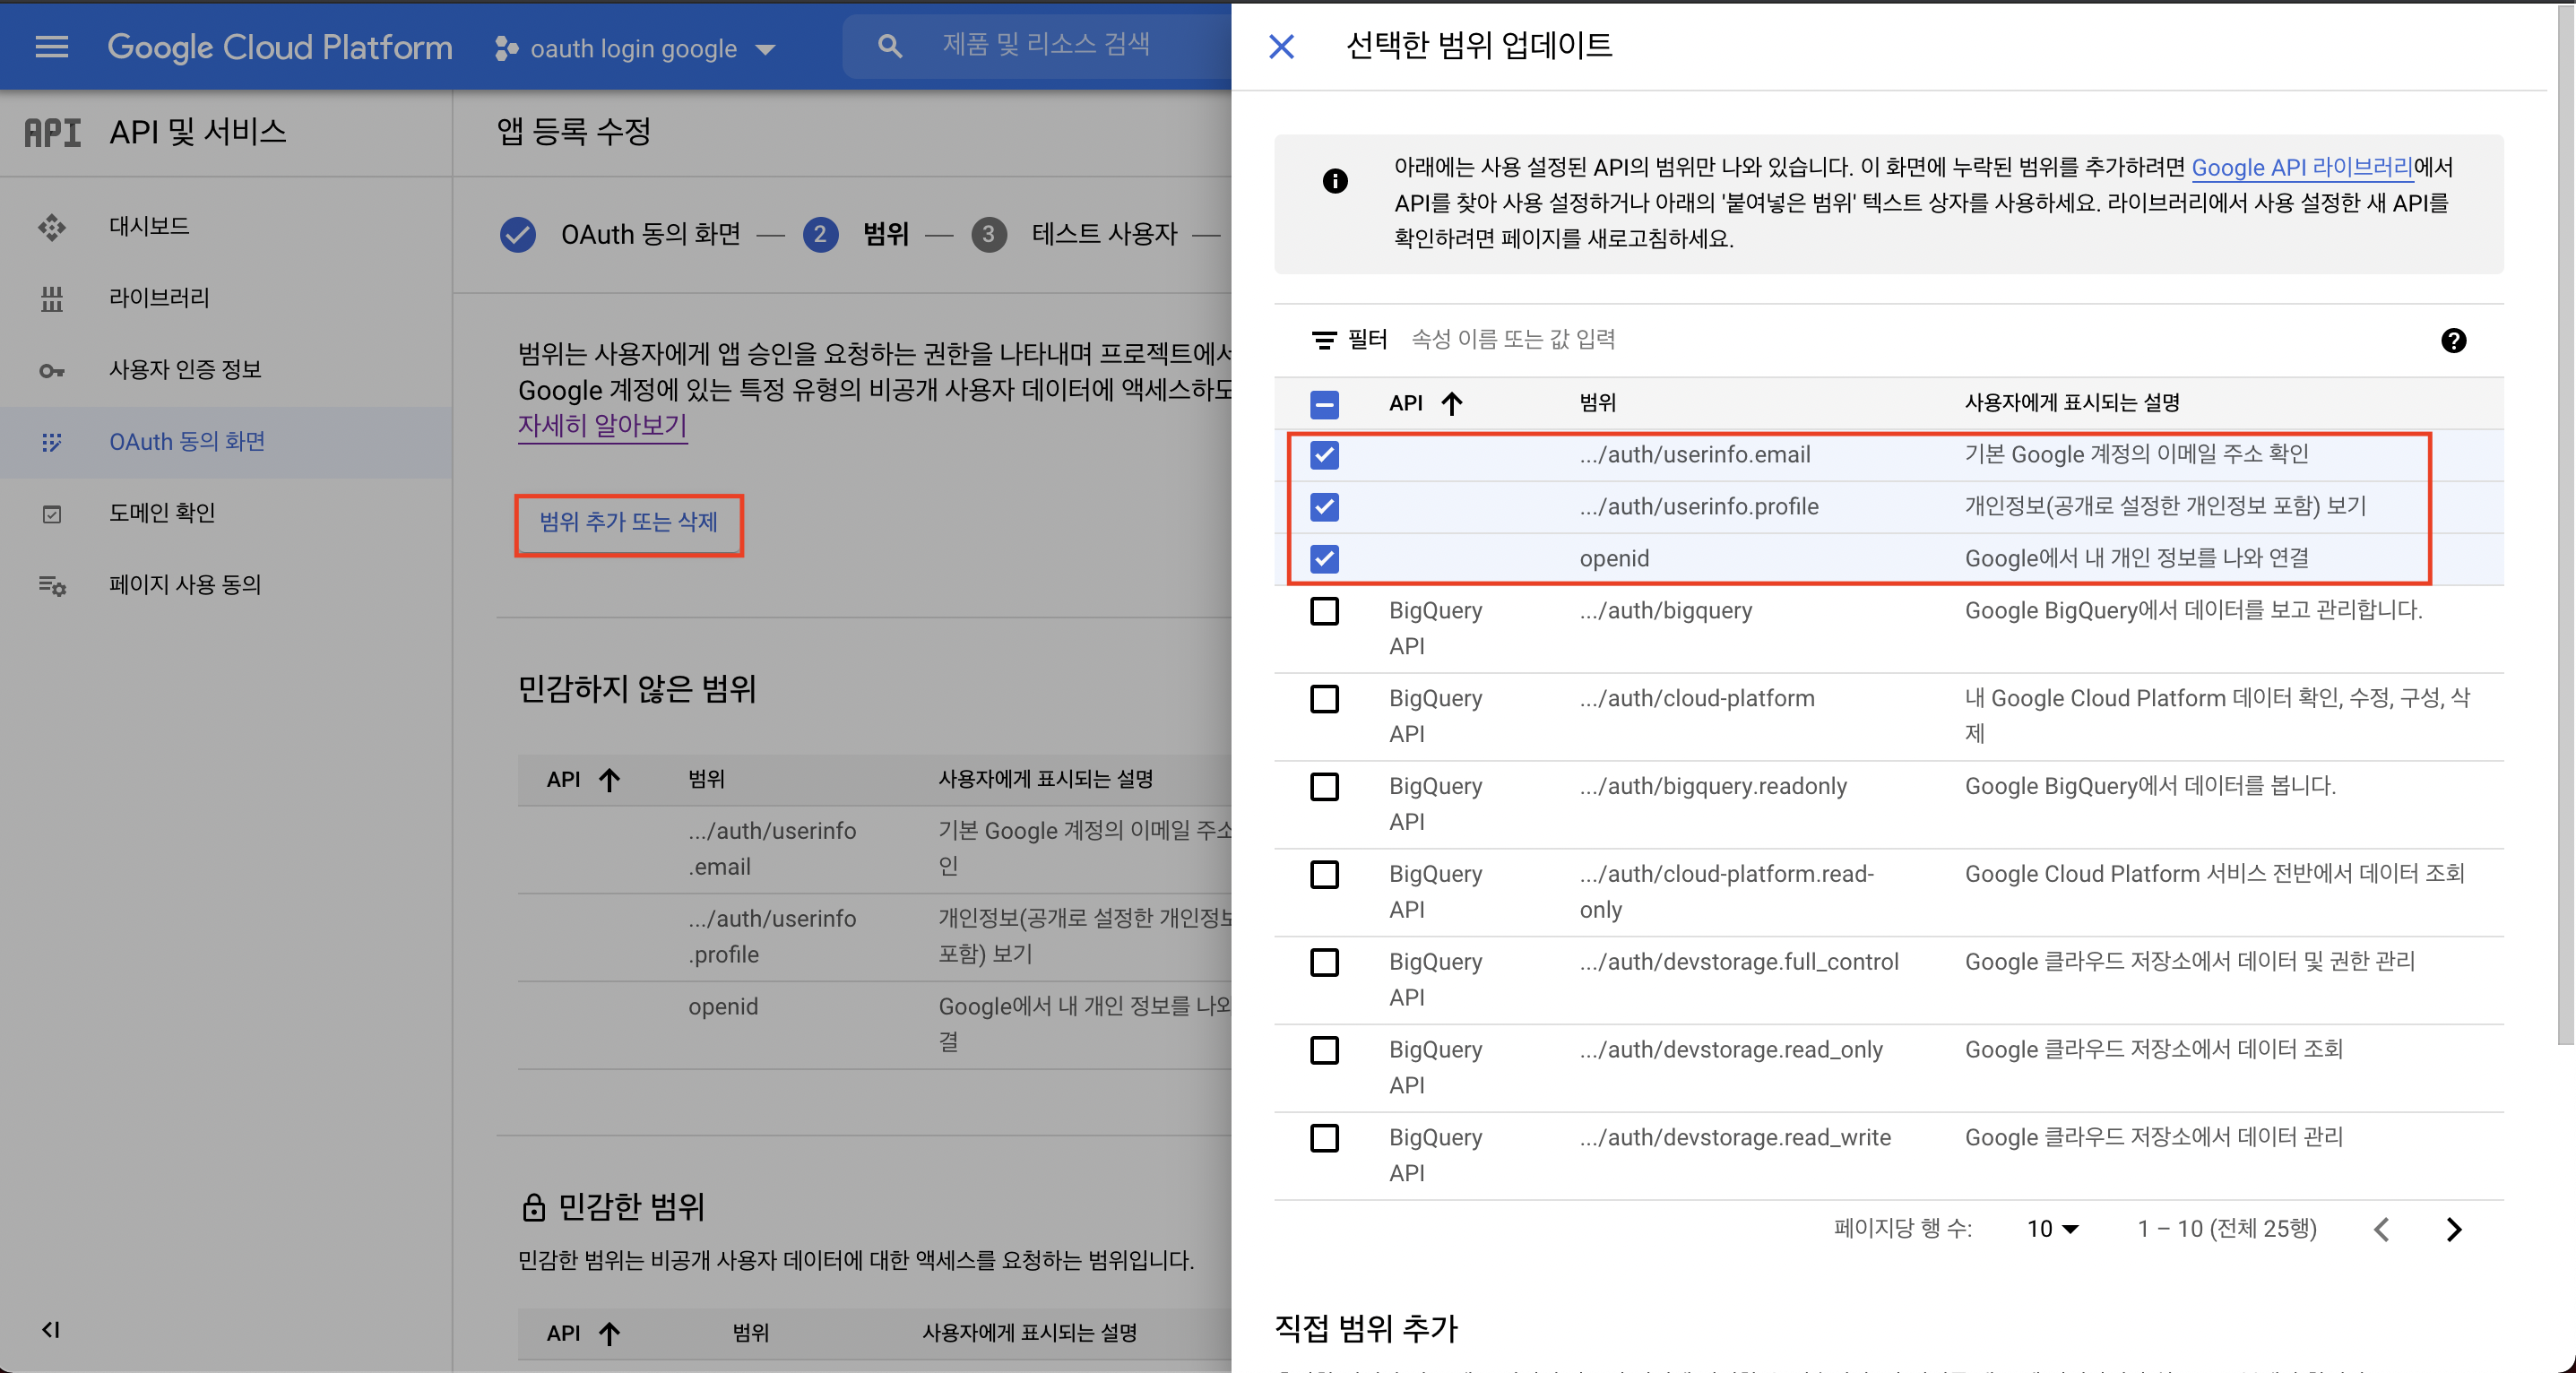
app에 맞게 OAuth 동의 화면을 구성해준다. 그 후 다시 사용자 인증 정보 -> 사용자 인증 정보 만들기 -> OAuth 클라이언트 ID를 클릭한다.
웹 애플리케이션을 클릭하면 아까 github callback 설정과 유사한 리디렉션 URI 설정이 있다. 여기에 /login/oauth2/code/google을 적어준다.
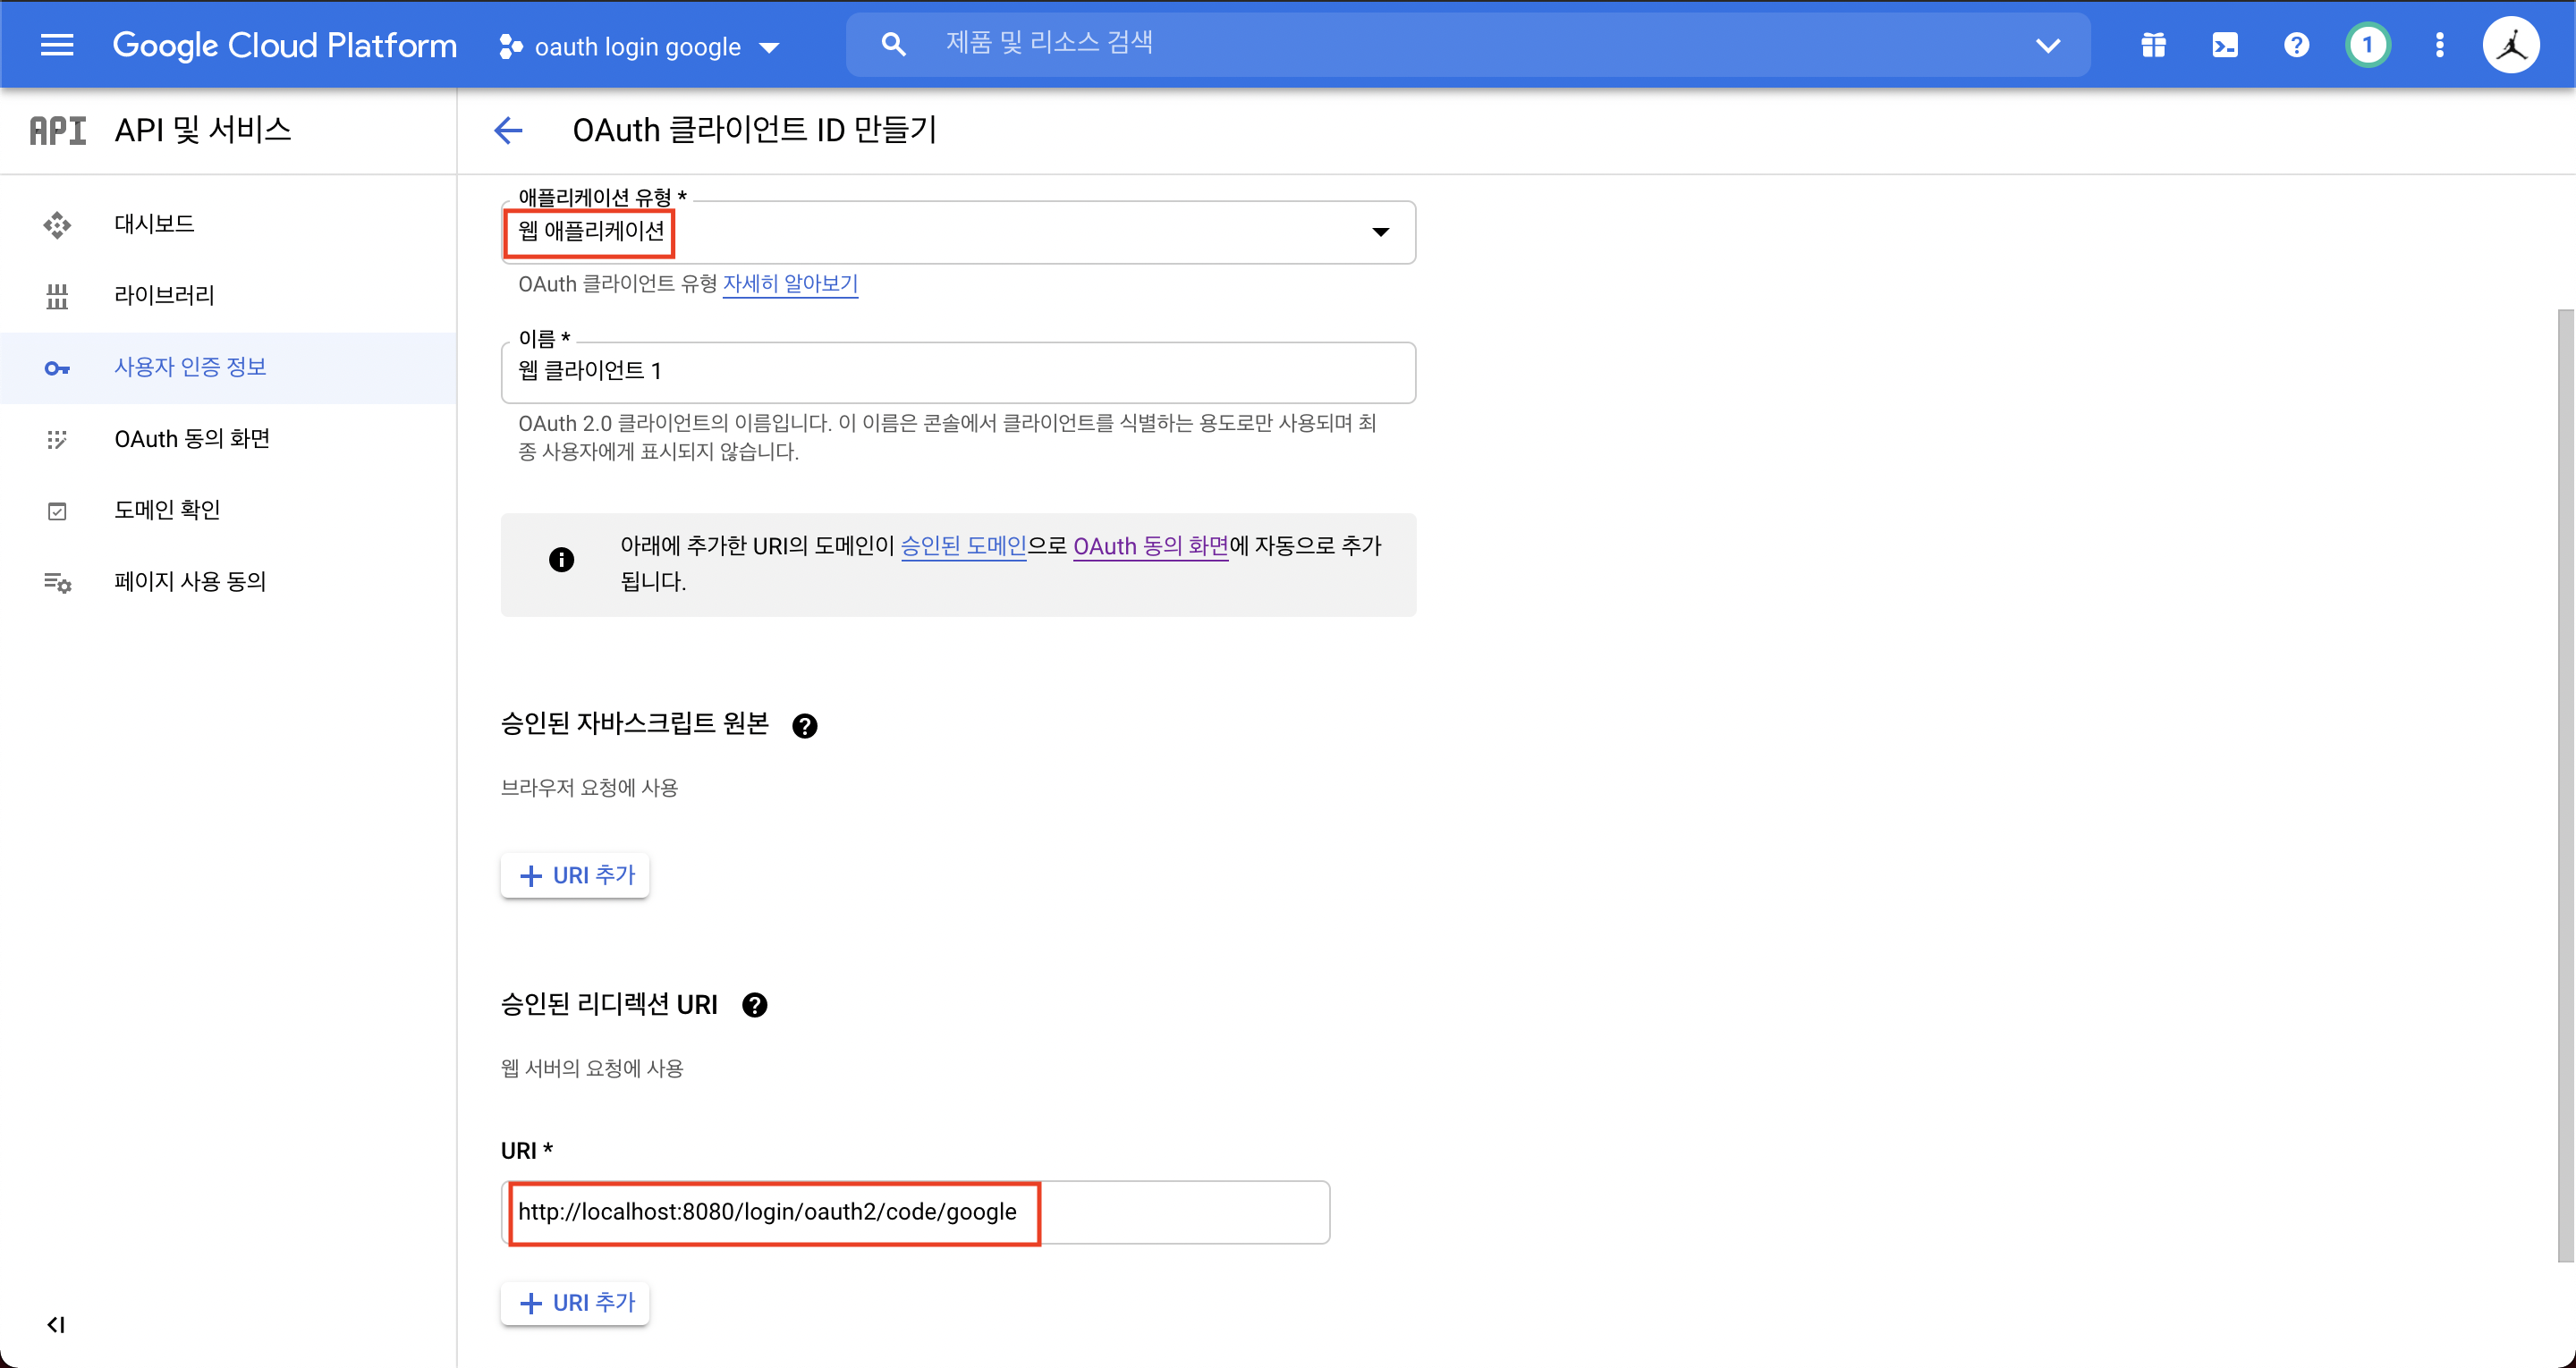
그리고 나면 github과 유사하게 Client ID와 클라이언트 보안 비밀번호가 나온다.
naver
https://developers.naver.com/apps/#/register 여기로 접속한다.
네아로(네이버 아이디로 로그인)을 클릭해주고, 원하는 권한을 선택해준다.
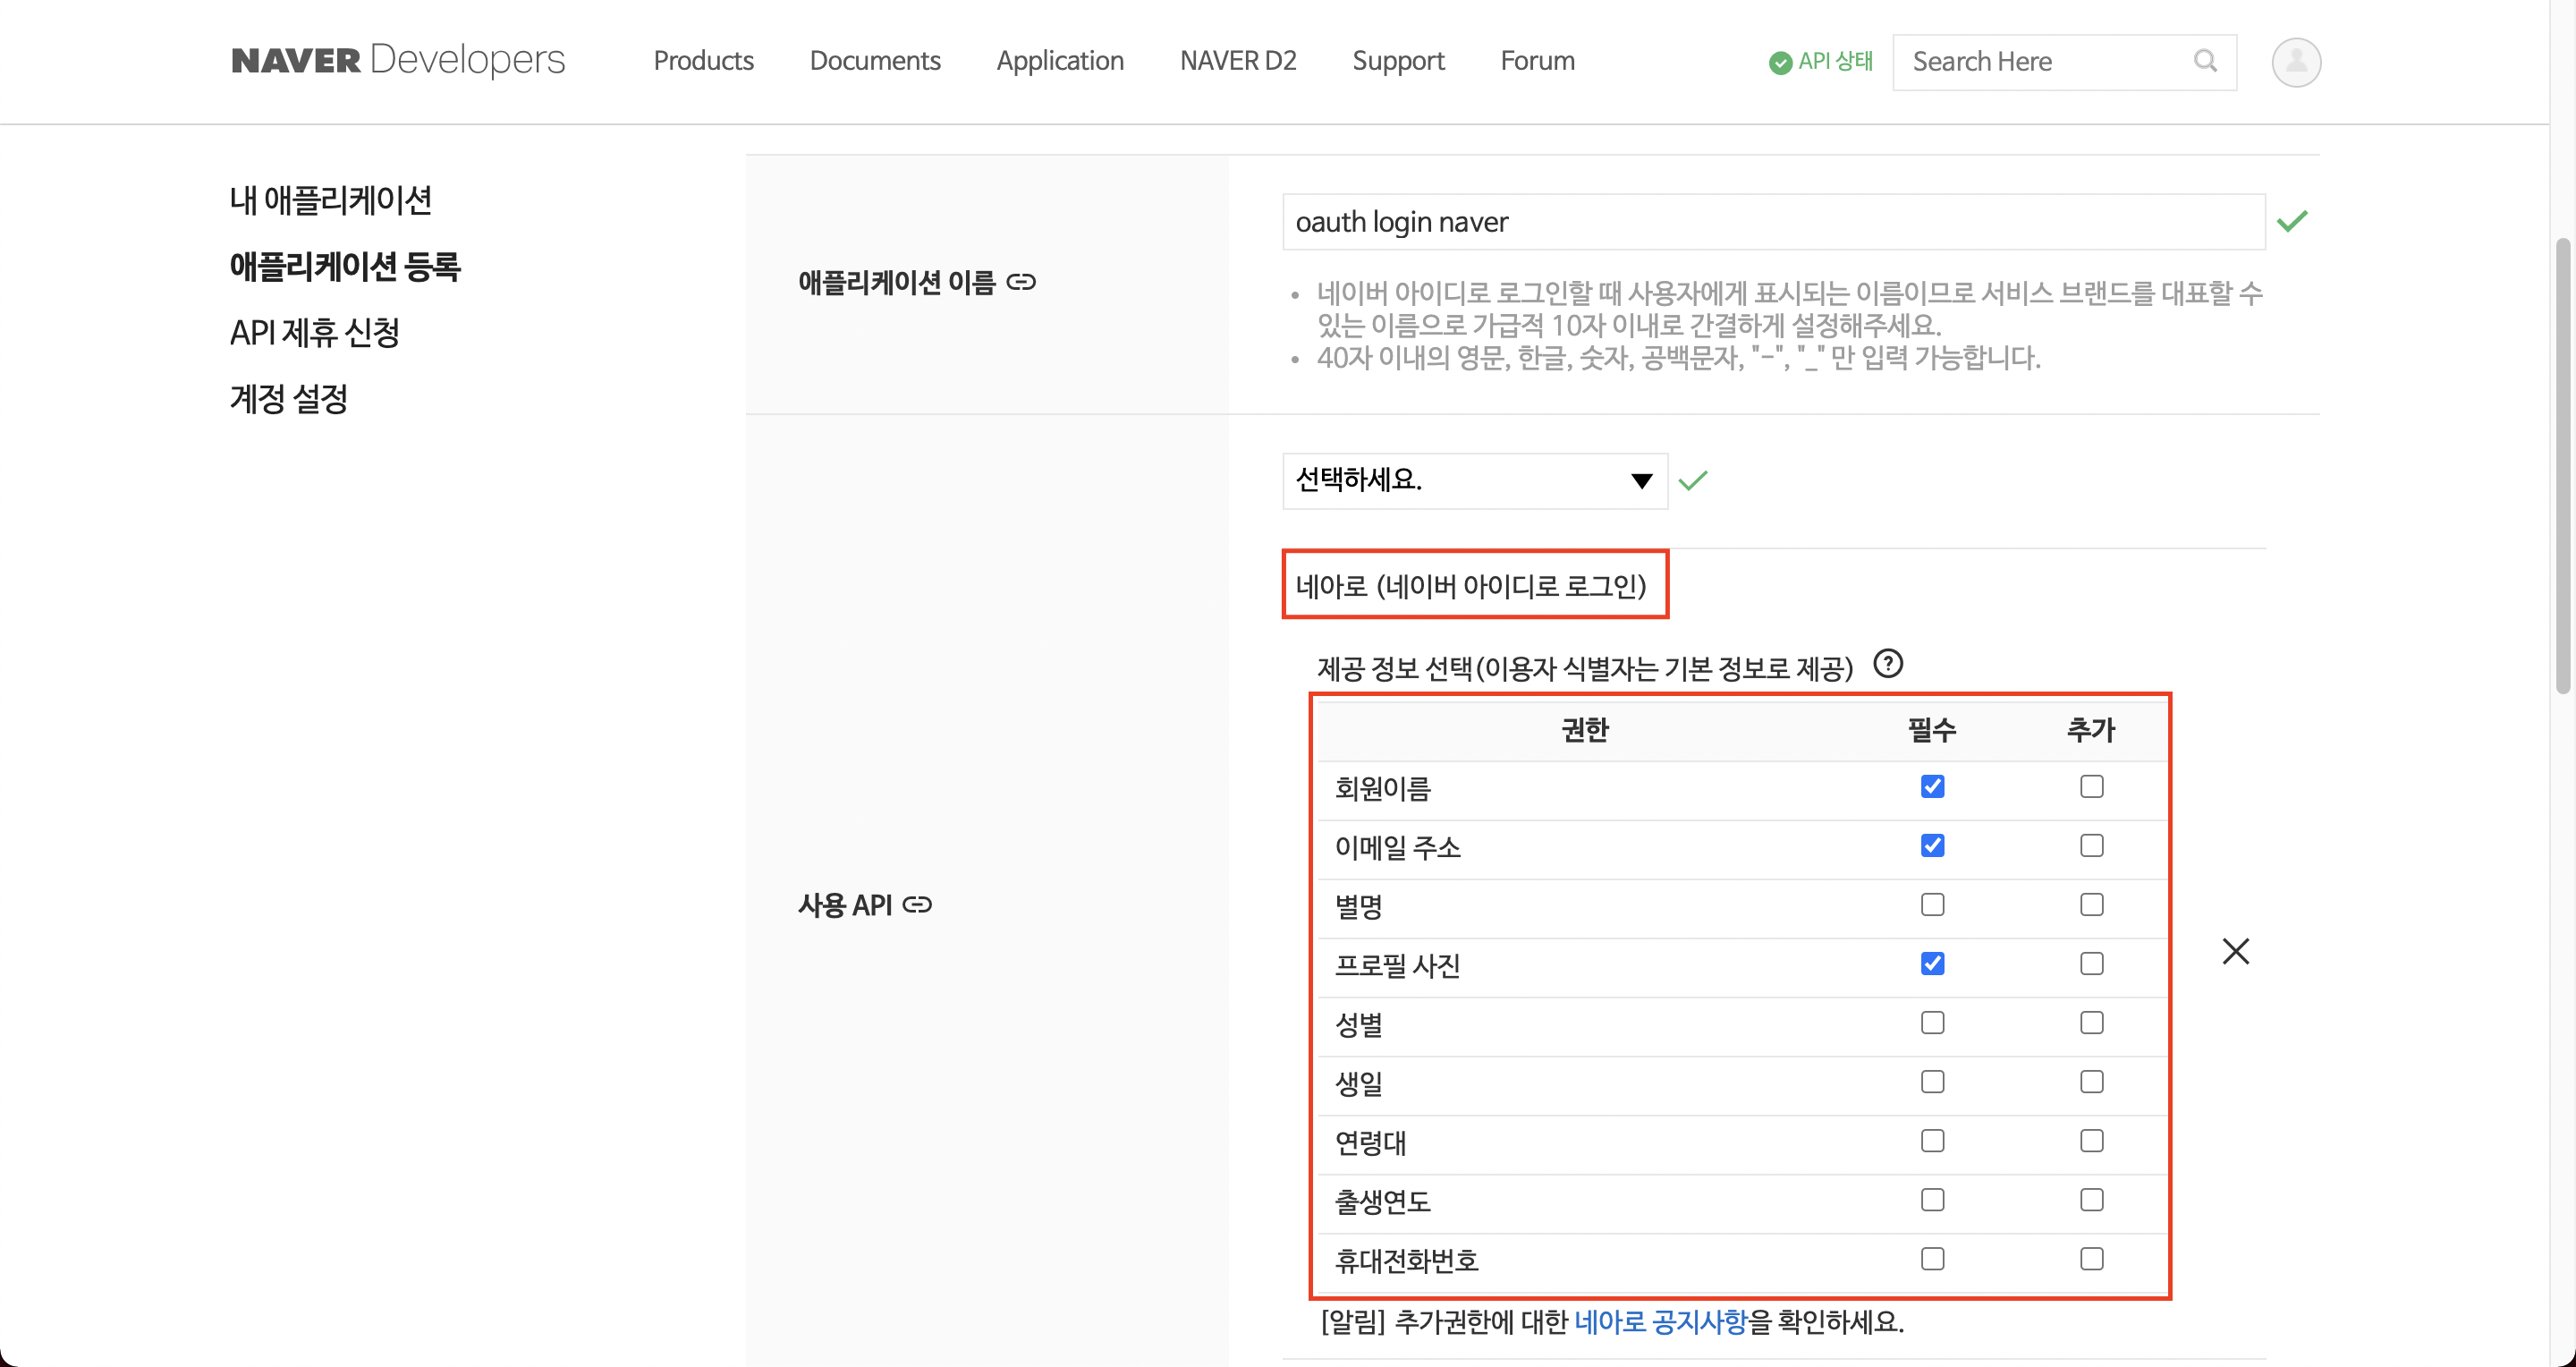
github, google과 마찬가지로 callback url을 /login/oauth2/code/naver로 설정해준다.
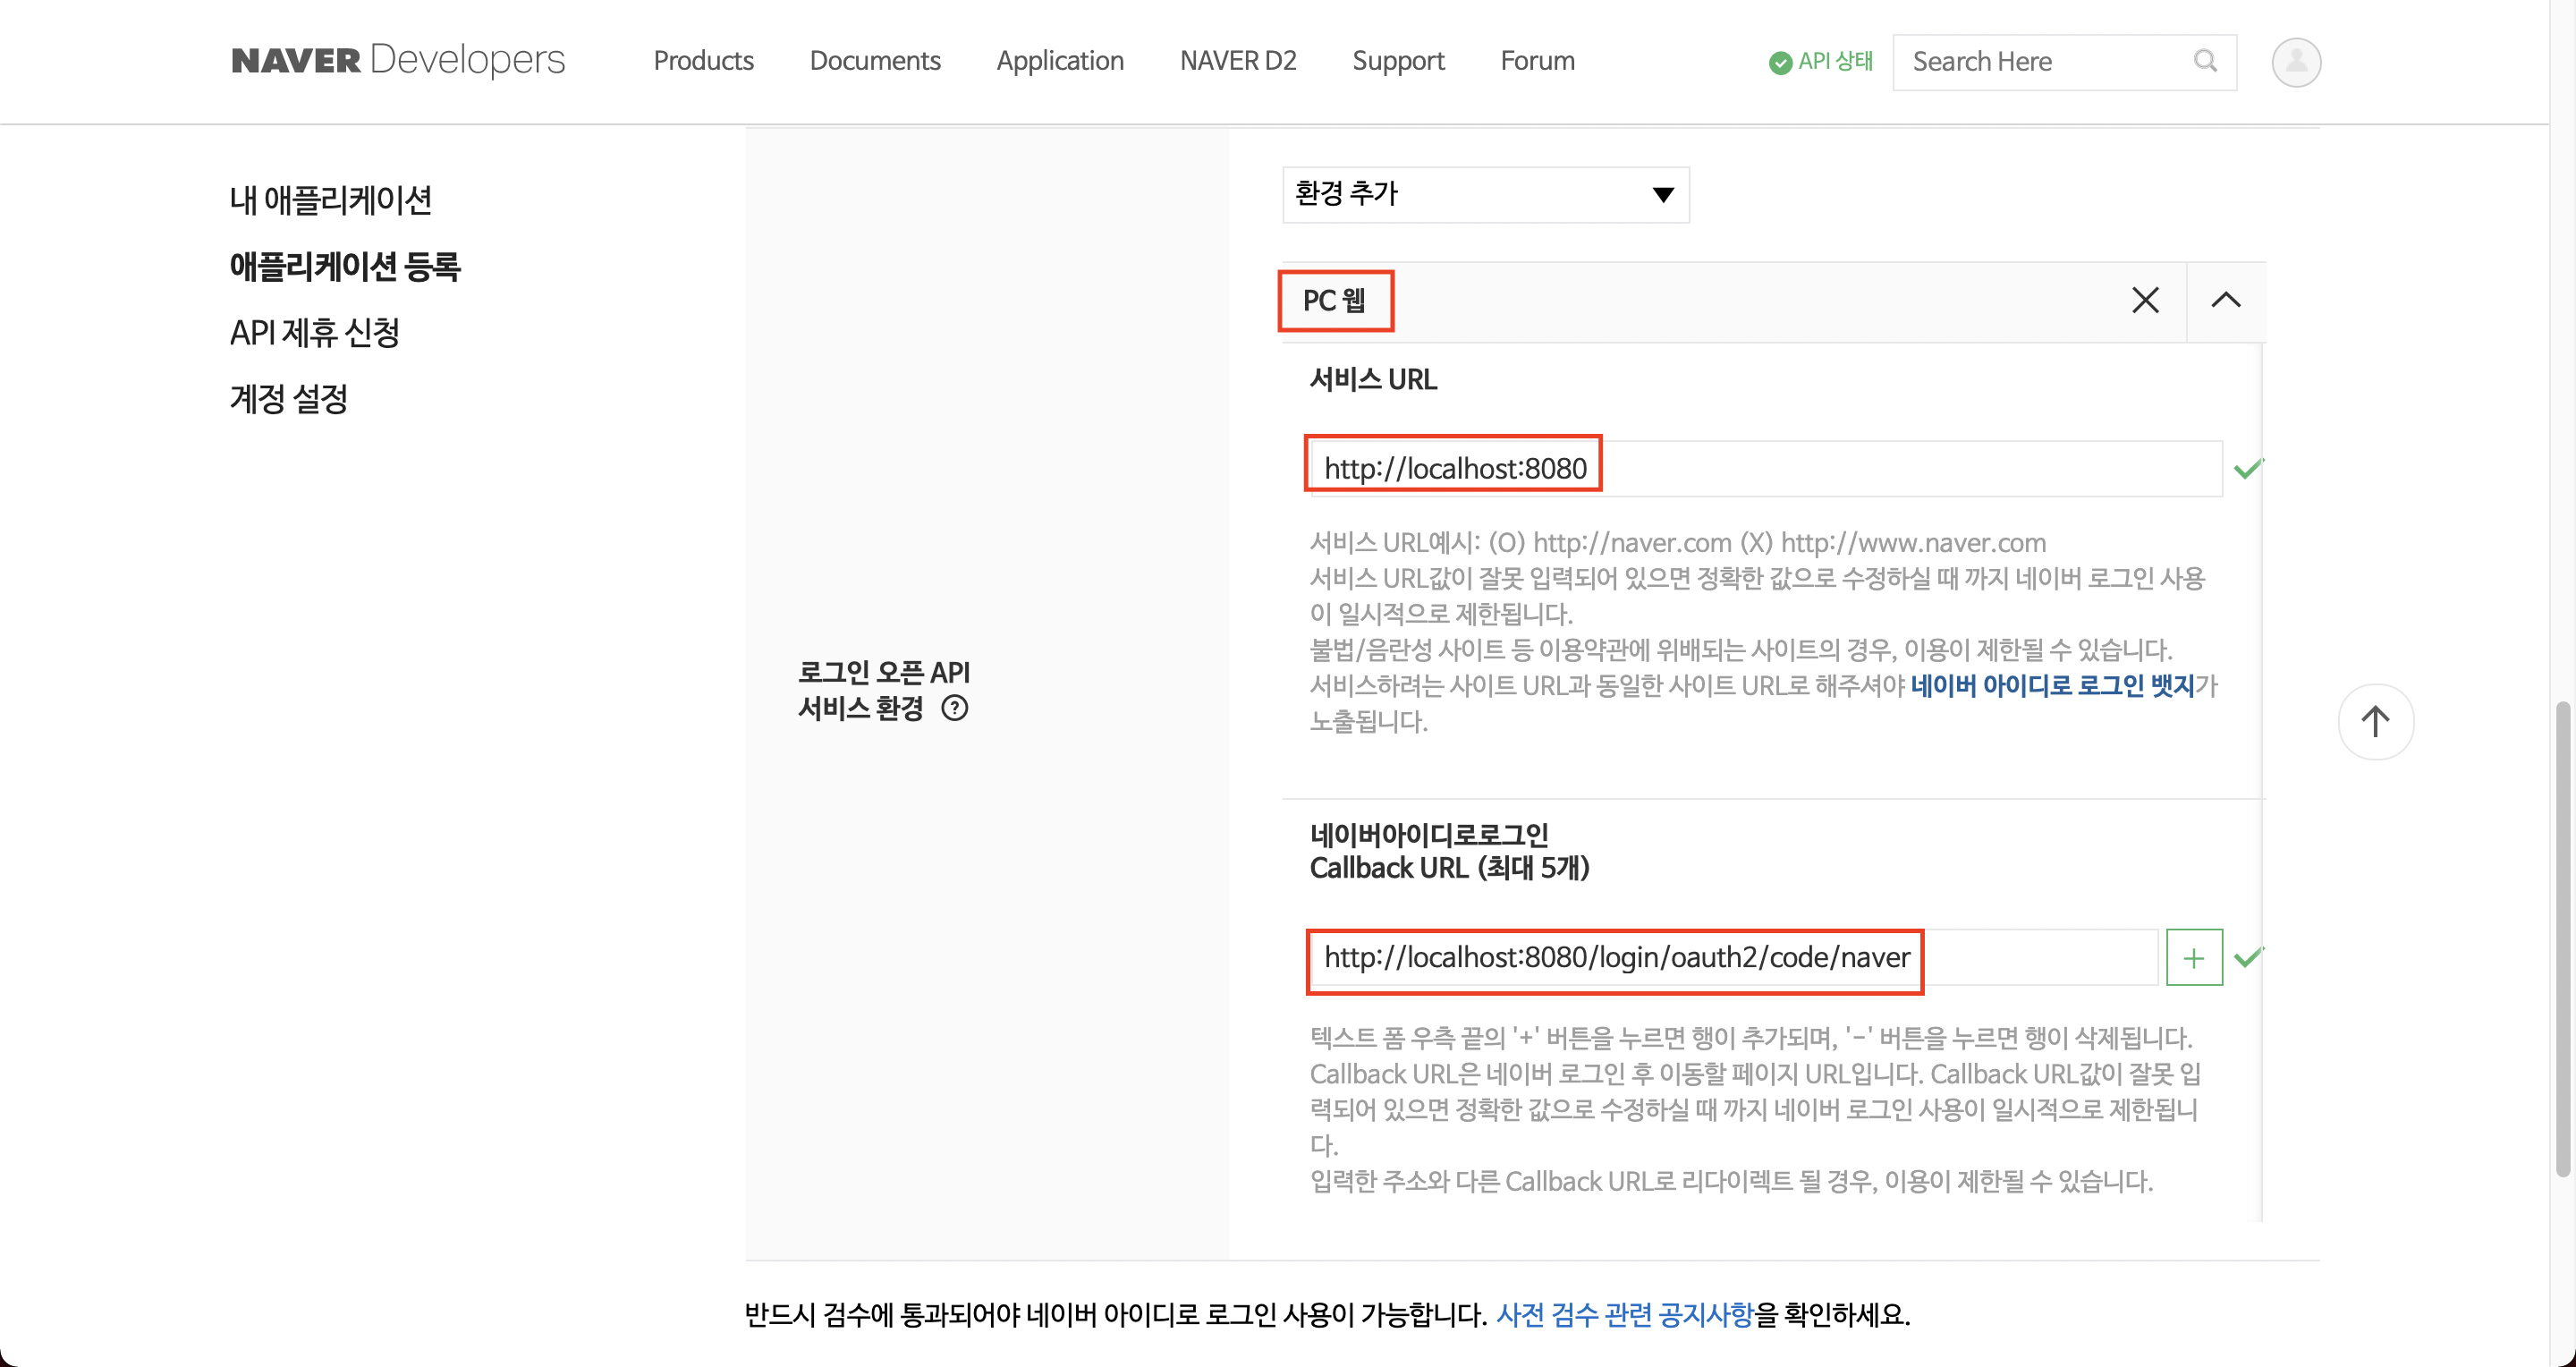
설정이 완료되면 마찬가지로, Client ID, Client secret이 나온다.
application.yml 작성
github, google, naver의 client Id, client secret을 활용하여 OAuth 로그인이 이루어진다. 따라서 이 정보들을 스프링 프로젝트에서 사용하기 위해 application.yml 파일을 작성해준다.
이 정보는 보안이 중요한 정보이기 때문에 application-oauth.yml 파일을 만들고 gitignore 처리하여 github에는 올라가지 않도록 한다.(설명 포스팅이므로 내 github에는 올라갈 예정이다.)
# application-oauth.yml

spring:
  security:
    oauth2:
      client:
        registration:
          github:
            client-id: 6c34d9a6903231c5a301
            client-secret: 비밀키
            scope: name,email,avatar_url
          google:
            client-id: 54767115914-gcla0mork6h3156h4qcutjerm0mdf4fu.apps.googleusercontent.com
            client-secret: 비밀키
            scope: profile,email
          # 네이버는 spring security가 기본적을 제공해주지 않기 때문에 github, google과 달리 많은 정보를 적어줘야한다.
          naver:
            client-id: sCfhQHgPVQFFf8RTGjVe
            client-secret: 비밀키
            redirect-uri: "{baseUrl}/{action}/oauth2/code/{registrationId}"
            authorization_grant_type: authorization_code
            scope: name,email,profile_image
            client-name: Naver
        provider:
          naver:
            authorization_uri: https://nid.naver.com/oauth2.0/authorize
            token_uri: https://nid.naver.com/oauth2.0/token
            user-info-uri: https://openapi.naver.com/v1/nid/me
            user_name_attribute: response
application.yml에서는 Include만 해준다.
# application.yml
spring:
  profiles:
    include: oauth
사전 작업이 끝났다! 이제 스프링 시큐리티를 이용해 OAuth 로그인을 구현해자
시큐리티 설정 파일 작성
스프링 시큐리티가 제공해주는 설정들을 사용하기 위해서는 WebSecurityConfigurerAdapter를 상속받아 configure메서드를 재정의 해줘야한다.
spring security는 OAuth2 로그인 말고도, csrf, url 별 권한 관리 등 여러 설정을 제공하지만 OAuth2 로그인에 대해서만 알아볼 것이기 때문에 아래와 같이 OAuth2 로그인 관련 설정만 해준다.
@EnableWebSecurity // spring security 설정을 활성화시켜주는 어노테이션
public class SecurityConfig extends WebSecurityConfigurerAdapter {

    private final OAuthService oAuthService;

    public SecurityConfig(OAuthService oAuthService) {
        this.oAuthService = oAuthService;
    }

    @Override
    protected void configure(HttpSecurity http) throws Exception {
        http.oauth2Login() // OAuth2 로그인 설정 시작점
            .userInfoEndpoint() // OAuth2 로그인 성공 이후 사용자 정보를 가져올 때 설정 담당
            .userService(oAuthService); // OAuth2 로그인 성공 시, 후작업을 진행할 UserService 인터페이스 구현체 등록
    }
}
위의 설정에 명시된 OAuthService를 이제부터 구현하여 로그인 후 유저 정보를 가져와 DB에 저장하는 작업을 진행해 볼 것이다.
OAuthService 구현
SecurityConfig에서 OAuth2 로그인 성공시, 후 작업을 OAuthService에서 하기로 하였으므로 OAuthService를 만들어보자.
OAuthService는 OAuth2UserService<OAuth2UserRequest, OAuth2User>를 implements 하여 loadUser 메서드를 재정의 해주면 된다.
@Service
public class OAuthService implements OAuth2UserService<OAuth2UserRequest, OAuth2User> {

    @Override
    public OAuth2User loadUser(OAuth2UserRequest userRequest) throws OAuth2AuthenticationException {
        return null;
    }
}
먼저 userRequest를 통해 OAuth 서비스에서 가져온 유저 정보를 담고 있는 OAuth2User를 가져온다.
@Service
public class OAuthService implements OAuth2UserService<OAuth2UserRequest, OAuth2User> {

    @Override
    public OAuth2User loadUser(OAuth2UserRequest userRequest) throws OAuth2AuthenticationException {
        OAuth2UserService delegate = new DefaultOAuth2UserService();
        OAuth2User oAuth2User = delegate.loadUser(userRequest); // OAuth 서비스(github, google, naver)에서 가져온 유저 정보를 담고있음
        return null;
    }
}
그 후, userRequest를 통해 어떤 OAuth 서비스인지(github인지 google인지 naver인지) 정보를 가져오고, OAuth 서비스에 따라 pk값도 가져온다. 또, 아까 얻은 OAuth2User를 통해 얻어온 유저의 정보를 map 형태로 꺼내준다.
@Service
public class OAuthService implements OAuth2UserService<OAuth2UserRequest, OAuth2User> {

    @Override
    public OAuth2User loadUser(OAuth2UserRequest userRequest) throws OAuth2AuthenticationException {
        OAuth2UserService delegate = new DefaultOAuth2UserService();
        OAuth2User oAuth2User = delegate.loadUser(userRequest); // OAuth 서비스(github, google, naver)에서 가져온 유저 정보를 담고있음

        String registrationId = userRequest.getClientRegistration()
                                           .getRegistrationId(); // OAuth 서비스 이름(ex. github, naver, google)
        String userNameAttributeName = userRequest.getClientRegistration().getProviderDetails()
                                                  .getUserInfoEndpoint().getUserNameAttributeName(); // OAuth 로그인 시 키(pk)가 되는 값
        Map<String, Object> attributes = oAuth2User.getAttributes(); // OAuth 서비스의 유저 정보들
        return null;
    }
}
OAuth 서비스 이름과, 얻어온 유저 정보를 통해 OAuth 서비스에 종속적이지 않은 공통된 UserProfile이라는 객체를 얻어온다.
@Service
public class OAuthService implements OAuth2UserService<OAuth2UserRequest, OAuth2User> {

    @Override
    public OAuth2User loadUser(OAuth2UserRequest userRequest) throws OAuth2AuthenticationException {
        OAuth2UserService delegate = new DefaultOAuth2UserService();
        OAuth2User oAuth2User = delegate.loadUser(userRequest); // OAuth 서비스(github, google, naver)에서 가져온 유저 정보를 담고있음

        String registrationId = userRequest.getClientRegistration()
                                           .getRegistrationId(); // OAuth 서비스 이름(ex. github, naver, google)
        String userNameAttributeName = userRequest.getClientRegistration().getProviderDetails()
                                                  .getUserInfoEndpoint().getUserNameAttributeName(); // OAuth 로그인 시 키(pk)가 되는 값
        Map<String, Object> attributes = oAuth2User.getAttributes(); // OAuth 서비스의 유저 정보들

        UserProfile userProfile = OAuthAttributes.extract(registrationId, attributes); // registrationId에 따라 유저 정보를 통해 공통된 UserProfile 객체로 만들어 줌
        return null;
    }
}
위에서 말했듯이 나는 OAuth 자체 ID, name, email, image url만 가져올 것이기 때문에 UserProfile은 아래와 같다.
public class UserProfile {
    private final String oauthId;
    private final String name;
    private final String email;
    private final String imageUrl;

    public UserProfile(String oauthId, String name, String email, String imageUrl) {
        this.oauthId = oauthId;
        this.name = name;
        this.email = email;
        this.imageUrl = imageUrl;
    }

    public Member toMember() {
        return new Member(oauthId, name, email, imageUrl, Role.USER);
    }

    public String getOauthId() {
        return oauthId;
    }

    public String getName() {
        return name;
    }

    public String getEmail() {
        return email;
    }

    public String getImageUrl() {
        return imageUrl;
    }
}
OAuth 서비스 이름과, 얻어온 유저 정보를 통해 UserProfile을 얻어내기 위해 enum OAuthAttributes를 사용하겠다. OAuth 서비스에 따라 얻어온 유저 정보의 key값이 다르기 때문에 각각 관리해준다.
public enum OAuthAttributes {
    GITHUB("github", (attributes) -> {
        return new UserProfile(
                String.valueOf(attributes.get("id")),
                (String) attributes.get("name"),
                (String) attributes.get("email"),
                (String) attributes.get("avatar_url")
        );
    }),
    GOOGLE("google", (attributes) -> {
        return new UserProfile(
                String.valueOf(attributes.get("sub")),
                (String) attributes.get("name"),
                (String) attributes.get("email"),
                (String) attributes.get("picture")
        );
    }),
    NAVER("naver", (attributes) -> {
        Map<String, Object> response = (Map<String, Object>) attributes.get("response");
        return new UserProfile(
                (String) response.get("id"),
                (String) response.get("name"),
                (String) response.get("email"),
                (String) response.get("profile_image")
        );
    });

    private final String registrationId;
    private final Function<Map<String, Object>, UserProfile> of;

    OAuthAttributes(String registrationId, Function<Map<String, Object>, UserProfile> of) {
        this.registrationId = registrationId;
        this.of = of;
    }

    public static UserProfile extract(String registrationId, Map<String, Object> attributes) {
        return Arrays.stream(values())
                     .filter(provider -> registrationId.equals(provider.registrationId))
                     .findFirst()
                     .orElseThrow(IllegalArgumentException::new)
                .of.apply(attributes);
    }
}
그 후 얻어온 UserProfile을 통해 우리 DB에 저장해준다. 따라서 최종 OAuthService 코드는 아래와 같다.
@Service
public class OAuthService implements OAuth2UserService<OAuth2UserRequest, OAuth2User> {
    private final MemberRepository memberRepository;

    public OAuthService(MemberRepository memberRepository) {
        this.memberRepository = memberRepository;
    }

    @Override
    public OAuth2User loadUser(OAuth2UserRequest userRequest) throws OAuth2AuthenticationException {
        OAuth2UserService delegate = new DefaultOAuth2UserService();
        OAuth2User oAuth2User = delegate.loadUser(userRequest); // OAuth 서비스(github, google, naver)에서 가져온 유저 정보를 담고있음

        String registrationId = userRequest.getClientRegistration()
                                           .getRegistrationId(); // OAuth 서비스 이름(ex. github, naver, google)
        String userNameAttributeName = userRequest.getClientRegistration().getProviderDetails()
                                                  .getUserInfoEndpoint().getUserNameAttributeName(); // OAuth 로그인 시 키(pk)가 되는 값
        Map<String, Object> attributes = oAuth2User.getAttributes(); // OAuth 서비스의 유저 정보들

        UserProfile userProfile = OAuthAttributes.extract(registrationId, attributes); // registrationId에 따라 유저 정보를 통해 공통된 UserProfile 객체로 만들어 줌

        Member member = saveOrUpdate(userProfile); // DB에 저장

        return new DefaultOAuth2User(
                Collections.singleton(new SimpleGrantedAuthority(member.getRoleKey())),
                attributes,
                userNameAttributeName);
    }

    private Member saveOrUpdate(UserProfile userProfile) {
        Member member = memberRepository.findByOauthId(userProfile.getOauthId())
                                        .map(m -> m.update(userProfile.getName(), userProfile.getEmail(), userProfile.getImageUrl())) // OAuth 서비스 사이트에서 유저 정보 변경이 있을 수 있기 때문에 우리 DB에도 update
                                        .orElse(userProfile.toMember());
        return memberRepository.save(member);
    }
}
👀 확인해보기
로그인이 정말 잘 되어서 유저 정보를 가지고 왔는지 눈으로 확인해보자.
resources - static 하위에 index.html을 만들어 주자. 스프링 시큐리티를 사용하면 /oauth2/authorization/{OAuth 서비스 이름} 형식으로 요청만 보내면 알아서 다해준다.
<a href="/oauth2/authorization/github">Github Login</a><br>
<a href="/oauth2/authorization/google">Google Login</a><br>
<a href="/oauth2/authorization/naver">Naver Login</a><br>
h2 db를 통해 유저가 저장되는지 확인하기 위해 아래의 설정들을 해준다. 아까 스프링 시큐리티 설정 파일에 csrf, frameOptions를 disable 해준다.
@EnableWebSecurity // spring security 설정을 활성화시켜주는 어노테이션
public class SecurityConfig extends WebSecurityConfigurerAdapter {

    private final OAuthService oAuthService;

    public SecurityConfig(OAuthService oAuthService) {
        this.oAuthService = oAuthService;
    }

    @Override
    protected void configure(HttpSecurity http) throws Exception {
        http.csrf().disable() // h2 console 접속을 위해
            .headers().frameOptions().disable() // h2 console 접속을 위해
            .and()
            .oauth2Login() // OAuth2 로그인 설정 시작점
            .userInfoEndpoint() // OAuth2 로그인 성공 이후 사용자 정보를 가져올 때 설정 담당
            .userService(oAuthService); // OAuth2 로그인 성공 시, 후작업을 진행할 UserService 인터페이스 구현체 등록
    }
}
application.yml도 h2 관련 설정을 해준다.
spring:
  profiles:
    include: oauth
  datasource:
    url: jdbc:h2:mem:test;DB_CLOSE_DELAY=-1;DB_CLOSE_ON_EXIT=FALSE
    name: sa
    password:
  h2:
    console:
      enabled: true
어플리케이션을 실행 시킨 후, 각각 로그인을 해보자.

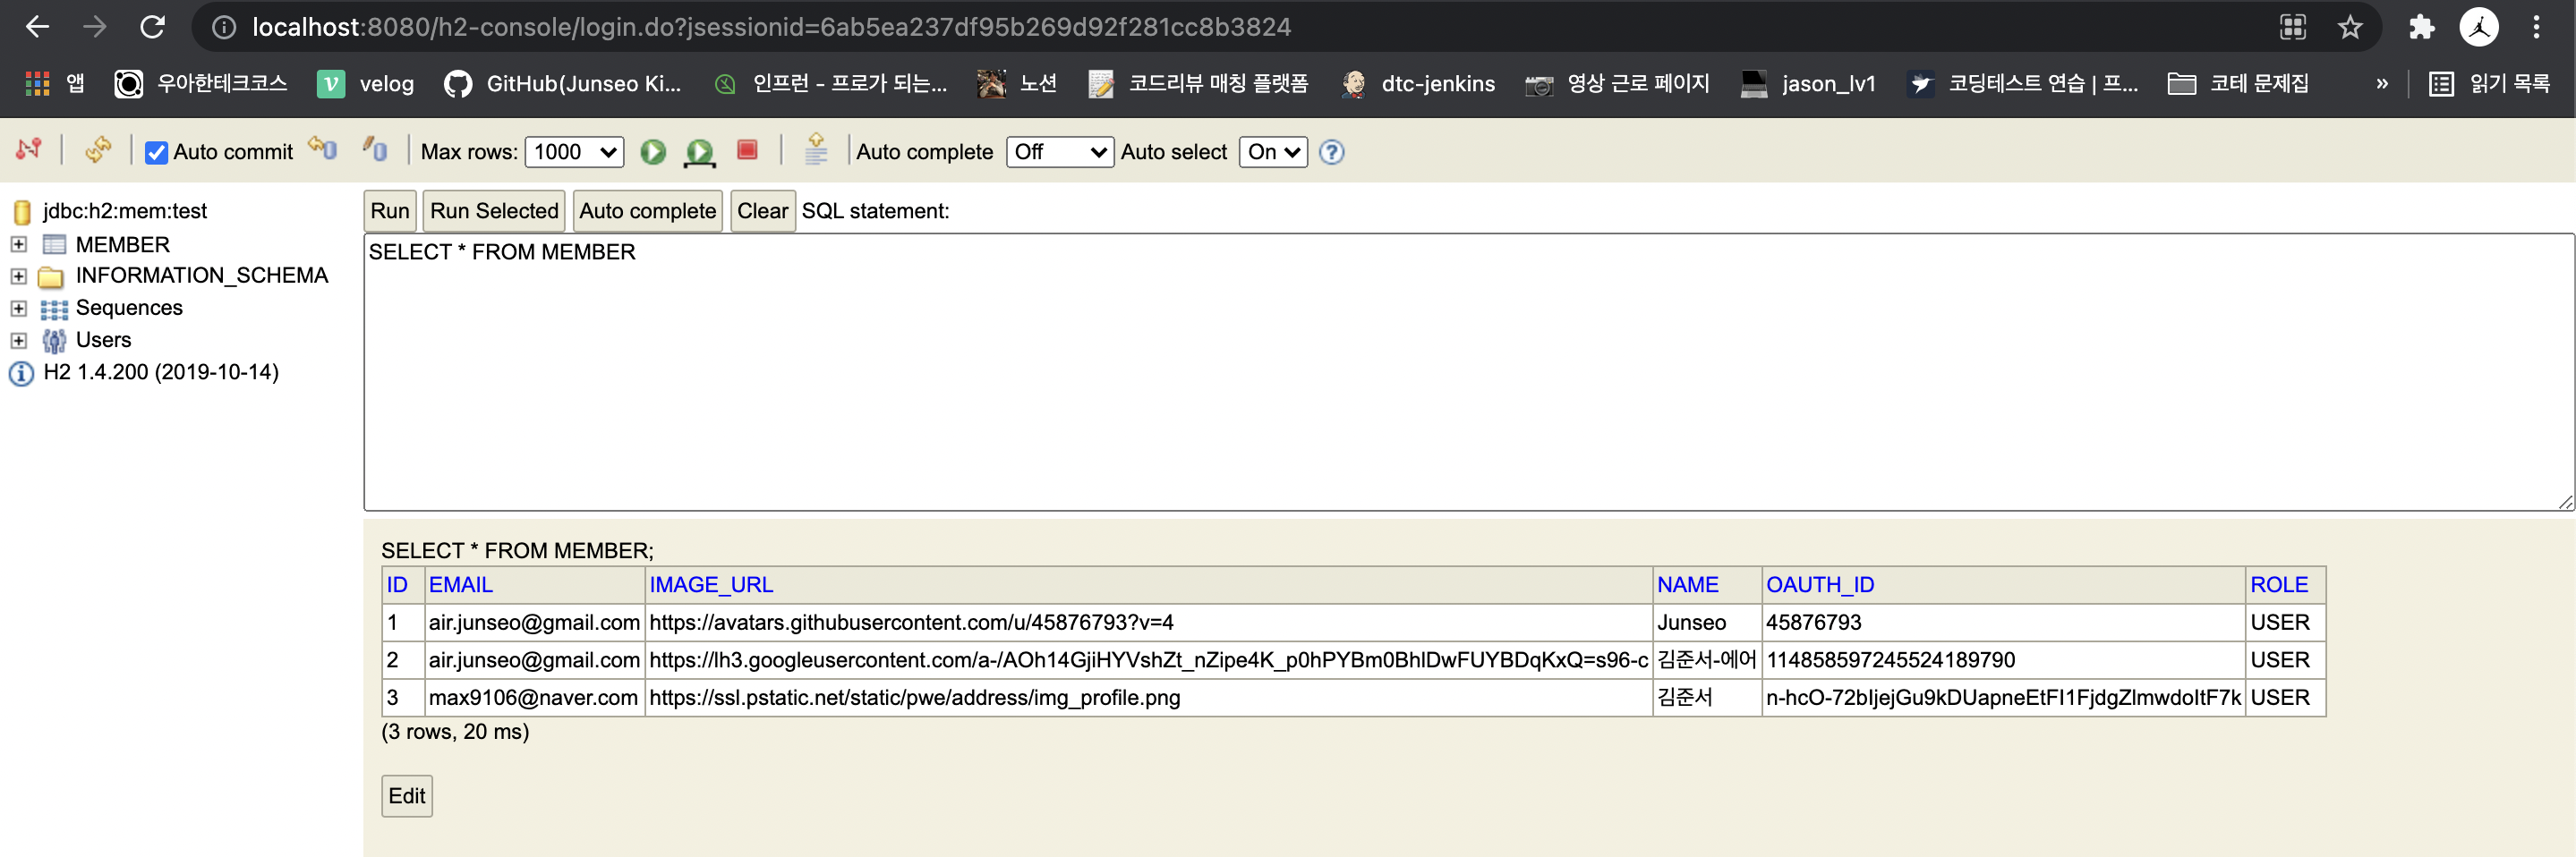
h2 콘솔을 확인해보면 잘 저장된 것을 볼 수 있다.
최종 코드는 여기서 확인할 수 있다. https://github.com/KJunseo/oauth-with-spring-security
🚗 Next
다음 포스팅은 spring security를 통해 구현한 OAuth 로그인이 어떤 식으로 동작하는지 spring security 코드를 파헤쳐보고, spring security 없이 spring security 구조를 참고하여 OAuth 로그인을 구현해보려고 한다.
reference
- 스프링 부트와 aws로 혼자 구현하는 웹 서비스 / 이동욱 님
- 12. OAuth2
