[React Native] 리액트 네이티브(react native) 푸시알람(push notification) - expo
push notification
로컬 서버를 인터넷에 노출시키는 역할인 ngrok를 설치해준다.
npm i -g ngrok
push notification 서버를 위해 express, es6 문법을 서버에서 사용하기 위해 esm push 알람을 진행하기 위한 expo-server-sdk를 설치해준다.
npm install express esm expo-server-sdk --save
permission을 위한 expo install expo-permissions를 설치해준다.
import { Notifications } from 'expo';
import * as Permissions from 'expo-permissions';를 임포트해준다.
서버의 API endpoint를 위해 아래의 const를 선언해준다. 뒤의 url주소는 후에 바꿔줄 것이다.
const PUSH_REGISTRATION_ENDPOINT = 'http://generated-ngrok-url/token';
const MESSAGE_ENPOINT = 'http://generated-ngrok-url/message';
notifications listener에 의해 notification을 받아오기 위해 notification property를 state에 선언해준다.
export default class App extends React.Component {
  state = {
    notification: null,
    messageText: ''
  }
 // Defined in following steps
}
push notification token을 서버에 등록하는 메소드를 만든다.
permission 컴포넌트의 askAsync 메소드를 통해 user에게 notification permission을 받아온다.
permission이 granted하면 Notification 컴포넌트의 getExpoPushTokenAsync 메소드를 사용하여 기기로부터 token을 받아온다.
registerForPushNotificationsAsync = async () => {
    const { status } = await Permissions.askAsync(Permissions.NOTIFICATIONS);
    if (status !== 'granted') {
      return;
    }
    let token = await Notifications.getExpoPushTokenAsync();
    // Defined in following steps
  }
token이 적절하다면, 등록을 위해 PUSH_REGISTRATION_ENDPOINT를 사용하여 push notification server로 요청을 보낼 것이다. PUSH_REGISTRATION_ENDPOINT는 token 객체와 user 객체를 포함한다.
registerForPushNotificationsAsync = async () => {
    // Defined in above step
    return fetch(PUSH_REGISTRATION_ENDPOINT, {
      method: 'POST',
      headers: {
        'Accept': 'application/json',
        'Content-Type': 'application/json',
      },
      body: JSON.stringify({
        token: {
          value: token,
        },
        user: {
          username: 'warly', //임의값
          name: 'Dan Ward'   //임의값
        },
      }),
    });
    // Defined in next step
  }
token이 등록되면, 어플리케이션에서 발생할 notification을 위해 event listener를 만든다.
registerForPushNotificationsAsync = async () => {
    // Defined in above steps
    this.notificationSubscription = Notifications.addListener(this.handleNotification);
  }
새로운 notification이 수신될 때마다 handleNotification 메소드가 실행된다. 나중에 render에서 사용하기 위해 callback에 전달된 새로운 notification을 state 객체에 넘겨주기만 하면 된다.
handleNotification = (notification) => {
    this.setState({ notification });
  }
push notification을 사용하고, token을 등록하기 위해 componentDidMount에서 registerForPushNotificationsAsync 메소드를 실행시켜준다.
componentDidMount() {
    this.registerForPushNotificationsAsync();
  }
push notification을 간단히 테스트할 render부분을 정의해준다.
render() {
    return (
      <View style={styles.container}>
        <TextInput
          value={this.state.messageText}
          onChangeText={this.handleChangeText}
          style={styles.textInput}
        />
        <TouchableOpacity
          style={styles.button}
          onPress={this.sendMessage}
        >
          <Text style={styles.buttonText}>Send</Text>
        </TouchableOpacity>
        {this.state.notification ?
          this.renderNotification()
        : null}
      </View>
    );
  }
<TextInput에 정의된 onChangeText props를 구현해준다.
handleChangeText = (text) => {
    this.setState({ messageText: text });
  }
<TouchableOpacity의 sendMessage도 구현해준다. push notification server로 메세지를 보낸다.
sendMessage = async () => {
    fetch(MESSAGE_ENPOINT, {
      method: 'POST',
      headers: {
        Accept: 'application/json',
        'Content-Type': 'application/json',
      },
      body: JSON.stringify({
        message: this.state.messageText,
      }),
    });
    this.setState({ messageText: '' });
  }
이제 server 부분을 건드려야한다.
프로젝트의 root에서 server라는 디렉토리를 생성하고, 안에 index.js파일을 생성한다.
index.js에는 서버를 돌리기 위한 express, 등록과 push notification을 보내주는 expo-server-sdk 를 import 해준다.
import express from 'express';
import Expo from 'expo-server-sdk';
express server app을 생성하고, const app에 저장한다.
const app = express();
expo server SDK의 새로운 instance를 const expo에 저장한다.
const expo = new Expo();
react native app에 등록된 token들을 저장하기 위한 array를 선언해준다.
let savedPushTokens = [];
server를 실행시키기 위한 port number를 선언해준다.
const PORT_NUMBER = 3000;
server는 두 개의 endpoint가 필요하다.
1. token을 등록하기 위한 endpoint
2. react native app에서 메세지를 받아오기 위한 endpoint
따라서, 두개의 함수를 정의해준다.
token 등록 함수
const saveToken = (token) => {
  if (savedPushTokens.indexOf(token === -1)) {
    savedPushTokens.push(token);
  }
}
react native app으로 부터 메세지를 받았을 때 push notification을 보내는 함수
const handlePushTokens = (message) => {
  let notifications = [];
  for (let pushToken of savedPushTokens) {
    if (!Expo.isExpoPushToken(pushToken)) {
      console.error(`Push token ${pushToken} is not a valid Expo push token`);
      continue;
    }
    notifications.push({
      to: pushToken,
      sound: 'default',
      title: 'Message received!',
      body: message,
      data: { message }
    })
  }
  // Defined in following step
}
message array를 받아오면, Expo 서버로 전송한다. expo 서버에서 등록된 모든 기기에 push notification을 해준다.
chunkPushNotifications와 sendPushNotificationsAsync 메소드를 통해, expo 서버에서 message array를 받는다.
const handlePushTokens = (message) => {
  // Defined in previous step
  let chunks = expo.chunkPushNotifications(notifications);
  (async () => {
    for (let chunk of chunks) {
      try {
        let receipts = await expo.sendPushNotificationsAsync(chunk);
        console.log(receipts);
      } catch (error) {
        console.error(error);
      }
    }
  })();
}
API endpoint를 생성해 위의 함수들을 사용해준다.
먼저 JSON 데이터로 작업해야 하기 때문에 JSON parser middleware를 사용한다.express.json()
app.use(express.json());
서버가 실행중이라는 응답을 준다.
app.get('/', (req, res) => {
  res.send('Push Notification Server Running');
});
push notification token을 저장하기 위한 endpoint를 실행한다.
post 요청이 /token endpoint로 보내지면, token 값을 saveToken으로 보내고 토큰이 수신되었다는 응답을 return한다.
app.post('/token', (req, res) => {
  saveToken(req.body.token.value);
  console.log(`Received push token, ${req.body.token.value}`);
  res.send(`Received push token, ${req.body.token.value}`);
});
마찬가지로 /message endpoint는 request body에서 메세지를 받아올 것이다. 그리고 그것을 handlePushTokens으로 넘겨준다. 그리고나면 우리는 message가 수신되었다는 응답을 받아온다.
app.post('/message', (req, res) => {
  handlePushTokens(req.body.message);
  console.log(`Received message, ${req.body.message}`);
  res.send(`Received message, ${req.body.message}`);
});
server instance의 express의 listen메소드로 서버를 시작해준다.
app.listen(PORT_NUMBER, () => {
  console.log(`Server Online on Port, ${PORT_NUMBER}`);
});
실제로 서버를 시작하기 위해서 package.json 파일을 수정해야한다.
"scripts"에 "serve": "node -r esm server/index.js"를 추가해준다.
npm run serve 명령어로 서버를 실행할 수 있다.
Test
*에뮬레이터로는 작동하지 않을 수 있으므로 실제 디바이스를 이용한다.
npm run serve명령어로 서버를 실행시킨다. 아래와 같은 문구가 출력되면 성공이다.

- 우리의 서버를 인터넷에 노출시키기 위해 ngrok을 실행시켜야한다. 새로운 터미널을 열어
ngrok http 3000명령어를 실행시킨다.
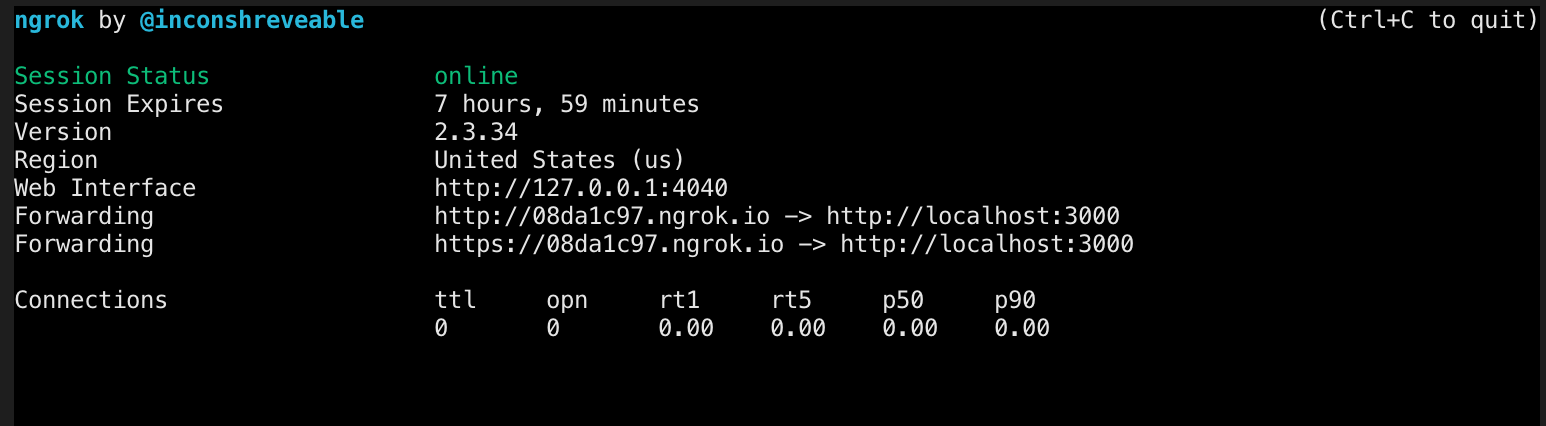
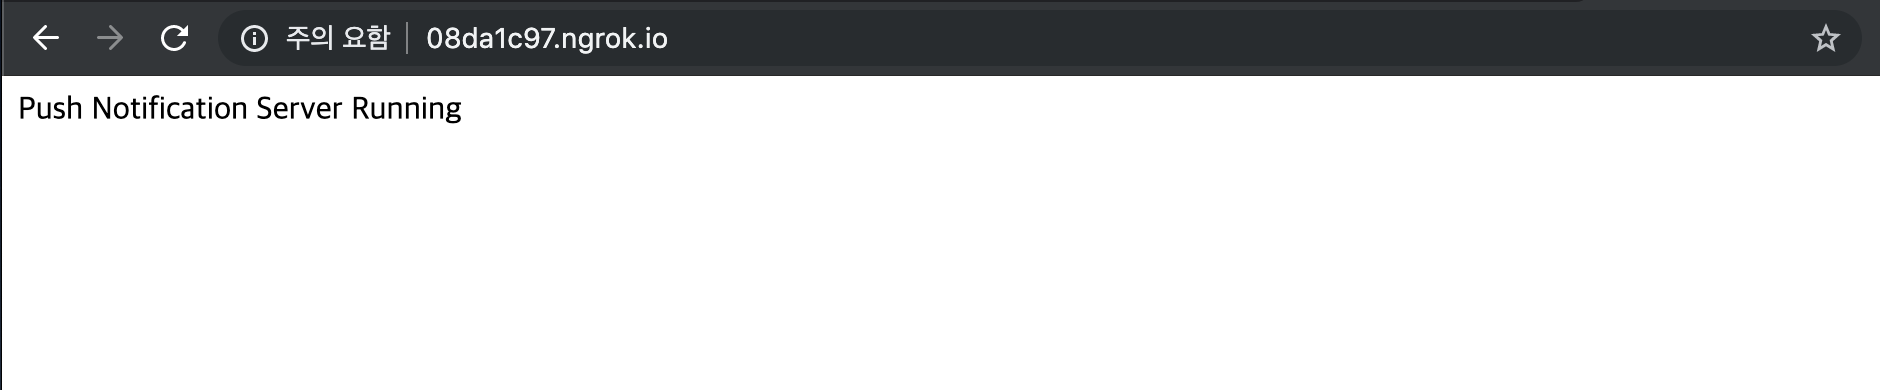
- url을 복사한다(예시의 경우 http://08da1c97.ngrok.io) 브라우저에 url을 입력해보면 아래와 같은 화면이 발생한다.
- 아까 위에서 선언해준 const PUSH_REGISTRATION_ENDPOINT 와 const MESSAGE_ENPOINT에 url/token 과 url/message 를 넣어준다.

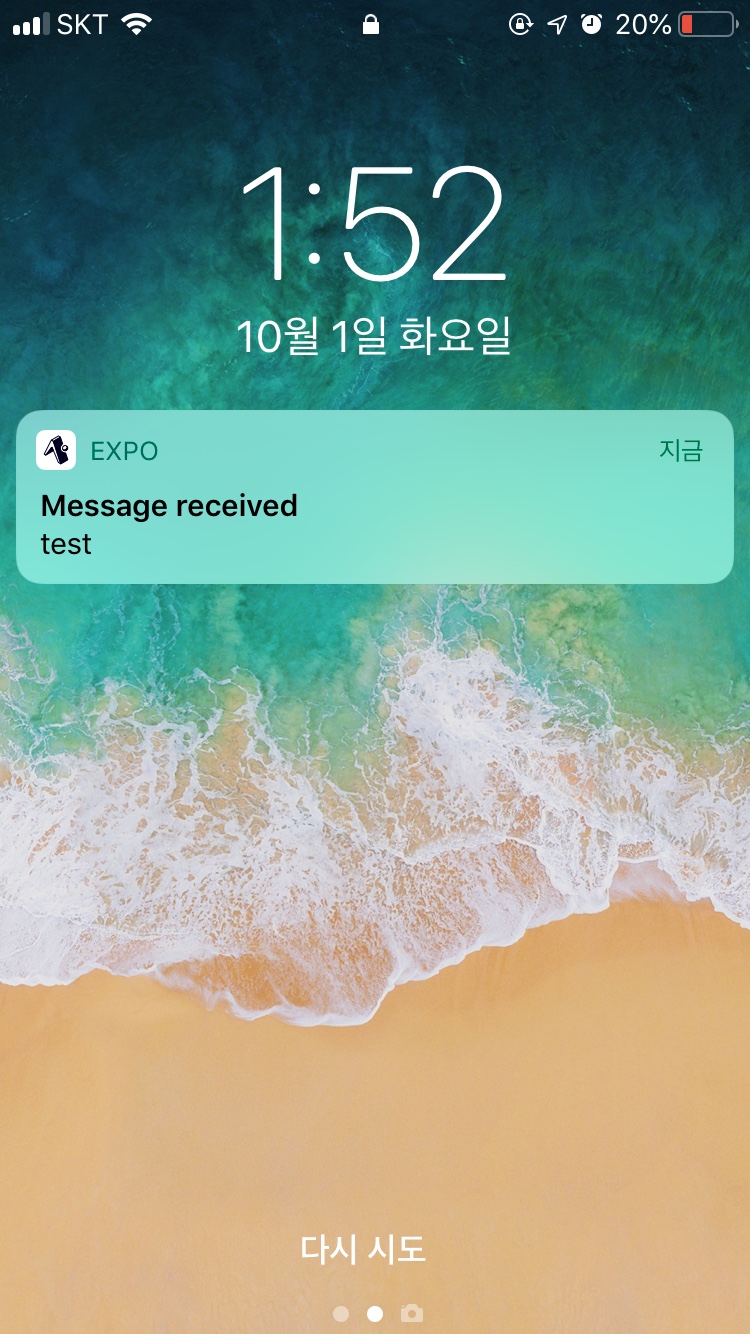
- 실제 디바이스에서 실행시켜보면 push notification을 허용할건지에 대한 알림이 뜬다. 허용을 누르면, push notification token이 저장될 서버의 /token endpoint로 전송된다.

- 디바이스에서 메세지를 입력시 status ok 가 뜨면 성공이다.

- 다른 기기에서 테스트해보거나 https://expo.io/dashboard/notifications 사이트에 접속하여 ExponentPushToken 값을 넣어주고 실행시켜보면, 푸시알람을 테스트 해볼 수 있다.
정리
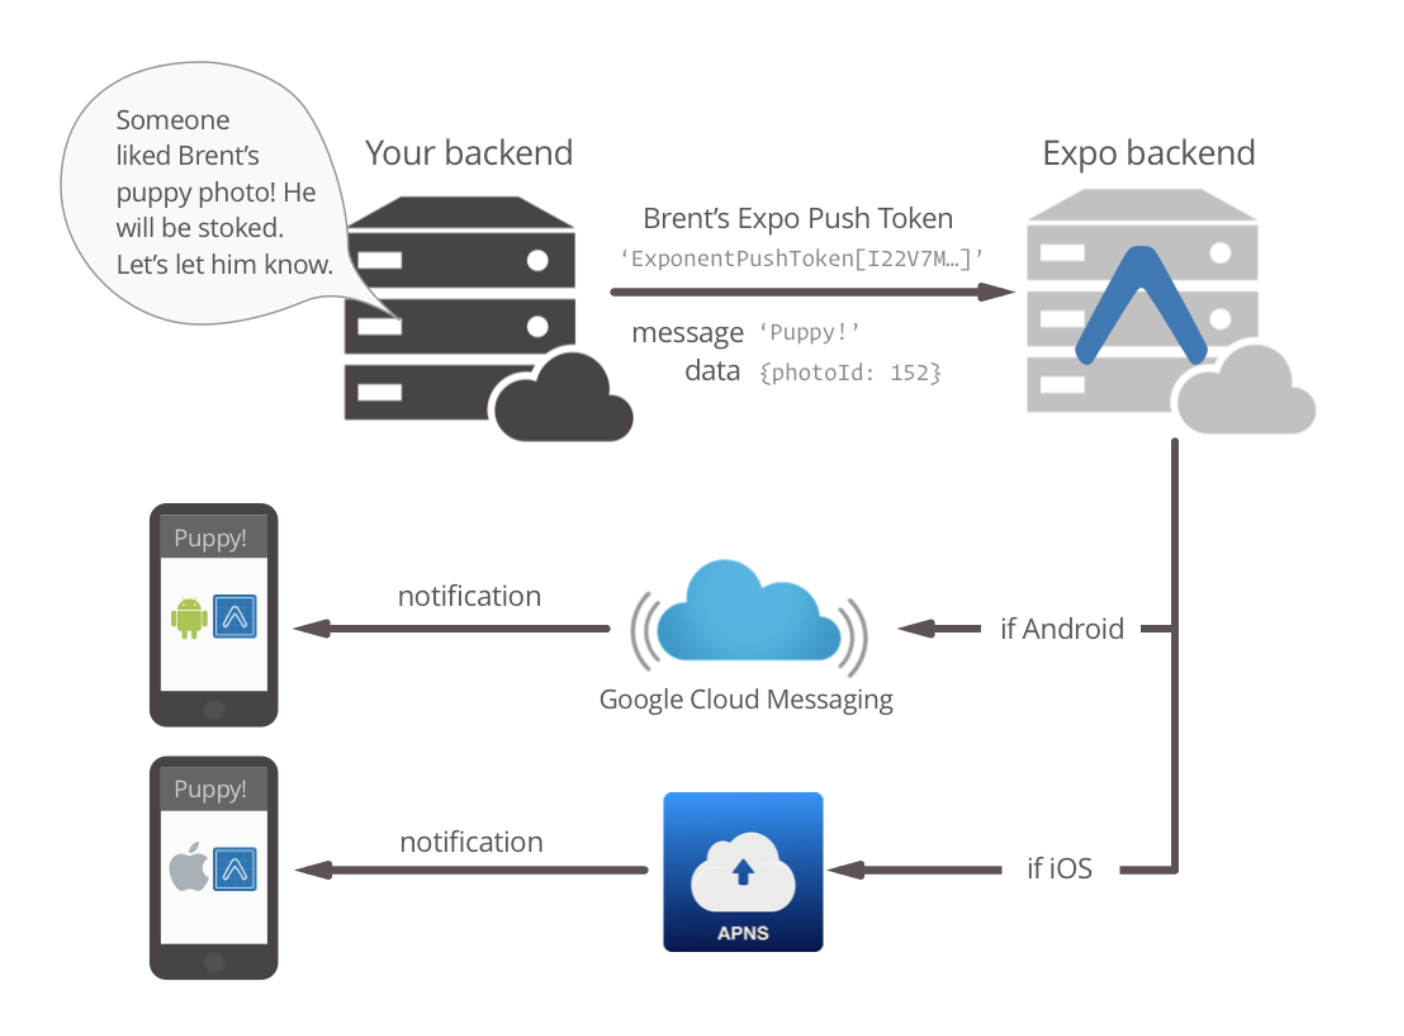
흐름을 살펴보자면, 아래와 같다.
1. request permissions
2. register tokens
3. accept app data
4. send push notifications in response to app data

질문 하나 해도 될까요?
그림을 보면 안드로이드나 ios에 메세지를 보내기 위해 FMS를 설치하는데
google-services.json이나 서버API key를 등록하는 과정은 필요 없나요?