✋개요
Devstagram의 자체 회원가입 및 로그인 기능을 구현했다. 하지만 이렇게 할 경우 프로필 사진을 우리가 S3같은 Storage에 저장해야하는데, 그 비용은 오롯이 우리의 사비로 내야했다. 한 푼이라도 클라우드 비용을 아끼기 위해 생각해낸 것이 Oauth를 사용하는 것이었다. 구글, 카카오 등은 프로필 사진의 URL을 제공하니 우리가 사진 그 자체가 아니라 url만 유저 정보에 저장하면 되는 것이다. 그 중에서 가장 글로벌한 구글 Oauth를 선택했다.
🥄삽질의 기록
-
처음에는 Spring Security와 Oauth Client를 이용해 구현했다. 참고글
- 하지만 Devstagram의 Backend는 MSA구조이며, Gateway에서 보안 (사용자 인증, 인가)를 처리하고, 유저 정보를 관리하는 Devsta-User 서비스에서는 기능만을 담당하기 때문에 Spring Security를 적용하는 것이 부적합했다.
- 또한 JWT로 토큰을 발행하고 있기 때문에 Spring Security를 이용하기 보다는 Restful API로 구현하고 싶었다
-
두번째로는 Rest API로 구현한 글을 참고했다 참고글
-
하지만 Devstagram은 Frontend server와 Backend server가 분리되어 통신하는 구조여야 했다.
-
이 글을 그대로 따라하다보면 requestUserInfo에서 Unuthorized 에러(401)가 발생하는데, 헤더에 AcessToken이 제대로 담기지 않고 요청이 가는 것이 문제였다.
public ResponseEntity<String> requestUserInfo(GoogleOAuthToken oAuthToken) { String GOOGLE_USERINFO_REQUEST_URL="https://www.googleapis.com/oauth2/v1/userinfo"; //header에 accessToken을 담는다. HttpHeaders headers = new HttpHeaders(); headers.set("Authorization","Bearer "+oAuthToken.getAccess_token()); System.out.println("Authorization: " + "Bearer "+oAuthToken.getAccess_token()); //HttpEntity를 하나 생성해 헤더를 담아서 restTemplate으로 구글과 통신하게 된다. HttpEntity request = new HttpEntity(headers); ResponseEntity<String> response = restTemplate.exchange( GOOGLE_USERINFO_REQUEST_URL, HttpMethod.GET, request, String.class ); System.out.println("response.getBody() = " + response.getBody()); return response; } -
단, 클래스 상단에
private final RestTemplate restTemplate;를 정의하고,RestTemplate 설정을 다음과 같이 해줬다@Configuration public class RestTemplateConfig { //HTTP get,post 요청을 날릴때 일정한 형식에 맞춰주는 template @Bean public RestTemplate restTemplate() { var factory = new SimpleClientHttpRequestFactory(); factory.setConnectTimeout(3000); factory.setReadTimeout(3000); return new RestTemplate(factory); } }
-
🔖 구현 요구사항
- Frontend/ Backend 서버 분리
- 기존에 동일한 email이 DB에 있는경우 회원가입이 아니라 로그인 되도록 하기
- 회원가입 도중에 그만두면 DB에 저장 안되도록 하기
🚪 로그인 프로세스
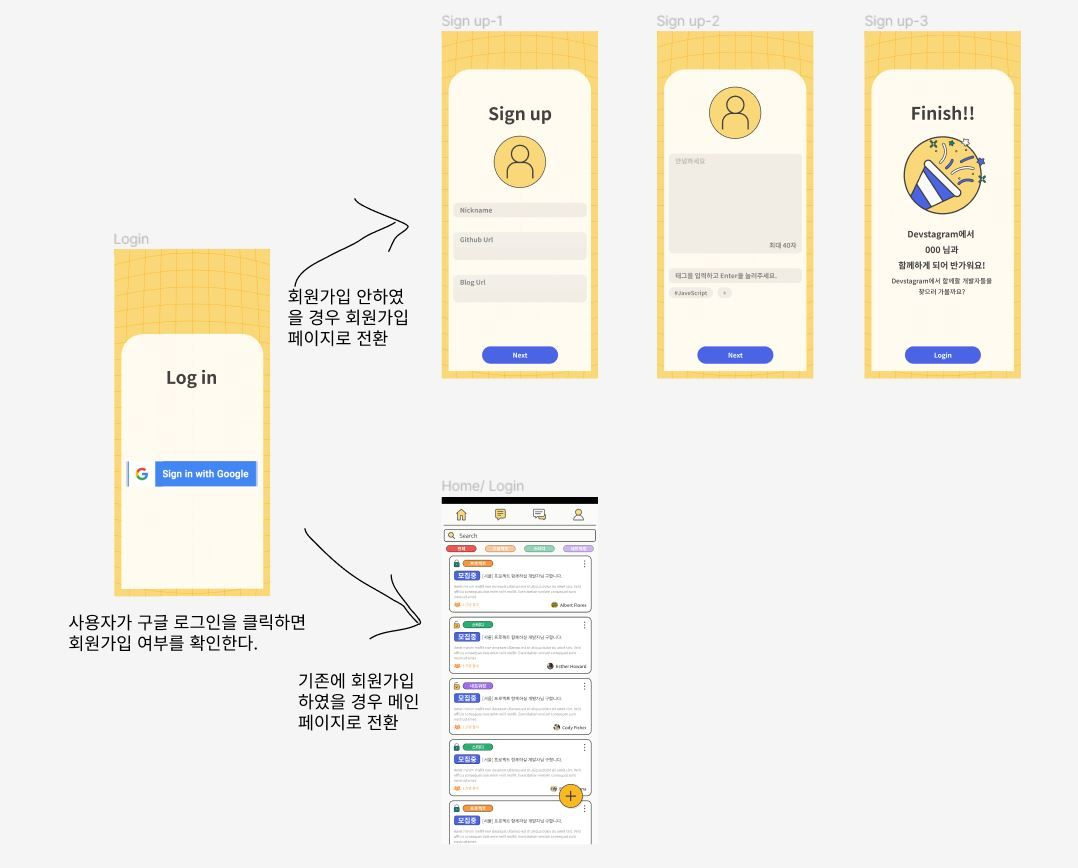
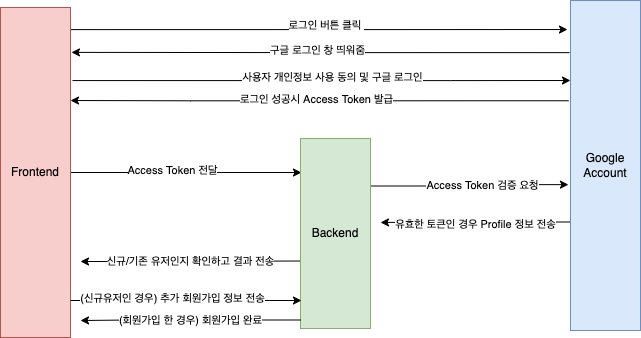
- 구글 로그인 버튼 클릭
- 구글 서버로부터 Access token을 받는다.
- 서버로 Access token 정보를 담은 HTTP 요청
- 서버에서 유저 정보 응답
4.1. AccessToken으로 profile 가져옴
4.2. email을 기준으로 기존에 회원가입 되어있는 유저인지 확인
4.3. 응답- 신규 회원인 경우 : email, name, picture 를 리턴해줌 -> 회원가입 페이지로 이동
- 기존 회원인 경우 : 로그인 JWT 토큰 리턴 (gateway에서)
- 유저가 회원가입 페이지에서 입력한 닉네임, github url, blog url, 자기소개, 태그 정보 등을 포함하여 서버로 전송
- 서버에서 DB에 저장
💡 프론트엔드가 굳이 서버에게 요청해서 email, username, picture 받아오는 이유
1. 신규 유저인지 기존 유저인지 확인하려면 DB 까지 갔다와야해서
2. 프론트엔드가 구글에 요청해서 email, username, picture 받아온 후 서버에게 로그인/회원가입 요청하면(나 이미 구글로그인 했어! email만 줄테니 로그인 된것으로 처리해줘!) 서버 입장에서 진짜 구글 로그인 한게 맞는지 믿을 수 없음 (보안 문제)
🤵🏼 프론트엔드 서버
-
프론트엔드 가이드용을 목적으로 작성
-
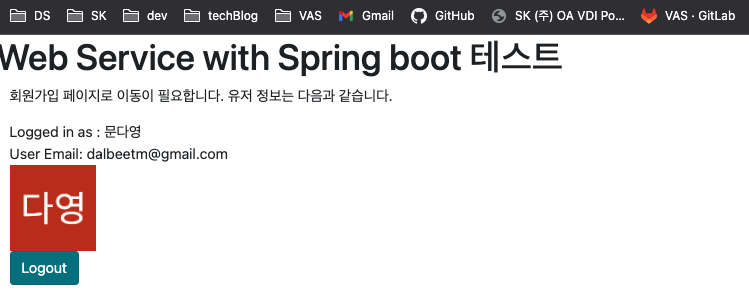
따라서 실제 회원가입 화면을 구현한 것이 아니라, 구글 로그인 후 유저 프로필 정보를 가져오고, 기존에 Devstagram에 가입한 유저인지 판단하는 부분만 이 블로그에서 다뤘다.
-
로직
-
홈 화면

-
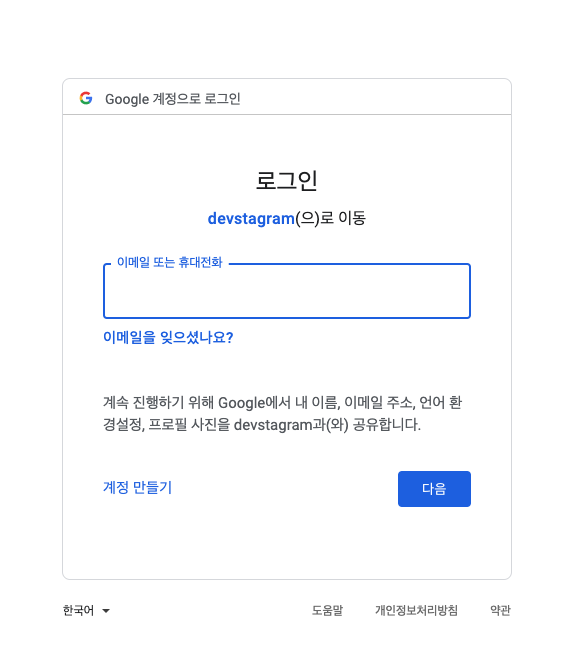
구글 로그인
-
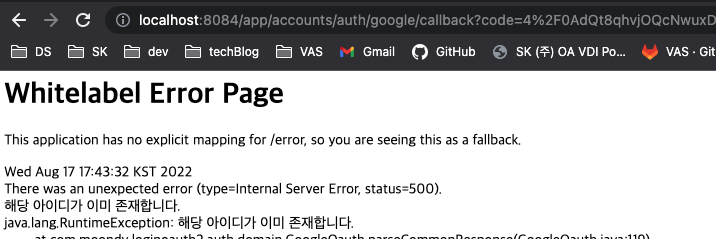
신규 유저인 경우
-
기존 유저인 경우 -> 에러발생
- 원래라면 로그인 한것으로 간주하여 로그인 JWT 토큰을 발행해야하나, 이 부분까지 다루려면 Gateway 코드, JWT 코드까지 다뤄야하기 때문에 글이 길어진다
- 따라서 이 글에서는 Exception이 발생하도록 처리해놨다.
-
코드
💡 구글 API 콘솔에서 프로젝트 생성하는 등의 사전작업은 생략. 위에 첨부한 블로그 글 참고
1. pom.xml
 <dependencies>
    <dependency>
      <groupId>org.springframework.boot</groupId>
      <artifactId>spring-boot-starter-web</artifactId>
    </dependency>
    <dependency>
      <groupId>org.springframework.boot</groupId>
      <artifactId>spring-boot-devtools</artifactId>
      <scope>runtime</scope>
      <optional>true</optional>
    </dependency>
    <dependency>
      <groupId>org.projectlombok</groupId>
      <artifactId>lombok</artifactId>
      <optional>true</optional>
    </dependency>
    <dependency>
      <groupId>org.springframework.boot</groupId>
      <artifactId>spring-boot-starter-mustache</artifactId>
    </dependency>
    <dependency>
      <groupId>com.github.spullara.mustache.java</groupId>
      <artifactId>compiler</artifactId>
      <version>0.9.5</version>
    </dependency>
    <dependency>
      <groupId>com.github.sps.mustache</groupId>
      <artifactId>mustache-spring-view</artifactId>
      <version>1.4</version>
    </dependency>
      <dependency>
          <groupId>org.springframework.boot</groupId>
          <artifactId>spring-boot</artifactId>
          <version>2.7.1</version>
      </dependency>
  </dependencies>
2. WebConfig
- resources/template에 있는 html 파일 읽도록
- 한글 읽도록 UTF-8 설정
@Configuration
public class WebConfig implements WebMvcConfigurer {
    @Override
    public void configureViewResolvers(ViewResolverRegistry registry) {
        MustacheViewResolver resolver = new MustacheViewResolver();

        resolver.setCharset("UTF-8");
        resolver.setContentType("text/html;charset=UTF-8");
        resolver.setPrefix("classpath:/templates/");
        resolver.setSuffix(".html");

        registry.viewResolver(resolver);
    }
}
3. IndexController
- 홈 화면 View 보여주는 API 있음
- username, email, picture은 null 가능, 값이 있으면 request parameter에 추가하여
GetRequest
@Controller
public class IndexController {
    @GetMapping("/home")
    public String index(@RequestParam @Nullable String username, @RequestParam @Nullable String email, @RequestParam @Nullable String picture, Model model) {
        if (username != null) {
            model.addAttribute("username", username);
        }
        if (email != null) {
            model.addAttribute("email", email);
        }
        if (picture != null) {
            model.addAttribute("picture", picture);
        }
        return "index";
    }
}
4. index.html
- mustache 이용
{{#username}}{{/username}}: username 값이 모델에 있으면{{^username}}{{/username}}: username 값이 모델에 없으면
<!DOCTYPE HTML>
<html lang="ko">
<head>
    <title>Web Service</title>
    <meta http-equiv="Content-Type" content="text/html; charset=UTF-8"/>
    <link rel="stylesheet" href="https://stackpath.bootstrapcdn.com/bootstrap/4.3.1/css/bootstrap.min.css">
    <script src="https://code.jquery.com/jquery-3.3.1.min.js"></script>
    <script src="https://stackpath.bootstrapcdn.com/bootstrap/4.3.1/js/bootstrap.min.js"></script>
</head>
<body>
    <h1>Web Service with Spring boot 테스트</h1>
    <div class="col-md-12">
        <!--로그인 기능 영역-->
        <div class="row">
            <div class="col-md-6">
                {{#username}}
                <p> 회원가입 페이지로 이동이 필요합니다. 유저 정보는 다음과 같습니다.</p>
                    <div>
                        Logged in as : <span id="user">{{username}}</span>
                    </div>
                    <div>
                        User Email: <span id="email">{{email}}</span>
                    </div>
                    <div>
                        <img id="profile-picture" src={{{picture}}}>
                    </div>
                    <div>
                        <a href="/home" class="btn btn-info active" role="button">Logout</a>
                    </div>
                {{/username}}
                {{^username}}
                    <a href="/app/accounts/auth/google" class="btn btn-success active" role="button">Google로 간편 회원가입 하기</a>
                {{/username}}
            </div>
        </div>
    </div>
    <br>
</body>
5. AuthController
- 구글 로그인 관련 API 있는 Controller
socialLoginRedirect: Oauth서비스(socialLoginType)에 따라 해당 provider가 제공하는 로그인 페이지로 redirectcallback: 로그인 후 콜백 받는 API. 로그인 성공시 Access Token을 리턴받고, 백엔드 서버에 인증 요청해 프로필 정보를 받아오고, 그걸 파라미터에 넣어 home으로 리다이렉트SocialLoginType: 허용된 소셜 로그인 타입인지 확인하기 위해 만든 Enum 클래스. 확장할 경우를 대비해 만들었는데, 이 경우엔 아직 Google 밖에 없어서 if문으로 처리해도 될 것 같다Boolean isValid = socialLoginPath.toUpperCase() == "GOOGLE";
@RequiredArgsConstructor
@Controller
@RequestMapping("/app/accounts")
@Slf4j
public class AuthController {

    private final OAuthService oAuthService;

    @GetMapping("/auth/{socialLoginType}") //GOOGLE이 들어올 것이다.
    public void socialLoginRedirect(@PathVariable(name = "socialLoginType") String socialLoginPath) throws IOException {
        SocialLoginType socialLoginType = SocialLoginType.valueOf(socialLoginPath.toUpperCase());
        oAuthService.request(socialLoginType);
    }

    @GetMapping(value = "/auth/{socialLoginType}/callback")
    public String callback(
            @PathVariable(name = "socialLoginType") String socialLoginPath,
            @RequestParam(name = "code") String code,
            RedirectAttributes re) throws IOException {
        log.info(">> 소셜 로그인 API 서버로부터 받은 Access Token :" + code);
        SocialLoginType socialLoginType = SocialLoginType.valueOf(socialLoginPath.toUpperCase());
        UserInfo userInfo = oAuthService.oAuthLogin(socialLoginType, code);
        re.addAttribute("email", userInfo.getEmail());
        re.addAttribute("username", userInfo.getUserName());
        re.addAttribute("picture", userInfo.getPictureUrl());
        return "redirect:/home";
    }
}
6.OAuthService
request: 소셜 로그인별로 로그인 페이지 리다이렉트.- 아직은 GOOGLE 밖에 없지만 KAKAO, NAVER, GITHUB 등 여러 소셜 로그인 페이지로 확장할 수 있어서 switch문으로 처리
oAuthLogin: 구글로부터 엑세스 코드를 받아와서, 백엔드 서버로 엑세스 코드를 보내고 신규 유저인지 확인후 프로필 정보 받아옴
@Service
@RequiredArgsConstructor
@Slf4j
public class OAuthService {
    private final GoogleOauth googleOauth;
    private final HttpServletResponse response;

    public void request(SocialLoginType socialLoginType) throws IOException {
        String redirectURL;
        switch (socialLoginType) {
            case GOOGLE: {
                //각 소셜 로그인을 요청하면 소셜로그인 페이지로 리다이렉트 해주는 프로세스이다.
                redirectURL = googleOauth.getOauthRedirectURL();
            }
            break;
            default: {
                throw new IllegalArgumentException("알 수 없는 소셜 로그인 형식입니다.");
            }

        }

        response.sendRedirect(redirectURL);
    }

    public UserInfo oAuthLogin(SocialLoginType socialLoginType, String code) throws IOException {
        UserInfo result;
        switch (socialLoginType) {
            case GOOGLE: {
                //구글로 일회성 코드를 보내 액세스 토큰이 담긴 응답객체를 받아옴
                ResponseEntity<String> accessTokenResponse = googleOauth.requestAccessToken(code);

                //BE 서버로 보내 기존에 존재하는 사용자인지 확인
                //액세스 토큰을 다시 구글로 보내 구글에 저장된 사용자 정보가 담긴 응답 객체를 받아온다.
                String response= googleOauth.requestUserInfoToBe(socialLoginType, accessTokenResponse.getBody());
                result = googleOauth.parseCommonResponse(response);
                break;
            }
            default: {
                throw new IllegalArgumentException("알 수 없는 소셜 로그인 형식입니다.");
            }
        }
        return result;
    }
}
7. GoogleOauth
getOauthRedirectURL: 파라미터 넣어서 URL 만들어주는 함수 (길어서 가독성을 위해)requestAccessToken: 구글에 Access Token 요청requestUserInfoToBe: 백엔드 서버에 Access Token 보내고 기존 유저인지 확인, 프로필 정보 받기parseCommonResponse: 백엔드 서버 응답을 파싱. 기존 유저이면 Exception 발생.- 실제로는 유저가 이미 있는 경우에는 로그인에 성공한 것으로 판단하여 JWT 토큰을 발행할 예정
- 지금은 JWT 토큰 발행까지 다루려면 글이 길어져서 우선 임시로 예외처리함
@Value: application.yml에 있는 값을 가져옴
@Component
@RequiredArgsConstructor
@Slf4j
public class GoogleOauth implements SocialOauth {

    private final RestTemplate restTemplate;

    //applications.yml 에서 value annotation을 통해서 값을 받아온다.
    @Value("${spring.oauth2.google.url}")
    private String GOOGLE_SNS_LOGIN_URL;

    @Value("${spring.oauth2.google.client-id}")
    private String GOOGLE_SNS_CLIENT_ID;

    @Value("${spring.oauth2.google.callback-url}")
    private String GOOGLE_SNS_CALLBACK_URL;

    @Value("${spring.oauth2.google.client-secret}")
    private String GOOGLE_SNS_CLIENT_SECRET;

    @Value("${spring.oauth2.google.scope}")
    private String GOOGLE_DATA_ACCESS_SCOPE;

    private final ObjectMapper objectMapper;

    @Override
    public String getOauthRedirectURL() {

        Map<String, Object> params = new HashMap<>();
        params.put("scope", GOOGLE_DATA_ACCESS_SCOPE);
        params.put("response_type", "code");
        params.put("client_id", GOOGLE_SNS_CLIENT_ID);
        params.put("redirect_uri", GOOGLE_SNS_CALLBACK_URL);

        //parameter를 형식에 맞춰 구성해주는 함수
        String parameterString = params.entrySet().stream()
                .map(x -> x.getKey() + "=" + x.getValue())
                .collect(Collectors.joining("&"));
        String redirectURL = GOOGLE_SNS_LOGIN_URL + "?" + parameterString;
        log.info("redirectURL = " + redirectURL);

        return redirectURL;
    }

    public ResponseEntity<String> requestAccessToken(String code) {
        String googleTokenRequestUrl = "https://oauth2.googleapis.com/token";
        RestTemplate restTemplate = new RestTemplate();
        Map<String, Object> params = new HashMap<>();
        params.put("code", code);
        params.put("client_id", GOOGLE_SNS_CLIENT_ID);
        params.put("client_secret", GOOGLE_SNS_CLIENT_SECRET);
        params.put("redirect_uri", GOOGLE_SNS_CALLBACK_URL);
        params.put("grant_type", "authorization_code");

        ResponseEntity<String> responseEntity = restTemplate.postForEntity(googleTokenRequestUrl,
                params, String.class);

        if (responseEntity.getStatusCode() == HttpStatus.OK) {
            return responseEntity;
        }
        return null;
    }


    public UserInfo parseCommonResponse (String respone) throws JsonProcessingException, RuntimeException {
        CommonResponse commonResponse = objectMapper.readValue(respone, CommonResponse.class);
        // 실제로는 유저가 이미 있는 경우에는 로그인에 성공한 것으로 판단하여 JWT 토큰을 발행할 예정
        // 하지만 지금은 임시 테스트니깐 예외처리
        if (commonResponse.getCode() == -1002) throw  new RuntimeException(commonResponse.getMessage());
        UserInfo oAuthRes = commonResponse.getAttribute().get("userInfo");
        return oAuthRes;
    }

    public String requestUserInfoToBe(SocialLoginType socialLoginType, String code) {
        String userServerUrl = String.format("http://localhost:9090/auth/oauth/%s?code=%s",socialLoginType.toString(), code);

        HttpEntity request = new HttpEntity(null);

        ResponseEntity<String> response = restTemplate.exchange(
                userServerUrl,
                HttpMethod.GET,
                request,
                String.class
        );
        return response.getBody();
    }
}
8.application.yml
application-oauth.properties에 민감정보를 담아두고,spring.profiles.include에서 import 해서 씀- Github에 코드 오픈하기 위해
server:
  port: 8084
spring:
  profiles:
    include: oauth
9. 기타 코드
🖥 백엔드 서버
설명
- 유저 정보를 관리하는 devsta-user 서비스의 일부 코드
- 실제 Devstagram 프로젝트에서는 Gateway를 거쳐서 devsta-user에 라우팅되지만, 이 글에서는 이 부분은 생략
코드
1. Controller
accessOauth: 엑세스 토큰(code)를 받아 유저 확인
@AllArgsConstructor
@RestController
@Slf4j
@RequestMapping("/auth")
public class AuthController {
    private final DevUserService devUserService;
    private final OAuthService oAuthService;

    @GetMapping("/oauth/{socialLoginType}")
    public CommonResponse accessOauth(@PathVariable("socialLoginType") String oauthType, @RequestParam("code") String code) {
        GetSocialOAuthRes res = oAuthService.oAuthLogin(oauthType.toUpperCase(), code);
        DevUser user = devUserService.findUserByEmail(res.getEmail());
        if (user == null) {
            return new CommonResponse(CommonCode.OAUTH_CHECK_SUCCESS, Map.of("userInfo", res));
        } else {
            // 유저가 이미 존재하는 경우 어떻게 Gateway에 데이터를 넘겨줄지에 따라 attribute 객체가 수정될 수 있음
            return new CommonResponse(CommonCode.USER_ALREADY_EXIST, Map.of("userInfo", new GetSocialOAuthRes(user)));
        }
    }

}
2. DevUserService
@AllArgsConstructor
@Service
public class DevUserService {
    private final DevUserRepository devUserRepository;
    private final MongoTemplate mongoTemplate;
    final static private String COLLECTION_NAME = "DevUser";

    public DevUser findUserByEmail(String email) {
        Query query = new Query(Criteria.where("email").is(email));
        DevUser targetUser = mongoTemplate.findOne(query, DevUser.class);
        return targetUser;
    }

}
3. OauthService
@Service
@RequiredArgsConstructor
@Slf4j
public class OAuthService {
    private final GoogleOauth googleOauth;

    public GetSocialOAuthRes oAuthLogin(String socialLoginType, String code) throws CustomException {
        GetSocialOAuthRes result;
        switch (socialLoginType) {
            case "GOOGLE": {
                try {
                    //응답 객체가 JSON형식으로 되어 있으므로, 이를 deserialization해서 자바 객체에 담을 것이다.
                    GoogleOAuthToken oAuthToken = googleOauth.getAccessToken(code);
                    //액세스 토큰을 다시 구글로 보내 구글에 저장된 사용자 정보가 담긴 응답 객체를 받아온다.
                    ResponseEntity<String> userInfoResponse = googleOauth.requestUserInfo(oAuthToken);
                    //다시 JSON 형식의 응답 객체를 자바 객체로 역직렬화한다.
                    GoogleUser googleUser = googleOauth.getUserInfo(userInfoResponse);
                    log.info("googleUser: " + googleUser.getEmail());
                    result = new GetSocialOAuthRes(googleUser.email, googleUser.name, googleUser.getPicture());
                    break;
                } catch (Exception e) {
                    log.error(">>>" + e.getMessage());
                    throw new CustomException(CommonCode.OAUTH_LOGIN_FAILED);
                }

            }
            default: {
                throw new CustomException(CommonCode.INVALID_SOCIAL_LOGIN_TYPE);
            }
        }
        return result;
    }
}
4. GoogleOauth
getAccessToken: 코드 파싱requestUserInfo: 구글에 엑세스 토큰으로 유저 프로필 정보 요청getUserInfo: 구글 유저로 파싱
@Component
@RequiredArgsConstructor
@Slf4j
public class GoogleOauth {

    private final RestTemplate restTemplate;
    private final ObjectMapper objectMapper;

    public GoogleOAuthToken getAccessToken(String code) throws JsonProcessingException {
        GoogleOAuthToken googleOAuthToken = objectMapper.readValue(code, GoogleOAuthToken.class);
        return googleOAuthToken;
    }

    public ResponseEntity<String> requestUserInfo(GoogleOAuthToken oAuthToken) {
        String GOOGLE_USERINFO_REQUEST_URL="https://www.googleapis.com/oauth2/v1/userinfo";

        //header에 accessToken을 담는다.
        HttpHeaders headers = new HttpHeaders();
        headers.set("Authorization","Bearer "+oAuthToken.getAccess_token());
        log.info("Authorization: " + "Bearer "+oAuthToken.getAccess_token());

        //HttpEntity를 하나 생성해 헤더를 담아서 restTemplate으로 구글과 통신하게 된다.
        HttpEntity request = new HttpEntity(headers);

        ResponseEntity<String> response = restTemplate.exchange(
                GOOGLE_USERINFO_REQUEST_URL,
                HttpMethod.GET,
                request,
                String.class
        );

        log.info("response.getBody() = " + response.getBody());
        return response;
    }

    public GoogleUser getUserInfo(ResponseEntity<String> userInfoRes) throws JsonProcessingException {
        GoogleUser googleUser = objectMapper.readValue(userInfoRes.getBody(), GoogleUser.class);
        log.info(googleUser.toString());
        return googleUser;
    }
}
5. Entity들
@Getter
@Setter
@AllArgsConstructor
// 소설 로그인 공통으로 쓸 클래스
public class GetSocialOAuthRes {
    String email;
    String userName;
    String pictureUrl;

    public GetSocialOAuthRes(DevUser user) {
        this.email = user.getEmail();
        this.userName = user.getName();
        this.pictureUrl = user.getPictureUrl();
    }
}

//구글에 일회성 코드를 다시 보내 받아올 액세스 토큰을 포함한 JSON 문자열을 담을 클래스
@AllArgsConstructor
@Getter
@Setter
public class GoogleOAuthToken {
    private String access_token;
    private int expires_in;
    private String scope;
    private String token_type;
    private String id_token;
}

//구글(서드파티)로 액세스 토큰을 보내 받아올 구글에 등록된 사용자 정보
@AllArgsConstructor
@Getter
@Setter
public class GoogleUser {
    public String id;
    public String email;
    public Boolean verifiedEmail;
    public String name;
    public String givenName;
    public String familyName;
    public String picture;
    public String locale;
}
6. 기타
- Repository, MonogoTemplate등의 기타 코드는 Github 참고
아쉬운 점
- 구글 Oauth만 다뤘지만 여러 소셜 로그인이 가능하도록 개선하고 싶다.
- Gateway를 통과해서 JWT 토큰 발급까지 다음 시리즈에서 To be continue
