📌 Buttons
드디어.. Flutter 2.0 버전 이후 변화된 버튼을 정리한다.
그 전까지 나 진짜 얼마나 낑낑거리며 구글링으로 버튼을 기워냈냐고,,ㅠ
뭐든 처음 하면 저는 너무 어렵다구요,,
암튼 이번에 변화된 버튼들 강의 들으면서 정리된 기분이라 아쥬 나이슈슉
Flutter 2.0 이후 버튼은 아래와 같이 바뀌었다.
- FlatButton -> TextButton
- RaisedButton -> ElevatedButton
- OutlineButton -> OutlinedButton
구 버전이기는 해도 다 해보긴 한 내용을 이제 강의들으면서 다시 정리하는 느낌이라,
그냥 강의 예제 따라해보면서 대충 주석으로 정리했다.
그래서 이번 포스팅은,,
그냥 예제 해본거 넣고 끝낼거다.
절대,, 귀찮아서가,, 맞다.
진짜 나 분명 요즘 엠비티아이도 J 나올만큼 계획적 인간인데 역시 게으름과 계획은 다른 문제였다..
P가 J된다고 부지런한 사람이 되는게 아니고 난 그냥 게으른 J..🤧
암튼 그래서 예제를 보자.
✅ 버튼 다 때려넣은 예제
👩💻 버튼 예제
import 'package:flutter/material.dart';
void main(){
runApp(MyApp());
}
class MyApp extends StatelessWidget {
const MyApp({super.key});
@override
Widget build(BuildContext context) {
return MaterialApp(
debugShowCheckedModeBanner: false,
title: 'Buttons',
theme: ThemeData(
primarySwatch: Colors.grey
),
home: MyPage(),
);
}
}
class MyPage extends StatelessWidget {
const MyPage({super.key});
@override
Widget build(BuildContext context) {
return Scaffold(
appBar: AppBar(
title: Text('Buttons'),
centerTitle: true,
),
body: Center(
// Column 안에 children으로 버튼을 때려 넣는다
child: Column(
mainAxisAlignment: MainAxisAlignment.spaceEvenly,
children: [
// 1. TextButton(구 FlatButton)
TextButton(
// 버튼 클릭 시 나타다는 동작
onPressed: (){
print('Text button');
},
// 버튼을 길게 눌렀을 때 나타나는 동작
onLongPress: (){
print('Long Pressed Text button');
},
child: Text('Text button',
style: TextStyle(
fontSize: 20.0
),
),
style: TextButton.styleFrom(
// 색상을 지정할 때 텍스트는 foregroundColor, 배경은 backgroundColor로 변경
foregroundColor: Colors.black,
backgroundColor: Colors.grey
),
),
// 2. ElevatedButton(구 RaisedButton)
ElevatedButton(
onPressed: (){
print('Elevated button');
},
child: Text('Elevated button'),
style: ElevatedButton.styleFrom(
foregroundColor: Colors.white,
backgroundColor: Colors.grey,
// button의 모서리 둥근 정도를 바꿀 수 있음
shape: RoundedRectangleBorder(
borderRadius: BorderRadius.circular(10.0),
),
elevation: 0.0,
),
),
//3. OutlinedButton(구 OutlineButton)
OutlinedButton(
onPressed: (){
print('Outlined button');
},
child: Text('Outlined button'),
style: OutlinedButton.styleFrom(
foregroundColor: Colors.white,
backgroundColor: Colors.black,
side: BorderSide(
color: Colors.grey,
width: 3.0,
)
),
),
// 4. TextButton에 icon 넣기
TextButton.icon(
// 버튼을 비활성화 하는 경우 onPressed 속성에 null값 줌
onPressed: null,
icon: Icon(Icons.home,
size: 30.0,
),
label: Text('Go home'),
style: TextButton.styleFrom(
foregroundColor: Colors.white,
backgroundColor: Colors.black54,
// 비활성화 된 버튼의 색상을 바꿀때는 disabled- 사용
disabledForegroundColor: Colors.pink.withOpacity(0.20),
disabledBackgroundColor: Colors.pink.withOpacity(0.20),
),
),
// 5. ButtonBar : 화면에 끝정렬해서 버튼 나타나게 해 줌
ButtonBar(
//중앙정렬
alignment: MainAxisAlignment.center,
//padding 적용
buttonPadding: EdgeInsets.all(20),
children: [
TextButton(
onPressed: (){},
child: Text('TextButton')
),
ElevatedButton(
onPressed: (){},
child: Text('ElevatedButton')
) // 아래는 괄호 파티 시작,,,,,
],
)
],
),
),
);
}
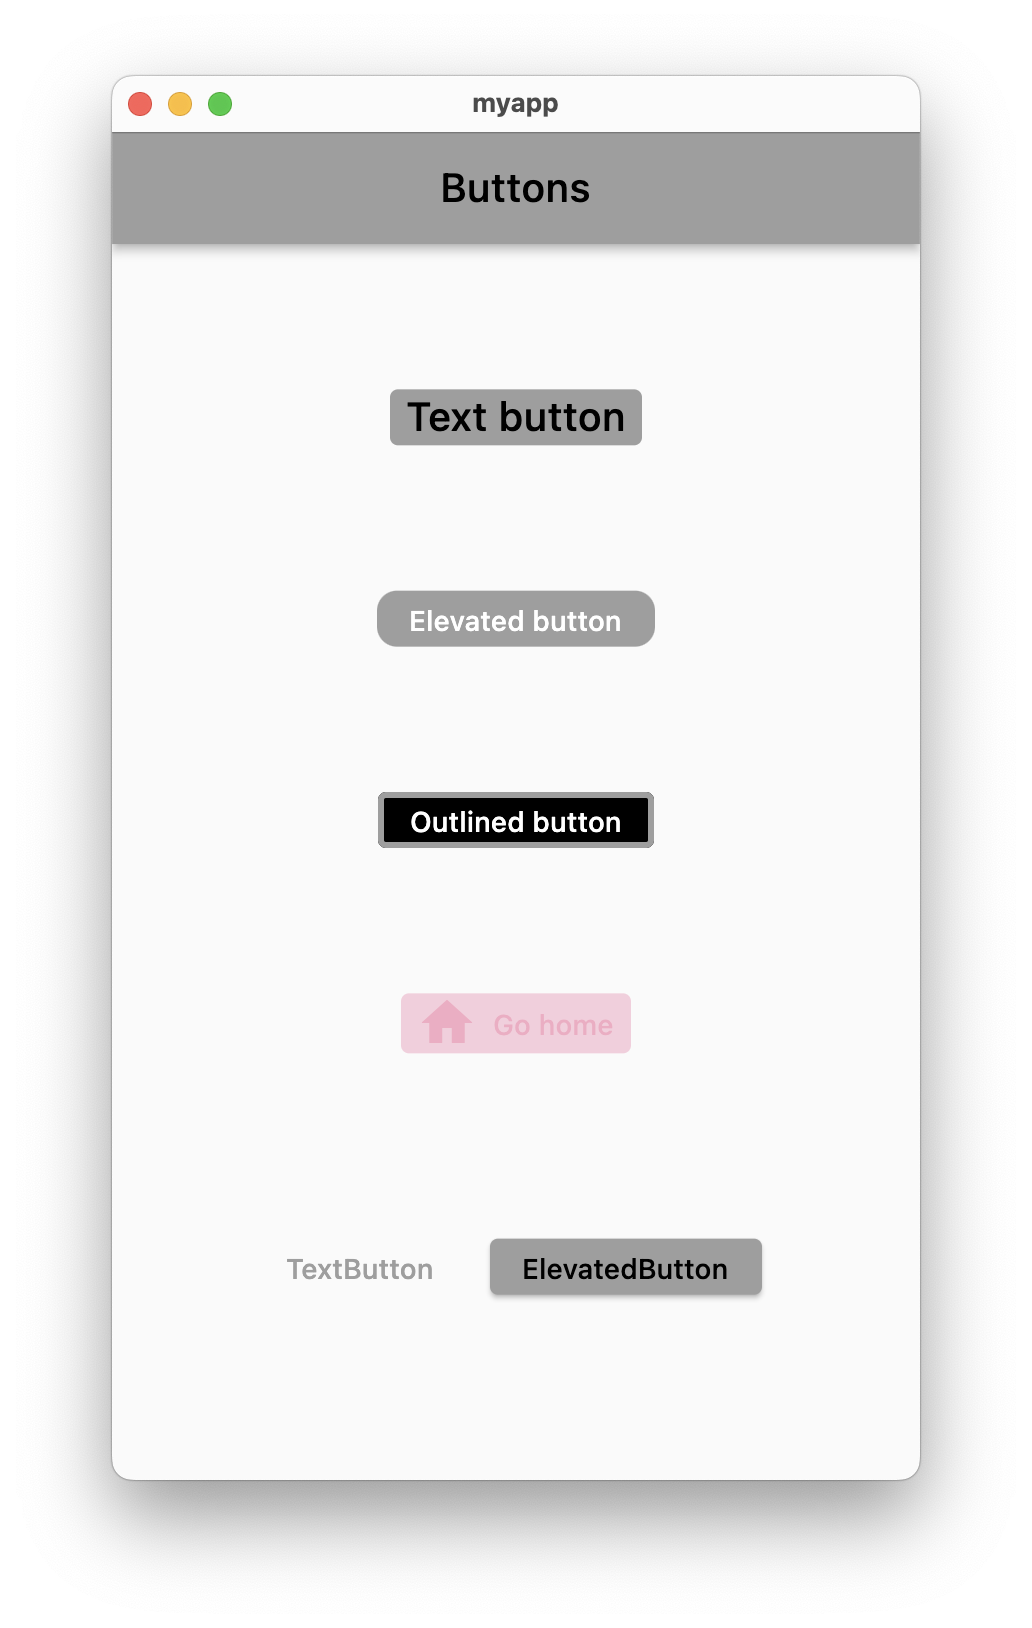
} 💻 결과 화면
✅ styleForm
이제 위의 예제에서 스타일 부분을 집어서 대충 봐보자.
일단은 버튼의 스타일 변경하는 방법이다.
방법은 간단하다.
아래와 같이 style 에서 어쩌구Button.sytleForm 을 사용해서 바꾸면 된다.
글자 색은 foregorundColor, 배경색은 backgroundColor를 사용해서 바꾸면 된다.
(전에 버튼 쓰는 포스팅에서 누덕누덕 기워볼때 정리하긴 한듯)
style 에서 또 바꿀 수 있는 것은 버튼의 테두리 색이다.
이거는 side: BorderSide() 를 사용하면 바꿀 수 있다.
그리고 버튼의 테두리 각진 정도도 바꿀 수 있다.
아래 코드와 같이 shape: RoundedRectangleBorder() 를 사용하여 바꿀 수 있다.
여기 안에 borderRadius: BorderRadius.circular(숫자) 이렇게 해서
안에 숫자가 0이면 네모 반듯반듯한 모양이 되고, 숫자가 커지면 끝이 동글동글 해진다.
마지막으로 elevation은 그 AppBar에서 elevation 0.0으로 주면 그림자 없어지게 한거 그거랑 똑같다.
아래 코드에서도 0.0으로 줘서 그림자를 없애주었다.
👩💻 버튼 스타일
OutlinedButton(
onPressed: (){
print('Outlined button');
},
child: Text('Outlined button'),
style: OutlinedButton.styleFrom(
foregroundColor: Colors.white,
backgroundColor: Colors.black,
side: BorderSide(
color: Colors.grey,
width: 3.0,
),
shape: RoundedRectangleBorder(
borderRadius: BorderRadius.circular(10.0),
),
elevation: 0.0,
),
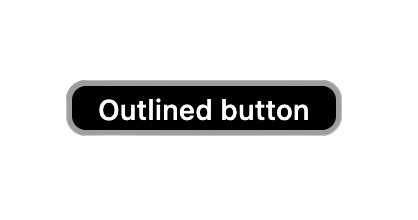
), 💻 버튼 모양
✅ ButtonBar
그리고 다른 버튼은 뭐 대충 다 해봤던 버튼이라 그냥 넘어가고,
Button bar는 이번에 처음 따라해본 내용이라 정리하려 한다.
그 어플에서 보면 화면 끝에 정렬해서 나오는 버튼들 있다.
벨로그에서 예를 들자면 아마도 이 포스팅 글 쓸 때 나오는 아래 사진 같은 버튼이다.

그래서 예제를 보면 아래와 같이 Button bar를 구현할 수 있다.
👩💻 Button bar
ButtonBar(
  //중앙정렬
  alignment: MainAxisAlignment.center,
  //padding 적용
  buttonPadding: EdgeInsets.all(20),
  children: [
    TextButton(
      onPressed: (){},
      child: Text('TextButton')
    ),
    ElevatedButton(
      onPressed: (){},
      child: Text('ElevatedButton')
    )	// 아래는 괄호 파티 시작,,,,,
  ],
)
💻 결과 버튼

📌 마무리
오늘은 이렇게 버튼까지 해서 코딩셰프 Flutter 순한맛 시즌1 강의 공부를 끝냈다.
내일부터는 순한맛 시즌2 강의를 시작해야겠다.
주말에 다 끝내면 좋게따,,
그럼 오늘 정리 끝 😚✨
참고
- Flutter
- 코딩셰프 Flutter 담백한 맛
- 코딩셰프 Flutter 순한맛 시즌1