자바로 DB 에 연결해서 데이터를 가져오려면 object에 넣은뒤 각 타입에 맞게 다운캐스팅을 해야 하는 번거로움이 있다.
스프링에는 이러한 파싱과정을 라이브러리로 대체할 수 있다.
라이브러리를 이용한 DB 연결 과정을 알아보자.
먼저 개념을 살짝 알아보자
Repository
-
Repository 를 통해서 DB에 접근
-
라이브러리 ( JPA, MyBatis ) 를 이용해 데이터를 오브젝트에 파싱
이후 사용자에게 보여줄 뷰로 오브젝트를 전달해야 한다 ( 엔티티, 모델, Dto 사용 )
포워딩
-
URI 요청을 URL 로 응답하면서 포워딩이 된다 ( 브라우저의 주소는 변경되지 않는다 )
-
포워딩이 되면 서버 내부적으로 2번의 요청이 이루어진다 ( 요청 덮어씌움 )
-
JSP 에서는
RequestDispatcher의forward()메소드를 이용해 request, reponse객체를 전달하지만 ( 뷰리졸버 x - 직접 경로 설정 )
스프링은@Controller에서 리턴타입을String+ 뷰리졸버를 이용해 쉽게 포워딩을 해준다.
RequestDispatcher dis = request.getRequestDispatcher("이동할페이지");
dis.forward(request, response); // 이동할페이지 - 매핑 주소-
@Controller어노테이션이 있는 클래스의 메소드에서 리턴에redirect를 생략하면 디폴트는forward의 기능을 한다 -
뷰( JSP )에서 표현식( EL )이 접근 가능한 객체는 - session, request, page
-
스프링에서는
Model 객체를 만들어 놨는데
Model의addAttribute()메소드는HttpServletRequest의setAttribute()메소드의 역할을 한다.
JPA 라이브러리
기본 설정
- spring 라이브러리 설정
	implementation 'org.springframework.boot:spring-boot-starter-data-jpa'
	implementation 'org.springframework.boot:spring-boot-starter-web'
	compileOnly 'org.projectlombok:lombok'
	developmentOnly 'org.springframework.boot:spring-boot-devtools'
	runtimeOnly 'com.h2database:h2'
	annotationProcessor 'org.projectlombok:lombok'
testImplementation 'org.springframework.boot:spring-boot-starter-test'- 설정파일
application.yml
spring:
  datasource:
    url: jdbc:h2:mem:test;MODE=MySQL
    driver-class-name: org.h2.Driver
    username: sa
    password:
  sql:
    init:
      schema-locations:
      - classpath:db/table.sql
      data-locations:
      - classpath:db/data.sql
  h2:
    console:
      enabled: true
  jpa:
    hibernate:
      ddl-auto: none
  output:
    ansi:
enabled: always- db/table.sql
create table product(
    id int auto_increment primary key,
    name varchar not null unique,
    price int not null,
    qty int not null,
    created_at Timestamp
);- db/data.sql
create table product(
    id int auto_increment primary key,
    name varchar not null unique,
    price int not null,
    qty int not null,
    created_at Timestamp
);
필요한 코드
- Product.java - 모델로 이용
import java.sql.Timestamp;
import javax.persistence.Entity;
import javax.persistence.GeneratedValue;
import javax.persistence.GenerationType;
import javax.persistence.Id;
import javax.persistence.Table;
import lombok.Getter;
import lombok.Setter;

// DB 테이블과 매핑될 모델링 클래스
@Getter
@Setter
@Entity
@Table(name="product")  // 테이블 이름
public class Product {
    @Id
    @GeneratedValue(strategy = GenerationType.IDENTITY)
    			// 기본키 생성 전략을 데이터베이스에게 위임
    private Integer id;
    private String name;
    private Integer price;
    private Integer qty;
    private Timestamp createdAt;
}- ProductRepository.java - DB 접근
import java.util.List;
import javax.persistence.EntityManager;
import javax.persistence.Query;
import org.springframework.beans.factory.annotation.Autowired;
import org.springframework.stereotype.Repository;

// 클래스의 목적 : DB 접근
@Repository
public class ProductRepository {

    @Autowired // - IoC 컨테이너에 떠있는 자신의 객체를 주입함 -> DI
               // DI (Dependency Injection) - 의존성 주입
    EntityManager em; // DB 에 접근하게 해주는 객체

    // 전체 Product 가져오기
    public List<Product> findAll() {
        String sql = "Select * from Product";
        Query query = em.createNativeQuery(sql, Product.class);
        List<Product> productList = query.getResultList();
        return productList;
    }

    // Product 에서 하나의 로우만 가져오기
    public Product findOne(int id){
        String sql = "Select * from Product where id = :idx"; // 가변적인 변수 ( :idx )
        Query query = em.createNativeQuery(sql, Product.class);
        query.setParameter("idx",id);
        Product product = (Product) query.getSingleResult();
        // 리턴 확인 - Object -> 다운캐스팅 (Product) 필요
        return product;
    }
}- 컨트롤러
ProductController.java
( 원래는 서비스 레이어를 나눠야 한다 ! )
import java.util.List;

import org.springframework.beans.factory.annotation.Autowired;
import org.springframework.web.bind.annotation.GetMapping;
import org.springframework.web.bind.annotation.PathVariable;
import org.springframework.web.bind.annotation.RestController;
import shop.mtcoding.red.model.Product;
import shop.mtcoding.red.model.ProductRepository;

// 클래스의 목적 : 클라이언트와 통신
@RestController
public class ProductController {

    // IoC 컨테이너에 이미 ProductRepository 가 있는데 새로운 객체를 만들 필요가 없다.
    @Autowired
    ProductRepository productRepository;

    @GetMapping("/product") 	// DB의 모든 행을 리턴
    public List<Product> findAllProduct() {
        List<Product> productList = productRepository.findAll();
        return productList;
        	// @RestController - 오브젝트 리턴시 Json으로 리턴해줌 (MassageConverter)
    }

    @GetMapping("/product/{idd}") 	// DB의 하나의 레코드를 리턴
    public Product findOneProduct(@PathVariable int idd) {
    					//@PathVariable - 가변변수 사용 {idd} 와 연결됨 -> PK 로 조회
        Product product = productRepository.findOne(idd);
        return product; // 마찬가지로 Json으로 리턴 (MassageConverter)
    }
}
@PathVariable 은 테이블의 Primary key를 주소에 넣을때 이용한다.
스프링의 기본 전략은 json 을 리턴한다.
서버 실행 후 결과는
http://localhost:8080/product입력시
[{"id":1,"name":"바나나","price":1000,"qty":50,"createdAt":"2023-01-13T08:41:00.133+00:00"},{"id":2,"name":"사과","price":2000,"qty":100,"createdAt":"2023-01-13T08:41:00.137+00:00"},{"id":3,"name":"딸기","price":3000,"qty":150,"createdAt":"2023-01-13T08:41:00.138+00:00"}]
http://localhost:8080/product/1입력시
{"id":1,"name":"바나나","price":1000,"qty":50,"createdAt":"2023-01-13T08:41:00.133+00:00"}
MyBatis 라이브러리
기본 설정
- spring 라이브러리 설정
	implementation 'javax.servlet:jstl'
    implementation 'org.apache.tomcat.embed:tomcat-embed-jasper'
	implementation 'org.springframework.boot:spring-boot-starter-web'
	implementation 'org.mybatis.spring.boot:mybatis-spring-boot-starter:2.3.0'
	compileOnly 'org.projectlombok:lombok'
	developmentOnly 'org.springframework.boot:spring-boot-devtools'
	runtimeOnly 'com.h2database:h2'
	annotationProcessor 'org.projectlombok:lombok'
testImplementation 'org.springframework.boot:spring-boot-starter-test- 설정파일
application.yml
server:
  port: 8080
  servlet:
    encoding:
      charset: utf-8
      force: true

spring:
  datasource:
    url: jdbc:h2:mem:test;MODE=MySQL
    driver-class-name: org.h2.Driver
    username: sa
    password:
  mvc:
    view:
      prefix: /WEB-INF/view/
      suffix: .jsp

  sql:
    init:
      schema-locations:
      - classpath:db/table.sql
      data-locations:
      - classpath:db/data.sql

  h2:
    console:
      enabled: true
  output:
    ansi:
      enabled: always

mybatis:
  mapper-locations:
- classpath:mapper/**.xml- MyBatis mapper 설정 -> mapper/product.xml
https://mybatis.org/mybatis-3/ko/sqlmap-xml.html - 참고해서 작성 !
<?xml version="1.0" encoding="UTF-8" ?>
<!DOCTYPE mapper
  PUBLIC "-//mybatis.org//DTD Mapper 3.0//EN"
  "http://mybatis.org/dtd/mybatis-3-mapper.dtd">

<mapper namespace="shop.mtcoding.orange.model.ProductRepository">
   <select id="findAll" resultType="shop.mtcoding.orange.model.Product">
      select * from product
   </select>

   <select id="findOne" resultType="shop.mtcoding.orange.model.Product">
      select * from product where id = #{id}
   </select>
</mapper>- db/table.sql
create table product(
    id int auto_increment primary key,
    name varchar not null unique,
    price int not null,
    qty int not null,
    created_at Timestamp
);- db/data.sql
create table product(
    id int auto_increment primary key,
    name varchar not null unique,
    price int not null,
    qty int not null,
    created_at Timestamp
);
필요한 코드
- Product.java - 모델로 사용
import java.sql.Timestamp;
import lombok.Getter;
import lombok.Setter;

@Getter
@Setter
public class Product {
    private Integer id;
    private String name;
    private Integer price;
    private Integer qty;
    private Timestamp createdAt;
}- ProductRepository.java - DB 접근
/* yml 에서 설정한 mapper 참고해서
<mapper namespace="shop.mtcoding.orange.model.ProductRepository">
   <select id="findAll" resultType="shop.mtcoding.orange.model.Product">
      select * from product
   </select>

   <select id="findOne" resultType="shop.mtcoding.orange.model.Product">
      select * from product where id = #{id}
   </select>
</mapper>
*/
import java.util.List;
import org.apache.ibatis.annotations.Mapper;

@Mapper
// product.xml 의 파일 생성 -> ProductRepositoryimpl ( implements )
											// IoC 컨테이너에 올린다
public interface ProductRepository {

    // yml - mapper 에 설정한 'select id' 와 같은 이름,
    //  					'resultType' 과 같은 리턴의 추상메소드 생성해야 함
    public List<Product> findAll();
    public Product findOne(int id);  // <-  #{id},  파라미터가 필요
}- 컨트롤러
ProductController.java
import java.util.List;
import org.springframework.beans.factory.annotation.Autowired;
import org.springframework.stereotype.Controller;
import org.springframework.ui.Model;
import org.springframework.web.bind.annotation.GetMapping;
import org.springframework.web.bind.annotation.PathVariable;
import shop.mtcoding.orange.model.Product;
import shop.mtcoding.orange.model.ProductRepository;

@Controller
public class ProductController {

    @Autowired      // 인터페이스 타입의 구현객체 (IoC컨테이너에 있는) 를 주입 ( DI )
    private ProductRepository productRepository;

    @GetMapping("/product")     // 파일( jsp ) 리턴
    public String findAllproduct(Model model){
        List<Product> productlist = productRepository.findAll();
        model.addAttribute("productList", productlist);   // Model 에 속성 추가
        return "main";  //  원래 과정은 request 생성 - 덮어씀 ( 프레임워크가 해준다 )
    }

    /*
        문자열 리턴할 경우 ( json )
    @GetMapping("/product")
    @ResponseBody
    		//  Controller + ResponseBody -> 오브젝트리턴 -> Json 으로 파싱후 리턴
    public List<Product> apiFindAllproduct(){
        List<Product> productlist = productRepository.findAll();
        return productlist;
    }
    */

    @GetMapping("/product/{id}")
    			// {id} -> @PathVariable int id - 사용자에게서 id를 입력받음
    public String findOneProduct(@PathVariable int id, Model model){
        Product product = productRepository.findOne(id);
        model.addAttribute("productList", product); // Model 에 속성 추가
        return "detail";
    }
}
연결되는 뷰 ( 차이만 비교 )
- main.jsp
<c:forEach items="${productList}" var="product">
        <tr>
            <td>${product.id}</td>
            <td>${product.name}</td>
            <td>${product.price}</td>
            <td>${product.qty}</td>
            <td>${product.createdAt}</td>
        </tr>
</c:forEach>- detail.jsp
		<tr>
            <td>${productList.id}</td>
            <td>${productList.name}</td>
            <td>${productList.price}</td>
            <td>${productList.qty}</td>
            <td>${productList.createdAt}</td>
        </tr>
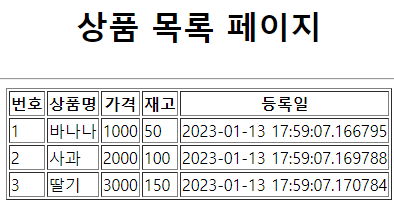
서버 실행 후 결과는
http://localhost:8080/product
http://localhost:8080/product/2

- 쿼리의 가변인수 바인딩 차이
JPA 라이브러리에서는:변수를 이용해서 uri에 입력된 인수와 바인딩 하지만
MyBatis 라이브러리에서는#{변수}를 이용해서 바인딩을 한다.
- mysql에서는
auto_increment전략을 사용한다 -> mysql에 insert하면 PK(id int)가 자동 증가