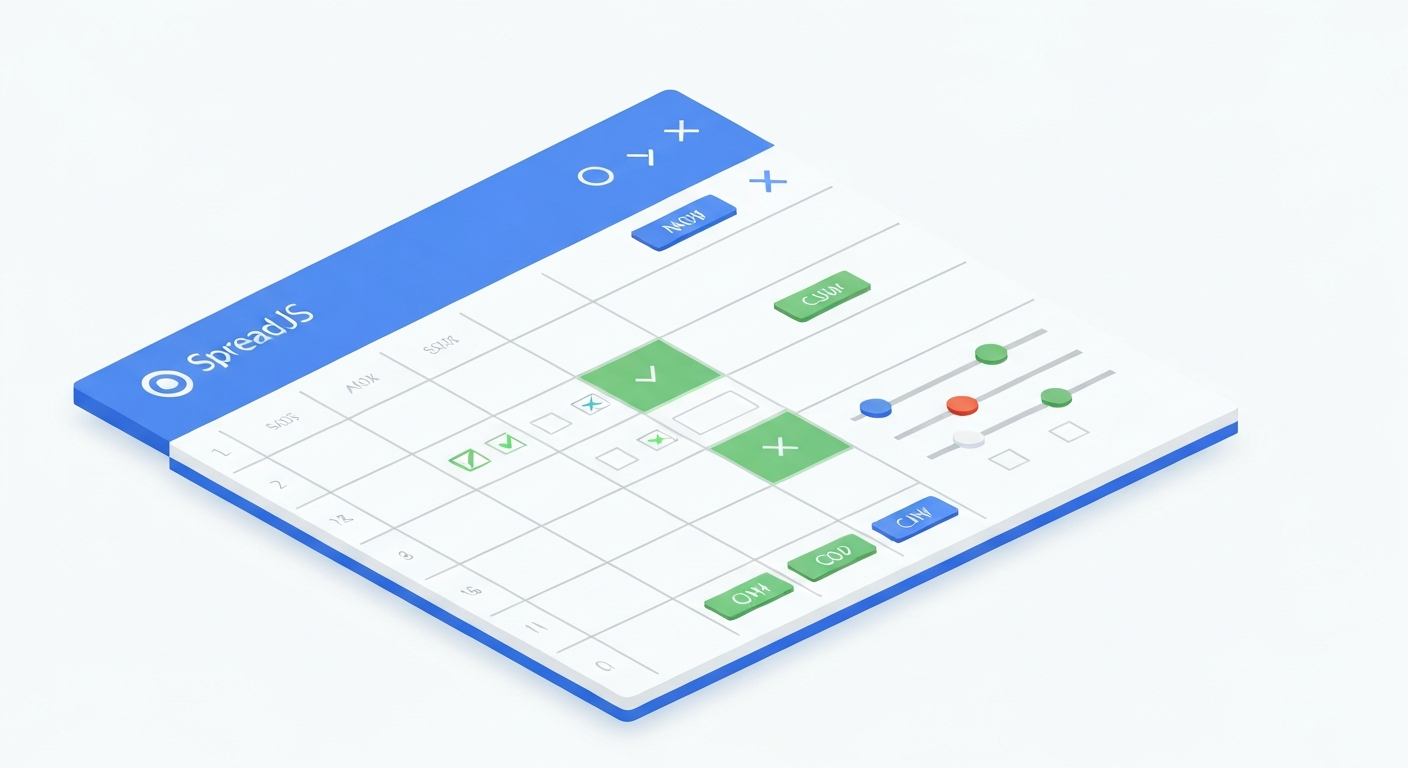
ERP·그룹웨어·MES 시스템을 웹으로 전환할 때 가장 많이 받는 질문이 있습니다. "기존 Excel의 버튼 매크로, 드롭다운, 체크박스를 웹 스프레드시트에서 그대로 구현할 수 있나요?" SpreadJS는 이 질문에 명확히 "예"라고 답합니다. 20종 이상의 내장 셀 타입을 제공해 별도 HTML 폼 없이 스프레드시트 셀 안에 직접 UI 컨트롤을 구현할 수 있으며, 커스텀 셀 타입 API로 어떤 인터랙티브 셀도 만들 수 있습니다.
📌 핵심 포인트
- SpreadJS ButtonCellType, CheckBoxCellType, ComboBoxCellType 등 20종 이상의 내장 셀 타입 제공 — HTML 폼 없이 셀 안에서 바로 동작
- 콤보박스에
fetch+items()패턴으로 REST API 데이터를 런타임에 동적 바인딩 가능GC.Spread.Sheets.CellTypes.Base를 상속해paint()메서드로 완전 커스텀 셀 타입 제작 가능- Excel(.xlsx) 내보내기 시 셀 타입은 SpreadJS 전용 — SJS 포맷으로 저장하면 완전 보존
SpreadJS 셀 타입이란? 인터랙티브 셀을 만드는 핵심 개념
SpreadJS의 셀 타입(Cell Type)은 셀의 데이터 표시 방식과 사용자 인터랙션 방식을 정의하는 객체입니다. GC.Spread.Sheets.CellTypes 네임스페이스 아래에 Button, CheckBox, ComboBox, HyperLink 등 다양한 타입이 내장되어 있습니다. 셀 타입 객체를 생성한 뒤 sheet.setCellType(row, col, cellType) 또는 sheet.getCell(row, col).cellType(cellType)으로 특정 셀에 적용하는 방식으로 사용합니다.
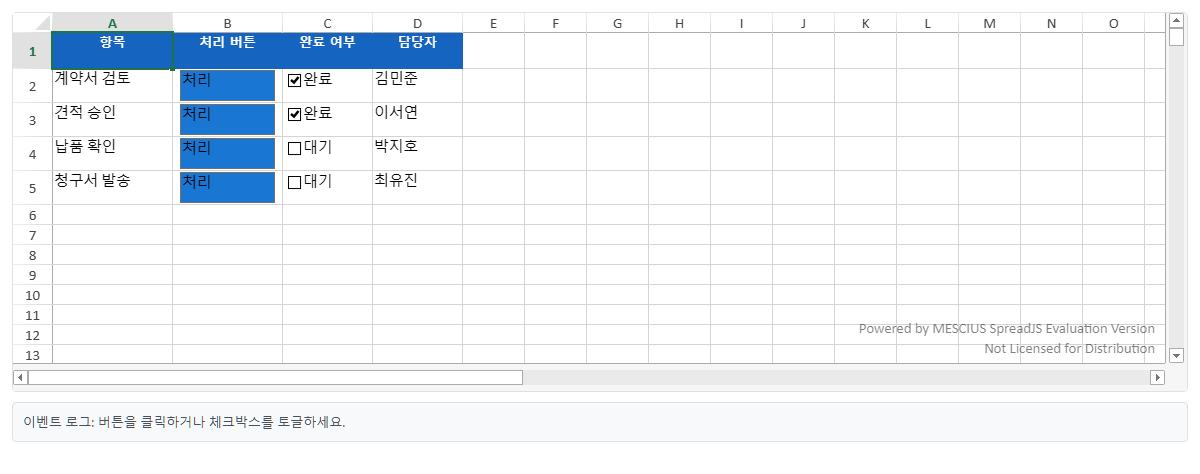
아래 예제는 ButtonCellType과 CheckBoxCellType을 한 시트에 함께 배치하고, ButtonClicked 이벤트로 클릭을 처리하는 가장 기본적인 패턴입니다.
STEP 1: CDN 참조
HTML
<link rel="stylesheet" href="https://cdn.mescius.com/spreadjs/hosted/css/gc.spread.sheets.excel2013white.19.0.6.css">
<script src="https://cdn.mescius.com/spreadjs/hosted/scripts/gc.spread.sheets.all.19.0.6.min.js"></script>
STEP 2: HTML 구조
<div id="spreadContainer" style="width:100%;height:380px;border:1px solid #e0e0e0;border-radius:4px;overflow:hidden;"></div>
<div id="eventLog" style="margin-top:10px;padding:10px;background:#f8f9fa;border:1px solid #dee2e6;border-radius:4px;font-size:13px;color:#495057;min-height:40px;">이벤트 로그: 버튼을 클릭하거나 체크박스를 토글하세요.</div>
STEP 3: JavaScript
JavaScript
const spread = new GC.Spread.Sheets.Workbook(document.getElementById('spreadContainer'));
const sheet = spread.getActiveSheet();
spread.options.tabStripVisible = false;

// 헤더
const headers = ['항목', '처리 버튼', '완료 여부', '담당자'];
headers.forEach((h, c) => {
    sheet.setValue(0, c, h);
    sheet.getCell(0, c).backColor('#1565C0').foreColor('#fff').font('bold 13px sans-serif').hAlign(1);
    sheet.setColumnWidth(c, c === 0 ? 120 : c === 1 ? 110 : 90);
});
sheet.setRowHeight(0, 36);

const items = ['계약서 검토', '견적 승인', '납품 확인', '청구서 발송'];
items.forEach((item, r) => {
    sheet.setValue(r + 1, 0, item);

    // ButtonCellType
    const btn = new GC.Spread.Sheets.CellTypes.Button();
    btn.text('처리');
    btn.buttonBackColor('#1976D2');
    btn.marginLeft(8); btn.marginRight(8);
    sheet.setCellType(r + 1, 1, btn);

    // CheckBoxCellType
    const chk = new GC.Spread.Sheets.CellTypes.CheckBox();
    chk.textTrue('완료'); chk.textFalse('대기');
    sheet.setCellType(r + 1, 2, chk);
    sheet.setValue(r + 1, 2, r < 2);

    sheet.setValue(r + 1, 3, ['김민준', '이서연', '박지호', '최유진'][r]);
    sheet.setRowHeight(r + 1, 34);
});

// ButtonClicked 이벤트 — Button, CheckBox 공통
spread.bind(GC.Spread.Sheets.Events.ButtonClicked, function(e, args) {
    const { row, col } = args;
    const cellType = sheet.getCellType(row, col);
    const log = document.getElementById('eventLog');
    if (cellType instanceof GC.Spread.Sheets.CellTypes.Button) {
        log.textContent = `[버튼 클릭] ${sheet.getValue(row, 0)} 처리 시작 — 행 ${row}`;
        sheet.getCell(row, 0).backColor('#E3F2FD');
    } else if (cellType instanceof GC.Spread.Sheets.CellTypes.CheckBox) {
        const val = sheet.getValue(row, col);
        log.textContent = `[체크박스] ${sheet.getValue(row, 0)}: ${val ? '✅ 완료' : '⬜ 대기'}`;
    }
});
💡 팁
ButtonClicked이벤트는 Button, CheckBox, HyperLink 셀 타입 모두에서 발생합니다.instanceof로 셀 타입을 구분하면 단일 이벤트 핸들러로 모든 클릭 이벤트를 처리할 수 있습니다.

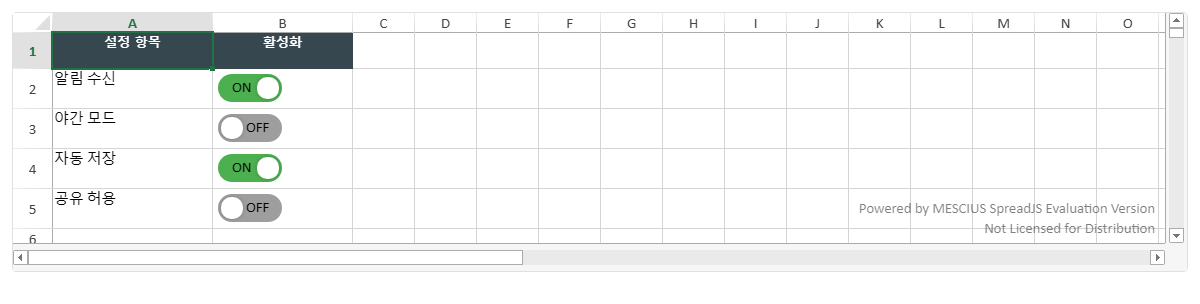
CheckBoxCellType 토글 스위치 모드 — iOS 스타일 스위치 구현
CheckBoxCellType은 3상태 모드와 함께 iOS 스타일 토글 스위치 모드를 지원합니다. .mode("toggle")을 설정하고 toggleOptions()으로 색상과 크기를 세밀하게 조정할 수 있어 모던한 인터페이스를 구현할 때 유용합니다.
<div id="spreadContainer" style="width:100%;height:260px;border:1px solid #e0e0e0;border-radius:4px;overflow:hidden;"></div>JavaScript
const spread = new GC.Spread.Sheets.Workbook(document.getElementById('spreadContainer'));
const sheet = spread.getActiveSheet();
spread.options.tabStripVisible = false;

const toggleItems = [
    ['알림 수신', true],
    ['야간 모드', false],
    ['자동 저장', true],
    ['공유 허용', false],
];

sheet.setValue(0, 0, '설정 항목'); sheet.setValue(0, 1, '활성화');
[0, 1].forEach(c => {
    sheet.getCell(0, c).backColor('#37474F').foreColor('#fff').font('bold 13px sans-serif').hAlign(1);
});
sheet.setColumnWidth(0, 160); sheet.setColumnWidth(1, 140); sheet.setRowHeight(0, 36);

toggleItems.forEach(([label, val], r) => {
    sheet.setValue(r + 1, 0, label);

    const chk = new GC.Spread.Sheets.CellTypes.CheckBox();
    chk.mode('toggle');
    chk.textTrue('ON'); chk.textFalse('OFF');
    chk.textAlign(GC.Spread.Sheets.CellTypes.CheckBoxTextAlign.inside);
    chk.toggleOptions({
        width: 64, height: 28,
        trackColorOn: '#4CAF50', trackColorOff: '#9E9E9E',
        sliderColorOn: '#fff', sliderColorOff: '#fff',
        sliderMargin: 3, animationDuration: 150,
        trackRadius: 14, sliderRadius: 10
    });
    sheet.setCellType(r + 1, 1, chk);
    sheet.setValue(r + 1, 1, val);
    sheet.setRowHeight(r + 1, 40);
});
📝 참고
토글 스위치 모드에서도 값은
true/false의 불리언으로 저장됩니다.sheet.getValue(row, col)로 언제든지 현재 상태를 읽을 수 있습니다.
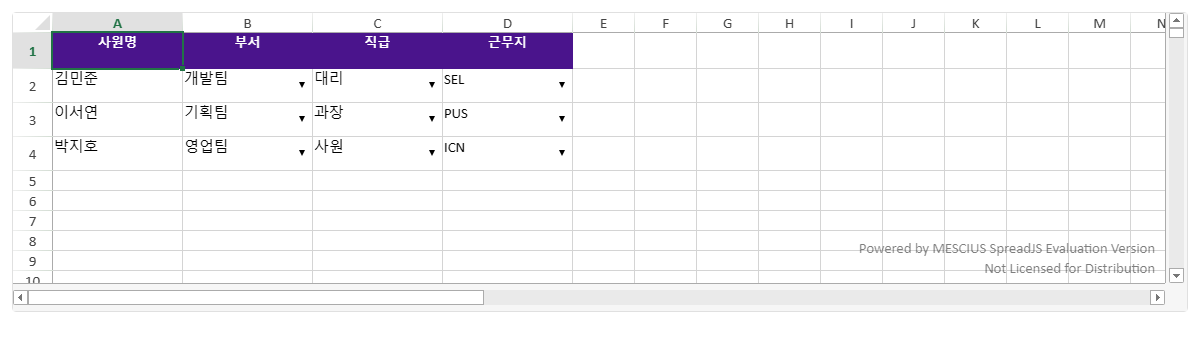
ComboBoxCellType — 정적 목록부터 REST API 동적 바인딩까지
ComboBoxCellType은 드롭다운 선택 UI를 셀 안에 내장합니다. 정적 항목 배열을 items()로 즉시 설정하거나, REST API 응답 데이터를 fetch 후 동적으로 바인딩하는 두 가지 패턴을 모두 지원합니다.
HTML
<div id="spreadContainer" style="width:100%;height:300px;border:1px solid #e0e0e0;border-radius:4px;overflow:hidden;"></div>JavaScript
const spread = new GC.Spread.Sheets.Workbook(document.getElementById('spreadContainer'));
const sheet = spread.getActiveSheet();
spread.options.tabStripVisible = false;

// 헤더 설정
const cols = ['사원명', '부서', '직급', '근무지'];
cols.forEach((h, c) => {
    sheet.setValue(0, c, h);
    sheet.getCell(0, c).backColor('#4A148C').foreColor('#fff').font('bold 13px sans-serif').hAlign(1);
    sheet.setColumnWidth(c, 130);
});
sheet.setRowHeight(0, 36);

// 부서 콤보박스 (정적 목록)
const deptCombo = new GC.Spread.Sheets.CellTypes.ComboBox();
deptCombo.items(['개발팀', '기획팀', '디자인팀', '영업팀', '경영지원팀']);
deptCombo.editorValueType(GC.Spread.Sheets.CellTypes.EditorValueType.text);
deptCombo.itemHeight(28);

// 직급 콤보박스 (text/value 구조)
const rankCombo = new GC.Spread.Sheets.CellTypes.ComboBox();
rankCombo.items([
    { text: '사원', value: 1 }, { text: '대리', value: 2 },
    { text: '과장', value: 3 }, { text: '차장', value: 4 },
    { text: '부장', value: 5 }
]);
rankCombo.editorValueType(GC.Spread.Sheets.CellTypes.EditorValueType.text);

// 근무지 콤보박스 — fetch 시뮬레이션 (실제 사용 시 fetch(url) 로 교체)
const locationCombo = new GC.Spread.Sheets.CellTypes.ComboBox();
const mockApiResponse = [
    { name: '서울 본사', code: 'SEL' }, { name: '부산 지점', code: 'PUS' },
    { name: '대구 지점', code: 'TAE' }, { name: '인천 지점', code: 'ICN' }
];
Promise.resolve(mockApiResponse).then(data => {
    locationCombo.items(data.map(d => ({ text: d.name, value: d.code })));
    locationCombo.editorValueType(GC.Spread.Sheets.CellTypes.EditorValueType.value);
    // 실제 코드: fetch('/api/locations').then(r=>r.json()).then(data => {...})
});

const sampleData = [
    ['김민준', '개발팀', '대리', 'SEL'],
    ['이서연', '기획팀', '과장', 'PUS'],
    ['박지호', '영업팀', '사원', 'ICN'],
];
sampleData.forEach(([name, dept, rank, loc], r) => {
    sheet.setValue(r + 1, 0, name);
    sheet.setValue(r + 1, 1, dept);
    sheet.getCell(r + 1, 1).cellType(deptCombo);
    sheet.setValue(r + 1, 2, rank);
    sheet.getCell(r + 1, 2).cellType(rankCombo);
    sheet.setValue(r + 1, 3, loc);
    sheet.getCell(r + 1, 3).cellType(locationCombo);
    sheet.setRowHeight(r + 1, 34);
});
💡 팁
fetch패턴의 핵심: 비동기 응답을 받은 뒤.items(mappedData)를 호출하면 됩니다. SpreadJS DataManager의dataBinding()메서드를 사용하면 테이블과 셀을 실시간으로 양방향 바인딩할 수 있습니다.
⚠️ 주의
editorValueType을EditorValueType.value로 설정하면 셀에는text가 아닌value속성의 값이 저장됩니다.getValue()로 읽을 때 이 점을 반드시 확인하세요.
슬라이더 드롭다운 — 셀에 범위 입력 컨트롤 추가하기
SpreadJS에서 슬라이더는 독립적인 셀 타입이 아닌 셀 드롭다운(Cell Dropdown) 방식으로 구현합니다. Style.cellButtons에 드롭다운 버튼을 추가하고 Style.dropDowns에 DropDownType.slider를 설정하면 됩니다. 클릭 시 드롭다운으로 슬라이더가 열려 값을 선택하면 셀에 숫자가 반영됩니다.

HTML
<div id="spreadContainer" style="width:100%;height:300px;border:1px solid #e0e0e0;border-radius:4px;overflow:hidden;"></div>JavaScript
const spread = new GC.Spread.Sheets.Workbook(document.getElementById('spreadContainer'));
const sheet = spread.getActiveSheet();
spread.options.tabStripVisible = false;

sheet.setValue(0, 0, '프로젝트'); sheet.setValue(0, 1, '진척률 (클릭하여 조정)'); sheet.setValue(0, 2, '상태');
[0, 1, 2].forEach(c => {
    sheet.getCell(0, c).backColor('#00695C').foreColor('#fff').font('bold 13px sans-serif').hAlign(1);
});
sheet.setColumnWidth(0, 150); sheet.setColumnWidth(1, 200); sheet.setColumnWidth(2, 80);
sheet.setRowHeight(0, 36);

// 슬라이더 드롭다운 스타일
const sliderStyle = new GC.Spread.Sheets.Style();
sliderStyle.cellButtons = [{
    imageType: GC.Spread.Sheets.ButtonImageType.dropdown,
    command: 'openSlider',
    useButtonStyle: true,
}];
sliderStyle.dropDowns = [{
    type: GC.Spread.Sheets.DropDownType.slider,
    option: {
        min: 0, max: 100, step: 5,
        marks: [0, 25, 50, 75, 100],
        direction: GC.Spread.Sheets.LayoutDirection.horizontal,
        tooltipVisible: true,
        width: 300,
    }
}];
sliderStyle.formatter = '0"%"';

const projects = [
    ['ERPv2 화면 개발', 72], ['모바일 앱 마이그레이션', 45],
    ['데이터 마트 구축', 88], ['결재 모듈 리팩토링', 20],
];
projects.forEach(([name, pct], r) => {
    sheet.setValue(r + 1, 0, name);
    sheet.setValue(r + 1, 1, pct);
    sheet.setStyle(r + 1, 1, sliderStyle);
    const status = pct >= 80 ? '완료임박' : pct >= 50 ? '진행중' : '초기';
    sheet.setValue(r + 1, 2, status);
    const color = pct >= 80 ? '#E8F5E9' : pct >= 50 ? '#FFF8E1' : '#FFF3E0';
    sheet.getCell(r + 1, 1).backColor(color);
    sheet.setRowHeight(r + 1, 36);
});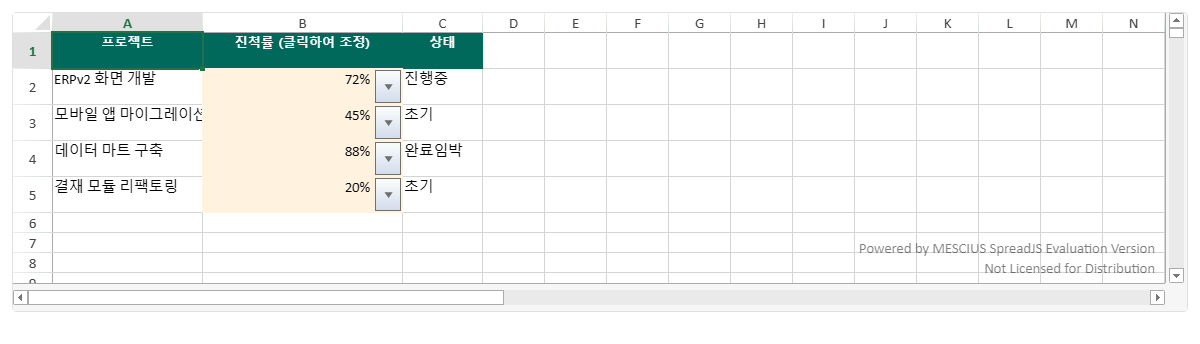
📝 참고
formatter: '0"%"'를 함께 설정하면 셀에 저장된 숫자 값이 "75%"처럼 표시됩니다. 실제 값은 여전히 숫자이므로 수식 계산에 그대로 사용할 수 있습니다.
커스텀 셀 타입으로 나만의 인터랙티브 셀 만들기
내장 셀 타입으로 해결이 안 될 때는 GC.Spread.Sheets.CellTypes.Base를 상속해 완전히 새로운 셀 타입을 제작합니다. paint() 메서드에서 Canvas 2D API로 원하는 대로 그리고, getHitInfo() + processMouseUp()으로 마우스 인터랙션을 처리합니다.
아래 예제는 업무 달성률을 시각적인 프로그레스 바로 렌더링하는 커스텀 셀 타입입니다.
HTML
<div id="spreadContainer" style="width:100%;height:320px;border:1px solid #e0e0e0;border-radius:4px;overflow:hidden;"></div>JavaScript
// 프로그레스 바 커스텀 셀 타입 정의
function ProgressBarCellType() {}
ProgressBarCellType.prototype = new GC.Spread.Sheets.CellTypes.Base();

ProgressBarCellType.prototype.paint = function(ctx, value, x, y, w, h, style, context) {
    if (!ctx) return;
    const pct = Math.min(Math.max(Number(value) || 0, 0), 100) / 100;
    const barH = 18, barY = y + (h - barH) / 2, padX = 8;

    ctx.save();
    ctx.rect(x, y, w, h); ctx.clip();

    // 배경 트랙
    ctx.fillStyle = '#ECEFF1';
    ctx.beginPath();
    ctx.roundRect(x + padX, barY, w - padX * 2, barH, 4);
    ctx.fill();

    // 진행 바
    if (pct > 0) {
        ctx.fillStyle = pct >= 0.8 ? '#43A047' : pct >= 0.5 ? '#FB8C00' : '#E53935';
        ctx.beginPath();
        ctx.roundRect(x + padX, barY, (w - padX * 2) * pct, barH, 4);
        ctx.fill();
    }

    // 퍼센트 텍스트
    ctx.fillStyle = pct > 0.45 ? '#fff' : '#546E7A';
    ctx.font = 'bold 11px sans-serif';
    ctx.textAlign = 'center'; ctx.textBaseline = 'middle';
    ctx.fillText(Math.round(pct * 100) + '%', x + w / 2, barY + barH / 2);
    ctx.restore();
};

// 워크북 구성
const spread = new GC.Spread.Sheets.Workbook(document.getElementById('spreadContainer'));
const sheet = spread.getActiveSheet();
spread.options.tabStripVisible = false;

const progBar = new ProgressBarCellType();
const headers = ['담당자', '이번 달 목표', '달성률'];
headers.forEach((h, c) => {
    sheet.setValue(0, c, h);
    sheet.getCell(0, c).backColor('#283593').foreColor('#fff').font('bold 13px sans-serif').hAlign(1);
    sheet.setColumnWidth(c, c === 2 ? 200 : 130);
});
sheet.setRowHeight(0, 36);

const data = [
    ['김민준', '계약 10건', 92], ['이서연', '매출 5억', 68],
    ['박지호', '신규 고객 20사', 35], ['최유진', '제안서 15건', 81],
];
data.forEach(([name, goal, pct], r) => {
    sheet.setValue(r + 1, 0, name);
    sheet.setValue(r + 1, 1, goal);
    sheet.setValue(r + 1, 2, pct);
    sheet.getCell(r + 1, 2).cellType(progBar);
    sheet.setRowHeight(r + 1, 42);
});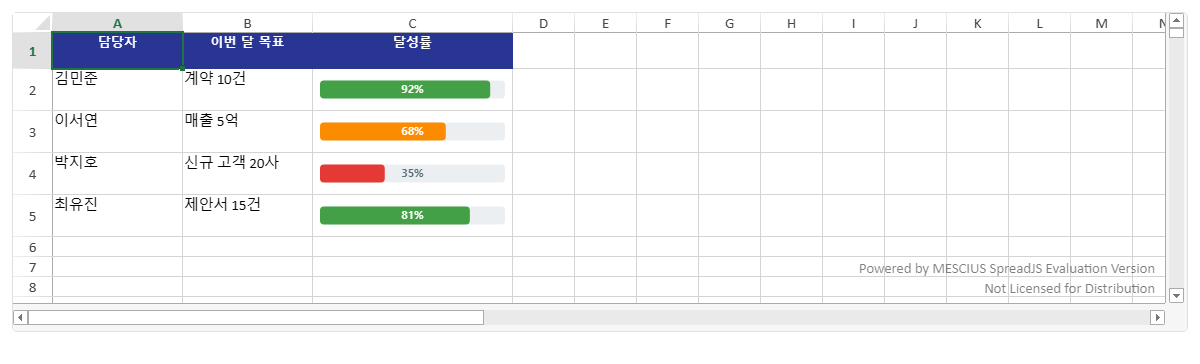
✅ Best Practice
paint()메서드에서ctx.save()와ctx.restore()로 Canvas 상태를 반드시 감싸야 합니다. 그렇지 않으면 렌더링 상태가 다른 셀에 영향을 줍니다.
Excel(.xlsx) 내보내기 시 셀 타입 호환성 정리
SpreadJS 공식 문서에 따르면 cellType 설정은 Excel 내보내기 시 무시됩니다. 셀 타입은 SpreadJS 전용 기능이며 Excel의 네이티브 컨트롤과 직접 매핑되지 않습니다. 아래 표로 각 셀 타입의 내보내기 동작을 정리합니다.
| 셀 타입 | Excel 내보내기 동작 | 값 보존 |
|---|---|---|
| ButtonCellType | 무시 (일반 셀로 출력) | 셀 텍스트만 |
| CheckBoxCellType | 무시 (일반 셀로 출력) | true/false 값 |
| ComboBoxCellType | 무시 (일반 셀로 출력) | 선택된 텍스트/값 |
| 슬라이더 드롭다운 | 무시 | 숫자 값 |
| CustomCellType | 무시 | 저장된 원시 값 |
🔥 중요
SpreadJS 자체 포맷인 SJS으로 저장하면 셀 타입을 포함한 모든 설정이 완전히 보존됩니다. Excel 호환이 필요하면서 UI 컨트롤을 유지하려면, Excel 쪽에 데이터 유효성 검사(드롭다운)나 양식 컨트롤을 별도로 구성해야 합니다.
자주 묻는 질문
Q. SpreadJS에서 셀 안에 버튼을 넣는 방법은?
A. new GC.Spread.Sheets.CellTypes.Button()으로 인스턴스를 생성하고 .text(), .buttonBackColor()로 스타일을 설정합니다. sheet.setCellType(row, col, btnType)으로 셀에 적용한 뒤 spread.bind(GC.Spread.Sheets.Events.ButtonClicked, callback)으로 클릭 이벤트를 처리합니다.
Q. 스프레드시트 셀에 드롭다운 목록을 추가하려면 어떻게 하나요?
A. new GC.Spread.Sheets.CellTypes.ComboBox()를 생성하고 .items(["항목1", "항목2"])로 목록을 설정합니다. {text: "표시명", value: "실제값"} 형태의 객체 배열로 표시 텍스트와 저장 값을 분리할 수도 있습니다.
Q. SpreadJS 체크박스 셀 클릭 이벤트를 어떻게 처리하나요?
A. CheckBox도 GC.Spread.Sheets.Events.ButtonClicked 이벤트를 사용합니다. 이벤트 핸들러 안에서 args.sheet.getValue(args.row, args.col)로 클릭 후 변경된 true/false 값을 읽습니다.
Q. SpreadJS 커스텀 셀 타입을 직접 만들 수 있나요?
A. 네. function MyCell() {} 선언 후 MyCell.prototype = new GC.Spread.Sheets.CellTypes.Base()로 Base를 상속합니다. paint(ctx, value, x, y, w, h, style, context) 메서드를 오버라이드해 Canvas로 원하는 UI를 직접 그릴 수 있습니다.
Q. SpreadJS 콤보박스 셀에 API 데이터를 동적으로 연결하는 방법은?
A. fetch(url).then(r => r.json()).then(data => { combo.items(data.map(d => ({text: d.name, value: d.id}))); sheet.getCell(row, col).cellType(combo); }) 패턴으로 API 응답을 받은 뒤 items()를 설정합니다. SpreadJS DataManager의 dataBinding() 메서드를 사용하면 테이블과 셀을 실시간으로 양방향 연결할 수 있습니다.
SpreadJS 무료 체험판: 30일 무료 체험 시작하기
온라인 데모: 라이브 데모 확인하기
기술 문의: MESCIUS 고객지원