요즘 스프링 부트의 Security에 관하여 공부 중이다.
지난주에 무작정 사람들의 글을 따라하며 Oauth2 로그인을 구현한 프로젝트를 만들었는데 Android와 연동을 하려니 이것저것 오류가 나는 게 많아 아직은 포스팅일 미뤄두고 있다.
무작정 따라하다 보니 이해도 안 되고, 필터 체인의 각 요소가 뭔지도 모르겠어서 우선 천천히 기초부터 시작하기로 했다.
Security를 적용할 프로젝트 준비
우선 시큐리티를 사용할 프로젝트를 만들어 줬다.
나는 java, gradle, jdk 17로 준비했고 추가한 의존성은 아래와 같다
dependencies {
	implementation 'org.springframework.boot:spring-boot-starter-security'
	implementation 'org.springframework.boot:spring-boot-starter-thymeleaf'
	implementation 'org.springframework.boot:spring-boot-starter-web'
	implementation 'org.thymeleaf.extras:thymeleaf-extras-springsecurity6'
	compileOnly 'org.projectlombok:lombok'
	annotationProcessor 'org.projectlombok:lombok'
	testImplementation 'org.springframework.boot:spring-boot-starter-test'
	testImplementation 'org.springframework.security:spring-security-test'
}
스프링부트를 처음 하시는 분이 시큐리티 포스팅을 읽을 것 같지는 않지만, 혹시 스프링부트 프로젝트를 어떻게 만들지 모르시는 분들이 계시다면 해당 링크에서 손쉽게 만들 수 있으니 참고하시길 바란다.
이렇게 작성하고 나면 시큐리티를 사용할 준비가 다 됐다.
Security 코드
우선 java 코드를 작성하기 전에, 기능이 잘 작동하는지 확인할 html 파일을 작성한다.
src/main/resources/templates 이 경로에 hello.html 파일과, home.html, login.html 파일을 만들어 준다.
위의 폴더 구조를 따르면 된다.
home.html
<!DOCTYPE html>
<html xmlns="http://www.w3.org/1999/xhtml" xmlns:th="https://www.thymeleaf.org">
<meta charset="UTF-8">
<head>
    <title>Spring Security Example</title>
</head>
<body>
<h1>Welcome!</h1>

<p><a th:href="@{/hello}">로그인</a>하러 가기</p>
</body>
</html>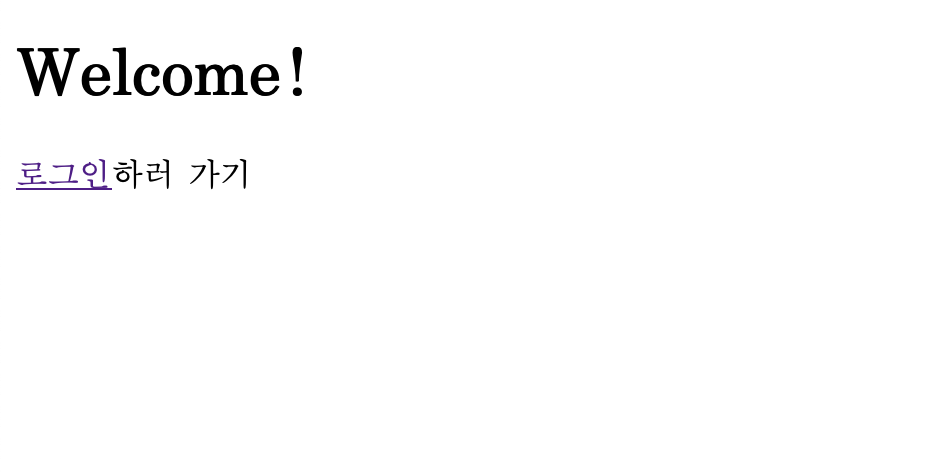
이 화면은 위 사진처럼 간단한 헤더와, 로그인 버튼으로 구성되어 있다.
여기서 로그인을 누르면 이동하는 화면이
login.html
<!DOCTYPE html>
<html xmlns="http://www.w3.org/1999/xhtml" xmlns:th="https://www.thymeleaf.org">
<head>
    <title>Spring Security Example </title>
</head>
<body>
<div th:if="${param.error}">
    Invalid username and password.
</div>
<div th:if="${param.logout}">
    You have been logged out.
</div>
<form th:action="@{/login}" method="post">
    <div><label> User Name : <input type="text" name="username"/> </label></div>
    <div><label> Password: <input type="password" name="password"/> </label></div>
    <div><input type="submit" value="Sign In"/></div>
</form>
</body>
</html>
이 로그인 화면이다.
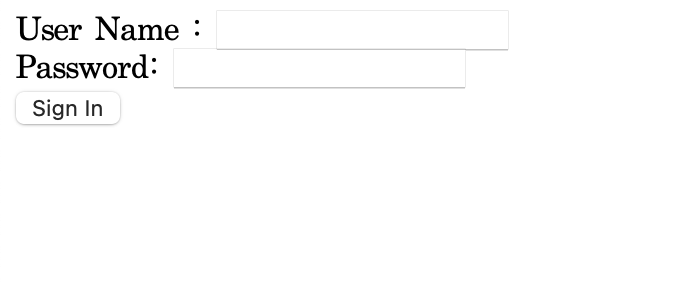
위 사진처럼 나오면 성공!
마지막으로 hello.html 파일을 생성해주면 완성이다.
<!DOCTYPE html>
<html xmlns="http://www.w3.org/1999/xhtml" xmlns:th="https://www.thymeleaf.org"
      xmlns:sec="https://www.thymeleaf.org/thymeleaf-extras-springsecurity5">
<head>
    <title>Hello World!</title>
</head>
<body>
<!-- 현재 인증된 사용자의 이름을 표시 -->
<h1>Hello, <span sec:authentication="name"></span>!</h1>
<form th:action="@{/logout}" method="post">
    <input type="submit" value="Sign Out"/>
</form>
</body>
</html>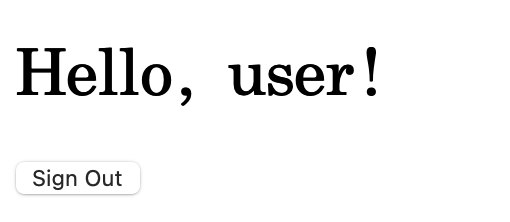
마지막에 유저 이름과 로그아웃 버튼을 만들어준 화면이다.
이제 본격적으로 security를 사용할 java 파일을 만들어 보자.
MvcConfig.java
이 파일은, 어플리케이션에서 뷰를 연결해주기 위한 파일이다.
@Configuration
public class MvcConfig implements WebMvcConfigurer {

    public void addViewControllers(ViewControllerRegistry registry) {
        registry.addViewController("/home").setViewName("home");
        registry.addViewController("/").setViewName("home");
        registry.addViewController("/hello").setViewName("hello");
        registry.addViewController("/login").setViewName("login");
    }
}
우리가 만들어둔 html 파일들을 매핑해 준 것인데, 간략히 설명을 해보자면 아래와 같다.
registry.addViewController("/home").setViewName("home");
- /home 이라는 경로에 home이라는 이름의 뷰를 매핑
- 즉, localhost:8080/home 으로 들어가면 home.html을 띄움
그리고 security를 사용하기 위해 여러가지 보안 필터를 걸어줘야 하는데, 그게 WebSecurityConfig.java 파일이다.
SecurityConfig 파일을 작성할 때, 정말 오류가 많았다.
WebSecurityConfigurerAdapter을 사용해서 작성하려 했더니 이제 지원되지 않아서 필터 체인을 사용해야 했고, 필터 체인을 썼더니 온통 빨간 줄이라 더 찾아보니까 각 내용들을 람다식으로 변경해야 했다.
그렇게 완성된 오류 없는 버전이 아래의 코드.
WebSecurityConfig.java
@Configuration
@EnableWebSecurity
@EnableMethodSecurity
public class WebSecurityConfig{
    @Bean
    public SecurityFilterChain filterChain(HttpSecurity http) throws Exception {
        http
				//crsf 보안을 꺼둠
				.csrf(AbstractHttpConfigurer::disable)
                //cors 보안을 꺼둠
                .cors(AbstractHttpConfigurer::disable)
                // restAPI 요청이 있을 시 해당 인가에 대한 필터링
                .authorizeHttpRequests(request -> request
                        // 요청이 "/"이나 "/home"이면 로그인 없이 허용
                        .requestMatchers("/", "/home").permitAll()
                        // 그 외는 어떠한 요청이라도 인가 필요
                        .anyRequest().authenticated()
                )

                .formLogin(login -> login
                                // 로그인은 /login 페이지로 매핑
                                .loginPage("/login")
                                .permitAll()
                )
                .logout(LogoutConfigurer::permitAll);

        return http.build();
    }

    @Bean
    public UserDetailsService userDetailsService() {
        // 유저 이름을 "user", 비밀번호를 "password"로 설정
        // 실제로는 BCryptPasswordEncoder를 사용해서 비밀번호를 암호화
        //  - BCryptPasswordEncoder는 암호화할 때마다 다른 결과를 반환
        UserDetails user = User.withDefaultPasswordEncoder()
                .username("user")
                .password("password")
                .roles("USER")
                .build();

        return new InMemoryUserDetailsManager(user);
    }
}
나처럼 처음 SecurityFilterChain을 접하신 분들이 대체 무슨 내용인지 잘 이해가 가지 않을 것 같아서, 최대한 설명하기 위해 줄마다 주석을 달아봤다.
그래도 뭐가 뭔지 모르겠다 싶으면 아래의 설명을 참고해 주시면 된다.
- crsf: 사이트 간 위조 요청 방지에 관한 필터링
- cors: 허용한 브라우저에서만 리소스 접근 가능
- authorizeHttpRequests: http 요청 시 인가 여부 필터링
- requestMatchers("주소"): "주소"로 오는 요청 관련 인가 필터링
- permitAll(): 특별한 인증 없이 모두 허용
- anyRequest: 모든 요청에 대한 인가 여부 필터링
- authenticated: 무조건 인증 필요
- formLogin: Spring Security에서 제공하는 폼 기반 로그인 사용
- loginPage("/login"): /login으로 매핑된 html을 로그인 화면으로 설정
- logout: 로그아웃 관련 필터링
이 정도로 정리할 수 있을 것 같다.
이렇게 보안 규칙과 유저 정보를 모두 설정해주면 끝이 난다.
localhost:8080으로 들어가면 설정해둔 html 파일이 보이며 제대로 프로젝트가 작동된다.
또 열심히 Security 관련 공부를 하고 다음 포스팅을 이어가겠다.
