개요
JavaScript + express로 SPA 만들기
참고 영상
youtu.be/6BozpmSjk-Y
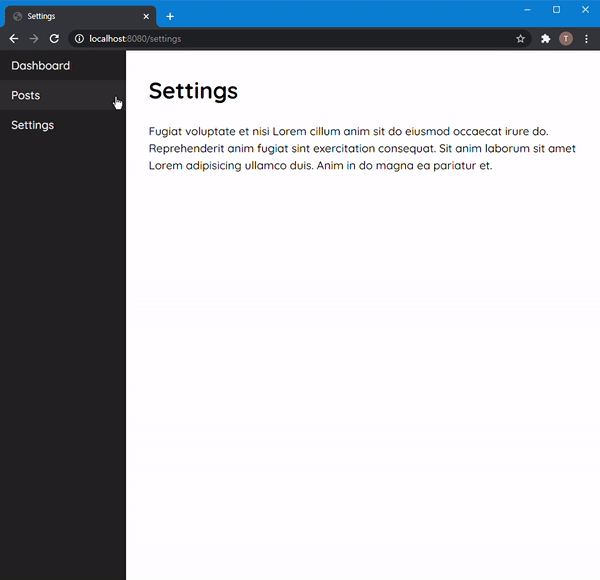
미리보기
새로고침 되지 않으면서 url이 바뀌고 컨텐츠 또한 바뀌는 걸 볼 수 있다
흐름
-
html & css
-
express로 웹서버 설정
-
js로 라우팅 구현
-
history API로 url 조작
-
url에 따른 컨텐츠 보여주기
파일 구조
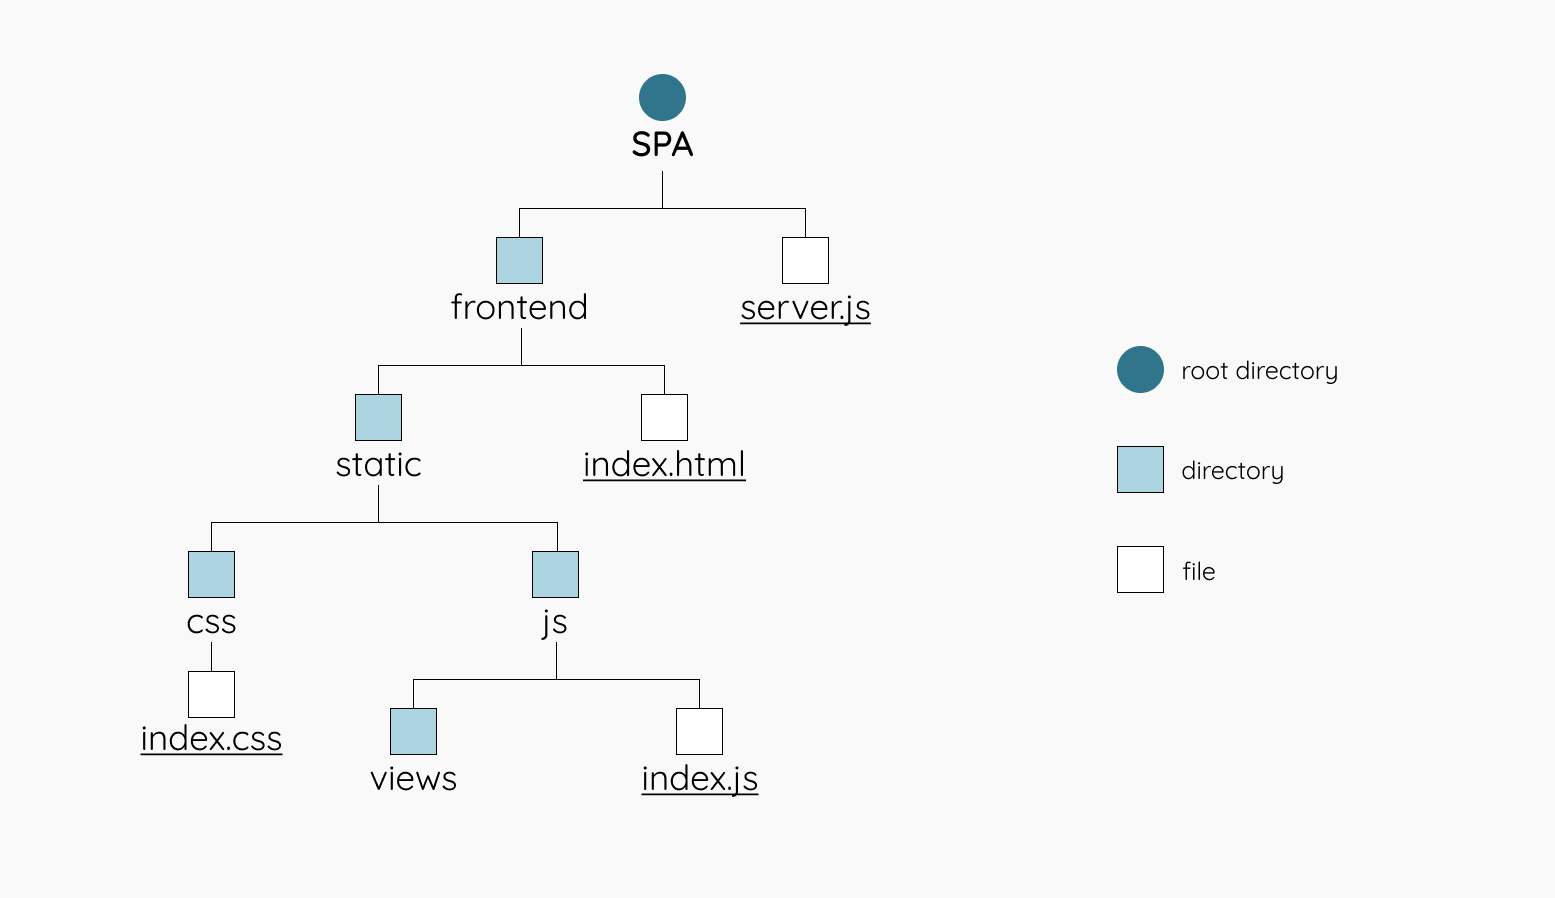
가장 최상위 폴더는 SPA이고 html, css, js는 따로 디렉토리를 만들어서 분리했음
제일 하단의 views 폴더에는 각 항목마다 보여질 페이지(js 파일)를 저장할 것이다
1. HTML & CSS
SPA > frontend > index.html
HTML
<!DOCTYPE html>
<html lang="en">
<head>
    <meta charset="UTF-8">
    <meta name="viewport" content="width=device-width, initial-scale=1.0">
    <title>Single Page App</title>
    <link rel="stylesheet" href="/static/css/index.css">
</head>
<body>
    <nav class="nav">
        <a href="/" class="nav__link" data-link>Dashboard</a>
        <a href="/posts" class="nav__link" data-link>Posts</a>
        <a href="/settings" class="nav__link" data-link>Settings</a>
    </nav>
    <div id="app"></div>
    <script type="module" src="/static/js/index.js"></script>
</body>
</html>
SPA > frontend > css > index.css
CSS
body{
    --nav-width: 200px;
    margin: 0 0 0 var(--nav-width);
    font-family: 'Quicksand', sans-serif;
    font-size: 18px;
}

.nav{
    position: fixed;
    top: 0;
    left: 0;
    width: var(--nav-width);
    height: 100vh;
    background-color: #222;
}

.nav__link{
    display: block;
    padding: 12px 18px;
    text-decoration: none;
    color: #eee;
    font-weight: 500;
}

.nav__link:hover{
    background: rgba(255, 255, 255, 0.05);
}

#app{
    margin: 2em;
    line-height: 1.5;
    font-weight: 500;
}

a{
    color: #009579;
}
2. express 설치
express는 nodeJS의 프레임워크이므로 nodeJS가 먼저 설치되어있어야 한다
이미 되어있다면 터미널에서 init 후 express를 설치해주면 된다 (express는 최상위 디렉토리에 설치하였다)
npm install express3. 서버 설정
이제 express를 설치한 디렉토리에 새로운 js파일을 만들어 서버를 설정해줄 것이다
이 파일의 이름은 server.js 라고 명명했다
const express = require("express");
const path = require("path");

const app = express();

app.use("/static", express.static(path.resolve(__dirname, "frontend", "static")));

app.get("/*", (req, res) => {
    res.sendFile(path.resolve(__dirname, "frontend", "index.html"));
});

app.listen(8080, () => console.log("Server running..."));
3-1. 서버 확인
터미널에서 다음과 같이 입력
node server.js
server.js 마지막 문단에서 입력한 대로 Server running... 이라는 메시지가 콘솔에 출력될 것이다
그럼 서버가 잘 설정되었다는 뜻이다
이제 브라우저에서 localhost:8080을 입력해서 확인해보자
4. 이제 찐 JS 시작
SPA > frontend > static > js > index.js
이제 JS에 라우터 기능을 구현해볼 것이다
시작
router
router()
const router = async () => {
    const routes = [
        { path: "/", view: () => console.log("Viewing Dashboard") },
        { path: "/posts", view: () => console.log("Viewing Posts") },
        { path: "/settings", view: () => console.log("Viewing Settings") },
    ];
});
당장은 콘솔창이 페이지라고 생각하고 확인해 볼 것이기 때문에 routes의 view에 콘솔 출력 함수를 넣어주었다
(후반부에 각 페이지들을 class형태로 만들어 import해서 쓸 것임 그래서 저 부분은 후에 바꿀 것이다)
potentialMatches
이제 본격 url과 view의 매칭을 시작해볼텐데 그전에 잠재적 매칭을 해본다
const router = async () => {
    const routes = [
        { path: "/", view: () => console.log("Viewing Dashboard") },
        { path: "/posts", view: () => console.log("Viewing Posts") },
        { path: "/settings", view: () => console.log("Viewing Settings") },
    ];

    const potentialMatches = routes.map(route => {
        return{
            route: route,
            isMatch: location.pathname === route.path
        };
    });

    console.log(potentialMatches);
};

document.addEventListener("DOMContentLoaded", () => {
    router();
});
map메소드가 각 routes의 객체들을 돌면서 나온 결과를 배열형태로 다시 반환을 할텐데
isMatch는 Boolean형태로 반환될 것이다 한번 각 메뉴들을 클릭하면서 콘솔에서 확인해보면
path가 일치하는 것만 true로 바뀌어있을 거임
이제 그걸 이용해서 진짜 매치된 걸 확인할 것임
match
const router = async () => {
    const routes = [
        { path: "/", view: () => console.log("Viewing Dashboard") },
        { path: "/posts", view: () => console.log("Viewing Posts") },
        { path: "/settings", view: () => console.log("Viewing Settings") },
    ];

    const potentialMatches = routes.map(route => {
        return{
            route: route,
            isMatch: location.pathname === route.path
        };
    });

    let match = potentialMatches.find(potentialMatch => potentialMatch.isMatch);

    //404 방지
    if(!match) {
        match = {
            route: routes[0],
            isMatch: true
        }
    }
    console.log(match);
};

document.addEventListener("DOMContentLoaded", () => {
    router();
})
이제 potentialMatches에 find메소드를 이용하여 isMatch가 true인 애만 콘솔에 출력되도록 해보았다
콘솔을 확인해보면 메뉴를 클릭할때마다 path가 일치하는 애만 나오는 걸 볼 수 있음
이제 걔를 이용해서 메뉴를 누를때마다 그거에 맞는 view가 콘솔에 보여지게 할 수있다
console.log(match.route.view());
바로 이렇게 하면
SPA가 거의 완성된 것이다
메뉴를 클릭하면 그거에 맞게 우리가 설정해두었던 콘솔 메시지가 나온다
404방지라고 써있는 if문의 역할은
만약 match가 되지않을때, 예를 들어 사용자가 직접 path를 입력하여 접속하려다가
전혀 없는 페이지를 호출하는 경우, 404가 뜨기 때문에 그걸 방지하기 위하여 넣은 것이다
만약 path가 match되지 않으면, routes[0](Dashboard)으로 돌아가게끔 한 것임
그냥 에러를 피하기 위해 임의로 설정한 거라서 404페이지를 내가 커스텀해서 저기에 연결해줄수도 있다
남은 과제
- 새로고침 막기
- 콘솔이 아닌 실제 컨텐츠를 보여주기
새로고침 막기
새로고침을 막기 위해 흔히 아는 e.preventDefault를 통해 할 것이다
근데 그러면 url도 요지부동이기 때문에
그래서
history API
이건 참고할만한 문서가 많이 없다 ...
const navigateTo = url => {
    history.pushState(null, null, url);
    router();
}
우린 메뉴를 클릭했을 때 새로고침되는 대신에 navigateTo 함수가 실행될 수 있게 할 것임
router를 호출하던 문단으로 가서
document.addEventListener("DOMContentLoaded", () => {
    document.body.addEventListener("click", e => {
        if(e.target.matches("[data-link]")) {
            e.preventDefault();
            navigateTo(e.target.href);
        }
    })
    router();
})
이렇게 추가를 해준다
이제 메뉴를 클릭하면서 콘솔을 확인하면 새로고침되지 않고 url은 바뀌면서 콘솔이 잘 출력되는 걸 볼 수있다
그런데 여기서 한가지 문제가 있음
브라우저 툴바에서 뒤로가기/앞으로가기 버튼을 클릭하는 경우에 url은 바뀌는데
콘솔은 요지부동인 걸 볼 수 있다 실제경우였다면 페이지가 안바뀌고 그대로 있는것과 마찬가지다
그래서
popstate
window.addEventListener("popstate", router);
놀랍게도 이 한줄만 적어주면 툴바로 이동했을 때도 잘 동작한다
popstate는 유저가 뒤로가기나 앞으로가기로 세션 기록을 변경할 때! 발생하는 애다
그래서 그때 router가 다시 실행되게 하면 올바르게 작동하는 것
지금까지 작성한 코드 점검
const navigateTo = url => {
    history.pushState(null, null, url);
    router();
}

const router = async () => {
    const routes = [
        { path: "/", view: () => console.log("Viewing Dashboard") },
        { path: "/posts", view: () => console.log("Viewing Posts") },
        { path: "/settings", view: () => console.log("Viewing Settings") },
    ];

    const potentialMatches = routes.map(route => {
        return{
            route: route,
            isMatch: location.pathname === route.path
        };
    });

    let match = potentialMatches.find(potentialMatch => potentialMatch.isMatch);

    if(!match) {
        match = {
            route: routes[0],
            isMatch: true
        }
    }
    console.log(match.route.view());
};

window.addEventListener("popstate", router);

document.addEventListener("DOMContentLoaded", () => {
    document.body.addEventListener("click", e => {
        if(e.target.matches("[data-link]")) {
            e.preventDefault();
            navigateTo(e.target.href);
        }
    })
    router();
})
실제 컨텐츠를 보여주기
이제 views만 만들어주면 끝난다
앞서 말했듯이 각자 분리된 js파일로 만들거임
views디렉토리를 하나 생성하여 그 안에 넣을 것이다.
SPA > frontend > static > js > views
Views
먼저 우리는 Dashboard, posts, settings 총 세가지의 페이지를 만들건데
껍데기는 비슷하기 때문에 한가지 파일을 상속받아서 진행할 것이다
그러면 총 4가지의 파일을 만드는 것임
- AbstractView.js
export default class {
    constructor(){

    }
    setTitle(title){
        document.title = title;
    }

    async getHtml(){
        return "";
    }
}
세 개의 페이지는 여기서 상속받아서 만들 것이다
- Dashboard.js
import AbstractView from "./AbstractView.js";

export default class extends AbstractView {
    constructor() {
        super();
        this.setTitle("Dashboard");
    }

    async getHtml() {
        return `
            <h1>Welcome back, Dom</h1>
            <p>
                Fugiat voluptate et nisi Lorem cillum anim sit do eiusmod occaecat irure do. Reprehenderit anim fugiat sint exercitation consequat. Sit anim laborum sit amet Lorem adipisicing ullamco duis. Anim in do magna ea pariatur et.
            </p>
            <p>
                <a href="/posts" data-link>View recent posts</a>.
            </p>
        `;
    }
}
AbstractView를 상속받아 만든 Dashboard 페이지
import, export만 잘해주면 된다
그러고 나서는
index.js에도 당연히 연결을 해줘야 한다!
import Dashboard from "./views/Dashboard.js";

(...)

const router = async () => {
    const routes = [
        { path: "/", view: Dashboard },
        // { path: "/posts", view: () => console.log("Viewing Posts") },
        // { path: "/settings", view: () => console.log("Viewing Settings") },
    ];

    (...)

};
이렇게 아까 썼던 코드에 수정 해줘야 함.
import 해주고 Dashboard를 view로 사용할 것이니 써준다.
const router = async () => {

    	(...)

    	const view = new match.route.view();

	document.querySelector("#app").innerHTML = await view.getHtml();

    };
- Posts.js
- Setting.js
마지막으로 이 두개의 페이지도 똑같이 해주면 드디어 완성
최종 코드 확인
github.com/notJyntax/SPA-vanilaJS.git