- Do it! 자바 프로그래밍 입문 온라인 강의를 수강하며 작성하였습니다.
- Section 1. 자바의 핵심 - 객체지향 프로그래밍
- 12강 "클래스와 객체1(4)"
- 참조 자료형 > 정보은닉
참조 자료형(reference data type)
- 클래스 형으로 선언하는 자료형
- 기본 자료형 : int, long, float, double 등
- 참조 자료형 : String, Data, Student 등
참조 자료형의 예
학생의 속성 중 수업에 대한 부분을 만들 때, 수업에 대한 각 속성을 학생 클래스에 정의하지 않고 수업이라는 클래스로 분리해서 사용한다. 이 때, 과목은 참조 자료형으로 선언한다.
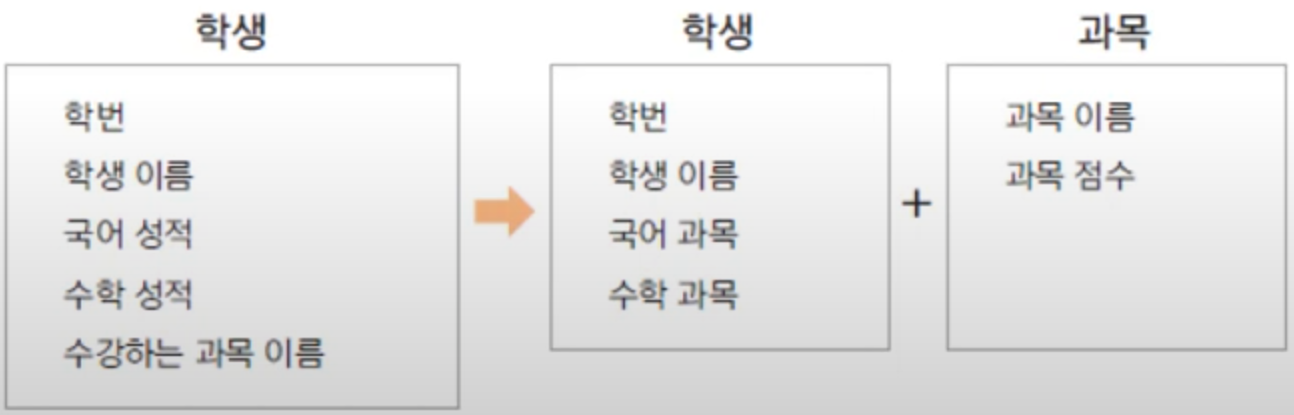
그림과 같이 학생의 학번, 이름, 국어성적, 수학성적, 수강 과목 이름을 만들어보자.
public class Student {
	int studentID;
	String studentName;

	int koreaScore;
    int mathScore;
    String koreaSubject;
    String mathSubject;
}
이런 방식으로 Student()에 모든 데이터를 담으면 데이터를 추가하거나 제거할 때 번거로움이 발생한다.
예를 들어 수강하는 과목의 선생님을 추가하고 싶다면 현재는 Student()에 변수 koreaTeacher와 mathTeacher이 추가되어야 한다.
이러한 방식은 과목 수가 늘어나면 번거로워지고, 필요없어서 지워야하는 경우에도 하나하나 지워야하므로 비효율적이다.
학생과 과목의 class를 분리하여 참조 자료형으로 사용하면 이러한 번거로움을 줄일 수 있다.
public class Subject {
	String subjectName;
	int score;
}

public class Student {
	int studentID;
	String studentName;
	Subject korea;
	Subject math;

	public Student() {
		korea = new Subject();
		math = new Subject();
	}
}
Subject()에서 과목에 필요한 정보를 담고, Student()에서 각 과목을 참조 자료형으로 선언하면 선생님을 추가할 때에는 Subject()에 teacher 변수만 추가해주면 된다.
eclipse에서는 getter와 setter를 자동으로 만들어주는 편의기능이 있다.
- 마우스 우클릭 -> Source -> Generate Getters and Setters -> get, set 메서드를 만들 변수를 선택 -> Generate
- 단축키 : Alt + Shift + s -> r
public class Subject {
	String subjectName;
	int score;
	public Subject() {}
	public Subject(String name) {
		subjectName = name;
	}
	public String getSubjectName() {
		return subjectName;
	}
	public void setSubjectName(String subjectName) {
		this.subjectName = subjectName;
	}
	public int getScore() {
		return score;
	}
	public void setScore(int score) {
		this.score = score;
	}
}
Subject()에 getter와 setter 메서드를 등록해주고, constructor를 정의해 주었다.
public class Student {
	int studentID;
	String studentName;
	Subject korea;
	Subject math;

	public Student() {
		korea = new Subject();
		math = new Subject();
	}

	public Student(int id, String name) {
		studentID = id;
		studentName = name;
		korea = new Subject("국어");
		math = new Subject("수학");
	}

	public void setKorea(int score) {
		korea.setScore(score);
	}

	public void setMath(int score) {
		math.setScore(score);
	}

	public void showStudentInfo() {
		int total = korea.getScore() + math.getScore();
		System.out.println(studentName + " 학생의 총점은 " + total + "점 입니다.");
	}
}
Student() 에서는 국어와 수학 점수에 대한 setter를 정의하고, totalScore를 보여주는 showStudentInfo 메서드를 만들었다.
public class StudentTest {
	public static void main(String[] args) {
		Student studentJames = new Student(100, "James");
		studentJames.setKorea(95);
		studentJames.setMath(88);

		Student studentTomas = new Student(100, "Tomas");
		studentTomas.setKorea(80);
		studentTomas.setMath(75);

		studentJames.showStudentInfo();
		studentTomas.showStudentInfo();
	}
}
StudentTest()에서 테스트 해 본 결과 구상한대로 정상 출력된 것을 확인할 수 있다.

정보은닉 (information hiding)
- private 접근 제어자
- 클래스 외부에서 클래스 내부의 멤버변수나 메서드에 접근(access)하지 못하게 하는 경우에 사용한다.
- 멤버변수나 메서드를 외부에서 사용하지 못하도록 하여 오류를 줄일 수 있다.
- 변수에 대해서는 필요한 경우 get(), set() 메서드를 제공한다.
class BirthDay {
	public int day;
	public int month;
	public int year;
}

public class BirthDayTest{
	public static void main(String[] args) {
		BirthDay day = new BirthDay();
		day.year = 2022;
        day.month = 2;
		day.day = 30;
	}
}
위와 같이 BirthDay 클래스의 변수인 day, month, year에 클래스 외부(BirthDayTest 클래스)에서 접근하는 경우에는 2월 30로 지정할 수 있다.
2월은 28일까지밖에 없기 때문에 이것은 코드상 오류는 없지만 실제로는 존재하지 않아야 한다.
이럴 때 변수는 private으로 감추고, public 메서드를 통해 이러한 오류들을 막는 코드를 작성할 수 있다.
class BirthDay {
	private int day;
	private int month;
	private int year;

	public int getDay() {
		return day;
	}
	public void setDay(int day) {
		if(month == 2) {
			if(day < 1 || day > 28) {
				System.out.println("날짜 오류입니다.");
			}
		}else {
			this.day = day;
		}
	}
	public int getMonth() {
		return month;
	}
	public void setMonth(int month) {
		this.month = month;
	}
	public int getYear() {
		return year;
	}
	public void setYear(int year) {
		this.year = year;
	}
}

public class BirthDayTest{
	public static void main(String[] args) {
		BirthDay day = new BirthDay();
		day.setYear(2022);
		day.setMonth(2);
		day.setDay(30);
	}
}
위처럼 setDay()에 2월일 경우 day가 28을 넘지 않도록 코드를 추가해주면 원하지 않는 값이 변수에 들어가는 것을 막을 수 있다.
접근제어자
- public : 외부 클래스에서 모두 사용 가능
- private : 클래스 내부에서만 사용 가능
- default(아무것도 쓰지 않는 경우) : 같은 package 내에서 사용 가능
- protected : 상속 관계에서 사용 가능
