Spring REST Docs VS Swagger
| Spring REST Docs | Swagger | |
|---|---|---|
| 장점 | 기존 코드에 영향이 없음 | API를 테스트할 수 있는 기능 제공 |
| 테스트가 성공해야 문서화 가능 | 테스트 코드 작성이 필요 없음 | |
| 단점 | 테스트 코드를 작성해야 함으로 번거로움 | 제품 코드에 어노테이션을 추가해서 지저분해짐 |
| 문서를 위한 테스트 코드를 관리해야 함 | 제품 코드와 동기화가 안될 수 있음 |
사용 이유
이전까지 API 문서화는 Postman을 이용하였다.
Postman으로 직접 API 요청을 보낼 수 있고, 이 결과를 바탕으로 자동으로 문서화까지 해주어 사용했다. (Swagger의 경우 서비스 코드에 어노테이션이 덕지덕지 붙는게 싫어서 사용하지 않았다.)
솔직히 번거롭긴 하지만 안정성 검증을 위해 테스트 코드를 작성을 강제하고, Swagger와 달리 제품 코드와 문서화 코드를 분리할 수 있다는 점에서 Spring REST Docs를 사용하려고 한다.
build.gradle 설정
Junit5, Spring REST Docs Version : 3.0.1 기준
plugins {
    id "org.asciidoctor.jvm.convert" version "3.3.2"    // Asciidoctor 파일을 컨버팅 후, Build 폴더에 복사하기 위한 플러그인 적용
}

group = 'com.example'
version = '0.0.1-SNAPSHOT'

java {
    sourceCompatibility = '17'
}

configurations {
    asciidoctorExt  // Asciidoctor를 확장하는 종속성에 대한 설정
}

repositories {
    mavenCentral()
}

dependencies {
	// (생략...)

    testImplementation 'org.springframework.boot:spring-boot-starter-test'

    // REST Docs
    asciidoctorExt 'org.springframework.restdocs:spring-restdocs-asciidoctor'   // 문서 포맷
    testImplementation 'org.springframework.restdocs:spring-restdocs-mockmvc'   // REST Docs를 MockMvc로 사용
}

tasks.named('test') {
    useJUnitPlatform()
}

ext {
    snippetsDir = file('build/generated-snippets')  // snippet의 출력 위치
}

test {
    outputs.dir snippetsDir // test 작업의 출력 위치
}

asciidoctor {
    inputs.dir snippetsDir  // 생성된 snippet의 출력 위치 정의
    configurations 'asciidoctorExt' // 확장을 위한 asciidoctorExt 사용을 설정
    dependsOn test  // test 실행 후에 문서 작성
}

tasks.register('copyDocument', Copy) {
    dependsOn asciidoctor   // asciidoctor 실행 후 복사

    from file("build/docs/asciidoc/")   // A
    into file("src/main/resources/static/docs") // A 위치의 파일을 여기에 복사
}


bootJar {
    dependsOn copyDocument   // 문서 작성 후에 .jar 생성
}
Spring REST Docs는 초기 설정이 중요하기 때문에 정확히 작성해야한다!
문서화를 위한 테스트 코드 작성
@ExtendWith(MockitoExtension.class) // Mockito 사용
@WebMvcTest(OAuthLoginController.class)
@AutoConfigureRestDocs // REST Docs 사용
class OAuthLoginDocumentationTest {

    @Autowired
    private MockMvc mockMvc;

    @Autowired
    private ObjectMapper objectMapper;

    @MockBean
    private OAuthLoginService oAuthLoginService;

    @MockBean
    private JwtService jwtService;

    @MockBean
    private JwtFilter jwtFilter;

    @MockBean
    private JwtExceptionFilter jwtExceptionFilter;

    @BeforeEach
    void setUp(@Autowired RestDocumentationContextProvider restDocumentation,
        @Autowired WebApplicationContext webApplicationContext) {

        this.mockMvc = MockMvcBuilders.webAppContextSetup(webApplicationContext)
            .apply(documentationConfiguration(restDocumentation))
            .build();
    }

    @Test
    @DisplayName("네이버 로그인")
    @WithMockCustomUser
    void loginNaver() throws Exception {
        // given
        TokenResponse response = TokenResponse.builder()
            .accessToken("accessToken")
            .grantType("Bearer")
            .expiredAt(3600000 L)
            .build();

        given(oAuthLoginService.login(any(NaverUserDto.class))).willReturn(response);

        //when
        NaverUserDto request = NaverUserDto.builder()
            .userId("aaaaa111")
            .email("aaaaa111@gmail.com")
            .name("홍길동")
            .nickname("길동이")
            .gender("M")
            .mobile("010-0000-0000")
            .profileImage("https://profile-image.com")
            .build();

        ResultActions result = mockMvc.perform(
            post("/api/login/naver")
            .with(csrf()) // CSRF Token 추가
            .content(objectMapper.writeValueAsString(request))
            .contentType(MediaType.APPLICATION_JSON)
        );

        // then
        result.andExpect(status().isOk())
            .andExpect(content().contentType(MediaType.APPLICATION_JSON))
            .andExpect(jsonPath("$.accessToken").value(response.getAccessToken()))
            .andDo(document("naver-login",
                // JSON 값 예쁘게 출력
                preprocessRequest(prettyPrint()),
                preprocessResponse(prettyPrint()),
                // 요청 값 설명
                requestFields(
                    fieldWithPath("user_id").description("네이버 ID의 고유 값"),
                    fieldWithPath("email").description("사용자 이메일"),
                    fieldWithPath("name").description("사용자 이름"),
                    fieldWithPath("nickname").description("닉네임"),
                    fieldWithPath("gender").description("성별"),
                    fieldWithPath("mobile").description("휴대폰 번호"),
                    fieldWithPath("profile_image").description("프로필 사진 URL")
                ),
                // 응답 값 설명
                responseFields(
                    fieldWithPath("accessToken").description("액세스 토큰"),
                    fieldWithPath("grantType").description("토큰 타입"),
                    fieldWithPath("expiredAt").description("토큰 만료 기간 (ms)")
                )
            ));
    }

    (...생략...)
}
나는 OAuthLoginController를 REST Docs로 문서화 할 것이다.
해당 컨트롤러와 관련 있는 Component들을 @MockBean으로 Mocking 해준다.
Spring Security와 커스텀한 Filter를 적용 중이라면 @WithMockCustomUser와 .with(csrf())를 추가해야 한다.
@WithMockCustomUser에 대한 설명은 여기를 클릭해주세요.
이후 위의 코드처럼 테스트 검증 부분 다음에 andDo()를 붙여 document()로 문서화 코드를 작성한다.
Asciidoc으로 문서 만들기
테스트 코드 실행
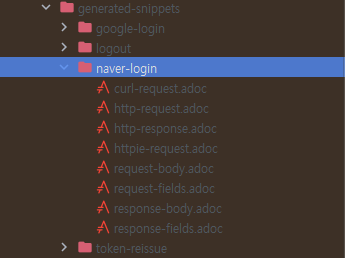
테스트 코드를 실행하면 이렇게 .adoc 파일인 스니펫이 생성되어 있다.

Intellij에Asciidoc 플러그인인 설치하면.adoc파일을미리보기로 볼 수 있다.
index.adoc
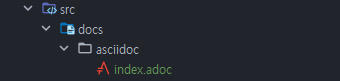
위처럼 src/docs/asciidoc/index.adoc 파일을 생성하자.
그리고 src/main/resources/static/docs 디렉토리를 생성하자.
= OAuthLogin API
:doctype: book
:source-highlighter: highlightjs
:toc-title: 목차
:toc: left
:toclevels: 1
:sectlinks:

== 네이버 로그인
operation::naver-login[snippets='http-request,request-fields,http-response,response-fields']

== 구글 로그인
operation::google-login[snippets='http-request,request-fields,http-response,response-fields']

== 토큰 갱신
operation::token-reissue[snippets='http-request,request-headers,http-response,response-fields']

== 로그아웃
operation::logout[snippets='http-request,request-headers,http-response']
index.adoc 파일을 조각된 스니펫을 모아 API 문서 형태로 구성한 것이다.
:doctype: book부터 :sectlinks:까지의 코드는 목차에 대한 설정이다.
operation::naver-login[snippets='http-request,request-fields,http-response,response-fields']은 naver-login 폴더 안에서 대괄호 안에 파일들을 순서대로 가져와 출력해준다.
보다 자세한 adoc의 문법은 여기를 클릭하세요.
아래 사진을 보면 이해하기 쉬울 것이다.
html 파일 생성
- Intellij 오른쪽에
Gradle클릭Tasks->other->copyDocument를 실행
2-1. 배포 시,Tasks->build->bootJar를 실행
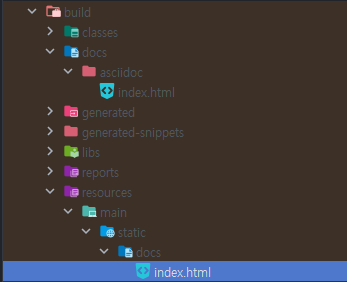
이렇게 위에서 작성한 index.adoc가 index.html 파일로 변환되어 생성되었다.
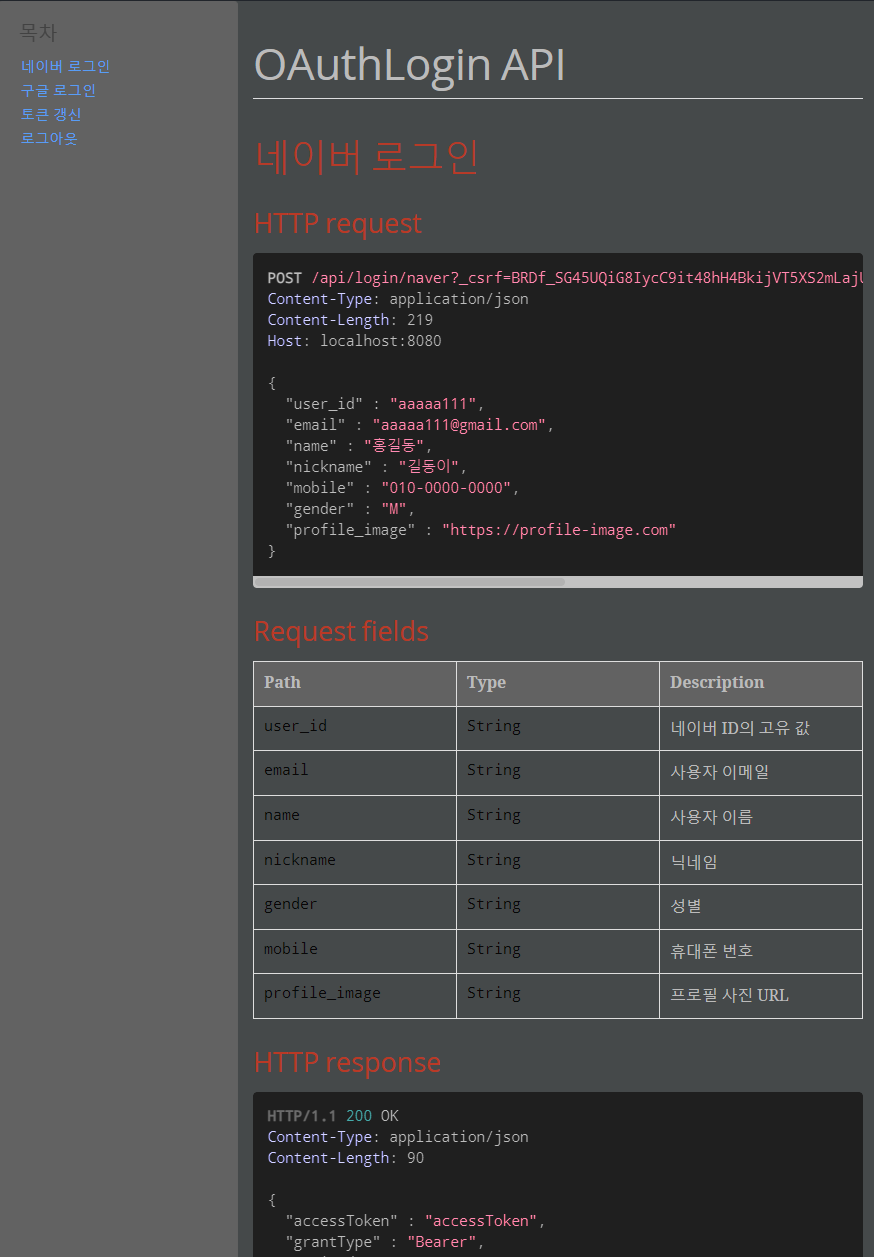
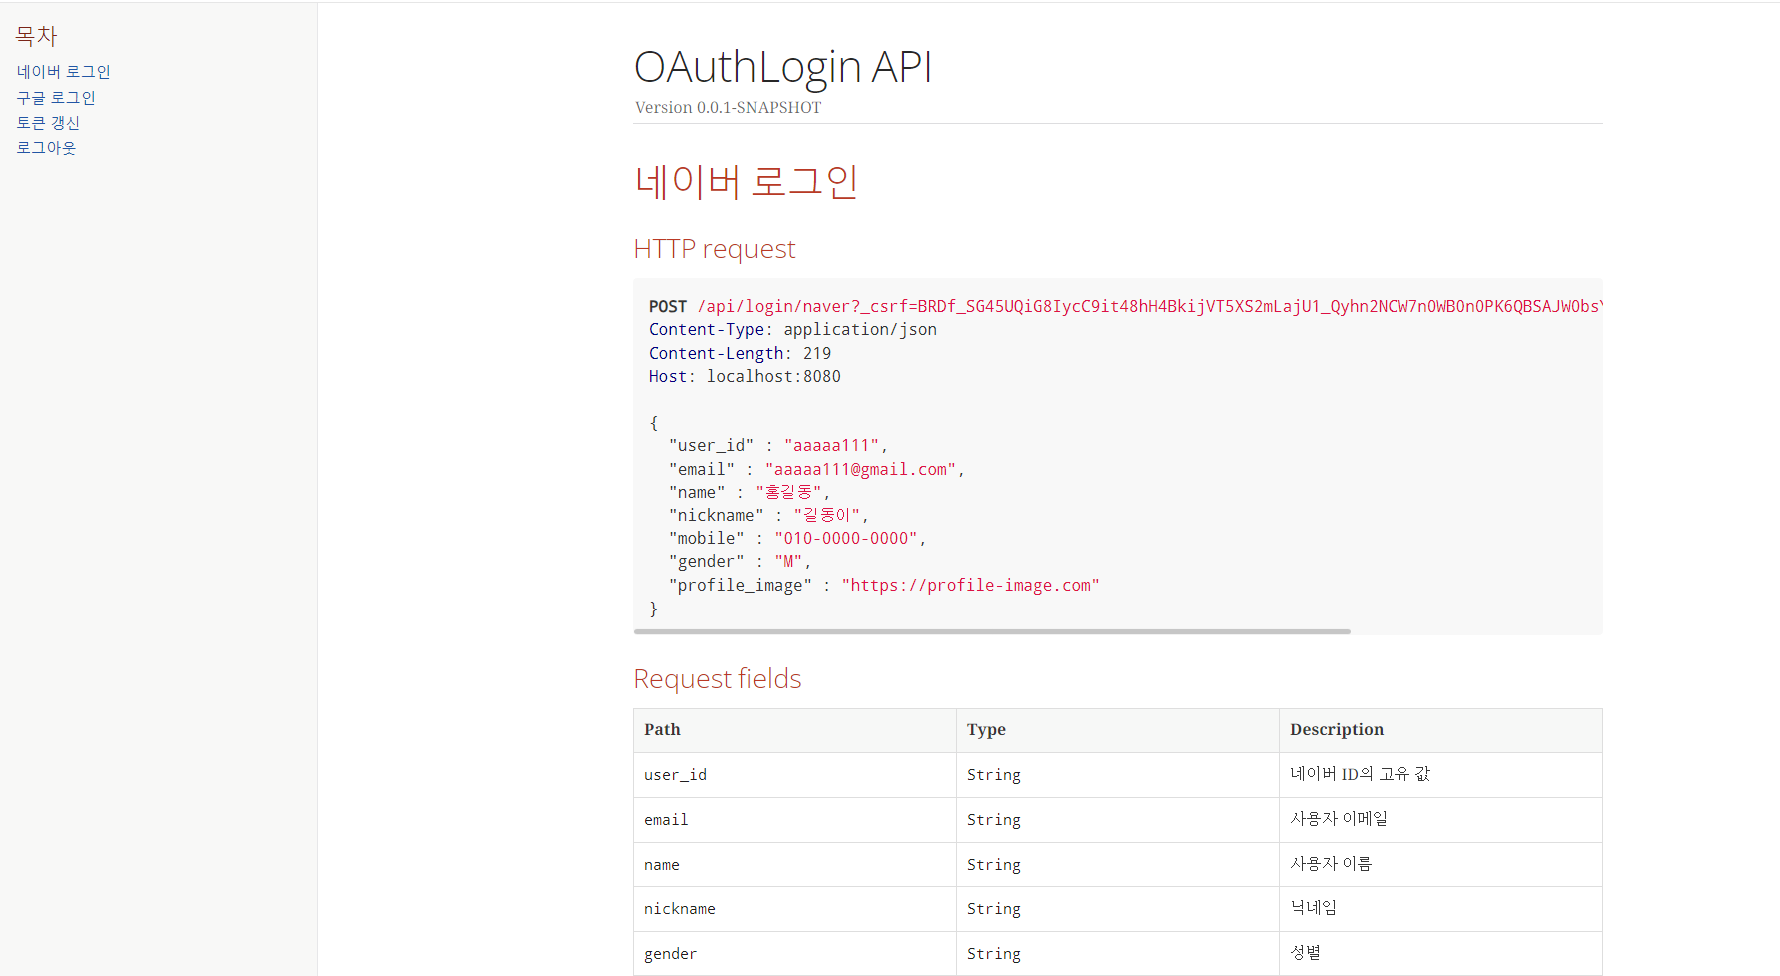
API 문서에 접속
이제 서버를 실행하고
/docs/index.html에 접속하면 아래와 같이 문서가 나온다!
Spring Security를 사용 중이면 URL 인증 설정에서/docs/*을 추가하여 문서화된 링크를 허용해주면 된다!
소감
한창 프로젝트할 때 바빠서 못한 테스트 코드를 이번에 작성보았다.
테스트를 코드를 작성하면서 조금 불편한 점이 많아 테스트하기 쉽게 DTO를 추가하거나 수정하기도 했다.
"좋은 코드는 테스트하기 쉽다"라는 글을 본 적이 있었는데, 이번 기회에 이 뜻을 알게 되었다.
API 문서화를 위해 Spring REST Docs를 활용하며 테스트 코드 작성의 중요성도 알게 되었다.
테스트 코드를 작성하는 시간은 로직의 검증 역할도 있겠지만, 기존 코드의 문제점도 파악하는 시간을 갖게 해주는 것 같아 이전과 생각이 달라지게 되었다.
앞으로 테스트 코드도 제품 코드처럼 잘 작성해보려고 노력해야겠다!!
참고
Spring REST Docs Reference Doc.
Spring Rest Docs 적용 | 우아한 형제들 기술 블로그
Spring Rest Docs Guide | 컬리 기술 블로그
index.html 복사