개요
코틀린 Flow의 debouce() 함수와 sample() 함수에 대해 알아보기
Debounce
프론트엔드에서 유저와의 상호작용으로 서버 API 호출 시 매 상호작용 (예를 들어 텍스트입력 등)마다 요청을 전달하면 서버 리소스 낭비, 과부하를 유발한다.
따라서 자주 발생하는 서버 요청 이벤트는 적절하게 필터링되어 전달될 필요가 있다.
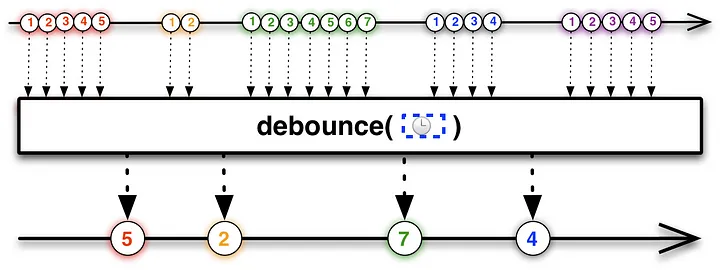
프로그래밍에서 debounce는 요청을 그룹화 하여 일정 시간 동안 이벤트가 발생하지 않으면 마지막 이벤트를 전달하는 기법이다.
위의 그림에선 일정 시간 기준으로 들어오는 요청들을 버퍼에 저장해두고,
설정한 시간동안 더 이상의 이벤트가 없을때마다 버퍼에 마지막으로 입력된 이벤트를 전달하고 있음을 확인할 수 있다.
debounce기법을 사용하는 대표적인 예시로 위에서 언급한 검색이 있다.
검색바에 텍스트를 입력하고, 검색버튼과 같은 요청버튼이 있는 경우가 아니라
검색바에 텍스트가 입력될때마다 실시간으로 이 텍스트로 서버에 요청해 결과를 받아오는 경우 유용하게 사용할 수 있다.
- 웹 같은 경우 브라우저 크기 조절 시에도 사용된다고 한다.
우리 프로젝트 역시 검색화면에서 검색창에 노래제목, 가수 등을 입력하면 해당 텍스트로 애플뮤직 API 의 검색결과를 받아와 화면에 표시하는데
이 debounce를 잘 사용해볼 수 있을 것이라 생각하였다.
Flow의 debounce
Flow에서 debounce() 메소드로 위와 같은 기능을 사용할 수 있다.
@FlowPreview
public fun <T> Flow<T>.debounce(timeoutMillis: Long): Flow<T> {
    require(timeoutMillis >= 0L) { "Debounce timeout should not be negative" }
    if (timeoutMillis == 0L) return this
    return debounceInternal { timeoutMillis }
}

@FlowPreview
@JvmName("debounceDuration")
@OverloadResolutionByLambdaReturnType
public fun <T> Flow<T>.debounce(timeout: (T) -> Duration): Flow<T> =
    debounceInternal { emittedItem ->
        timeout(emittedItem).toDelayMillis()
    }

private fun <T> Flow<T>.debounceInternal(timeoutMillisSelector: (T) -> Long): Flow<T> =
    scopedFlow { downstream ->
        // Produce the values using the default (rendezvous) channel
        val values = produce {
            collect { value -> send(value ?: NULL) }
        }
        // Now consume the values
        var lastValue: Any? = null
        while (lastValue !== DONE) {
            var timeoutMillis = 0L // will be always computed when lastValue != null
            // Compute timeout for this value
            if (lastValue != null) {
                timeoutMillis = timeoutMillisSelector(NULL.unbox(lastValue))
                require(timeoutMillis >= 0L) { "Debounce timeout should not be negative" }
                if (timeoutMillis == 0L) {
                    downstream.emit(NULL.unbox(lastValue))
                    lastValue = null // Consume the value
                }
            }
            // assert invariant: lastValue != null implies timeoutMillis > 0
            assert { lastValue == null || timeoutMillis > 0 }
            // wait for the next value with timeout
            select<Unit> {
                // Set timeout when lastValue exists and is not consumed yet
                if (lastValue != null) {
                    onTimeout(timeoutMillis) {
                        downstream.emit(NULL.unbox(lastValue))
                        lastValue = null // Consume the value
                    }
                }
                values.onReceiveCatching { value ->
                    value
                        .onSuccess { lastValue = it }
                        .onFailure {
                            it?.let { throw it }
                            // If closed normally, emit the latest value
                            if (lastValue != null) downstream.emit(NULL.unbox(lastValue))
                            lastValue = DONE
                        }
                }
            }
        }
    }
Flow의 debounce() 코드는 위와 같다.
timeoutMills 를 매개변수로 받아 이벤트를 방출할 시간 간격을 지정할 수 있다.
(debounceInternal 의 동작도 자세히 알아보고싶은데 아직 지식이 부족해 이해가 안되니 scopedFlow , produce 등을 먼저 학습하고 나중에 살펴봐야겠다)
fun <T> debounce(
    timeMillis: Long = 300L,
    coroutineScope: CoroutineScope,
    block: (T) -> Unit
): (T) -> Unit {
    var debounceJob: Job? = null
    return {
        debounceJob?.cancel()
        debounceJob = coroutineScope.launch {
            delay(timeMillis)
            block(it)
        }
    }
}위 코드는 블로그에서 가져온 코드로, debounce 를 직접 코루틴을 이용해 구현한 것인데
이 코드를 보면 직관적으로 debounce의 동작을 알 수 있어 가져와보았다
fun debounce(): Flow<Int> = flow<Int> {
    emit(1)
    emit(2)
    delay(500L)
    emit(3)
    emit(4)
    delay(200L)
    emit(5)
    delay(700L)
    emit(6)
}.debounce(400L)

fun main() = runBlocking<Unit> {
    debounce().collect { log(it.toString()) }
}
main()에서 400ms 간격으로 방출하는 Flow를 collect하고 있다.
위의 코드에선 2-5-6 순서로 log가 나타날 것 이다.
Throttling
throttle은 일정 주기마다 이벤트를 캐치해서 전달하는 기법이다.
debounce와의 차이는 debounce는 마지막 이벤트를 기점으로 delay 타이머를 작동시키지만,
throttle은 마지막 이벤트와 관계없이 항상 일정한 timer가 동작하고 있고 타이머가 종료될때마다 해당 주기의 첫번째 이벤트를 처리한다 ( = throttleFirst)
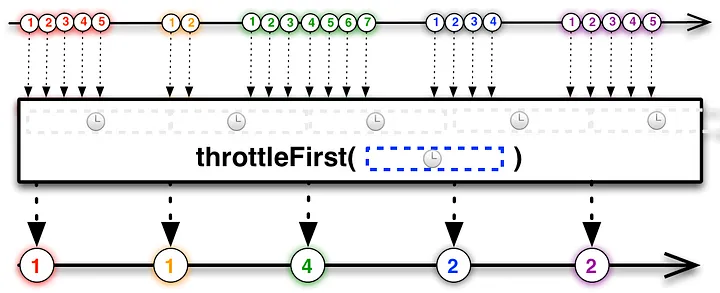
위 그림에선 첫번째 타이머 주기에 가장 먼저 들어온 이벤트가 빨간색 1이므로 이것을 처리하고
두번째 타이머 주기에선 가장 먼저 들어온 이벤트가 노란색 1이므로 마지막으로 들어온 이벤트가 초록색3 이더라도 노란색 1을 처리한다.
대표적인 사용 예시로는 버튼 중복 클릭 방지, 활성화 처리가 있다.
좋아요 같은 버튼에 아무런 처리 없이 유저의 클릭 이벤트 마다 서버에 요청하게 된다면 과부하가 발생할 수 있다.
이때 throttleFirst 기법을 사용해 첫번째 클릭 이벤트만 서버에 전달하게 되면 이 문제를 방지할 수 있다.
Sample
Sample은 이 throttle 기법 중 throttleLast, 즉 항상 일정하게 도는 타이머가 종료될때마다 버퍼의 마지막(최신) 이벤트를 처리하는 것이다.
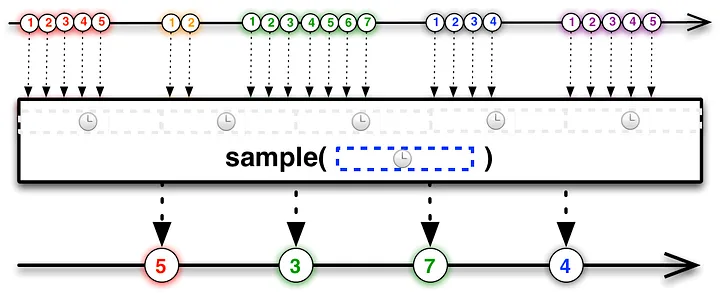
위 그림에서 첫번째 타이머 주기에서 마지막으로 입력된 이벤트가 빨간 5이기 때문이 이를 처리하고,
두번째 타이머 주기에선 마지막으로 입력된 이벤트가 초록 3이므로 이를 처리한다.
Sample 기법의 예시로는 채팅 전송 버튼이 있는데,
채팅 메시지 전송버튼이 항상 활성화 되어있지 않고 텍스트가 입력되었을때만 이를 활성화 시키려할때,
일정한 주기마다 최신 텍스트 입력 이벤트를 확인하여 버튼 활성화 여부를 결정할 수 있다.
Flow의 sample
Flow에선 throttleLast의 기능을 sample() 메소드를 통해 제공한다.
@FlowPreview
public fun <T> Flow<T>.sample(period: Duration): Flow<T> = sample(period.toDelayMillis())

@FlowPreview
public fun <T> Flow<T>.sample(periodMillis: Long): Flow<T> {
    require(periodMillis > 0) { "Sample period should be positive" }
    return scopedFlow { downstream ->
        val values = produce(capacity = Channel.CONFLATED) {
            collect { value -> send(value ?: NULL) }
        }
        var lastValue: Any? = null
        val ticker = fixedPeriodTicker(periodMillis)
        while (lastValue !== DONE) {
            select<Unit> {
                values.onReceiveCatching { result ->
                    result
                        .onSuccess { lastValue = it }
                        .onFailure {
                            it?.let { throw it }
                            ticker.cancel(ChildCancelledException())
                            lastValue = DONE
                        }
                }

                // todo: shall be start sampling only when an element arrives or sample aways as here?
                ticker.onReceive {
                    val value = lastValue ?: return@onReceive
                    lastValue = null // Consume the value
                    downstream.emit(NULL.unbox(value))
                }
            }
        }
    }
}
일정한 타이머 주기인 period를 매개변수로 받는다.
flow {
    repeat(10) {
        emit(it)
        delay(110)
    }
}.sample(200)

// 1, 3, 5, 7, 9
0부터 9까지 emit 되는데
0 (110ms) 1 (220ms) 2 (330ms) 3 (440ms) …
이런 식으로 동작하고 있고 이를 200ms 마다 최신값을 캐치해서 가져오므로 1,3,5,7,9 값이 collect 될 것이다
참고