스프링 환경에서 DB에 저장된, 혹은 지정된 이메일 주소로 이메일을 보내는 API를 구현해보자.
배겐드 쪼랩으로써 유치원생도 따라할 수 있도록 쉽게 작성할 것이다! 왜냐하면 그렇게 안적어놓으면 내가 이해를 못하니깐 ㅠ.ㅠ.ㅠ.ㅠ.
우선 지메일(Gmail)의 경우 2022년 5월부터 보안 정책 변경으로 이메일 서버를 사용하기가 매우 까다로워져 지메일로는 구현하기 힘들어졌다. 그래서 나는 네이버 메일 서버를 이용하기로 했다.
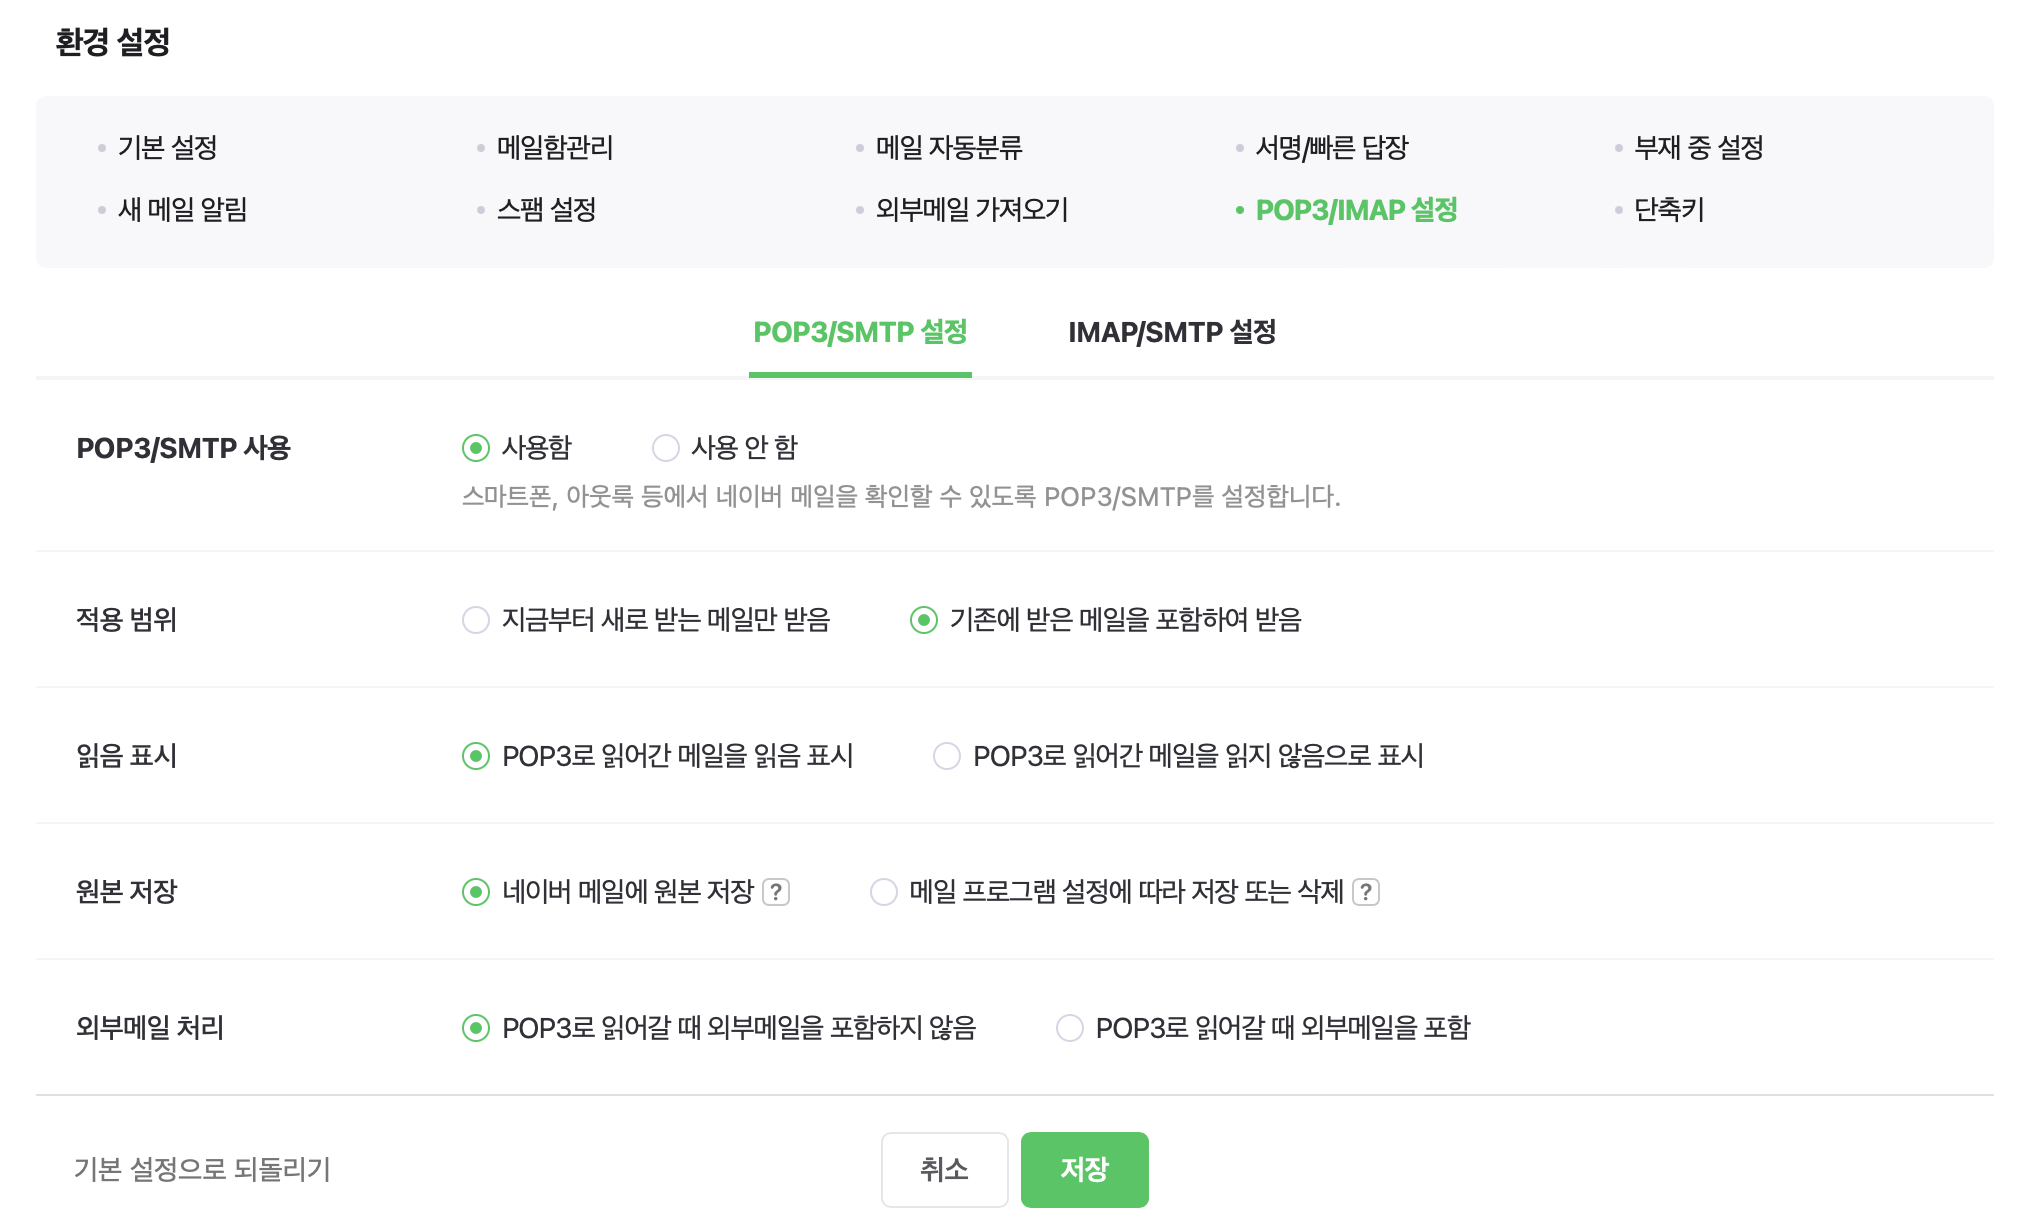
- 먼저 네이버 메일에서 환경설정-POP3/IMAP 설정에서 POP3/SMTP 사용을 사용함으로 체크해준다.
- 프로젝트 폴더로 돌아와서, application.yml 파일에 다음과 같이 추가해준다.
spring:
  mail:
    host: smtp.naver.com
    port: 465
    username: [FROM_EMAIL_ADDRESS]
    password: [PASSWORD]
    properties:
      mail.smtp.auth: true
      mail.smtp.ssl.enable: true
      mail.smtp.ssl.trust: smtp.naver.com
mail.smtp.starttls.enable: true- 요청값으로 받을 model class를 만들어준다.
@Getter
@Setter
@NoArgsConstructor
@AllArgsConstructor
public class PostMailReq {
    private String name;
    private String region;
    private String date;
    private String message;
    private String kakaoId;
    private String instrIdx;
}- Controller에 아래와 같이 작성한다.
    @ResponseBody
    @PostMapping("")
    public BaseResponse<String> sendEmail (@ModelAttribute PostMailReq postMailReq){
        try {
            emailService.sendMail(postMailReq, Integer.parseInt(postMailReq.getInstrIdx()));
            return new BaseResponse<>("메일 전송이 완료되었습니다");
        } catch (MessagingException e) {
            throw new RuntimeException(e);
        } catch (UnsupportedEncodingException e) {
            throw new RuntimeException(e);
        }
}- Service에 아래와 같이 작성한다. 아래 소스처럼 text에 원하는 내용을 구성하여 넣어준다.
나처럼 DB에 저장된 이메일 주소를 사용하는게 아닌, 고정된 주소를 사용할 것이라면 TO_ADDRESS 변수에 설정해주고 Dao 단계는 생략하면 된다.
    @Async
    public void sendMail (PostMailReq postMailReq, int instrIdx) throws UnsupportedEncodingException, MessagingException {
        String TO_ADDRESS = emailDao.retrieveEmailAddress(instrIdx);
        MimeMessage message = mailSender.createMimeMessage();
        message.addRecipients(Message.RecipientType.TO, TO_ADDRESS);
        message.setSubject("Sent a Skate Lesson Request from Fun2Skate!");
        String text = "";
        text += "Sent a Skate Lesson Request from Fun2Skate!\nFun2Skate 사이트에서 스케이트보드 레슨 요청서가 도착했습니다!\n\n";
        text += "Name : " + postMailReq.getName() + " \n ";
        text += "Region : " + postMailReq.getRegion() + " \n ";
        text += "Date : " + postMailReq.getDate() + "\n";
        text += "KakaoTalk ID : " + postMailReq.getKakaoId()+ "\n";
        text += "Message : " + postMailReq.getMessage() + "\n";
        message.setText(text, "utf-8");
        message.setFrom(new InternetAddress(ADMIN_ADDRESS, "fun2skate_admin"));
        mailSender.send(message);
}- Dao에 아래와 같이 작성해준다. 요청값으로 받아온 idx값으로 DB에 저장된 email 주소를 받아오는 과정이다.
    public String retrieveEmailAddress(int InstrIdx) {
        String retrieveEmailAddressQuery = "select email from Instructor where instrIdx=?;";
        int retrieveEmailAddressParams = InstrIdx;
        return this.jdbcTemplate.queryForObject(retrieveEmailAddressQuery, String.class, retrieveEmailAddressParams);
    }
이렇게 해주면 Server 단에서의 구현은 끝이다! Postman에서 테스트해보면 정상적으로 작동한다.
이제 클라이언트 단에서 요청값을 올바르게 넘겨주는 부분은 구현해주면 이메일 전송 앱이 완성된다. 이 부분은 다음 포스팅에서 이어서 작성하겠다.

Backend Developer