Goodbye react-beautiful-dnd, Hello @dnd-kit
react-beautiful-dnd의 끝, 새로운 시작 @dnd-kit
react-beautiful-dnd는 한때 React 애플리케이션에서 드래그 앤 드롭 기능을 구현하는 데 있어 대명사였습니다. 그러나 현재는 유지보수가 중단되어, 더 이상 업데이트나 지원을 받을 수 없는 상태입니다. 따라서 많은 개발자들이 새로운 대안으로 @dnd-kit를 선택하고 있습니다. 이번 포스팅에서는 @dnd-kit로 전환하는 이유와 그 과정에 대해 설명하겠습니다.
왜 @dnd-kit인가?
성능
@dnd-kit는 뛰어난 성능을 자랑합니다. 빠르고 부드러운 드래그 앤 드롭 경험을 제공하며, 대규모 데이터셋에서도 안정적으로 작동합니다.
유연성
높은 커스터마이즈 가능성을 제공합니다. 다양한 요구사항에 맞게 드래그 앤 드롭 인터랙션을 세밀하게 조정할 수 있습니다.
접근성
접근성을 고려한 설계로, 모든 사용자가 편리하게 사용할 수 있는 UI를 구현할 수 있습니다.
@dnd-kit로 구현하기
기본 설정
먼저 필요한 패키지를 설치합니다:
npm install @dnd-kit/core @dnd-kit/sortable @emotion/styledDrag and Drop 컴포넌트 구현
다음은 @dnd-kit를 사용하여 드래그 앤 드롭 기능을 구현한 코드입니다.
주요 코드 하이라이트
드래그 앤 드롭 요소를 설정하는 컴포넌트입니다.
해당 코드는 드래그 앤 드랍을 할 수 있게 해주는 Provider의 역할을 하게 됩니다.
import React, { useState, useMemo, createContext, useContext } from "react";
import {
  DndContext,
  useSensor,
  useSensors,
  KeyboardSensor,
  PointerSensor,
  DragOverlay,
  defaultDropAnimationSideEffects,
  UniqueIdentifier,
} from "@dnd-kit/core";
import {
  SortableContext,
  arrayMove,
  useSortable,
  sortableKeyboardCoordinates,
} from "@dnd-kit/sortable";
import styled from "@emotion/styled";
import { CSS } from "@dnd-kit/utilities";

interface DragAndDropProviderProps<T> {
  items: T[];
  onChange: (items: T[]) => void;
  renderItem: (item: T) => React.ReactNode;
}

const DragAndDropProvider = <T extends { id: UniqueIdentifier }>({
  items,
  onChange,
  renderItem,
}: DragAndDropProviderProps<T>) => {
  const [activeId, setActiveId] = useState<UniqueIdentifier | null>(null);
  const activeItem = useMemo(
    () => items.find((item) => item.id === activeId),
    [activeId, items]
  );
  const sensors = useSensors(
    useSensor(PointerSensor),
    useSensor(KeyboardSensor, {
      coordinateGetter: sortableKeyboardCoordinates,
    })
  );

  const handleDragStart = ({
    active,
  }: {
    active: { id: UniqueIdentifier };
  }) => {
    setActiveId(active.id);
  };

  const handleDragEnd = ({
    active,
    over,
  }: {
    active: { id: UniqueIdentifier };
    over: { id: UniqueIdentifier } | null;
  }) => {
    if (over && active.id !== over.id) {
      const oldIndex = items.findIndex((item) => item.id === active.id);
      const newIndex = items.findIndex((item) => item.id === over.id);
      onChange(arrayMove(items, oldIndex, newIndex));
    }
    setActiveId(null);
  };

  return (
    <DndContext
      sensors={sensors}
      onDragStart={handleDragStart}
      onDragEnd={handleDragEnd}
      onDragCancel={() => setActiveId(null)}
    >
      <SortableContext items={items}>
        <ul style={{ padding: 0, listStyle: "none" }}>
          {items.map((item) => (
            <React.Fragment key={item.id}>{renderItem(item)}</React.Fragment>
          ))}
        </ul>
      </SortableContext>
      <DragOverlay
        dropAnimation={{
          sideEffects: defaultDropAnimationSideEffects({
            styles: { active: { opacity: "0.4" } },
          }),
        }}
      >
        {activeItem ? renderItem(activeItem) : null}
      </DragOverlay>
    </DndContext>
  );
};
개별 항목을 드래그할 수 있도록 설정하는 컴포넌트입니다.
interface SortableItemProps {
  id: string;
  children: ({
    listeners,
    isDragging,
  }: {
    listeners:
      | import("@dnd-kit/core/dist/hooks/utilities").SyntheticListenerMap
      | undefined;
    isDragging: boolean;
  }) => React.ReactNode;
}

interface Context {
  attributes: Record<string, any>;
  listeners:
    | import("@dnd-kit/core/dist/hooks/utilities").SyntheticListenerMap
    | undefined;
  ref(node: HTMLElement | null): void;
}

const SortableItemContext = createContext<Context>({
  attributes: {},
  listeners: {},
  ref() {},
});

export const SortableItem = ({ children, id }: SortableItemProps) => {
  const {
    attributes,
    listeners,
    setNodeRef,
    setActivatorNodeRef,
    transform,
    transition,
    isDragging,
  } = useSortable({ id });

  const context = useMemo(
    () => ({
      attributes,
      listeners,
      ref: setActivatorNodeRef,
    }),
    [attributes, listeners, setActivatorNodeRef]
  );

  const style = {
    opacity: isDragging ? 0.4 : undefined,
    transform: CSS.Translate.toString(transform),
    transition,
  };

  return (
    <SortableItemContext.Provider value={context}>
      <Item ref={setNodeRef} style={style}>
        {children({ listeners, isDragging })}
      </Item>
    </SortableItemContext.Provider>
  );
};
마지막으로 드래그 핸들을 추가하여 사용자가 드래그할 수 있는 영역을 지정합니다.
export const DragHandle = () => {
  const { attributes, listeners, ref } = useContext(SortableItemContext);

  return (
    <Button {...attributes} {...listeners} ref={ref}>
      <svg viewBox="0 0 20 20" width="12">
        <path d="M7 2a2 2 0 1 0 .001 4.001A2 2 0 0 0 7 2zm0 6a2 2 0 1 0 .001 4.001A2 2 0 0 0 7 8zm0 6a2 2 0 1 0 .001 4.001A2 2 0 0 0 7 14zm6-8a2 2 0 1 0-.001-4.001A2 2 0 0 0 13 6zm0 2a2 2 0 1 0 .001 4.001A2 2 0 0 0 13 8zm0 6a2 2 0 1 0 .001 4.001A2 2 0 0 0 13 14z"></path>
      </svg>
    </Button>
  );
};
이제 이 컴포넌트들을 하나의 컴포넌트로 묶어서 컴포지션 형태로 사용할 수 있게 구성해보겠습니다.
const DragAndDrop = Object.assign({}, {
	Provider: DragAndDropProvider,
  	SortableItem,
  	DragHandle,
})

export default DragAndDrop;
혹은
interface IDragAndDrop {
  Provider: typeof DragAndDropProvider;
  SortableItem: typeof SortableItem;
  DragHandle: typeof DragHandle;
}

const DragAndDrop: IDragAndDrop = {
  Provider: DragAndDropProvider,
  SortableItem: SortableItem,
  DragHandle: DragHandle,
};

export default DragAndDrop;
이제 이 컴포넌트를 사용하여 간단한 드래그 앤 드롭 기능을 가진 애플리케이션을 만들어 보겠습니다.
import React, { useState } from "react";
import DragAndDrop from "./DragAndDrop";
import styled from "@emotion/styled";

interface Column {
  id: string;
  value: string;
}

const ColumnSelectBoxRow = ({ listeners, value, isDragging }: any) => {
  return (
    <Row {...listeners} style={{ opacity: isDragging ? 0.4 : 1 }}>
      {value}
      <DragAndDrop.DragHandle />
    </Row>
  );
};

const Row = styled.div`
  display: flex;
  justify-content: space-between;
  align-items: center;
  padding: 8px;
  background-color: white;
  width: 100%;
  margin-bottom: 4px;
`;

const App = () => {
  const [columnList, setColumnList] = useState<Column[]>([
    { id: "1", value: "Column 1" },
    { id: "2", value: "Column 2" },
    { id: "3", value: "Column 3" },
  ]);

  const handleSave = (newColumnList: Column[]) => {
    console.log("Saved order: ", newColumnList);
  };

  return (
    <DragAndDrop.Provider
      items={columnList}
      onChange={(newOrder) => {
        setColumnList(newOrder);
        handleSave(newOrder);
      }}
      renderItem={(item) => {
        console.info(item);
        return (
          <DragAndDrop.SortableItem key={item.id} id={item.id}>
            {({ listeners, isDragging }) => (
              <ColumnSelectBoxRow
                listeners={listeners}
                value={item.value}
                isDragging={isDragging}
              />
            )}
          </DragAndDrop.SortableItem>
        );
      }}
    />
  );
};

export default App;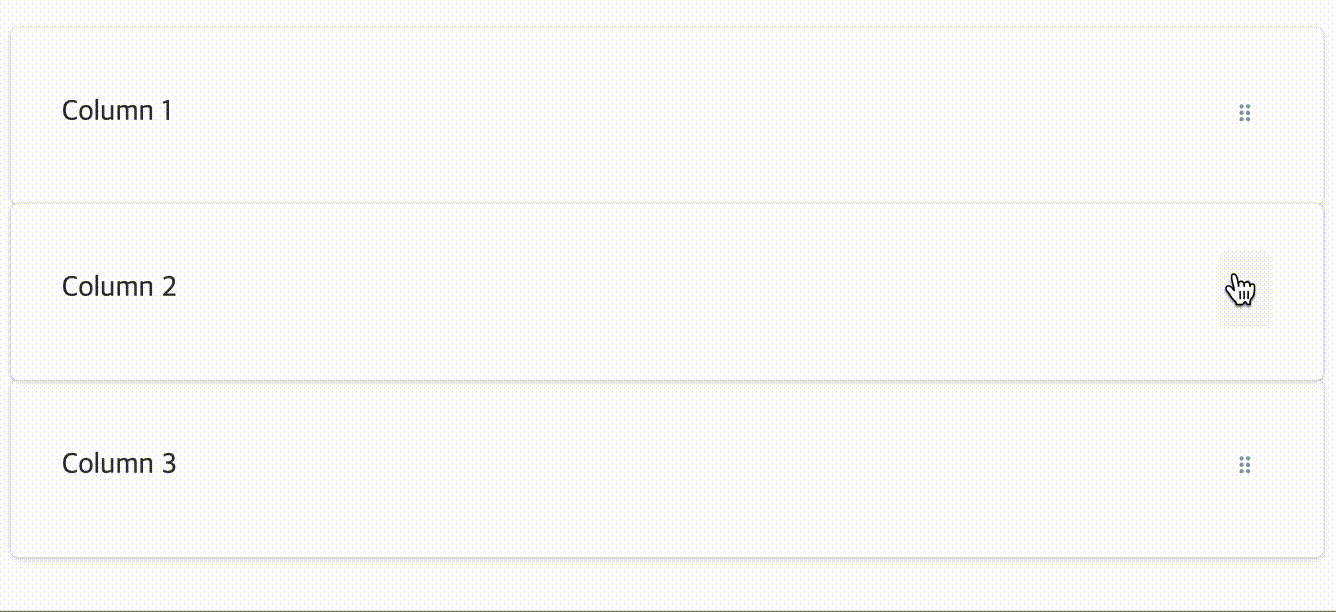
다음과 같이 react-beautiful-dnd에서 경험했던 부드러운 드래그 앤 드랍을 구현할 수 있습니다.