React에서 Custom Snackbar(알림) 시스템 직접 구현하기 ## – Context API 기반 설계, 코드, 사용법, 그리고 Zustand와의 비교
Frontend
목록 보기
28/30
1. 들어가며
서비스를 개발하다 보면 사용자에게 간단한 알림 메시지(예: 성공, 실패, 정보, 경고 등)를 띄워야 할 때가 많습니다.
이때 재사용 가능하고, 타입 안정성이 높으며, 여러 위치에서 쉽게 호출할 수 있는 Snackbar(스낵바) 시스템을 직접 구현하면,
외부 라이브러리 의존성 없이 우리 서비스에 딱 맞는 UX를 제공할 수 있습니다.
이번 글에서는 React + TypeScript 환경에서 Context API와 모듈화를 활용해
Custom Snackbar 시스템을 설계/구현하는 방법을 상세히 소개합니다.
또한, Zustand와 Context의 차이점과 Context를 선택한 이유도 함께 설명합니다.
2. 전체 구조 및 설계 의도
2.1. 주요 목표
- Context API로 전역에서 스낵바를 쉽게 띄울 수 있도록 한다.
- 타입 안정성을 극대화한다. (strict mode, 명확한 타입 정의)
- 모듈화: 스낵바 UI, 상태 관리, 호출 함수 분리
- 자동 사라짐, 위치 지정, 커스텀 아이콘/버튼 등 확장성 고려
- 회사/서비스 종속적 네이밍/로직 제거 (범용성)
3. 핵심 코드 및 설명
3.1. 타입 정의 (snackbar.types.ts)
// snackbar.types.ts

import { ReactNode } from 'react';

/**
 * @description 스낵바의 타입(종류)
 */
export type SnackbarType = 'success' | 'error' | 'info' | 'default' | 'custom';

/**
 * @description 스낵바가 나타날 위치
 */
export type SnackbarPosition =
  | 'top-left'
  | 'top-center'
  | 'top-right'
  | 'bottom-left'
  | 'bottom-center'
  | 'bottom-right';

/**
 * @description 스낵바 컴포넌트에 전달되는 props
 */
export interface SnackbarProps {
  snackbarKey: string;
  children: ReactNode;
  type: SnackbarType;
  position?: SnackbarPosition;
  description?: ReactNode;
  autoHideDuration?: number;
  renderStartIcon?: () => ReactNode;
  renderEndIcon?: () => ReactNode;
  renderActionButton?: (args: { snackbarKey: string }) => ReactNode;
  color?: 'light' | 'dark';
}
3.2. 스낵바 UI 컴포넌트 (Snackbar.tsx)
// Snackbar.tsx

import React, { useEffect } from 'react';
import type { SnackbarProps } from './snackbar.types';

/**
 * @description 스낵바 UI 컴포넌트. 타입/아이콘/버튼 등 렌더링 담당
 */
const Snackbar: React.FC<SnackbarProps & { onClose: (key: string) => void }> = ({
  snackbarKey,
  children,
  type,
  position,
  description,
  autoHideDuration = 3000,
  renderStartIcon,
  renderEndIcon,
  renderActionButton,
  color = 'light',
  onClose,
}) => {
  // 자동 사라짐 타이머
  useEffect(() => {
    const timer = setTimeout(() => {
      onClose(snackbarKey);
    }, autoHideDuration);
    return () => clearTimeout(timer);
  }, [snackbarKey, autoHideDuration, onClose]);

  // 기본 아이콘 렌더링
  const renderDefaultIcon = () => {
    switch (type) {
      case 'success':
        return <span aria-label="성공">✅</span>;
      case 'error':
        return <span aria-label="실패">❌</span>;
      case 'info':
        return <span aria-label="정보">ℹ️</span>;
      default:
        return null;
    }
  };

  return (
    <div
      className={`snackbar-root ${color} ${type}`}
      style={{
        // 위치, 색상 등은 CSS로 제어
      }}
    >
      <div className="snackbar-content">
        {type === 'custom'
          ? renderStartIcon?.()
          : renderDefaultIcon()}
        <div className="snackbar-message">{children}</div>
        {renderActionButton?.({ snackbarKey })}
      </div>
      {description && <div className="snackbar-description">{description}</div>}
      {renderEndIcon?.()}
    </div>
  );
};

export default Snackbar;
3.3. Context 및 Provider (SnackbarProvider.tsx)
// SnackbarProvider.tsx

import React, { createContext, useContext, useReducer, useRef, ReactNode } from 'react';
import Snackbar, { SnackbarProps } from './Snackbar';

type SnackbarContextType = {
  addSnackbar: (snackbar: Omit<Partial<SnackbarProps>, 'snackbarKey'> & Pick<SnackbarProps, 'children' | 'type'>) => void;
  removeSnackbar: (snackbarKey: string) => void;
};

const SnackbarContext = createContext<SnackbarContextType | undefined>(undefined);

type SnackbarState = SnackbarProps[];

type SnackbarAction =
  | { type: 'ADD'; payload: SnackbarProps }
  | { type: 'REMOVE'; payload: string };

function snackbarReducer(state: SnackbarState, action: SnackbarAction): SnackbarState {
  switch (action.type) {
    case 'ADD':
      return [...state, action.payload];
    case 'REMOVE':
      return state.filter(snackbar => snackbar.snackbarKey !== action.payload);
    default:
      return state;
  }
}

/**
 * @description 고유 ID 생성 함수
 */
function getUniqueId() {
  return Math.random().toString(36).slice(2) + Date.now();
}

/**
 * @description 스낵바 Provider. 전역에서 addSnackbar 사용 가능
 */
export const SnackbarProvider: React.FC<{ children: ReactNode }> = ({ children }) => {
  const [snackbars, dispatch] = useReducer(snackbarReducer, []);
  const timeoutRefs = useRef<Map<string, NodeJS.Timeout>>(new Map());

  const addSnackbar: SnackbarContextType['addSnackbar'] = (snackbar) => {
    const snackbarKey = getUniqueId();
    const autoHideDuration = snackbar.autoHideDuration ?? 3000;
    const position = snackbar.position ?? 'top-center';

    const fullSnackbar: SnackbarProps = {
      snackbarKey,
      ...snackbar,
      autoHideDuration,
      position,
    };

    dispatch({ type: 'ADD', payload: fullSnackbar });

    // 자동 사라짐 타이머
    const timeoutId = setTimeout(() => {
      removeSnackbar(snackbarKey);
    }, autoHideDuration);
    timeoutRefs.current.set(snackbarKey, timeoutId);
  };

  const removeSnackbar = (snackbarKey: string) => {
    dispatch({ type: 'REMOVE', payload: snackbarKey });
    const timeoutId = timeoutRefs.current.get(snackbarKey);
    if (timeoutId) {
      clearTimeout(timeoutId);
      timeoutRefs.current.delete(snackbarKey);
    }
  };

  // 위치별로 스낵바 렌더링
  const positions: SnackbarProps['position'][] = [
    'top-left', 'top-center', 'top-right',
    'bottom-left', 'bottom-center', 'bottom-right',
  ];

  return (
    <SnackbarContext.Provider value={{ addSnackbar, removeSnackbar }}>
      {children}
      {positions.map((position) => (
        <div key={position} className={`snackbar-container ${position}`}>
          {snackbars
            .filter(snackbar => snackbar.position === position)
            .map(snackbar => (
              <Snackbar
                key={snackbar.snackbarKey}
                {...snackbar}
                onClose={removeSnackbar}
              />
            ))}
        </div>
      ))}
    </SnackbarContext.Provider>
  );
};

/**
 * @description 스낵바 Context 사용 Hook
 */
export function useSnackbar() {
  const context = useContext(SnackbarContext);
  if (!context) throw new Error('useSnackbar must be used within a SnackbarProvider');
  return context;
}
3.4. 사용 예시 (App.tsx)
// App.tsx

import React from 'react';
import { SnackbarProvider, useSnackbar } from './SnackbarProvider';

function DemoComponent() {
  const { addSnackbar } = useSnackbar();

  const handleClick = () => {
    addSnackbar({
      type: 'success',
      children: '저장에 성공했습니다!',
      description: '데이터가 정상적으로 저장되었습니다.',
      position: 'top-center',
      autoHideDuration: 2500,
    });
  };

  return <button onClick={handleClick}>스낵바 띄우기</button>;
}

function App() {
  return (
    <SnackbarProvider>
      <DemoComponent />
      {/* ...다른 컴포넌트 */}
    </SnackbarProvider>
  );
}

export default App;
3.5. CSS 예시 (snackbar.css)
.snackbar-container {
  position: fixed;
  z-index: 9999;
  display: flex;
  flex-direction: column;
  gap: 12px;
  pointer-events: none;
}
.snackbar-container.top-center { top: 40px; left: 50%; transform: translateX(-50%); }
.snackbar-container.bottom-center { bottom: 40px; left: 50%; transform: translateX(-50%); }
/* ...좌/우/코너 등 위치별 스타일 추가 */

.snackbar-root {
  min-width: 250px;
  max-width: 500px;
  background: #fff;
  color: #222;
  border-radius: 8px;
  box-shadow: 0 2px 8px rgba(0,0,0,0.15);
  padding: 12px 20px;
  pointer-events: auto;
  display: flex;
  flex-direction: column;
  gap: 4px;
}
.snackbar-root.success { border-left: 4px solid #37B862; }
.snackbar-root.error { border-left: 4px solid #AF3737; }
.snackbar-root.info { border-left: 4px solid #489CF0; }
.snackbar-root.dark { background: #222; color: #fff; }
.snackbar-content { display: flex; align-items: center; gap: 8px; }
.snackbar-message { flex: 1; }
.snackbar-description { font-size: 0.95em; color: #666; }
4. Context API로 구현하는 이유 (Zustand와의 비교)
4.1. Context API의 장점
- React 내장 기능: 별도 외부 상태관리 라이브러리 없이, React만으로 충분히 구현 가능
- Provider로 명확한 범위 지정: 스낵바가 필요한 영역만 감싸면 됨 (테스트, SSR, 마이크로 프론트엔드 등에서 유리)
- 불필요한 리렌더 최소화: 스낵바 상태 변경 시, 실제로 스낵바 UI만 리렌더됨 (Provider 하위에서만 영향)
- 코드 일관성: 기존 React Context 패턴과 동일하게 사용 가능, 러닝커브 없음
- 외부 의존성 최소화: 번들 크기 증가 없음, 유지보수 용이
4.2. Zustand와 비교
| 구분 | Context API 기반 Snackbar | Zustand 기반 Snackbar |
|---|---|---|
| 러닝커브 | React만 알면 충분 | Zustand 문법 추가 학습 필요 |
| 외부 의존성 | 없음 | Zustand 설치 필요 |
| Provider 범위 | 명확하게 지정 가능 | 전역 store, 범위 지정 어려움 |
| SSR/테스트 | Provider로 쉽게 분리 | Store mocking 필요 |
| 리렌더링 제어 | Provider 하위만 영향 | selector 등 추가 최적화 필요 |
| 프로젝트 규모 | 소규모/중규모 적합 | 대규모 복잡 상태엔 유리 |
결론
- Snackbar처럼 "UI 계층에 한정된, 비교적 단순한 상태"는 Context API가 더 직관적이고,
Provider 범위 지정, 외부 의존성 최소화, 코드 일관성 측면에서 유리합니다. - Zustand는 전역 상태, 복잡한 비동기/동기화, selector 기반 최적화가 필요한 경우에 더 적합합니다.
5. 주요 포인트 및 확장성
- Context API로 어디서든
addSnackbar호출 가능 - 타입 안정성:
SnackbarProps명확히 정의,strict모드 대응 - 자동 사라짐:
autoHideDuration활용, 타이머 관리 - 위치 지정:
positionprop으로 다양한 위치 지원 - 커스텀 아이콘/버튼:
renderStartIcon,renderActionButton등 확장성 - 모듈화: UI/상태/호출 분리, 유지보수 용이
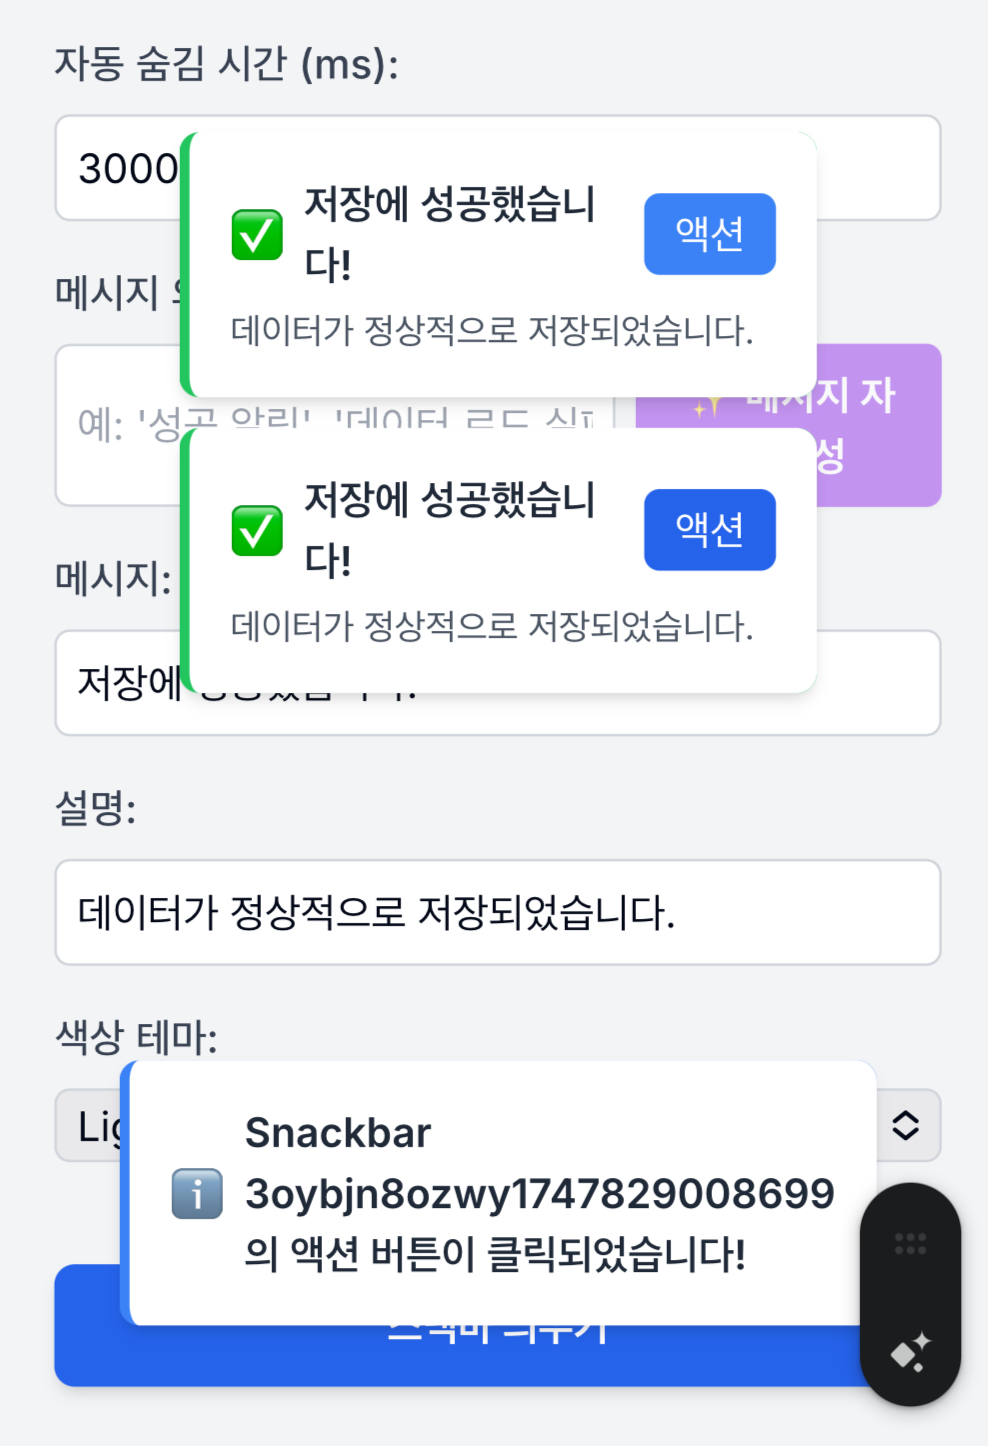
결과 이미지 => 직접 확인해보기
6. 결론
이렇게 구현하면 외부 라이브러리 없이도 우리 서비스에 최적화된,
확장 가능하고 타입 안전한 스낵바 시스템을 만들 수 있습니다.
- Context/Provider로 전역 호출
- 모듈화로 유지보수/확장성 확보
- 타입스크립트로 예측 가능성/안정성 강화
실제 서비스에 적용할 때는 디자인 시스템, 접근성, 애니메이션 등도 추가로 고려하면 더욱 완성도 높은 알림 시스템을 구축할 수 있습니다.
전체 예제 소스코드
Github
https://github.com/milliwonkim/react-easy-snackbar
질문/피드백은 언제든 환영합니다!
더 나은 알림 UX를 위해, 여러분의 서비스에 맞게 자유롭게 커스터마이즈해보세요.

FOR_THE_BEST_DEVELOPER