File IO
📥 InputStream, OutputStream 📤
| ← | ← | |
|---|---|---|
| Program | InputStream | Source |
| Program | FileInputStream | File |
| → | → | |
|---|---|---|
| Program | OutputStream | Source |
| Program | FileOutputStream | File |
상속 관계
java.io.InputStream
┕━ java.io.FileInputStream
java.io.OutputStream
┕━ java.io.FileOutputStream
read()
InputStream 으로부터 1byte씩 읽어서 int(4byte)에 담아 반환한다.
더 이상 읽을 것이 없으면 -1을 반환한다.
write()
int(4byte)에 1byte씩 담아 OutputStream에 쓴다.
💻 Java 예제 1
📝 소스 코드
public class Main {
    public static void main(String[] args) {
    	InputStream in = null;
        OutputStream out = null;

        try {
            in = new FileInputStream("temp/big_text.txt");
            out = new FileOutputStream("temp/copy_big_text.txt");

            int dataRead;	// 읽고 쓰는 데이터를 저장할 변수
            int bytes = 0;	// 파일의 바이트 수 저장
            long startTime = System.currentTimeMillis();

            // 파일 복사
            // InputStream에서 1byte씩 읽어와서, OutputStream에 1byte씩 쓴다.
            while (true) {
            	dataRead = in.read();
                if (dataRead == -1)
                	break;

                out.write(dataRead);
                bytes++;
            }

            long endTime = System.currentTimeMillis();
            long elapsedTime = endTime - startTime;	// 경과 시간

            System.out.println("읽고 쓴 바이트 : " + bytes);
            System.out.println("경과 시간(ms) : " + elapsedTime);
        } catch (FileNotFoundException e) {
            e.printStackTrace();
        } catch (IOException e) {
            e.printStackTrace();
        } finally {	// 리소스 해제
            try {
                if (in != null)
                    in.close();
                if (out != null)
                    out.close();
            } catch (IOException e) {
                e.printStackTrace();
            }
        }
    }
}
while 문을 돌면서 txt 파일 처음부터 끝까지 한 바이트씩 읽고 쓰는 작업을 반복한다.
파일의 크기가 클수록 시간이 엄청나게 오래 걸린다.
따라서 해당 방법은 잘 쓰이지 않는다.
📄 실행 결과
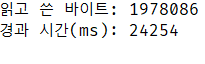
실제 경과 시간도 20초 이상이 걸렸다.
앞서 보았던 예제는 1byte씩 읽고 쓰게되니 시간이 오래걸린다.
따라서 임시 버퍼를 만들어서 한 번에 많은 양의 데이터를 읽고 쓸 수 있게 해본다.
Java 7 버전부터 도입된 try-with-resource를 사용한다.
리소스를 close 하는 코드가 없어도 자동으로 close가 실행되므로 따로 close()를 써줄 필요가 없다.
💻 Java 예제 2
📝 소스 코드
public class Main {
    public static void main(String[] args) {
        try (
        	InputStream in = new FileInputStream("temp/big_text.txt");
            	OutputStream out = new FileOutputStream("temp/copy_big_text.txt");
            ) {
        	byte[] buf = new byte[1024];	// 버퍼

            long startTime = System.currentTimeMillis();
            int lengthRead = 0;
            int bytes = 0;

            while (true) {
            	lengthRead = in.read(buf);
                if (lengthRead == -1)
                	break;

                out.write(buf, 0, lengthRead);
                bytes += lengthRead;
            }

            long endTime = System.currentTimeMillis();
            long elapsedTime = endTime - startTime;

            System.out.println("전체 복사한 바이트 : " + bytes);
            System.out.println("경과 시간 : " + elapsedTime);
        } catch (FileNotFoundException e) {
            e.printStackTrace(0;
        } catch (IOException e) {
            e.printStackTrace();
        }
    }
}
buf 라는 바이트 배열을 만들어 버퍼로 사용하였다.
read() 메소드에 매개변수로 주어진 byte[] 배열의 길이만큼 데이터를 읽어들인다.
실제 읽어 들인 데이터는 매개변수 byte[]에 담기고, read() 메소드는 읽어들인 바이트 수를 반환한다.
따라서 lengthRead 에는 그때 읽어들인 바이트 수가 담겨있다.
write() 메소드는 직전에 읽어들인 데이터만큼 쓴다.
0 ~ lengthRead - 1 만큼의 데이터를 buf에 쓰는 것이다.
현재 버퍼 사이즈는 1024로 해주었기 때문에 예제 1에서 1byte씩 담아오던 것과는 다르게,
예제 2에서는 1024byte씩 데이터를 읽고 쓰게 된다.
📄 실행 결과
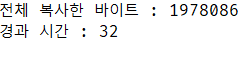
버퍼를 사용하는 경우 읽고 쓴 바이트는 같지만 경과 시간이 엄청나게 줄어든 것을 확인할 수 있다.
