https://github.com/seomimi/AWS-Presigned-URL
이 글은 API gateway, lamdba를 이용한 RESTful API 생성에 대한 선수 지식이 있어야 원활한 이해가 가능합니다.
Presigned URL이란?
S3에 직접 파일을 업로드 하기 위해서는 해당 S3에 대한 접근 권한을 인증해야 합니다.
접근 권한에 대한 인증을 마치면 S3에 업로드 할 수 있는 URL을 발급해 주는데, 이 URL을 presigned URL이라고 합니다. 발급 받은 presigned URL을 이용하면 브라우저에서 AWS S3 버킷에 바로 파일을 업로드 할 수 있습니다.
사용하게 된 이유
제가 현재 작업하고 있는 서버리스 웹 앱은 s3를 데이터 저장소로 이용하고 있습니다.
백서버를 따로 구축하지 않았기 때문에 보통 프론트에서 s3로 파일을 저장하기 위해 아래 이미지와 같은 아키텍처로 데이터를 전송합니다.
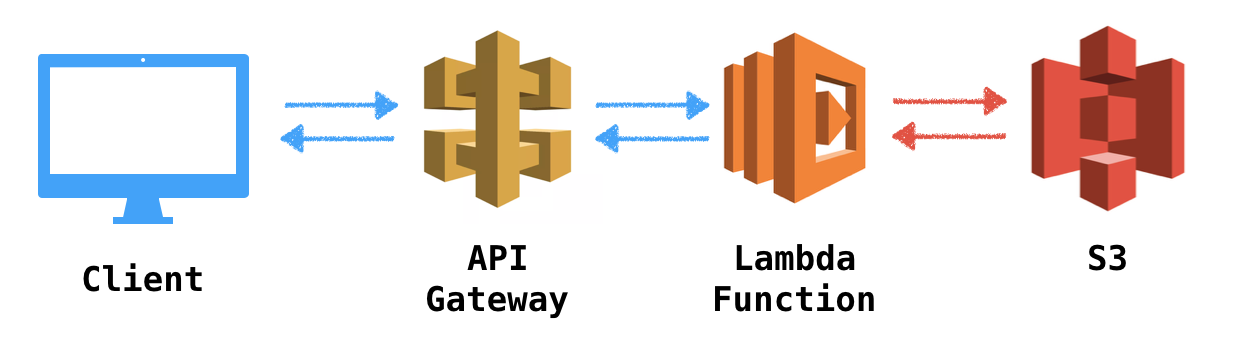 하지만 API gateway로 보낼 수 있는 최대 파일 크기가 10MB이므로 고화질 이미지를 보낼 수 없습니다. 그래서 presigned URL을 발급 받아 프론트에서 s3로 직접 파일을 전송하기로 했습니다.
전체 아키텍처
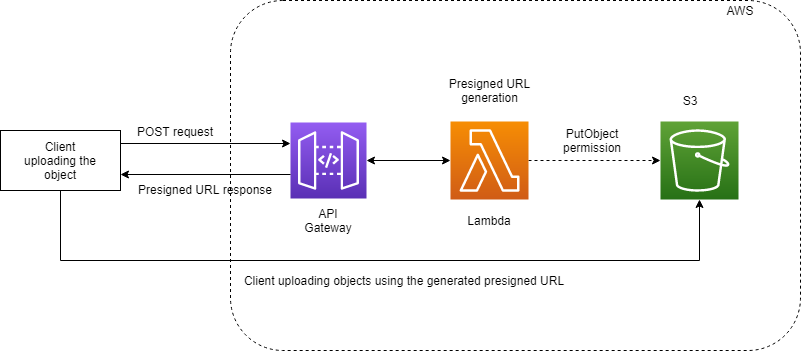
1. POST request
- 프론트에서 presigned URL생성을 위한 요청을 보냄
2. Presigned URL generation -> Presigned URL response
- s3버킷으로 파일을 전송할 수 있는 url을 생성하여 프론트로 보냄
3. Client uploading objects using the generated presigned URL
- 프론트에서 응답받은 url로 파일을 보냄 (put 요청)
1. POST 요청
https://github.com/seomimi/AWS-Presigned-URL/blob/main/apis/request.ts
//apis/request.ts
import axios from 'axios';
function createPresinedURL(file: File){
	axios.post('API gateway의 배포 스테이지 URL', {filename:file.name})
      .then(response=>console.log(response.data))
  	//response.data에 생성한 presigned URL이 들어있다.
      .catch(error=>console.error(error);
}
2. Presigned URL 생성
//람다 함수 작성
const aws = require("aws-sdk");
aws.config.update({
    accessKeyId: 'IAM에 생성한 사용자 액세스키',
    secretAccessKey: 'IAM에 생성한 사용자 비밀키',
    region: "ap-northeast-2"
});//s3에 대한 접근 권한을 인증하기 위함
exports.handler = (event, context, callback) => {
  const s3 = new aws.S3();
  const request = JSON.parse(event.body);
  const filename = request.filename;//파일이름.확장자
  const params = {
    Bucket: 's3버킷이름',
    Key: `upload/test/${filename}`,
    // s3버킷의 upload/test폴더 안에 저장됨
    Expires: 300,// In seconds
    // presigned URL의 유효시간의 기본값은 15분 입니다.
    ContentType: 'image/*'
  };
  s3.getSignedUrl("putObject", params, function(err, url){
    if(err) return callback(err);
    callback(null,{
      statusCode: 200,
      headers:{'Access-Control-Allow-Origin':'*'},
      body: url //생성 된 presigned URL을 프론트로 보냄
    });
  });
};
https://docs.aws.amazon.com/AWSJavaScriptSDK/latest/AWS/S3.html#putObject-property
putObject의 파라미터들은 링크를 참고해주세요.
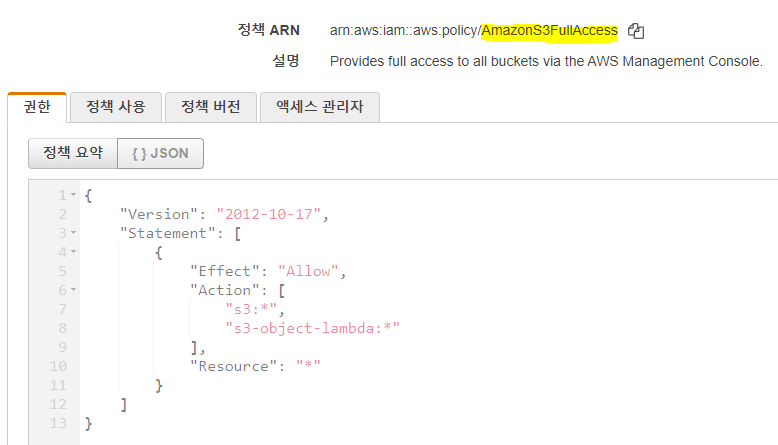
S3에 접근하려는 IAM 사용자에 S3접근 권한을 추가해주어야 합니다.
3. S3로 이미지 업로드
전송하려는 이미지 파일

//apis/request.ts
import axios from 'axios';
export function createPresinedURL(file: File) {
    axios
      .post('API gateway의 배포 스테이지 URL', {filename: file.name})
      .then((response) => {
            const presignedUrl = response.data;
            console.log(presignedUrl);
            uploadImageToS3(presignedUrl, file);
        })
      .catch((error) => console.error(error));
}

function uploadImageToS3(url: string, file: File) {
    axios
        .put(url, file)
        .then((response) => console.log(response))
        .catch((error) => console.error(error));
}
생성된 presigned URL로 파일을 전송합니다.
이때 반드시 put요청으로 보내야 합니다.
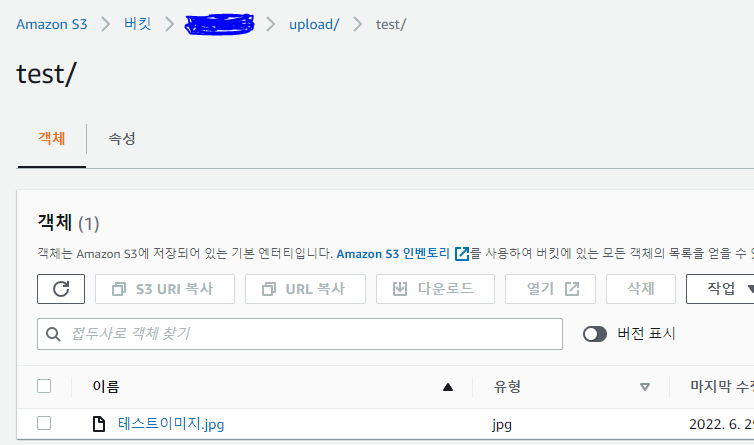 업로드 한 이미지 파일의 이름으로 s3에 저장된 것을 확인 할 수 있습니다.
 S3에 이미지가 저장되고 나면 위 이미지와 같이 response가 돌아옵니다.
마치며
다음 포스팅은 putObject의 파라미터 중 metadata나 tagging을 이용하여 S3로 파일 업로드 완료 후 응답에 받고 싶은 정보를 넣어 추출한 과정을 설명할 예정입니다.