코드카타 (26.02.10)
캐스팅
class Solution {
    public int solution(int num1, int num2) {
        // 나누기 전에 형 변환을 해서 실수 나눗셈이 되게
        return (int) ((double) num1/num2 * 1000);
    }
}
class Solution {
public double solution(int[] numbers) {
int sum = 0;
for(int x : numbers){
sum += x;
}
return (double)sum / numbers.length;
}
}1️⃣ 기본 원칙
👉 작은 타입 → 큰 타입 : 자동
👉 큰 타입 → 작은 타입 : 강제 캐스팅
2️⃣ 숫자 타입 크기 순서 (중요 ⭐)
byte → short → int → long → float → double
	• 왼쪽 → 오른쪽 : 자동 형 변환 (업캐스팅)
	• 오른쪽 → 왼쪽 : 강제 형 변환 (다운캐스팅)
3️⃣ 자동 형 변환 (업캐스팅)
int a = 10;
double b = a;   // OK
✔️ 데이터 손실 가능성 없음
4️⃣ 강제 형 변환 (다운캐스팅)
double a = 3.14;
int b = (int) a;  // 3
✔️ 소수점 버림
⚠️ 데이터 손실 가능
5️⃣ 연산 전에 타입이 먼저 결정됨
예제 ❌

int a = 10;
int b = 3;
double result = a / b; // 3.0 ❌
왜?
	• a / b → int / int → 결과 int 3
	• 그 다음 3 → 3.0
예제 ✅
double result = (double) a / b; // 3.333...
• (double)a → double / int
• int가 double로 자동 변환
• 결과 double6️⃣ 캐스팅 위치에 따른 차이
(double)(a / b)   // ❌ 이미 늦음 → 3.0
(double)a / b     // ✅ 3.333...
👉 나누기 전에 캐스팅해야 의미 있음
switch 문
class Solution {
    public int solution(int angle) {
        switch (angle){
        case 90: return 2;
        case 180: return 4;
        }
        if(angle < 90) return 1;
        else return 3;
    }
}
정해진 값에 따라 분기 할 때 : switch문
값에 대한 판별이 필요할 때 : if문
숙련주차 강의
필터
Web 애플리케이션에서 관리되는 웹 요청 처리 흐름의 앞단에 위치한 구성 요소로
Client 요청이 DispatcherServlet에 도달하기 전과
응답이 Client로 반환되기 전에 동작한다.
이를 통해 요청(Request)과 응답(Response)을 가로채
정보를 변경하거나 공통적인 부가 기능을 수행할 수 있다.
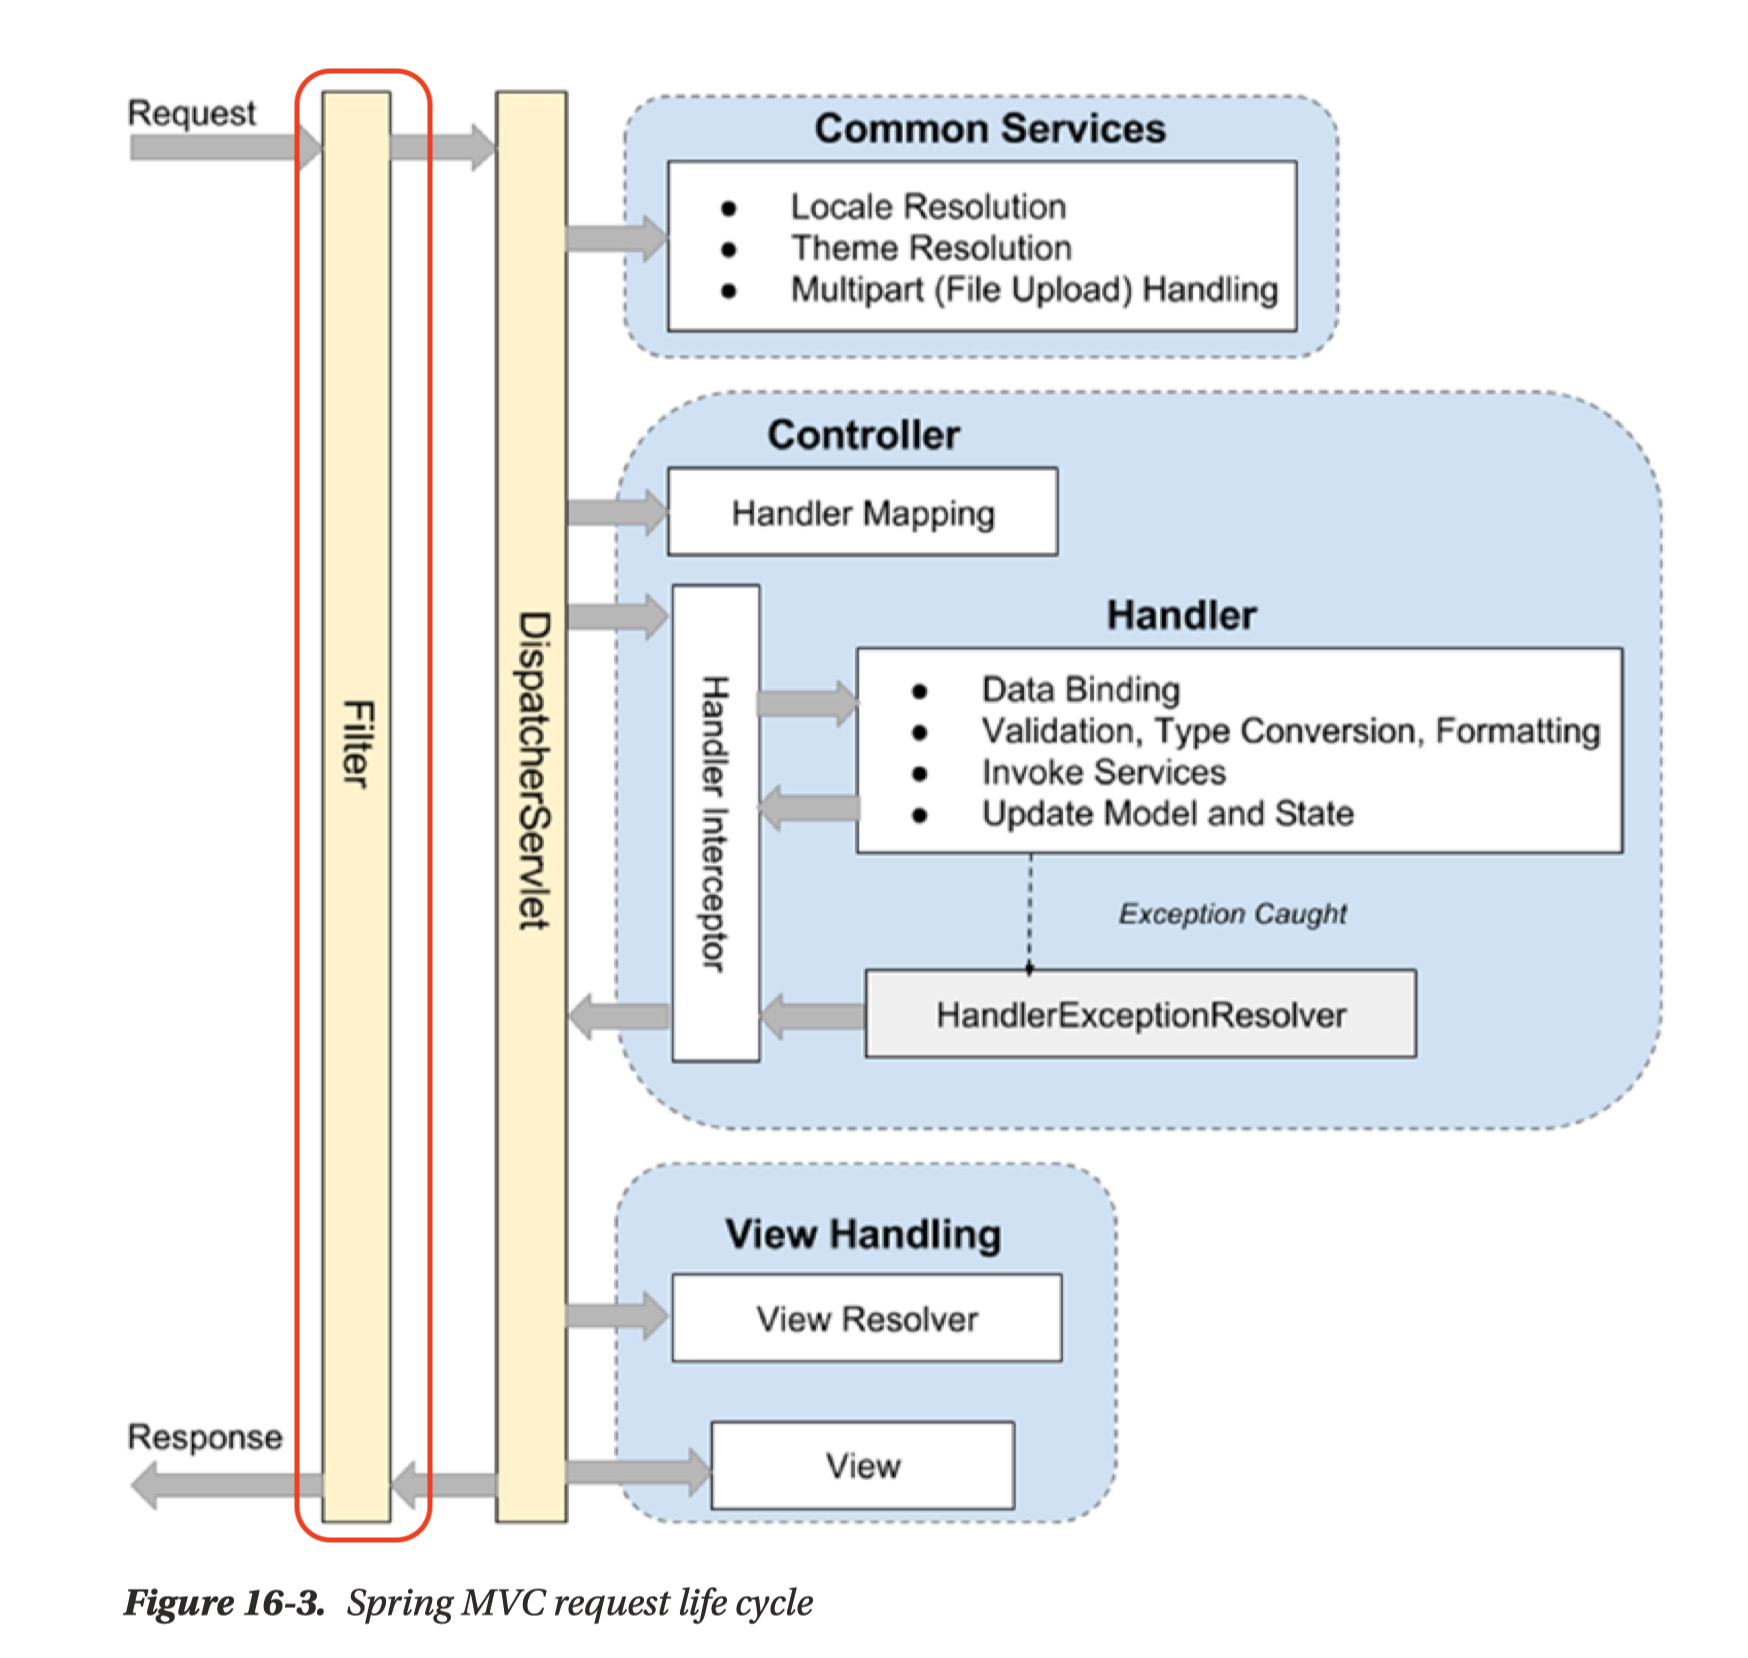
주로 애플리케이션 전반에 공통으로 적용되어야 하는 작업,
예를 들어 로깅, 보안 처리, 인증(Authentication), 인가(Authorization) 등의 기능을 처리하는 데 사용된다.
Filter를 사용하면 인증·인가와 같은 공통 관심사를
비즈니스 로직과 분리하여 관리할 수 있다는 장점이 있다.
단, DispatcherServlet 이전 단계에서 동작하기 때문에
Spring MVC에서 제공하는 컨트롤러 관련 객체나 어노테이션은
Filter 내부에서 사용할 수 없다.
필터 사용하기
Filter 인터페이스 구현체에서 doFilter를 오버라이딩해 필터 동작을 넣는다.
로깅 필터
@Slf4j(topic = "LoggingFilter")
@Component
@Order(1)
public class LoggingFilter implements Filter {
    @Override
    public void doFilter(ServletRequest request, ServletResponse response, FilterChain chain) throws IOException, ServletException {
        // 전처리
        HttpServletRequest httpServletRequest = (HttpServletRequest) request;
        String url = httpServletRequest.getRequestURI();
        log.info(url);

        chain.doFilter(request, response); // 다음 Filter 로 이동

        // 후처리
        log.info("비즈니스 로직 완료");
    }
}
@Slf4j(topic = "로깅 제목")
@Order(N) : 숫자가 작을수록 먼저 실행되며, 필터 체인의 실행 순서를 지정한다.
JWT 토큰 처리
AuthFilter에서 request에 저장한 user 객체를 Controller에서 HttpServletRequest를 통해 꺼내 사용할 수 있다.
 @GetMapping("/products")
    public String getProducts(HttpServletRequest req) {
        System.out.println("ProductController.getProducts : 인증 완료");
        User user = (User) req.getAttribute("user");
        System.out.println("user.getUsername() = " + user.getUsername());

        return "redirect:/";
    }
Filter는 ServletRequest 타입으로 들어오기 때문에 HttpServletRequest로 캐스팅해서 사용한다.
@Slf4j(topic = "AuthFilter")
@Component
@Order(2)
public class AuthFilter implements Filter {

    private final UserRepository userRepository;
    private final JwtUtil jwtUtil;

    public AuthFilter(UserRepository userRepository, JwtUtil jwtUtil) {
        this.userRepository = userRepository;
        this.jwtUtil = jwtUtil;
    }

    @Override
    public void doFilter(ServletRequest request, ServletResponse response, FilterChain chain) throws IOException, ServletException {
        HttpServletRequest httpServletRequest = (HttpServletRequest) request;
        String url = httpServletRequest.getRequestURI();
		// 회원가입, 로그인 API 및 정적 리소스 요청은 인증 없이 통과시키고, 그 외 요청에 대해서만 JWT 인증을 수행한다.
        if (StringUtils.hasText(url) &&
                (url.startsWith("/api/user") || url.startsWith("/css") || url.startsWith("/js"))
        ) {
            // 회원가입, 로그인 관련 API 는 인증 필요없이 요청 진행
            chain.doFilter(request, response); // 다음 Filter 로 이동
        } else {
            // 나머지 API 요청은 인증 처리 진행
            // 토큰 확인
            String tokenValue = jwtUtil.getTokenFromRequest(httpServletRequest);

            if (StringUtils.hasText(tokenValue)) { // 토큰이 존재하면 검증 시작
                // JWT 토큰 substring
                String token = jwtUtil.substringToken(tokenValue); // Bearer

                // 토큰 검증
                if (!jwtUtil.validateToken(token)) {
                    throw new IllegalArgumentException("Token Error");
                }

                // 토큰에서 사용자 정보 가져오기
                Claims info = jwtUtil.getUserInfoFromToken(token);

                // 토큰의 해당 유저가 존재하는지 확인
                User user = userRepository.findByUsername(info.getSubject()).orElseThrow(() ->
                        new NullPointerException("Not Found User")
                );
                // Controller로 넘어가는 request에 user 객체 전달
                request.setAttribute("user", user);
                chain.doFilter(request, response); // 다음 Filter 로 이동
            } else {
                throw new IllegalArgumentException("Not Found Token");
            } // 실제 서비스에서는 예외를 던지기보다 HttpServletResponse를 이용해 상태 코드(401, 403)를 직접 반환하는 방식이 권장된다.
        }
    }

}
Spring Security
'Spring Security' 프레임워크는 Spring 서버에 필요한 인증 및 인가를 위해 많은 기능을 제공해 줌으로써 개발의 수고를 덜어 준다.
// @SpringBootApplication(@SpringBootApplication(exclude = SecurityAutoConfiguration.class))
@SpringBootApplication
public class SpringAuthApplication {

	public static void main(String[] args) {
		SpringApplication.run(SpringAuthApplication.class, args);
	}

}
security config
HttpSecurity 객체를 통해 웹 요청에 대한 보안 정책(인증·인가, 로그인 방식, CSRF 등) 을 설정할 수 있다.
SecurityFilterChain Bean을 등록하면 Spring Security가 해당 설정을 기반으로 보안 필터 체인을 구성해준다.
package com.sparta.springauth.config;

import org.springframework.boot.autoconfigure.security.servlet.PathRequest;
import org.springframework.context.annotation.Bean;
import org.springframework.context.annotation.Configuration;
import org.springframework.security.config.Customizer;
import org.springframework.security.config.annotation.web.builders.HttpSecurity;
import org.springframework.security.config.annotation.web.configuration.EnableWebSecurity;
import org.springframework.security.web.SecurityFilterChain;

@Configuration
@EnableWebSecurity // Spring Security 지원을 가능하게 함
public class WebSecurityConfig {

    @Bean
    public SecurityFilterChain securityFilterChain(HttpSecurity http) throws Exception {
        // CSRF 비활성화
        http.csrf((csrf) -> csrf.disable());
		// 요청별 인가 설정
        http.authorizeHttpRequests((authorizeHttpRequests) ->
                authorizeHttpRequests
                        .requestMatchers(PathRequest.toStaticResources().atCommonLocations()).permitAll() // resources 접근 허용 설정
                        .anyRequest().authenticated() // 그 외 모든 요청 인증처리
        );

        // 기본 로그인 폼 사용
        http.formLogin(Customizer.withDefaults());

        return http.build();
    }
}
@EnableWebSecurity
Spring Security의 웹 보안 기능을 활성화하는 애노테이션이다.
내부적으로 SecurityFilterChain을 등록하고, HttpSecurity 설정이 실제 Filter 기반 보안 로직으로 동작할 수 있도록 해준다.
Spring Boot 3.x 이상에서는 SecurityFilterChain Bean이 있으면 자동으로 필터 체인 등록되지만,
보안 설정을 직접 구성할 때는 명시적으로 사용하는 것이 일반적이다.
CSRF(사이트 간 요청 위조, Cross-site request forgery)
CSRF protection 비활성화 하기:
http.csrf((csrf) -> csrf.disable());CSRF란 사용자가 의도하지 않았음에도,
브라우저에 저장된 쿠키의 세션 정보를 활용하여
웹 서버에 사용자가 의도하지 않은 요청을 전달하는 공격이다.
공격자는 사용자의 인증 정보를 직접 알 필요 없이,
이미 로그인된 브라우저를 이용해 요청을 위조한다.
쿠키 기반 인증 방식(세션 로그인)에서 주로 문제가 된다.
REST API는 보통 세션이 아닌 JWT, Authorization 헤더 기반 인증을 사용한다.
쿠키를 사용하지 않는다면 CSRF 공격 자체가 성립하지 않기 때문에
CSRF 보호를 비활성화해도 문제가 없다.
CSRF 보호가 활성화된 경우
서버는 요청마다 (HTML form이나 AJAX 요청 포함)
CSRF 토큰 값을 함께 전달해야 요청이 정상 처리된다.
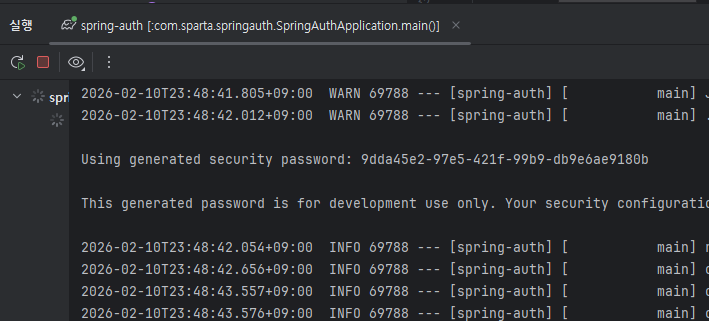
Spring Security의 default 로그인 기능 (FormLogin 기반 인증)
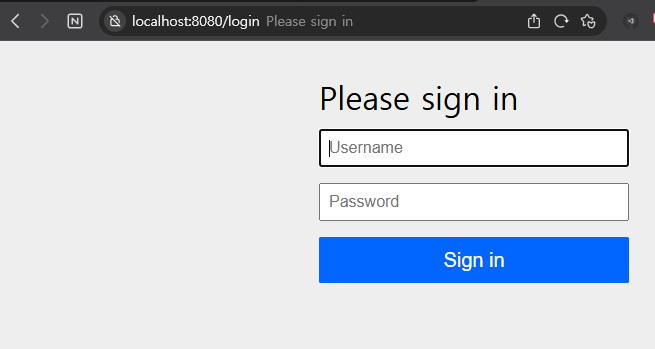
아이디 user와
애플리케이션 실행시 발행되는 비밀번호로 로그인 할 수 있다.
로그인시 세션이 생성되고 설정해 둔 대로 인가가 필요한 페이지에서 로그인된 세션이 발견되지 않으면 403으로 다시 /login 경로로 리다이렉트 한다.
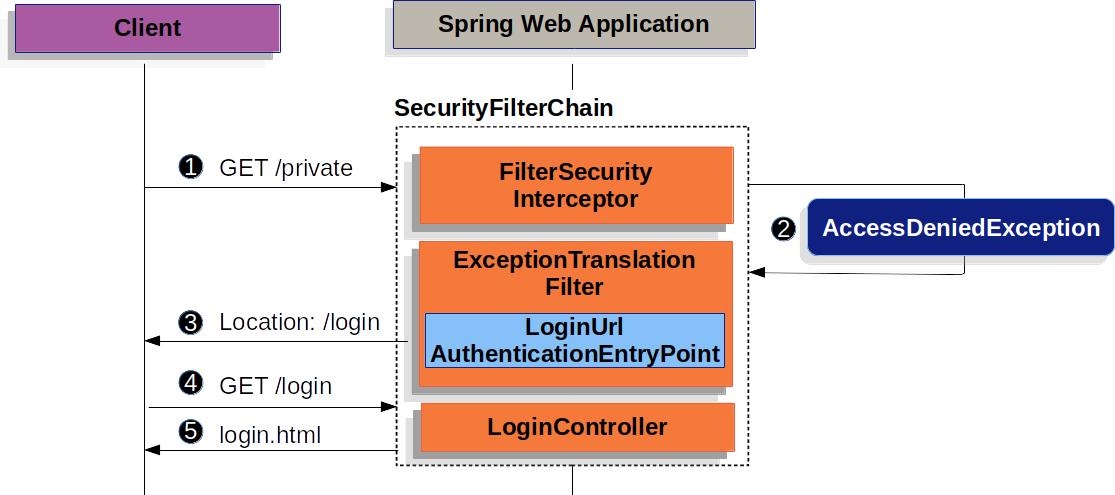
SpringSecurity와 Filter
Spring Security는 인증(Authentication)과 인가(Authorization) 를 처리하기 위해
Servlet Filter 기반 구조를 사용한다.
실제로는 여러 개의 보안 필터들이 체인 형태로 동작한다.

이 필터 체인을 관리하는 핵심 컴포넌트가 FilterChainProxy 이다.
HttpSecurity로 설정한 내용은 Security Filter Chain의 동작 방식을 정의하는 것이다.
HttpSecurity 설정
→ SecurityFilterChain 생성
→ FilterChainProxy가 요청을 필터 체인으로 전달
→ 인증 / 인가 처리
실습 예제에서 작성한 Filter가 Security Filter Chain 과정에 방해가 될 수 있기 때문에 Bean을 생성하는 @Component 애노테이션을 주석 처리한다.
UsernamePasswordAuthenticationFilter
UsernamePasswordAuthenticationFilter는 Spring Security의 AbstractAuthenticationProcessingFilter를 상속한 Filter이다.
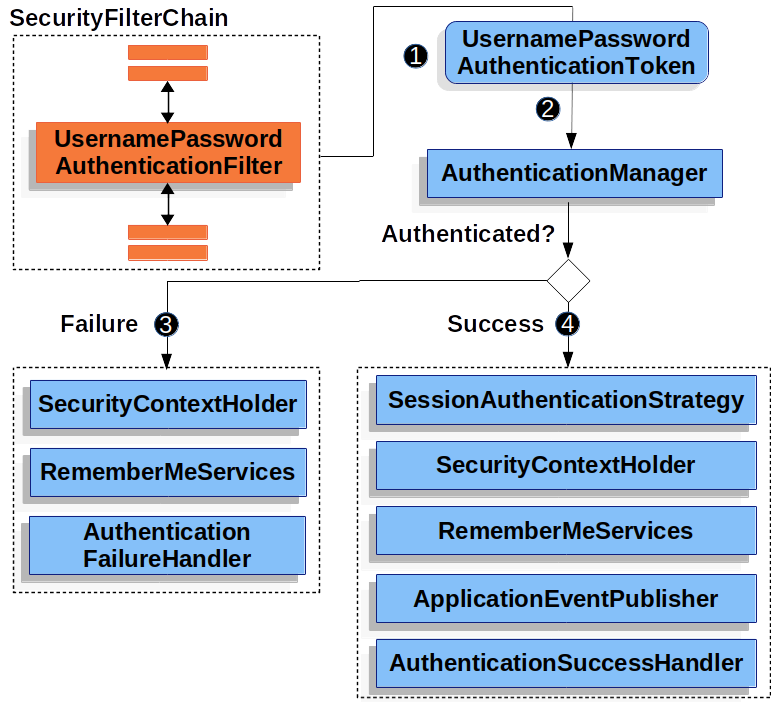
1. 사용자가 username과 password를 제출
2. UsernamePasswordAuthenticationFilter가 인증된 사용자의 정보가 담긴 인증 객체인  UsernamePasswordAuthenticationToken을 만들어 (Authentication의 종류 중 하나)
3. AuthenticationManager에게 넘겨 인증을 시도
4. 실패하면 SecurityContextHolder를 비우기
4. 성공하면 SecurityContextHolder에 Authentication를 세팅
SecurityContextHolder
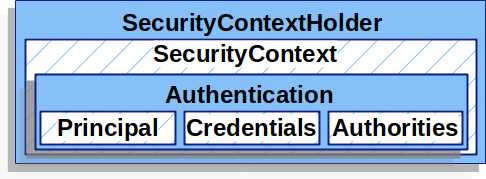
SecurityContextHolder 로 접근
|
SecurityContext
|
인증이 완료된 사용자의 상세 정보(Authentication)를 저장
// 예시코드
SecurityContext context = SecurityContextHolder.createEmptyContext();
Authentication authentication = new UsernamePasswordAuthenticationToken(principal, credentials, authorities);
context.setAuthentication(authentication); // SecurityContext 에 인증 객체 Authentication 를 저장합니다.
SecurityContextHolder.setContext(context);-
principal: 사용자를 식별합니다.
Username/Password 방식으로 인증할 때는 일반적으로UserDetails인스턴스 -
credentials: 주로 비밀번호, (대부분 사용자 인증에 사용한 후 비운다.) -
authorities: 사용자에게 부여한 권한을GrantedAuthority로 추상화해 사용한다. (권한에 따른 인가) -
<UserDetails>
@Override
public Collection<? extends GrantedAuthority> getAuthorities() {
    UserRoleEnum role = user.getRole();
    String authority = role.getAuthority();

    SimpleGrantedAuthority simpleGrantedAuthority = new SimpleGrantedAuthority(authority);
    Collection<GrantedAuthority> authorities = new ArrayList<>();
    authorities.add(simpleGrantedAuthority);

    return authorities;
}
Authentication authentication = new UsernamePasswordAuthenticationToken(userDetails, null, userDetails.getAuthorities());
UserDetailsService username/password 인증방식을 사용할 때 사용자를 조회하고 검증한 후 UserDetails를 반환, Custom하여 Bean으로 등록 후 사용 가능하다.
최대한 문장을 적으며 이해해보려고 했지만
UsernamePasswordAuthenticationFilter 구현체 설명부터 제대로 이해가 안됐다🥲
강사님은 실습을 하다보면 이해가 갈 거라며 걱정하지 말라하셨으니 일단 믿어보기로...😭