
Next.js의 App Router를 사용하여 다국어 웹사이트를 개발할 때 next-intl은 매우 유용한 라이브러리입니다. 이 글에서는 next-intl을 설치하고 구성하는 방법부터 실제 사용 예시까지 자세히 살펴보겠습니다.
next-intl 설치 및 폴더 구조
설치
// npm
npm install next-intl

// yarn
yarn add next-intl

// pnpm
pnpm add next-intl
사용하시는 패키지 매니저에 맞게 next-intl를 설치합니다.
폴더 구조
다음은 next-intl을 사용하기 위한 권장 폴더 구조입니다.
├── messages
│   ├── ko.json
│   ├── en.json
│   └── ...
├── next.config.ts
└── src
    ├── i18n
    │   ├── routing.ts    # 라우팅 설정
    │   ├── navigation.ts # 네비게이션 유틸리티
    │   └── request.ts    # 서버 요청 관련 유틸리티
    ├── middleware.ts     # 언어 감지 및 리다이렉션
    └── app
        └── [locale]      # 동적 경로 세그먼트로 언어 코드를 받음
            ├── layout.tsx
            ├── page.tsx
            └── YOUR_PAGE_PATH
                └── page.tsx
설정
기본 JSON 파일
언어별 번역 파일을 JSON 파일에 설정합니다.
// ko
{
  "fetchError": "데이터를 불러오는데 실패했습니다.",
  "noSearchResults": "검색 결과가 없습니다",
}
// en
{
"fetchError": "Failed to fetch data.",
"noSearchResults": "No search results found",
}Next.js 설정
// next.config.ts
import type { NextConfig } from 'next';
import createNextIntlPlugin from 'next-intl/plugin';

const nextConfig: NextConfig = {};

const withNextIntl = createNextIntlPlugin();

export default withNextIntl(nextConfig);
i18n 디렉토리 설정
src/i18n/routing.ts
이 파일은 지원하는 로케일과 기본 로케일을 설정합니다,
import {defineRouting} from 'next-intl/routing';

export const routing = defineRouting({
  // A list of all locales that are supported
  locales: ['en', 'de'],

  // Used when no locale matches
  defaultLocale: 'en'
});
src/i18n/navigation.ts
이 파일은 클라이언트 컴포넌트에서 사용할 네비게이션 유틸리티를 제공합니다.
import {createNavigation} from 'next-intl/navigation';
import {routing} from './routing';

export const {Link, redirect, usePathname, useRouter, getPathname} =
  createNavigation(routing);
src/request.ts
서버 컴포넌트에서 번역을 가져오는 방법을 제공합니다
import {getRequestConfig} from 'next-intl/server';
import {hasLocale} from 'next-intl';
import {routing} from './routing';

export default getRequestConfig(async ({requestLocale}) => {
  const requested = await requestLocale;
  const locale = hasLocale(routing.locales, requested)
    ? requested
    : routing.defaultLocale;

  return {
    locale,
    messages: (await import(`../../messages/${locale}.json`)).default
  };
});
src/middleware.ts
미들웨어는 사용자의 요청을 인터셉트하여 로케일을 확인하고 필요시 리다이렉션합니다.
import createMiddleware from 'next-intl/middleware';
import {routing} from './i18n/routing';

export default createMiddleware(routing);

export const config = {
  // Match all pathnames except for
  // - … if they start with `/api`, `/trpc`, `/_next` or `/_vercel`
  // - … the ones containing a dot (e.g. `favicon.ico`)
  matcher: '/((?!api|trpc|_next|_vercel|.*\\..*).*)'
};
사용 예시
src/app/[locale]/layout.tsx
루트 레이아웃에서 next-intl의 NextIntlClientProvider를 설정합니다.
import { NextIntlClientProvider } from 'next-intl';
import { getMessages } from 'next-intl/server';

export async function generateStaticParams() {
  return ['en', 'ko', 'zh'].map(locale => ({ locale }));
}

export default async function LocaleLayout({
  children,
  params,
}: {
  children: React.ReactNode;
  params: Promise<{ locale: string }>;
}) {
  const resolvedParams = await params;
  const locale = resolvedParams.locale;
  const messages = await getMessages({ locale });

  return (
    <NextIntlClientProvider locale={locale} messages={messages}>
      {children}
    </NextIntlClientProvider>
  );
}
generateStaticParams 함수는 빌드 시 지원할 언어 목록을 정적으로 생성합니다. 여기서는 영어(en), 한국어(ko), 중국어(zh)를 지원하도록 설정했습니다.
src/app/[locale]/page.tsx
'use client';

import { useState, useEffect } from 'react';
import { useTranslations } from 'next-intl';
import { useParams } from 'next/navigation';


const HistoricSite = () => {
  const t = useTranslations();
  const { locale } = useParams();

  return (
    <div className="container mx-auto px-4 py-8">
        <div className="text-center py-8 text-gray-500">{t('noSearchResults')}</div>
    </div>
  );
};

export default HistoricSite;
위 JSON 파일에 작성된
noSearchResults제외 다른 코드들은 지웠습니다.
이 예시에서는 useTranslations 훅을 사용하여 현재 활성화된 언어의 번역을 가져옵니다.
위와 같이 구현하면 기존 domain/HistoricSite URL이 이제 domain/ko/HistoricSite 또는 domain/en/HistoricSite와 같이 로케일 경로가 포함된 형태로 변경됩니다.
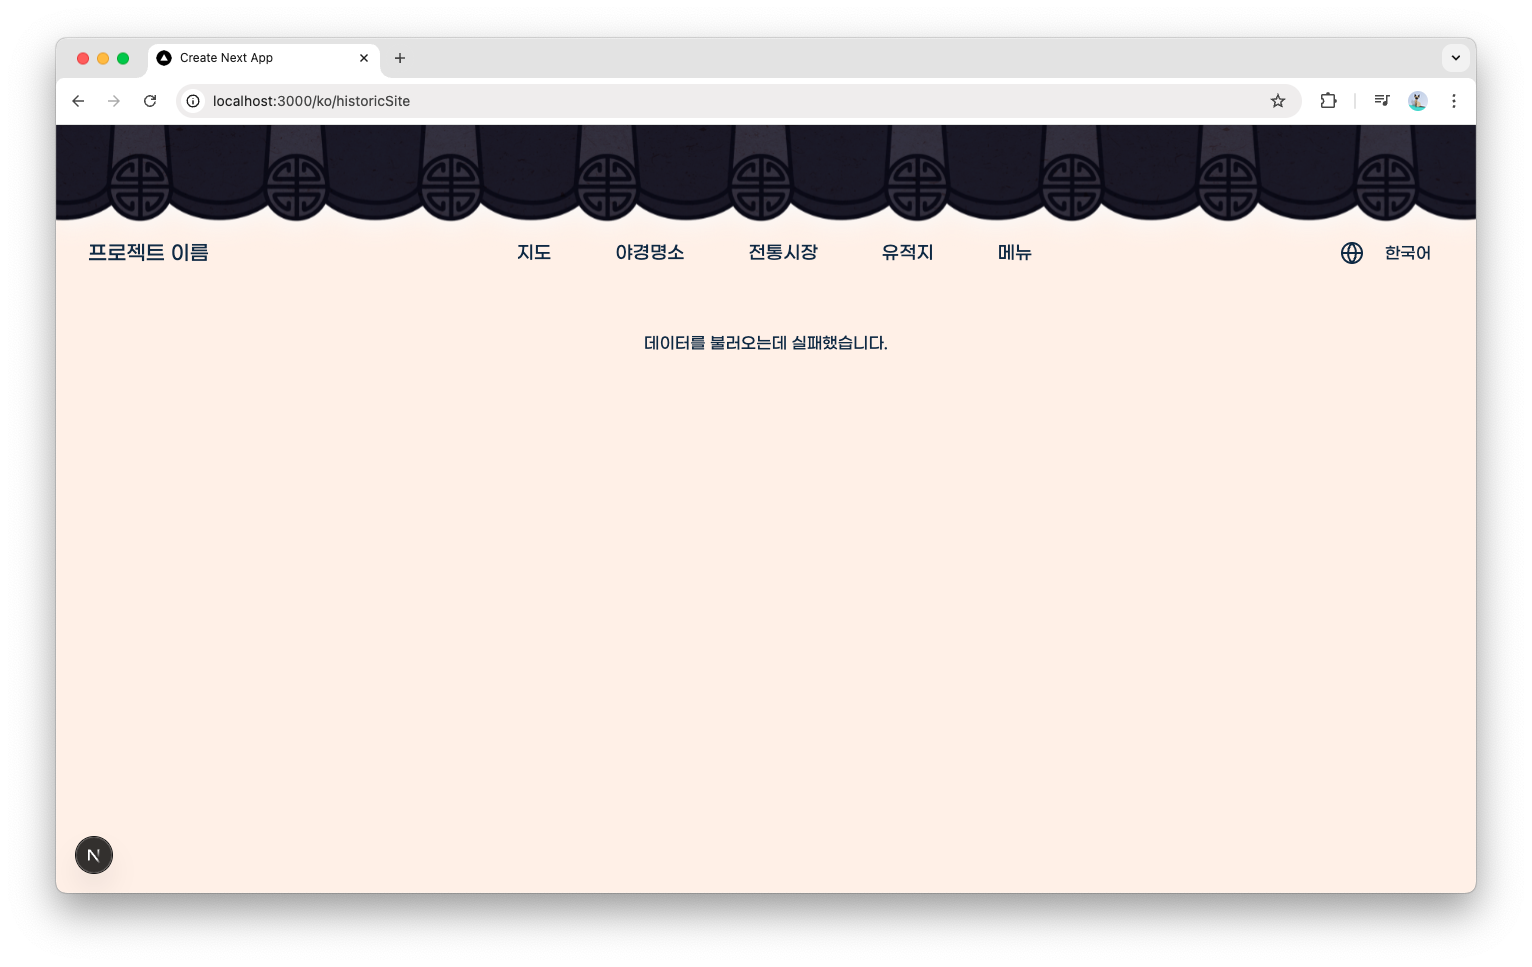
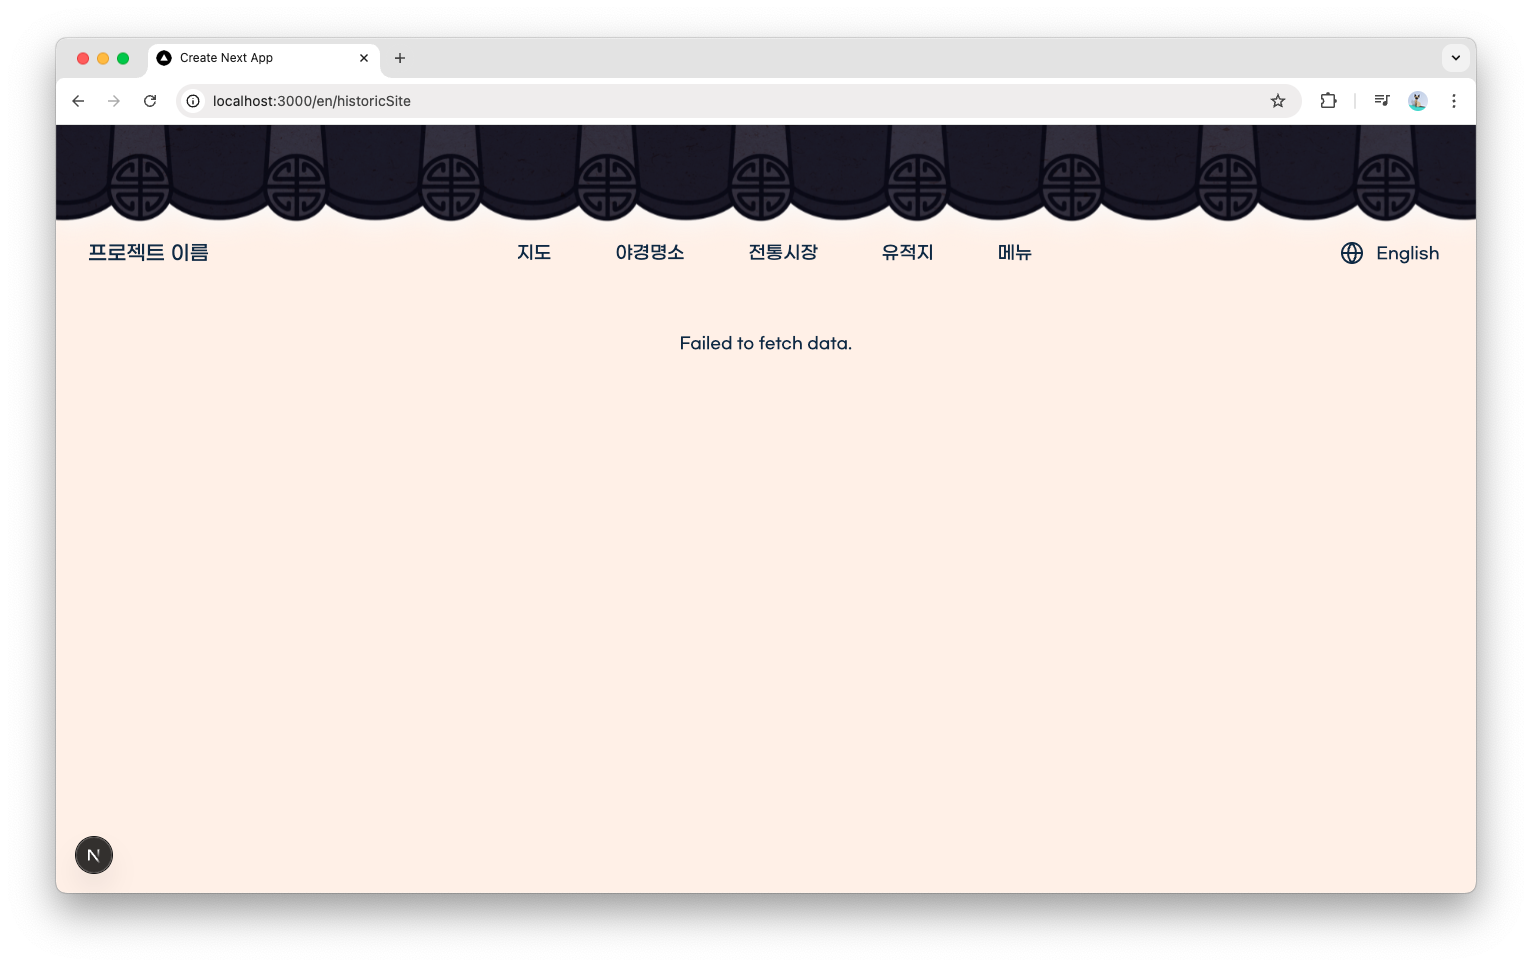
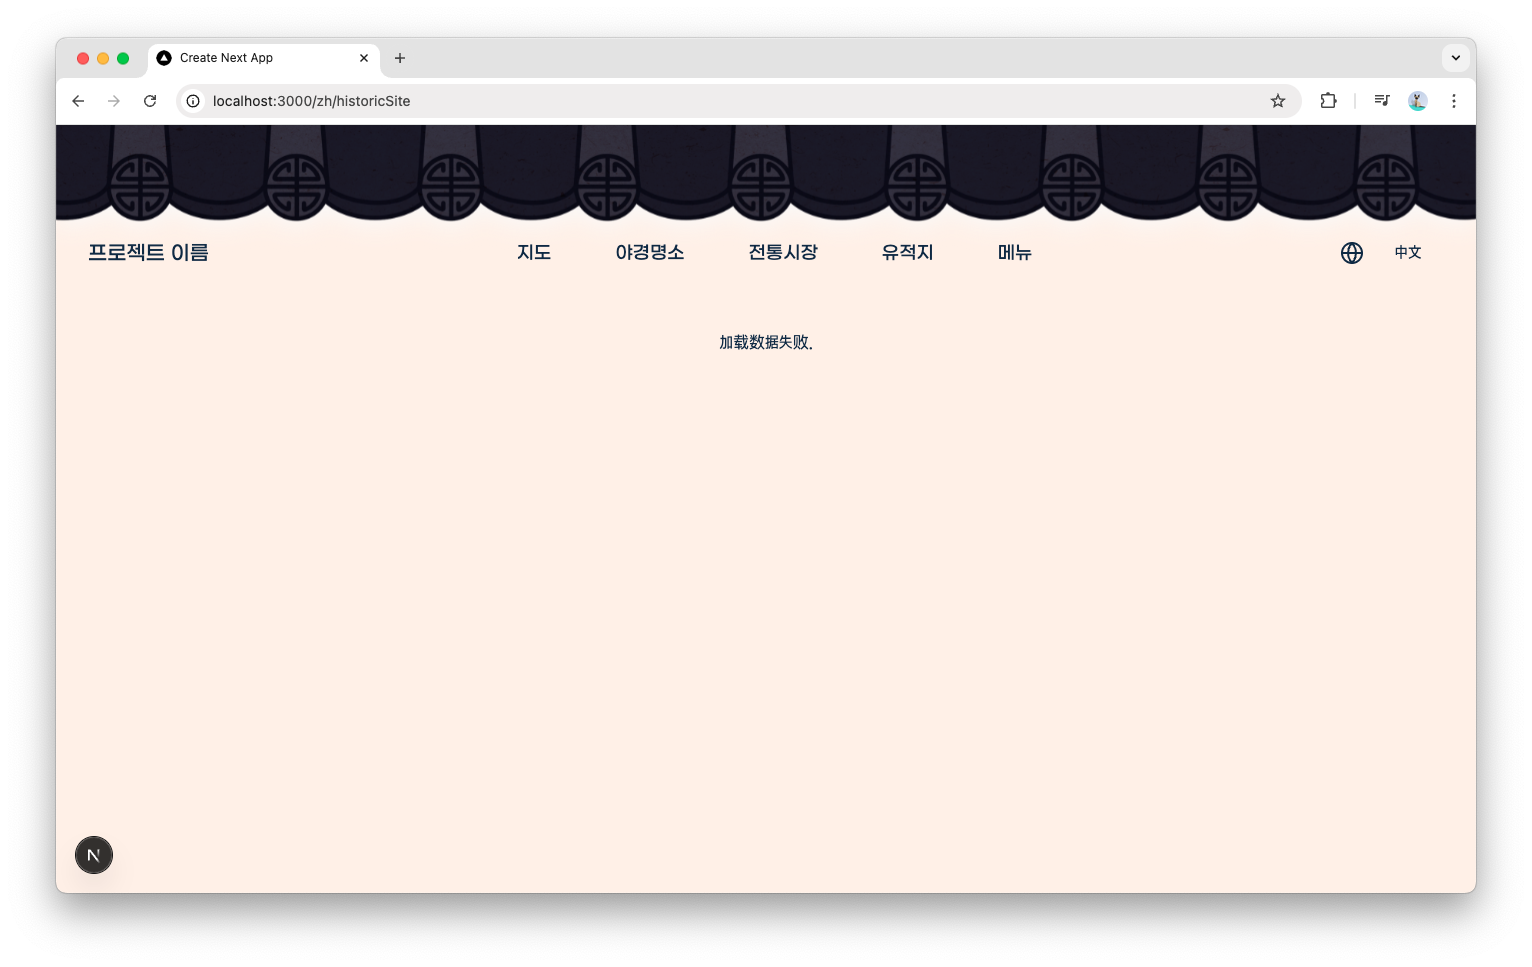
저는 사진 우측상단 드롭다운을 통해 [locales]를 변경했습니다.
결론
next-intl은 Next.js App Router에서 다국어 지원을 구현하는 데 강력한 도구입니다. 기본적인 번역부터 날짜/시간 포맷팅, 복수형 처리까지 다양한 국제화 기능을 제공합니다.
useParams를 사용하여 현재 로케일 정보를 가져오고, useTranslations를 통해 해당 언어의 번역 텍스트를 렌더링함으로써 사용자에게 친숙한 언어로 콘텐츠를 제공할 수 있습니다.
✅ 참고

이 포스트를 통해 꼭 저도 다국어 처리를 해 보겠습니다!