ingress?
http나 https를 통해 클러스터 내부의 서비스를 외부로 노출한다.
기능
- service 외부 URL 제공
- 트래픽 로드밸런싱
- SSL 인증서 처리
- virtual hosting을 지정
동작방식
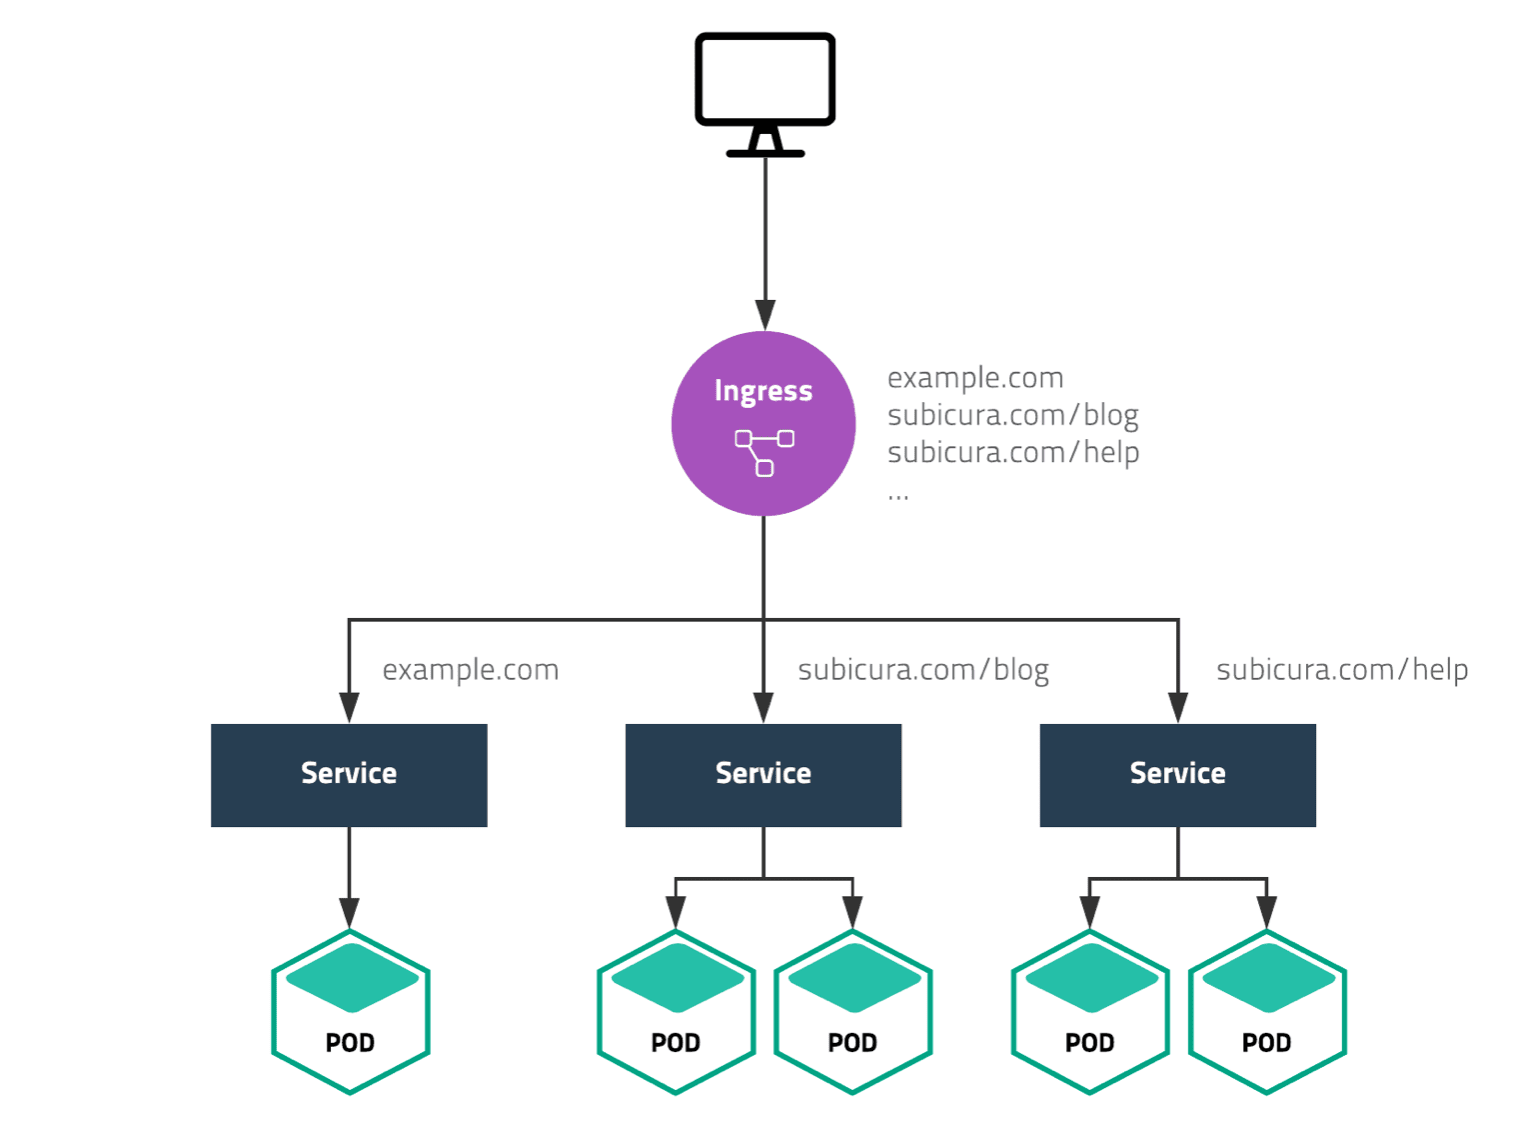
모든 커넥션은 ingress controller pod로 들어오고 ingress rules에 따라 각 서비스로 연결
ingress controller 설치
우리는 nginx ingress controller사용해보자
난 퍼블릭 클라우드 아니라서 bare-metal 사용
wget https://raw.githubusercontent.com/kubernetes/ingress-nginx/controller-v1.8.2/deploy/static/provider/baremetal/deploy.yaml
kubectl create -f deploy.yaml
or
kubectl apply -f https://raw.githubusercontent.com/kubernetes/ingress-nginx/controller-v1.8.2/deploy/static/provider/baremetal/deploy.yaml
kubectl get pod -n ingress-nginx
kubectl get svc -n ingress-nginx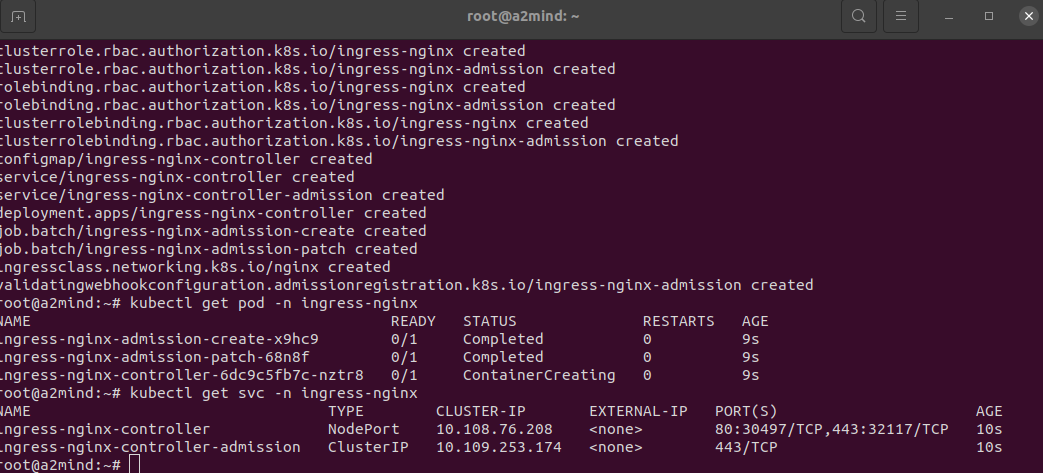
label
node를 포함하여 pod, deployment 등 모든 리소스에 할당하는것으로 리소스의 특성을 분류하고, selector를 이용해서 선택한다.
key - value 한쌍으로 적용.
# label
"metadata": {
  "labels": {
    "key1" : "value1",
    "key2" : "value2"
  }
}
# label 예시
"release" : "stable", "release" : "canary"
"environment" : "dev", "environment" : "qa", "environment" : "production"
"tier" : "frontend", "tier" : "backend", "tier" : "cache"
"partition" : "customerA", "partition" : "customerB"
"track" : "daily", "track" : "weekly"

#selector
selector:
  matchLabels:
		key: value
    component: redis
  matchExpressions:
    - {key: tier, operator: In, values: [cache]}
- {key: environment, operator: NotIn, values: [dev]}apiVersion: v1
kind: Pod
metadata:
name: label-demo
labels:
environment: production
app: nginx
spec:
containers:
- name: nginx
image: nginx:1.14.2
ports:
- containerPort: 80kubectl get pods --show-labels
kubectl get pods -l key=value
kubectl get pods --selector key=value
kubectl label pod [pod name] key=value
# 이미 라벨을 붙여준거면 맨 뒤에 --overwrite 붙여준다.
# 해당 라벨 삭제하는
kubectl label pod [pod name] key-node label
node에 label해서 원하는 노드에 파드를 배치할 수 있다.
kubectl label nodes [node 이름] key=valueapiVersion: v1
kind: Pod
metadata:
name: label-demo
labels:
environment: production
app: nginx
spec:
containers:
- name: nginx
image: nginx:1.14.2
ports:
- containerPort: 80
nodeSelector:
key: value
key: valuekubectl get nodes -L disk,gpuAnnotation
metadata안에 넣어주면 된다.
label과 동일하게 key-value를 통해 리소스의 특성을 기록
- 쿠버네티스에게 특정 정보를 전달할 용도로 사용
ex) rolling update할때 정보 기록
annotations:
kubernetes.io/change-cause: version 1.15
- 관리를 위해 필요한 정보를 기록할 용도로 사용
ex) 릴리즈, 로깅, 모니터링에 필요한 정보들을 기록
annotations:
builder: “minseo kim”
buildDate: “20240130”
imageRegistry: https://..
apiVersion: v1
kind: Pod
metadata:
name: pod-annotation
annotations:
builder: “minseo kim”
buildDate: “20240130”
imageRegistry: https://hub.docker.com/
spec:
containers:
- name: nginx
image: nginx:1.14
ports:
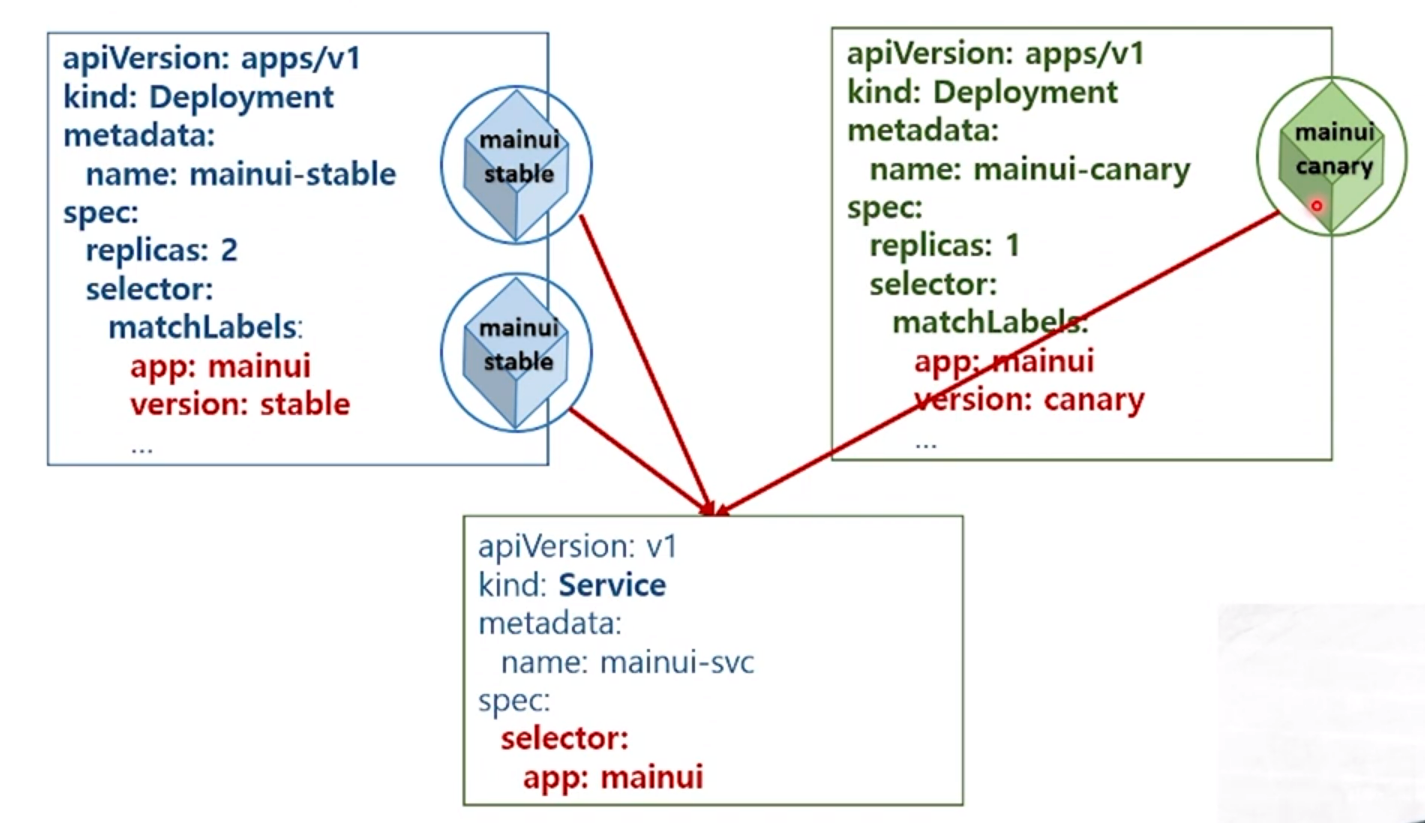
- containerPort: 80카나리 배포
기존 버전을 유지한 채로 일부 버전만 신규 버전으로 올려서 신규 버전에 버그나 이상은 없는지 확인하는 배포 방법
apiVersion: apps/v1
kind: Deployment
metadata:
  name: mainui-canary
spec:
  replicas: 1
  selector:
    matchLabels:
      app: mainui
      version: canary
  template:
    metadata:
      labels:
        app: mainui
        version: canary
    spec:
      containers:
      - name: mainui
        image: nginx:1.15
        ports:
        - containerPort: 80
apiVersion: apps/v1
kind: Deployment
metadata:
name: mainui-stable
spec:
replicas: 2
selector:
matchLabels:
app: mainui
version: stable
template:
metadata:
labels:
app: mainui
version: stable
spec:
containers:
- name: mainui
image: nginx:1.14
ports:
- containerPort: 80apiVersion: v1
kind: Service
metadata:
name: mainui-svc
spec:
selector:
app: mainui
ports:
- port: 8080
protocol: TCP
targetPort: 8080label이 mainui인 것을 단일 진입점으로 묶어주는 서비스를 생성해야함.
replicas수를 조절하거나 deploy를 없애거나 생성하면서 안정적으로 배포 가능
configmap
컨테이너 구성 정보를 한곳에 모아서 관리
kubexctl create configmap NAME [--from-file=source] [--from-literal=key=value]

# ex)
kubectl create configmap test_configmap --from-literal=id=minseo --from-literal=class=bigdata
kubectl create configmap test_configmap --from-file=mydata=test.fileapiVersion: v1
kind: Pod
metadata:
name: genid-stone
spec:
containers:
- image: smlinux/genid:env
env:
- name: INTERVAL
valueFrom:
configMapKeyRef:
name: ttabae-config
key: INTERVAL
name: fakeid
volumeMounts:
- name: html
mountPath: /webdata
- image: nginx:1.14
name: web-server
volumeMounts:
- name: html
mountPath: /usr/share/nginx/html
readOnly: true
ports:
- containerPort: 80
volumes:
- name: html
emptyDir: {}이런식으로 env 즉 환경변수 설정을 하면
configmap에 있는 Interval 값으로 설정된다.
실습
[Dockerfile]
FROM ubuntu:18.04
RUN apt-get update ; apt-get -y install rig boxes
ENV INTERVAL 5
ENV OPTION stone
ADD genid.sh /bin/genid.sh
RUN chmod +x /bin/genid.sh
ENTRYPOINT ["/bin/genid.sh"]
[genid.sh]
#!/bin/bash
mkdir -p /webdata
while true
do
  /usr/bin/rig | /usr/bin/boxes -d $OPTION  > /webdata/index.html
  sleep $INTERVAL
done
kubectl create configmap ttabae-config --from-literal=INTERVAL=2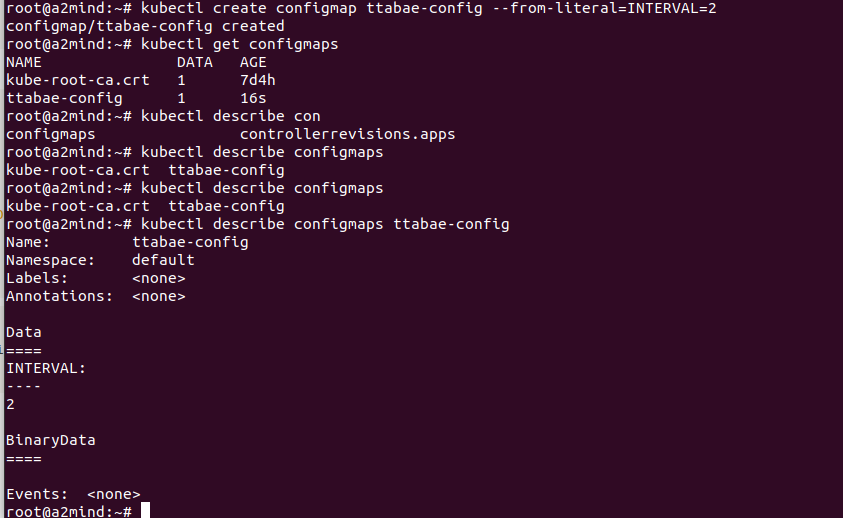
secret
컨테이너가 사용하는 pwd, auth token, ssh key와 같은 중요한 정보를 저장하고 민감한 구성정보를 base64로 인코딩해서 한곳에 모아서 관리
kubectl create secret [available commands] name [flags] [option]available command 이 세가지 중 하나 선택해줘야
- docker-registry
- generic
- tls
kubectl create secret tls [name] --cert=/path/to/cert/file --key=/path/to/key/file
kubectl create secret docker-registry [name] --docker-username=minseo --docker-password=pwd --docker-email=minseo@kuber.com
kubectl create secret generic --from-literal=INTERVAL=2 --from-file=./path/to/config/file
만든 secret을 환경변수로 전달 → configmap하는 방법이랑 똑같음.
apiVersion: v1
kind: Pod
metadata:
  name: genid-env-secret
spec:
  containers:
  - image: smlinux/genid:env
    env:
    - name: INTERVAL
      valueFrom:
        secretKeyRef:
          name: ttabae-secret
          key: INTERVAL
    name: fakeid-generator
    volumeMounts:
    - name: html
      mountPath: /webdata
  - image: nginx:1.14
    name: web-server
    volumeMounts:
    - name: html
      mountPath: /usr/share/nginx/html
      readOnly: true
    ports:
    - containerPort: 80
  volumes:
  - name: html
    emptyDir: {}