1. Git 저장소 만들기
1.1. 기존 디렉터리를 Git 저장소로 만들기
.git이라는 하위 디렉터리를 만든다.
$ git initgit add 명령으로 파일을 추가할 수 있고, git commit 명령으로 커밋할 수 있다.
$ git add *.c
$ git commit -m "initial project version"
1.2. 기존 저장소를 Clone 하기
다른 프로젝트에 참여하거나 Git 저장소를 복사하고 싶을 때 git clone 명령을 사용한다.
git clone을 실행하면 프로젝트 히스토리를 전부 받아온다.
$ git clone https://github.com/username/project_name기존 디렉터리 이름(project_name)이 아니라 다른 디렉터리 이름(othername)으로 Clone 할 수도 있다.
$ git clone https://github.com/username/project_name othernamehttps:// 프로토콜 뿐만 아니라 git://이나 git@github.com:username/project_name처럼 SSH 프로토콜을 사용할 수도 있다.
2. 수정하고 저장소에 저장하기
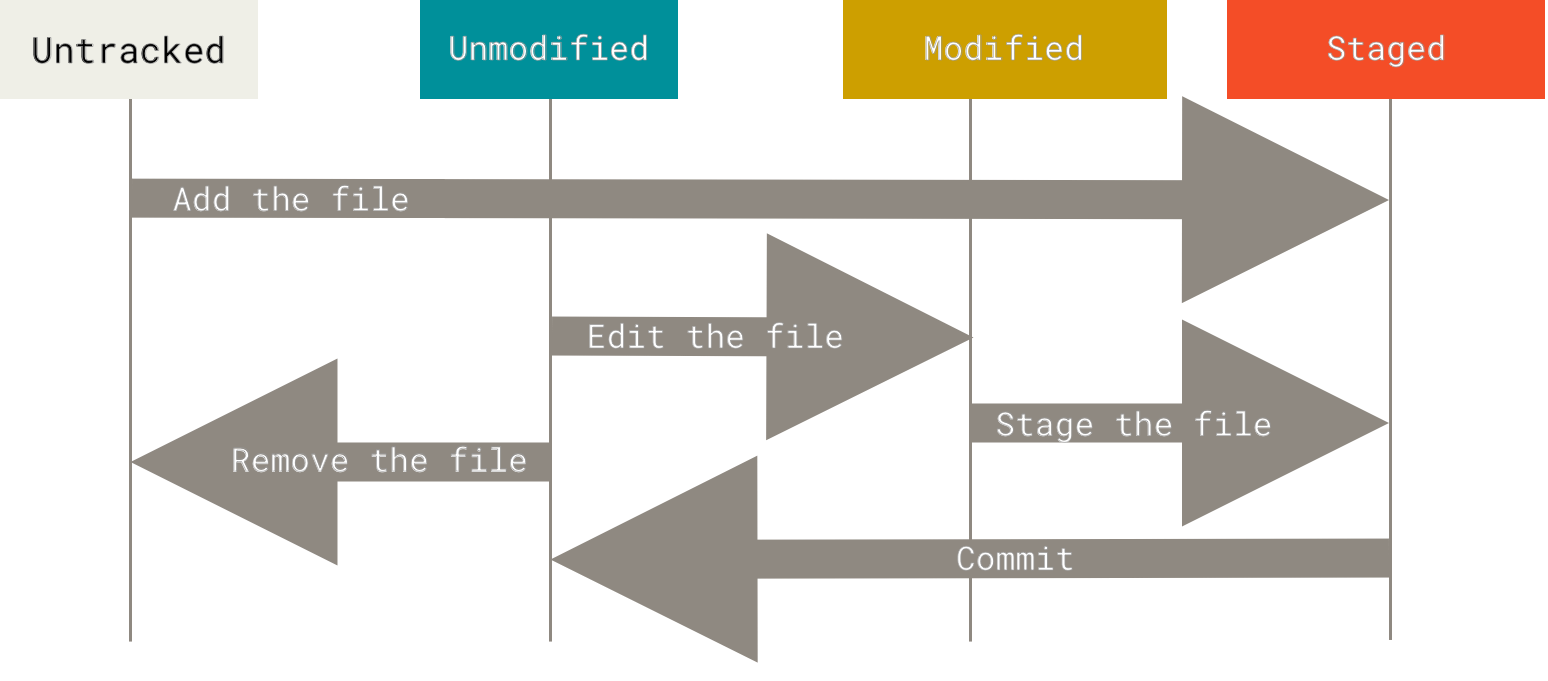
워킹 디렉터리의 모든 파일은 크게 Tracked(관리대상)와 Untracked(관리대상 아님)로 나눈다.
여기서 Tracked 파일은 Unmodified(수정하지 않음)와 Modified(수정함) 그리고 Staged(커밋으로 저장소에 기록할) 상태 중 하나이다.
그 외 나머지 파일은 모두 Untracked 파일이다.
마지막 커밋 후 파일을 수정하게 되면 Git은 그 파일을 Modified 상태로 인식한다.
실제 커밋을 하기 위해선 수정한 파일을 Staged 상태로 만들고, Staged 상태의 파일을 커밋한다. 이런 라이프사이클을 계속 반복한다.
2.1. 파일의 상태 확인하기
git status 명령을 통해 파일의 상태를 확인할 수 있다.
Clone한 후 바로 git status를 사용할 경우 아래와 같은 메시지를 볼 수 있다.
$ git status
On branch main
Your branch is up to date with 'origin/main'.

nothing to commit, working tree clean
새로 만든 파일을 추가한 후 git status를 실행하면 'Untracked files'에 들어있는 것을 알 수 있다.
$ echo 'My Project' > README
$ git status
On branch main
Your branch is up to date with 'origin/main'.

Untracked files:
  (use "git add <file>..." to include in what will be committed)
        README

nothing added to commit but untracked files present (use "git add" to track)
Git은 Untracked 파일을 아직 스냅샷(커밋)에 넣어지지 않은 파일이라고 본다. 파일이 Tracked 상태가 되기 전까지는 Git은 절대 그 파일을 커밋하지 않는다.
2.2. 파일을 새로 추적하기
git add 명령으로 파일을 새로 추적할 수 있다.
$ git add READMEgit status 명령을 다시 실행하면 README 파일이 Tracked 상태이면서 커밋에 추가될 Staged 상태라는 것을 확인할 수 있다.
$ git status
On branch main
Your branch is up to date with 'origin/main'.

Changes to be committed:
  (use "git restore --staged <file>..." to unstage)
        new file:   README
“Changes to be committed” 에 들어 있는 파일은 Staged 상태라는 것을 의미한다.
커밋하면 git add를 실행한 시점의 파일이 커밋되어 저장소 히스토리에 남는다.
2.3. Modified 상태의 파일을 Stage 하기
test.txt라는 파일을 수정하고 나서 git status 명령을 다시 실행하면 결과는 아래와 같다.
$ git status
On branch main
Your branch is up to date with 'origin/main'.

Changes to be committed:
  (use "git restore --staged <file>..." to unstage)
        new file:   README

Changes not staged for commit:
  (use "git add <file>..." to update what will be committed)
  (use "git restore <file>..." to discard changes in working directory)
        modified:   test.txt
"Changes not staged for commit"에 들어있는 파일은 Tracked 상태지만 아직 Staged 상태는 아니라는 것이다.
git add 명령을 통해 Staged 상태로 만들 수 있다.
git add 명령은 파일을 새로 추적할 때 사용하지만 수정한 파일을 Staged 상태로 만들 때도 사용한다. Merge 할 때 충돌난 상태의 파일을 Resolve 상태로 만들때도 사용한다.
add의 의미는 프로젝트에 파일을 추가한다기 보다는 다음 커밋에 추가한다고 받아들이는게 좋다.
$ git add test.txt
$ git status
On branch main
Your branch is up to date with 'origin/main'.

Changes to be committed:
  (use "git restore --staged <file>..." to unstage)
        new file:   README
        modified:   test.txt
두 파일 모두 Staged 상태이므로 다음 커밋에 포함된다.
이 상태에서 test.txt를 수정하고 git status 명령을 실행했을 때 파일의 상태는 다음과 같다.
$ git status
Your branch is up to date with 'origin/main'.

Changes to be committed:
  (use "git restore --staged <file>..." to unstage)
        new file:   README
        modified:   test.txt

Changes not staged for commit:
  (use "git add <file>..." to update what will be committed)
  (use "git restore <file>..." to discard changes in working directory)
modified: test.txttest.txt가 Staged 상태이면서 동시에 Unstaged 상태로 나온다.
지금 이 시점에서 커밋을 하면 마지막으로 git add 명령을 실행했을 때의 버전이 커밋된다.
git add 명령을 실행한 후에 파일을 수정한다면 git add 명령을 다시 실행해서 최신 버전을 Staged 상태로 만들어야 한다. 그렇지 않으면 추가로 수정한 내용이 커밋에 반영되지 않게 된다.
$ git add test.txt
$ git status
On branch main
Your branch is up to date with 'origin/main'.

Changes to be committed:
  (use "git restore --staged <file>..." to unstage)
        new file:   README
        modified:   test.txt
2.4. 파일 상태를 짤막하게 확인하기
git status -s 또는 git status --short를 통해 현재 변경한 상태를 간략하게 확인할 수 있다.
Staged 상태로 추가한 파일 중 새로 생성한 파일 앞에는 A 표시가, 수정한 파일 앞에는 M 표시가 붙는다.
아직 추적하지 않는 새 파일 앞에는 ?? 표시가 붙는다.
Staged 이면서 Unstaged 상태인 파일(git add 후 파일을 수정하고 git add를 실행하지 않은 경우)은 MM 표시가 붙는다.
$ git status -s
A  README
M  test.txt
?? tmp.txt
2.5. 파일 무시하기
Git이 관리할 필요가 없는 파일의 경우 .gitignore 파일을 만들고 그 안에 무시할 파일 패턴을 적는다.
.gitignore 파일에 입력하는 패턴은 아래 규칙을 따른다.
-
아무것도 없는 라인이나, # 로 시작하는 라인은 무시한다.
-
표준 Glob 패턴을 사용한다. 이는 프로젝트 전체에 적용된다.
-
슬래시(/)로 시작하면 하위 디렉토리에 적용되지(Recursivity) 않는다.
-
디렉토리는 슬래시(/)를 끝에 사용하는 것으로 표현한다.
-
느낌표(!)로 시작하는 패턴의 파일은 무시하지 않는다.
아래는 .gitignore 파일의 예이다.
# 확장자가 .a인 파일 무시
*.a

# 윗 라인에서 확장자가 .a인 파일은 무시하게 했지만 lib.a는 무시하지 않음
!lib.a

# 현재 디렉토리에 있는 TODO파일은 무시하고 subdir/TODO처럼 하위디렉토리에 있는 파일은 무시하지 않음
/TODO

# build/ 디렉토리에 있는 모든 파일은 무시
build/

# doc/notes.txt 파일은 무시하고 doc/server/arch.txt 파일은 무시하지 않음
doc/*.txt

# doc 디렉토리 아래의 모든 .pdf 파일을 무시
doc/**/*.pdf
2.6. Staged와 Unstaged 상태의 변경 내용을 보기
README 파일을 수정해서 Staged 상태로 만들고 test.txt 파일은 그냥 수정만 해둔다. 이 상태에서 git status 명령을 실행하면 아래와 같은 메시지를 볼 수 있다.
$ git status
On branch main
Your branch is up to date with 'origin/main'.

Changes to be committed:
  (use "git restore --staged <file>..." to unstage)
        modified:   README

Changes not staged for commit:
  (use "git add <file>..." to update what will be committed)
  (use "git restore <file>..." to discard changes in working directory)
        modified:   test.txt
git diff 명령을 실행하면 수정했지만 아직 staged 상태가 아닌 파일을 비교해 볼 수 있다. 이 명령은 워킹 디렉토리에 있는 것과 Staging Area에 있는 것을 비교한다.
$ git diff
diff --git a/test.txt b/test.txt
index bdf08de..c7b32c7 100644
--- a/test.txt
+++ b/test.txt
@@ -1 +1 @@
-test file
\ No newline at end of file
+modified test file
\ No newline at end of file
Staging Area에 넣은 파일의 변경 부분을 보고 싶으면 git diff --staged 옵션을 사용한다. 이 명령은 저장소에 커밋한 것과 Staging Area에 있는 것을 비교한다.
$ git diff --staged
diff --git a/README b/README
index 5bef3bd..46d6cdc 100644
--- a/README
+++ b/README
@@ -1 +1 @@
-My Project
\ No newline at end of file
+Modified My Project
\ No newline at end of file
git diff 는 Unstaged 상태인 것들만 보여준다. 수정한 파일을 모두 Staging Area에 넣었다면 git diff 명령은 아무것도 출력하지 않는다.
test.txt 파일을 Stage 한 후에 다시 수정해도 git diff 명령을 사용할 수 있다. 이때는 Staged 상태인 것과 Unstaged 상태인 것을 비교한다.
$ git add test.txt
$ echo '# test line' > test.txt
$ git status
On branch main
Your branch is up to date with 'origin/main'.

Changes to be committed:
  (use "git restore --staged <file>..." to unstage)
        modified:   test.txt

Changes not staged for commit:
  (use "git add <file>..." to update what will be committed)
  (use "git restore <file>..." to discard changes in working directory)
        modified:   test.txt

$ git diff
diff --git a/test.txt b/test.txt
index c7b32c7..ce3974c 100644
--- a/test.txt
+++ b/test.txt
@@ -1 +1 @@
-modified test file
\ No newline at end of file
+# test line
Staged 상태인 파일은 git diff --cached 옵션으로 확인한다. --staged 와 --cached 는 같은 옵션이다.
$ git diff --cached
diff --git a/test.txt b/test.txt
index bdf08de..c7b32c7 100644
--- a/test.txt
+++ b/test.txt
@@ -1 +1 @@
-test file
\ No newline at end of file
+modified test file
\ No newline at end of file
2.7. 변경사항 커밋하기
Unstaged 상태의 파일은 커밋되지 않는다. 따라서 새로 생성하거나 수정한 경우 git add 명령을 내린 후 git commit을 실행하여 커밋해야 한다.
# Please enter the commit message for your changes. Lines starting
# with '#' will be ignored, and an empty message aborts the commit.
#
# On branch main
# Your branch is up to date with 'origin/main'.
#   (use "git push" to publish your local commits)
#
# Changes to be committed:
#       modified:   README
#       modified:   test.txt
#
~
~
git commit -v를 사용하면 다음과 같이 편집기에 diff 메시지도 추가할 수 있다.
# Please enter the commit message for your changes. Lines starting
# with '#' will be ignored, and an empty message aborts the commit.
#
# On branch main
# Your branch is up to date with 'origin/main'.
#   (use "git push" to publish your local commits)
#
# Changes to be committed:
#       modified:   README
#       modified:   test.txt
#
# ------------------------ >8 ------------------------
# Do not modify or remove the line above.
# Everything below it will be ignored.
diff --git a/README b/README
index 5bef3bd..46d6cdc 100644
--- a/README
+++ b/README
@@ -1 +1 @@
-My Project
\ No newline at end of file
+Modified My Project
\ No newline at end of file
diff --git a/test.txt b/test.txt
index bdf08de..b7d3864 100644
--- a/test.txt
+++ b/test.txt
@@ -1 +1 @@
-test file
\ No newline at end of file
+# test line
~
~
~
~
내용을 저장하고 편집기를 종료하면 Git은 입력된 내용(#로 시작하는 내용을 제외한)으로 새 커밋을 하나 완성한다.
commit 명령을 실행할 때 -m 옵션을 사용하면 메시지를 인라인으로 첨부할 수도 있다.
$ git commit -m 'test commit'
[main dca9f60] test commit
 2 files changed, 2 insertions(+), 2 deletions(-)
commit 명령은 몇 가지 정보를 출력하는데 위 예제의 경우 main 브랜치에 커밋했고 커밋 해시는 dca9f60이라고 알려준다. 그리고 수정한 파일이 몇 개이고 삭제됐거나 추가된 라인이 몇 라인인지 알려준다.
Git은 Staging Area에 속한 스냅샷만을 커밋할 수 있다. 그리고 커밋할 때마다 프로젝트의 스냅샷을 기록하기 때문에 나중에 스냅샷끼리 비교하거나 예전 스냅샷으로 되돌릴 수 있다.
2.8. Staging Area 생략하기
git commit 명령을 실행할 때 -a 옵션을 추가하면 Git은 Tracked 상태의 모든 파일을 자동으로 Staging Area에 넣는다. 쉽게 말하면 git add 명령을 실행하지 않고도 커밋을 할 수 있다.
$ git status
On branch main
Your branch is up to date with 'origin/main'.

Changes not staged for commit:
  (use "git add <file>..." to update what will be committed)
  (use "git restore <file>..." to discard changes in working directory)
        modified:   test.txt

no changes added to commit (use "git add" and/or "git commit -a")

$ git commit -a -m 'test commit'
[main e66cdf8] test commit
 1 file changed, 1 insertion(+), 1 deletion(-)
2.9. 파일 삭제하기
Git에서 파일을 제거하려면 git rm 명령으로 상태의 파일을 삭제한 후에(정확하게는 Staging Area에서 삭제하는 것) 커밋해야 한다. 이 명령은 워킹 디렉토리에 있는 파일도 삭제하기 때문에 실제로 파일도 지워진다.
Git 명령을 사용하지 않고 단순히 워킹 디렉터리에서 파일을 삭제하고 git status 명령으로 상태를 확인하면 Git은 현재 “Changes not staged for commit” (즉, Unstaged 상태)라고 표시해준다.
$ rm test.txt
$ git status
On branch main
Your branch is up to date with 'origin/main'.

Changes not staged for commit:
  (use "git add/rm <file>..." to update what will be committed)
  (use "git restore <file>..." to discard changes in working directory)
        deleted:    test.txt

no changes added to commit (use "git add" and/or "git commit -a")
git rm 명령을 실행하면 삭제한 파일은 Staged 상태가 된다.
$ git rm test.txt
rm 'test.txt'
$ git status
On branch main
Your branch is up to date with 'origin/main'.
  (use "git push" to publish your local commits)

Changes to be committed:
  (use "git restore --staged <file>..." to unstage)
        deleted:    test.txt
이미 파일을 수정했거나 Staging Area에 추가했다면 -f 옵션을 주어 강제로 삭제해야 한다. 커밋 하지 않고 수정한 데이터는 Git으로 복구할 수 없기 때문에 실수를 방지하기 위한 안전장치이다.
Staging Area에서만 제거하고 워킹 디렉터리에 있는 파일은 지우지 않고 남겨둘 수도 있다.
$ git rm --cached README2.10. 파일 이름 변경하기
git mv 명령을 통해 파일 이름을 변경할 수 있다.
$ git mv test.txt test
$ git status
On branch main
Your branch is up to date with 'origin/main'.
  (use "git push" to publish your local commits)

Changes to be committed:
  (use "git restore --staged <file>..." to unstage)
        renamed:    test.txt -> test
git mv 명령은 아래 명령어를 수행한 것과 같다.
$ mv test.txt test
$ git rm test.txt
$ git add test
3. 커밋 히스토리 조회하기
git log 명령을 통해 저장소의 히스토리를 조회할 수 있다.
특별한 아규먼트 없이 git log 명령을 실행하면 저장소의 커밋 히스토리를 시간순으로 보여준다.
$ git log
commit dca9f6048145178503c2f66950b874d7b7ca79ef
Author: minhyung <minhyung@example.com>
Date:   Wed Jun 26 22:59:38 2024 +0900

    test commit

commit 4da641e08d826c1065838eefb717a1f44109b96c
Author: minhyung <minhyung@example.com>
Date:   Thu Jun 6 23:45:19 2024 +0900

    test
여러 옵션 중 -p, --patch 는 굉장히 유용한 옵션이다. -p 는 각 커밋의 diff 결과를 보여준다. 다른 유용한 옵션으로 -2 가 있는데 최근 두 개의 결과만 보여주는 옵션이다.
이 옵션은 직접 diff를 실행한 것과 같은 결과를 출력하기 때문에 동료가 무엇을 커밋했는지 리뷰하고 빨리 조회하는데 유용하다.
$ git log -p -2
commit dca9f6048145178503c2f66950b874d7b7ca79ef (HEAD -> main)
Author: minhyung <minhyung@example.com>
Date:   Wed Jun 26 22:59:38 2024 +0900

    test commit

diff --git a/README b/README
index 5bef3bd..46d6cdc 100644
--- a/README
+++ b/README
@@ -1 +1 @@
-My Project
\ No newline at end of file
+Modified My Project
\ No newline at end of file
diff --git a/test.txt b/test.txt
index bdf08de..b7d3864 100644
--- a/test.txt
+++ b/test.txt
@@ -1 +1 @@
-test file
\ No newline at end of file
+# test line

commit 4da641e08d826c1065838eefb717a1f44109b96c
Author: minhyung <minhyung@example.com>
Date:   Thu Jun 6 23:45:19 2024 +0900

    test

diff --git a/README b/README
new file mode 100644
index 0000000..5bef3bd
--- /dev/null
+++ b/README
@@ -0,0 +1 @@
+My Project
\ No newline at end of file
--stat 옵션으로 각 커밋의 통계 정보를 조회할 수도 있다.
어떤 파일이 수정됐는지, 얼마나 많은 파일이 변경됐는지, 또 얼마나 많은 라인을 추가하거나 삭제했는지 보여준다. 요약정보는 가장 뒤쪽에 보여준다.
$ git log --stat
commit dca9f6048145178503c2f66950b874d7b7ca79ef
Author: minhyung <minhyung@example.com>
Date:   Wed Jun 26 22:59:38 2024 +0900

    test commit

 README   | 2 +-
 test.txt | 2 +-
 2 files changed, 2 insertions(+), 2 deletions(-)

commit 4da641e08d826c1065838eefb717a1f44109b96c
Author: minhyung <minhyung@example.com>
Date:   Thu Jun 6 23:45:19 2024 +0900

    test

 README | 1 +
 1 file changed, 1 insertion(+)
--pretty 옵션은 히스토리 내용을 보여줄 때 기본 형식 이외에 여러 가지 중에 하나를 선택할 수 있다.
여러 옵션 중에 oneline 옵션은 각 커밋을 한 라인으로 보여준다. 이 옵션은 많은 커밋을 한 번에 조회할 때 유용하다. 추가로 short, full, fuller 옵션도 있는데 이것은 정보를 조금씩 가감해서 보여준다.
$ git log --pretty=oneline
dca9f6048145178503c2f66950b874d7b7ca79ef test commit
4da641e08d826c1065838eefb717a1f44109b96c test
format 옵션을 통해 원하는 포맷으로 결과를 출력할 수 있다. 결과를 다른 프로그램으로 파싱하고자 할 때 유용하다.
$ git log --pretty=format:"%h - %an, %ar : %s"
dca9f60 - minhyung, 6 days ago : test commit
4da641e - minhyung, 4 weeks ago : test| 옵션 | 설명 |
|---|---|
| %H | 커밋 해시 |
| %h | 짧은 길이 커밋 해시 |
| %T | 트리 해시 |
| %t | 짧은 길이 트리 해시 |
| %P | 부모 해시 |
| %p | 짧은 길이 부모 해시 |
| %an | 저자 이름 |
| %ae | 저자 메일 |
| %ad | 저자 시각 (형식은 –-date=옵션 참고) |
| %ar | 저자 상대적 시각 |
| %cn | 커미터 이름 |
| %ce | 커미터 메일 |
| %cd | 커미터 시각 |
| %cr | 커미터 상대적 시각 |
| %s | 요약 |
oneline 옵션과 format 옵션은 --graph 옵션과 함께 사용할 때 더 빛난다. 이 명령은 브랜치와 머지 히스토리를 보여주는 아스키 그래프를 출력한다.
$ git log --pretty=format:"%h %s" --graph
*   fa9c5b2 Merge pull request #89 from userA/main
|\
| * 68e8f2d Fix: 순위 표시 오류 수정
|/
*   9908a7a Merge pull request #88 from userB/main
|\
| * 32bd69b fix: 랭킹 점수 중복시 출력안되는 문제 수정
|/
git log 주요 옵션은 다음과 같다
| 옵션 | 설명 |
|---|---|
| -p | 각 커밋에 적용된 패치를 보여준다. |
| --stat | 각 커밋에서 수정된 파일의 통계정보를 보여준다. |
| --shortstat | --stat 명령의 결과 중에서 수정한 파일, 추가된 라인, 삭제된 라인만 보여준다. |
| --name-only | 커밋 정보중에서 수정된 파일의 목록만 보여준다. |
| --name-status | 수정된 파일의 목록을 보여줄 뿐만 아니라 파일을 추가한 것인지, 수정한 것인지, 삭제한 것인지도 보여준다. |
| --abbrev-commit | 40자 짜리 SHA-1 체크섬을 전부 보여주는 것이 아니라 처음 몇 자만 보여준다. |
| --relative-date | 정확한 시간을 보여주는 것이 아니라 “2 weeks ago” 처럼 상대적인 형식으로 보여준다. |
| --graph | 브랜치와 머지 히스토리 정보까지 아스키 그래프로 보여준다. |
| --pretty | 지정한 형식으로 보여준다. 이 옵션에는 oneline, short, full, fuller, format이 있다. format은 원하는 형식으로 출력하고자 할 때 사용한다. |
| --oneline | --pretty=oneline --abbrev-commit 두 옵션을 함께 사용한 것과 같다. |
3.1. 조회 제한조건
git log 명령은 조회 범위를 제한해 히스토리 전부가 아니라 부분만 조회할 수도 있다.
-n을 사용하면 되는데 여기서 n은 최근 n개의 커밋을 의미한다.
--since나 --until을 사용하여 시간을 기준으로 조회할 수도 있다.
지난 2주 동안 만들어진 커밋들만 조회하는 명령은 아래와 같다.
$ git log --since=2.weeks이 옵션은 다양한 형식을 지원하는데 "2024-07-02" 같이 정확한 날짜도 사용할 수 있고 "2 years 1 day 3 minutes ago" 같이 상대적인 기간을 사용할 수도 있다.
--author 옵션으로 저자를 지정하여 검색할 수도 있고 --grep 옵션으로 커밋 메시지에서 키워드를 검색할 수도 있다
옵션 -S를 통해서 코드에서 추가되거나 제거된 내용 중에 특정 텍스트가 포함되어 있는지를 검색할 수 있다. 예를 들어 어떤 함수가 추가되거나 제거된 커밋만을 찾아보려면 아래와 같은 명령을 사용한다.
$ git log -S function_name디렉토리나 파일 이름을 사용하여 그 파일이 변경된 log의 결과를 검색할 수 있다.
아래는 README 파일이 변경된 log를 검색한 결과이다.
$ git log -- README
commit dca9f6048145178503c2f66950b874d7b7ca79ef
Author: minhyung <minhyung@example.com>
Date:   Wed Jun 26 22:59:38 2024 +0900

    test commit

commit 4da641e08d826c1065838eefb717a1f44109b96c
Author: minhyung <minhyung@example.com>
Date:   Thu Jun 6 23:45:19 2024 +0900

    test
git log 조회 범위를 제한하는 옵션은 아래와 같다.
| 옵션 | 설명 |
|---|---|
| -n | 최근 n 개의 커밋만 조회한다. |
| --since, --after | 명시한 날짜 이후의 커밋만 검색한다. |
| --until, --before | 명시한 날짜 이전의 커밋만 조회한다. |
| --author | 입력한 저자의 커밋만 보여준다. |
| --committer | 입력한 커미터의 커밋만 보여준다. |
| --grep | 커밋 메시지 안의 텍스트를 검색한다. |
| -S | 커밋 변경(추가/삭제) 내용 안의 텍스트를 검색한다. |
4. 되돌리기
커밋을 완료한 후 어떤 파일을 빼먹었을 경우나 커밋 메시지를 수정하고 싶은 경우 커밋을 다시 작성할 수 있다. 다시 커밋하고 싶으면 파일 수정 작업을 하고 Staging Area에 추가한 다음 --amend 옵션을 사용하여 커밋을 재작성 할 수 있다.
$ git commit -m 'test commit'
$ git add forgotten_file
$ git commit --amend
4.1. 파일 상태를 Unstage로 변경하기
실수로 Staging Area에 파일을 추가한 경우 git reset HEAD <file>을 통해 해당 파일을 Unstaged 상태로 변경할 수 있다.
$ git add *
$ git status
On branch main
Your branch is up to date with 'origin/main'.

Changes to be committed:
  (use "git restore --staged <file>..." to unstage)
        new file:   new_file.txt
        new file:   test.txt

Changes not staged for commit:
  (use "git add/rm <file>..." to update what will be committed)
  (use "git restore <file>..." to discard changes in working directory)
        deleted:    test


$ git reset HEAD new_file.txt
Unstaged changes after reset:
D       test
$ git status
On branch main
Your branch is up to date with 'origin/main'.

Changes to be committed:
  (use "git restore --staged <file>..." to unstage)
        new file:   test.txt

Changes not staged for commit:
  (use "git add/rm <file>..." to update what will be committed)
  (use "git restore <file>..." to discard changes in working directory)
        deleted:    test

Untracked files:
  (use "git add <file>..." to include in what will be committed)
        new_file.txt
git reset 명령은 매우 위험하다. --hard 옵션과 함께 사용하면 더욱 위험하다. 하지만 위에서처럼 옵션 없이 사용할 경우 워킹 디렉터리의 파일은 건드리지 않는다.
4.2. Modified 파일 되돌리기
git checkout -- <file>을 통해 수정한 파일을 최근 커밋된 버전으로 되돌릴 수 있다.
$ git status
On branch main
Your branch is up to date with 'origin/main'.

Changes not staged for commit:
  (use "git add <file>..." to update what will be committed)
  (use "git restore <file>..." to discard changes in working directory)
        modified:   test.txt

no changes added to commit (use "git add" and/or "git commit -a")
$ git checkout -- test.txt
Git 2.23.0 업데이트 이후 checkout은 switch와 restore로 분리되었다.
switch 명령은 브랜치를 변경할 수 있다. 기존에 없는 브랜치의 경우 생성후 전환도 가능하다. 자세한 사용법은 여기에 정리되어 있다.
restore 명령은 수정된 파일을 최근 커밋된 버전으로 되돌릴 수 있다.
git restore <file>로 사용할 수 있다.
$ git restore test.txt5. 원격 저장소
원격 저장소는 인터넷이나 네트워크 어딘가에 있는 저장소를 말한다. 저장소는 여러 개가 있을 수 있는데 어떤 저장소는 읽고 쓰기 모두 할 수 있고 어떤 저장소는 읽기만 가능할 수 있다.
5.1. 원격 저장소 확인하기
git remote 명령을 통해 현재 프로젝트에 등록된 원격 저장소를 확인할 수 있다.
$ git remote
origin
-v 옵션을 넣을 경우 단축이름과 URL을 함께 볼 수 있다.
원격 저장소가 여러 개 있다면 이 명령은 등록된 전부를 보여준다.
$ git remote -v
origin  https://github.com/username/project_name (fetch)
origin  https://github.com/username/project_name (push)
5.2. 원격 저장소 추가하기
git remote add <원격 저장소 이름> <원격 url> 명령을 통해 원격 저장소를 추가할 수 있다.
위 명령을 통해 원격 저장소를 추가할 경우 URL 대신 원격이름을 사용할 수도 있다.
$ git remote add un2 https://github.com/username2/project_name
$ git fetch un2
5.3. 원격 저장소를 Pull 하거나 Fetch 하기
git fetch <remote> 명령은 로컬에는 없지만, 원격 저장소에 있는 데이터를 모두 가져온다.
저장소를 Clone하면 명령은 자동으로 원격 저장소를 "origin" 이라는 이름으로 추가한다. 그래서 나중에 git fetch origin 명령을 실행하면 Clone 한 이후에 수정된 것을 모두 가져온다. git fetch 명령은 리모트 저장소의 데이터를 모두 로컬로 가져오지만, 자동으로 Merge 하지 않는다. 직접 수동으로 Merge 해야 한다.
git pull 명령은 원격 저장소 브랜치에서 데이터를 가져올 뿐만 아니라 자동으로 로컬 브랜치와 Merge 시킬 수 있다.
5.4. 원격 저장소에 Push 하기
git push <원격 저장소 이름> <브랜치 이름> 명령을 통해 해당 서버에 push 할 수 있다. 다른 유저가 push 한 후에 바로 push 할 수 없는데, 이럴 경우 다른 사람이 작업한 데이터를 가져와서 merge 한 후 push하면 된다.
$ git push origin main5.5. 원격 저장소 살펴보기
git remote show <원격 저장소 이름> 명령으로 원격 저장소의 구체적인 정보를 확인할 수 있다.
$ git remote show origin
* remote origin
  Fetch URL: https://github.com/username/project_name
  Push  URL: https://github.com/username/project_name
  HEAD branch: main
  Remote branch:
    main tracked
  Local branch configured for 'git pull':
    main merges with remote main
  Local ref configured for 'git push':
    main pushes to main (fast-forwardable)
5.6. 원격 저장소 이름을 바꾸거나 원격 저장소를 삭제하기
git remote rename 명령으로 원격 저장소의 이름을 변경할 수 있다.
$ git remote rename un2 newuser
$ git remote
origin
newuser
git remote remove나 git remote rm 명령을 통해 원격 저장소를 삭제할 수 있다.
$ git remote remove newuser
$ git remote
origin
5.7. 원격 저장소 URL 변경
git remote set-url <원격 저장소 이름> <원격 url> 명령으로 기존 원격 저장소의 URL을 HTTPS에서 SSH로 변경하거나 SSH에서 HTTPS로 변경할 수 있다.
$ git remote -v
origin  https://github.com/username/project_name (fetch)
origin  https://github.com/username/project_name (push)

$ git remote set-url origin git@github.com:username/project_name

$ git remote -v
origin  git@github.com:username/project_name (fetch)
origin  git@github.com:username/project_name (push)
6. 태그
6.1. 태그 조회하기
git tag 명령으로 이미 만들어진 태그가 있는지 확인할 수 있다.
-l 또는 --list 옵션을 사용하여 특정 패턴의 태그를 검색할 수 있다.
$ git tag -l "v1.8.5*"6.2. 태그 붙이기
6.2.1. Lightweight 태그
Lightweight 태그는 브랜치와 비슷한데 브랜치처럼 가리키는 지점을 최신 커밋으로 이동시키지 않는다. 단순히 특정 커밋에 대한 포인터일 뿐이다.
$ git tag v0.1-lw
$ git tag
v0.1-lw
git show <태그 이름>를 통해 커밋 정보를 확인할 수 있다.
$ git show v0.1-lw
commit a6b52654023f549624f050bd14af6934f5ac9c1f (HEAD -> main, tag: v0.1-lw, tag: v0.1)
Author: minhyung <minhyung@example.com>
Date:   Wed Jun 26 22:59:38 2024 +0900

    test commit

diff --git a/README b/README
index 5bef3bd..46d6cdc 100644
--- a/README
+++ b/README
@@ -1 +1 @@
-My Project
\ No newline at end of file
+Modified My Project
\ No newline at end of file
diff --git a/test b/test
new file mode 100644
index 0000000..b7d3864
--- /dev/null
+++ b/test
@@ -0,0 +1 @@
+# test line
6.2.2. Annotated 태그
Annotated 태그는 Git 데이터베이스에 태그를 만든 사람의 이름, 이메일과 태그를 만든 날짜, 그리고 태그 메시지를 저장한다. tag 명령을 실행할 때 -a 옵션을 추가하면 된다.
$ git tag -a v0.1 -m "test version 0.1"
$ git tag
v0.1
v0.1-lw
git show <태그 이름>를 통해 태그 메시지와 커밋을 확인할 수 있다.
$ git show v0.1
tag v0.1
Tagger: minhyung <minhyung@example.com>
Date:   Thu Jul 11 17:24:09 2024 +0900

test version 0.1

commit a6b52654023f549624f050bd14af6934f5ac9c1f (HEAD -> main, tag: v0.1-lw, tag: v0.1)
Author: minhyung <minhyung@example.com>
Date:   Wed Jun 26 22:59:38 2024 +0900

    test commit

diff --git a/README b/README
index 5bef3bd..46d6cdc 100644
--- a/README
+++ b/README
@@ -1 +1 @@
-My Project
\ No newline at end of file
+Modified My Project
\ No newline at end of file
diff --git a/test b/test
6.3. 나중에 태그하기
예전 커밋에 대해서도 태그할 수 있다. 태그를 붙일 때 커밋 해시를 명시하면 특정 커밋에 태그를 붙일 수 있다.
$ git log --pretty=oneline
a6b52654023f549624f050bd14af6934f5ac9c1f (HEAD -> main, tag: v0.1-lw, tag: v0.1) test commit
4da641e08d826c1065838eefb717a1f44109b96c test
ee038ee29eb1175e4e3c3666b59e4058683a43c7 test
0e6959c59532a1fde133d3193577dc8a4fadfbef test

$ git tag -a v0.1-beta ee038ee -m "beta version 0.1"
$ git tag
v0.1
v0.1-beta
v0.1-lw
6.4. 태그 공유하기
git push 명령은 자동으로 원격 서버에 태그를 전송하지 않는다. 태그를 원격 서버에 전송하려면 git push <원격 저장소 이름> <태그 이름> 명령으로 별로도 Push 해야 한다.
$ git push origin v0.1한 번에 태그 여러 개를 Push 하고 싶으면 --tags 옵션을 추가하여 git push 명령을 실행하면 된다. 이 명령을 통해 리모트 서버에 없는 태그를 모두 전송할 수 있다.
$ git push origin --tags6.5. 태그를 Checkout 하기
태그가 가리키는 커밋 위치로 Checkout이 가능하다. 단 태그를 체크아웃하면 "detached HEAD" 상태가 된다.
$ git checkout v0.1-beta
Note: switching to 'v0.1-beta'.

You are in 'detached HEAD' state. You can look around, make experimental
changes and commit them, and you can discard any commits you make in this
state without impacting any branches by switching back to a branch.

If you want to create a new branch to retain commits you create, you may
do so (now or later) by using -c with the switch command. Example:

  git switch -c <new-branch-name>

Or undo this operation with:

  git switch -

Turn off this advice by setting config variable advice.detachedHead to false

HEAD is now at ee038ee test
"detached HEAD" 상태에서는 작업을 하고 커밋을 만들면 아래와 같이 된다. 아래는 B 위치로 checkout을 한 후 새로운 커밋(D)를 만든 상태이다.
A -- B -- C (main)
      \
       D (detached HEAD)
물론 이러한 방법보다는 아래와 같이 브랜치를 만들어서 작업하는 것이 좋다. 아래와 같이 브랜치를 만든 후에 beta 브랜치에 커밋하면 브랜치가 업데이트 된다.
$ git checkout -b beta v0.1-beta
Switched to a new branch 'beta'
Git 2.23.0 업데이트 이후 checkout은 switch와 restore로 분리되었다.
태그를 "detached HEAD" 상태로 전환하는 명령은 아래와 같다.
$ git switch --detach v0.1-beta
HEAD is now at ee038ee test
브랜치를 생성 후 전환하는 명령어는 아래와 같다.
$ git switch -c beta v0.1-beta
Switched to a new branch 'beta'
6.5. 태그 삭제하기
태그는 -d 옵션을 사용하여 삭제할 수 있다.
$ git tag -d v0.1
Deleted tag 'v0.1' (was e14c467)

$ git tag
v0.1-beta
v0.1-lw
7. Git Alias
7.1. Alias 추가
git config를 사용하여 각 명령의 Alias를 쉽게 만들 수 있다. --global 옵션을 추가하면 전역에 Alias를 추가하고, 추가하지 않으면 지역에 Alias를 추가한다.
Alias를 사용하면 아래와 같이 긴 명령어를 편리하게 사용할 수 있다.
$ git config --global alias.last 'log -1 HEAD'
$ git last
7.2. Alias 삭제
--unset 옵션을 추가해서 Alias를 삭제할 수 있다. 위와 마찬가지로 --global 옵션을 추가하면 전역을 삭제하고, 추가하지 않으면 지역을 삭제한다.
$ git config --global --unset alias.last7.3. Alias 목록 확인
--get-regexp 옵션을 추가해서 Alias의 목록을 확인할 수 있다. --global 옵션을 추가하면 전역을 확인하고, --local 옵션을 추가하면 지역을 확인한다. 옵션을 추가하지 않을 경우 전역과 지역의 Alias 목록을 확인할 수 있다.
$ git config --global --get-regexp alias
alias.last log -1 HEAD
7.4. 외부 명령어 Alias 추가
!를 앞에 추가하면 외부 명령도 추가할 수 있다.
$ git config --global alias.visual '!gitk'
$ git visual
참고문서: https://git-scm.com/book
